height Citroen C4 PICASSO 2016 2.G Owner's Manual
[x] Cancel search | Manufacturer: CITROEN, Model Year: 2016, Model line: C4 PICASSO, Model: Citroen C4 PICASSO 2016 2.GPages: 527, PDF Size: 13.72 MB
Page 5 of 527
C4-Picasso-II_en_Chap00a_sommaire_ed01-2016
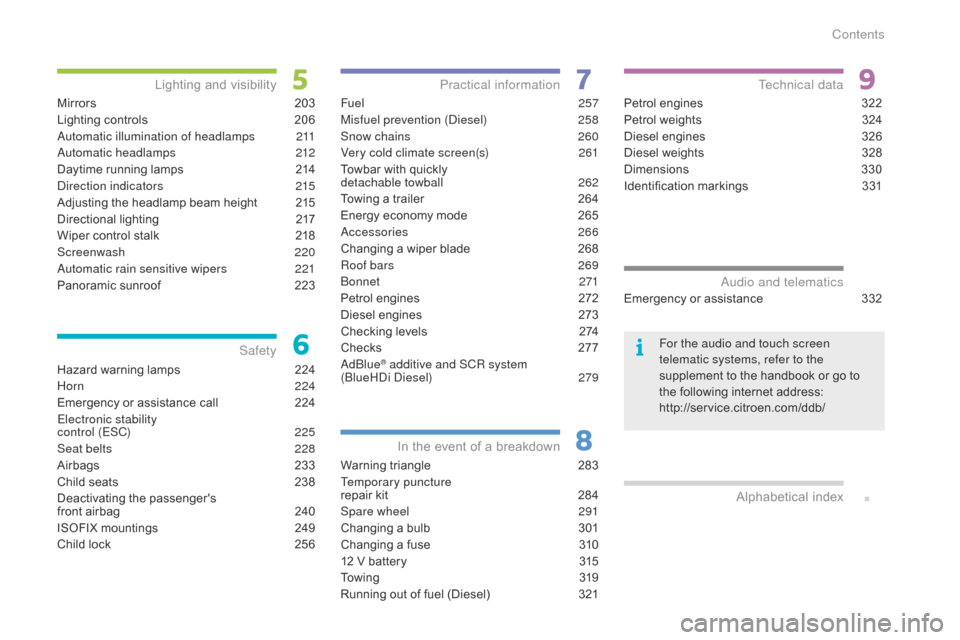
Hazard warning lamps 224
Horn
2
24
Emergency
or assistance call
2
24
Electronic stability
control (ESC)
2
25
Seat belts
2
28
Airbags
2
33
Child
seats
2
38
Deactivating
t
he
p
assenger's
f
ront airbag
2
40
ISOFIX
mountings
2
49
Child
lock
2
56
Safety
Fuel 257
Misfuel prevention (Diesel)
2
58
Snow chains
2
60
Very cold climate screen(s)
2
61
Towbar
with quickly
detachable towball
2
62
Towing
a trailer
2
64
Energy
economy mode
2
65
Accessories
266
Changing
a wiper blade
2
68
Roof bars
2
69
B o nnet
271
Petrol
engines
2
72
Diesel
engines
2
73
Checking
levels
2
74
Checks
2
77
AdBlue
® additive and SCR system
(BlueHDi Diesel) 2 79
Practical information
Warning triangle 2 83
Temporary puncture
repair
kit
2
84
Spare wheel
2
91
Changing
a bulb
3
01
Changing
a fuse
3
10
12
V battery
3
15
To w i n g
3
19
Running
out of fuel (Diesel)
3
21
In the event o f a b reakdown
Petrol engines 3 22
Petrol weights
3
24
Diesel
engines
3
26
Diesel
weights
3
28
Dimensions
3
30
Identification
ma
rkings
3
31
Technical data
Emergency or assistance 332Audio and telematics
Mirrors 203
Lighting controls
2
06
Automatic illumination of headlamps
2
11
Automatic headlamps
2
12
Daytime
running lamps
2
14
Direction indicators
2
15
Adjusting
the headlamp beam height
2
15
Directional
l
ighting
2
17
Wiper
control stalk
2
18
Screenwash
220
Automatic rain sensitive wipers
2
21
Panoramic
sunroof
2
23
Lighting and v isibility
Alphabetical
in
dex
For the audio and touch screen
telematic systems, refer to the
supplement to the handbook or go to
t
he following internet address:
http://service.citroen.com/ddb/
Contents
Page 6 of 527
4
C4-Picasso-II_en_Chap00b_vue-ensemble_ed01-2016
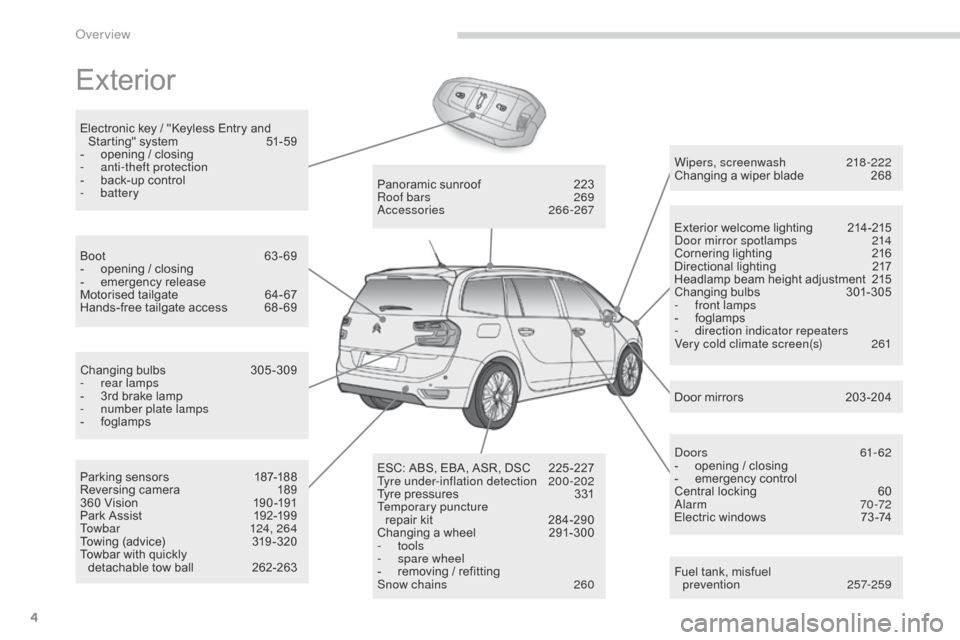
Exterior
Fuel tank, misfuel
p revention 257-259
Wipers, screenwash
2
18 -222
Changing a wiper blade
2
68
Exterior welcome lighting
2
14-215
Door mirror spotlamps
2
14
Cornering lighting
2
16
Directional
l
ighting
2
17
Headlamp beam height adjustment
2
15
Changing
bu
lbs
3
01-305
-
f
ront lamps
-
fo
glamps
-
d
irection indicator repeaters
Very cold climate screen(s)
2
61
Door mirrors
2
03 -204
Panoramic
sunroof
2
23
Roof bars
2
69
Accessories
266-267
ESC:
ABS,
EBA,
ASR,
DSC
2
25 -227
Tyre under-inflation detection
20
0-202
Tyre
pressures
3
31
Temporary puncture repair
kit
2
84-290
Changing
a
wheel
2
91-300
-
tools
- spar
e wheel
-
r
emoving
/
refitting
Snow chains
2
60
Changing
bu
lbs
3
05-309
-
r
ear lamps
-
3
rd
brake
lamp
-
n
umber plate lamps
-
fo
glamps
Parking
sensors
1
87-188
Reversing
camera
1
89
360
Vision
1
90 -191
Park
Assist
1
92-199
Towbar
1
24, 264
Towing
(advice)
3
19 -320
Towbar
with
quickly
detachable
tow
ball
2
62-263
Boot
6
3-69
-
o
pening
/
closing
-
em
ergency
r
elease
Motorised
tailgate
6
4- 67
Hands-free
tailgate
access
6
8 - 69
Electronic
key
/
"Keyless
Entry
and
S
tarting"
system
5
1-59
-
o
pening
/
closing
-
a
nti-theft protection
-
b
ack-up
control
-
battery
Doors
61
- 62
-
o
pening / closing
-
em
ergency
c
ontrol
Central locking
6
0
Alarm
7
0-72
Electric windows
7
3 -74
Over view
Page 9 of 527
7
C4-Picasso-II_en_Chap00b_vue-ensemble_ed01-2016
Hazard warning lamps 224
Headlamp
beam
height
adjustment
2
15
Steering
wheel adjustment
9
1
Horn
224
START/STOP
button
1
25 -130
Wiper and screenwash control
stalk
2
18-222
Trip computer
4
8 -50
Lighting
control
stalk
2
06 -215
Direction indicators
2
15
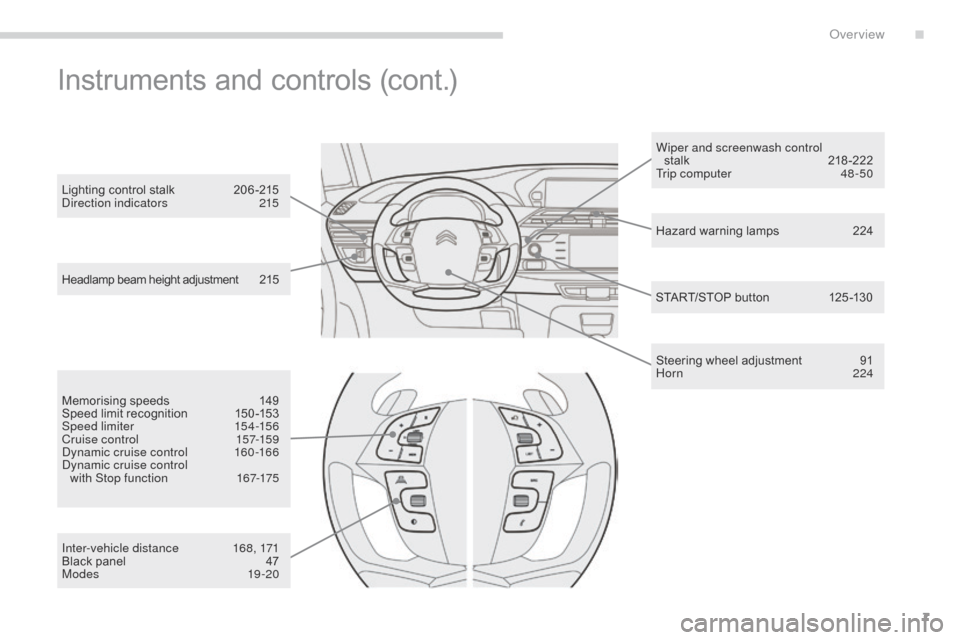
Instruments and controls (cont.)
Memorising speeds 1
49
Speed limit recognition 1 50 -153
Speed limiter
1
54-156
Cr uise c ontrol
15
7-159
Dynamic cruise control
1
60 -166
Dynamic cruise control with Stop function
1
67-175
Inter-vehicle distance
1
68, 171
Black
panel
4
7
Modes
19 -20
.
Over view
Page 68 of 527
66
C4-Picasso-II_en_Chap02_ouvertures_ed01-2016
Memorising an
opening position
Where height is restricted (garage with a low c
eiling, ...) it is possible to limit and memorise
t
he opening angle of the motorised tailgate.
This
memorisation is done as follows:
-
o
pen the tailgate to the desired position,
-
p
ress button C or the exterior control B for
more
than 3 seconds.
Memorisation
of the maximum opening position
o
f the tailgate is confirmed by an audible signal.
To
cancel the memorised position:
-
s
top the tailgate in an intermediate
p
osition,
-
p
ress button C or the exterior control B for
more
than 3 seconds.
Cancellation of the memorised position is
confirmed
by an audible signal.
Manual operation
The motorised tailgate can be opened and closed manually, even if motorised operation is
activated.
However, any manual intervention must be
done
with the tailgate stopped.
Repeated
opening
and
closing
of
the
t
ailgate
can
cause
overheating
of
its
e
lectric
motor,
after
which
opening
and
c
losing
will
not
be
possible.
Allow 10 minutes for the motor to cool
down
before
operating
the
tailgate
ag
ain.
If you are not able to wait, operate it
manually.
Detection of obstacles
Should an obstacle (person or object) be en countered, the anti-pinch system interrupts
the
closing movement and raises the tailgate a
f
ew centimetres to clear the obstacle. When
opening and closing a motorised tailgate
m
anually, there is no assistance from gas-filled
s
truts. Resistance to opening and closing is
t
herefore entirely normal.
Access
Page 77 of 527
75
C4-Picasso-II_en_Chap03_ergonomie-confort_ed01-2016
Front seats
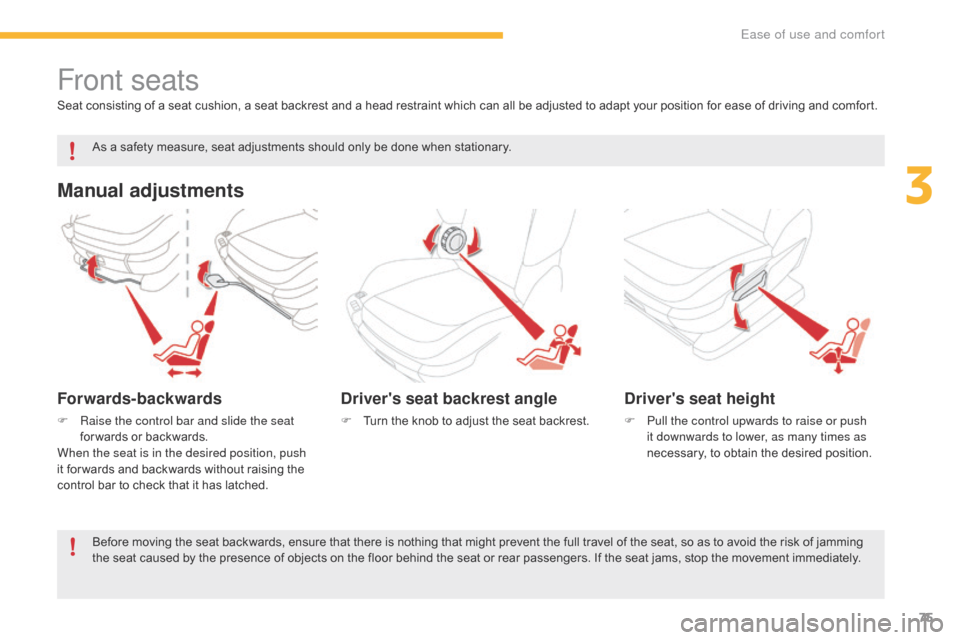
Manual adjustments
Forwards-backwards
F Raise the control bar and slide the seat for wards or backwards.
When the seat is in the desired position, push
it
for wards and backwards without raising the
c
ontrol bar to check that it has latched.
Driver's seat backrest angle
F Turn the knob to adjust the seat backrest.
As
a
safety
measure,
seat
adjustments
should only be done when stationary.
Driver's seat height
F Pull the control upwards to raise or push
it downwards to lower, as many times as
necessary,
to obtain the desired position.
Seat
consisting
of
a
seat
cushion,
a
seat
backrest
and
a
head
restraint
which
can
all
be
adjusted
to
adapt your position for ease of driving and comfort.
Before
moving
the
seat
backwards,
ensure
that
there
is
nothing
that
might
prevent
the
full
travel
of the seat, so as to avoid the risk of jamming
t
he
seat
caused
by
the
presence
of
objects
on
the
floor
behind
the
seat
or
rear
passengers.
If
the
seat jams, stop the movement immediately.
3
Ease of use and comfort
Page 79 of 527
77
C4-Picasso-II_en_Chap03_ergonomie-confort_ed01-2016
Front seats
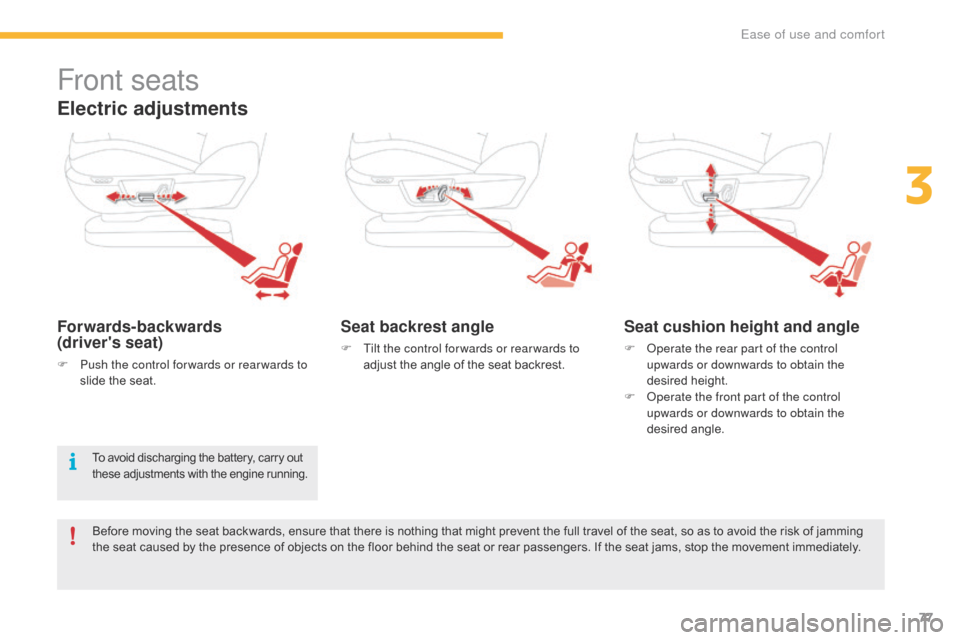
Electric adjustments
Forwards-backwards
(driver's seat)
F Push the control for wards or rear wards to slide the seat.
Seat backrest angle
F Tilt the control for wards or rear wards to adjust the angle of the seat backrest.
Seat cushion height and angle
F Operate the rear part of the control upwards or downwards to obtain the
desired
h
eight.
F
O
perate the front part of the control
upwards or downwards to obtain the
desired
a
ngle.
To avoid discharging the battery, carry out these adjustments with the engine running.
Before moving the seat backwards, ensure that there is nothing that might prevent the full travel of the seat, so as to avoid the risk of jamming the seat caused by the presence of objects on the floor behind the seat or rear passengers. If the seat jams, stop the movement immediately.
3
Ease of use and comfort
Page 81 of 527
79
C4-Picasso-II_en_Chap03_ergonomie-confort_ed01-2016
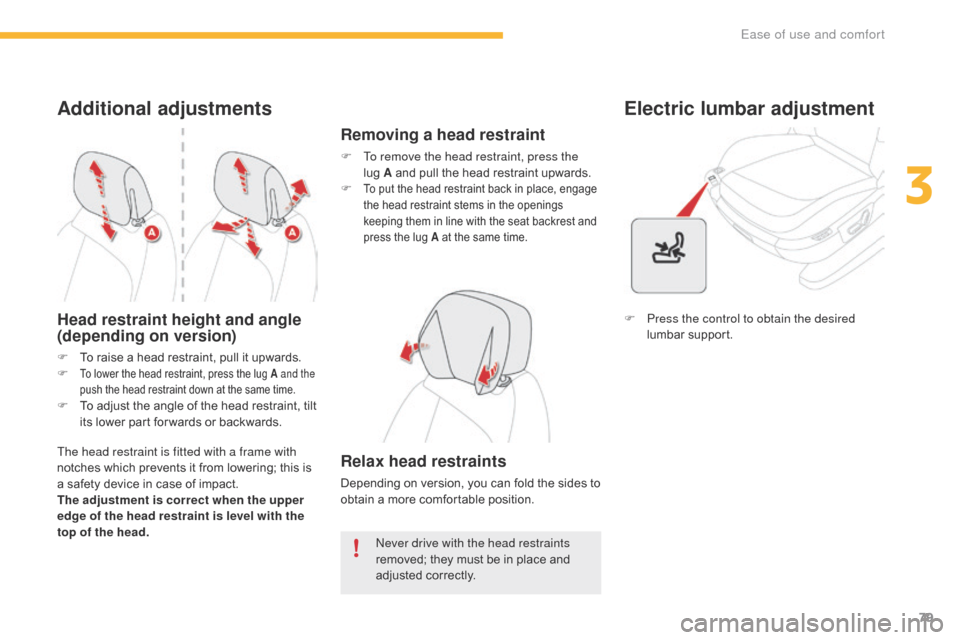
Additional adjustments
Head restraint height and angle
(depending on version)
The head restraint is fitted with a frame with
notches which prevents it from lowering; this is
a
safety device in case of impact.
The adjustment is correct when the upper
edge of the head restraint is level with the
top of the head. Never drive with the head restraints
removed;
they must be in place and
adj
usted
c
orrectly.
F
T
o raise a head restraint, pull it upwards.
F
To lower the head restraint, press the lug A and the
p ush the head restraint down at the same time.
F To adjust the angle of the head restraint, tilt i
ts lower part for wards or backwards.
Removing a head restraint
F To remove the head restraint, press the lug A and pull the head restraint upwards.
F
To put the head restraint back in place, engage the head restraint stems in the openings
k
eeping them in line with the seat backrest and
p
ress the lug A at the same time.
Relax head restraints
Depending on version, you can fold the sides to obtain a more comfortable position.F
P
ress the control to obtain the desired
lumbar
sup
port.
Electric lumbar adjustment
3
Ease of use and comfort
Page 83 of 527
81
C4-Picasso-II_en_Chap03_ergonomie-confort_ed01-2016
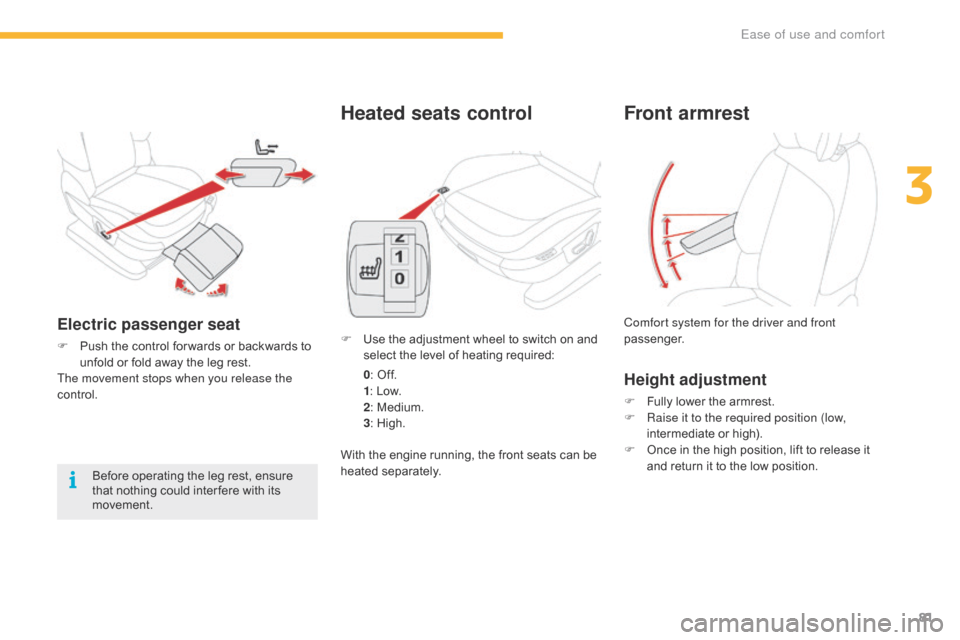
Heated seats control
F Use the adjustment wheel to switch on and s
elect the level of heating required:
0 :
Off.
1 :
Low.
2 :
Medium.
3 :
High.
With
the engine running, the front seats can be
h
eated
s
eparately.
Before
operating
the
leg
rest,
ensure
t
hat
nothing
could
inter fere
with
its
m
ovement.Electric passenger seat
F Push the control for wards or backwards to u
nfold or fold away the leg rest.
The movement stops when you release the
control.
Front armrest
Height adjustment
F Fully lower the armrest.
F R aise it to the required position (low,
intermediate
or high).
F
O
nce in the high position, lift to release it
a
nd return it to the low position.
Comfort system for the driver and front
passenger.
3
Ease of use and comfort
Page 93 of 527
91
C4-Picasso-II_en_Chap03_ergonomie-confort_ed01-2016
Steering wheel adjustment
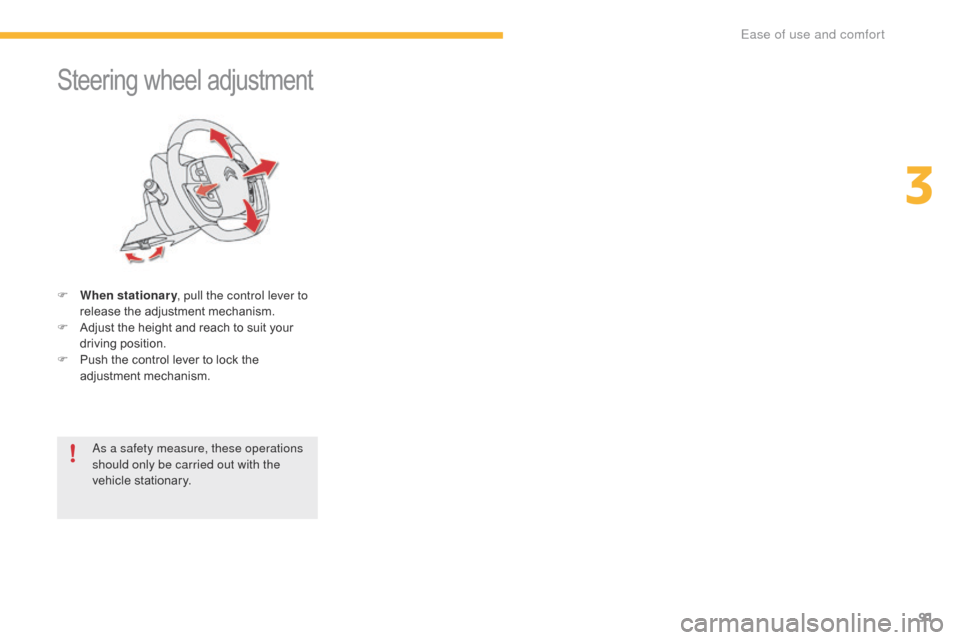
F When stationary , pull the control lever to
release the adjustment mechanism.
F
A
djust the height and reach to suit your
d
riving position.
F
P
ush the control lever to lock the
a
djustment
m
echanism.
As a safety measure, these operations
should only be carried out with the
vehicle
stationary.
3
Ease of use and comfort
Page 126 of 527
124
C4-Picasso-II_en_Chap04_conduite_ed01-2016
When towing
Distribution of loads
F Distribute the load in the trailer so that the heaviest items are as close as possible to
the
axle and the nose weight approaches the
m
aximum permitted without exceeding it.
Air density decreases with altitude, thus
reducing
engine per formance. Above
1 0
00 metres, the maximum towed load must
b
e reduced by 10 % for every 1 000 metres of
altitude.
Side wind
F Take into account the increased sensitivity t
o side wind.
For more information on Weights
, refer
to the corresponding section.
The rear parking sensors will be
d
eactivated automatically to avoid the
audible
signal if a genuine CITROËN
t
owbar is used.
Cooling
Towing a trailer on a slope increases the temperature of the coolant.
As
the fan is electrically controlled, its cooling
c
apacity is not dependent on the engine speed.
F
T
o lower the engine speed, reduce your
s
peed.
The
maximum towed load on a long incline
d
epends on the gradient and the ambient
t
emperature.
In
all cases, keep a check on the coolant
t
emperature. F
I
f the warning lamp and the
S
TOP
warning lamp come on,
s
top the vehicle and switch off
the
engine as soon as possible.
Braking
Towing a trailer increases the braking distance.
T o avoid overheating of the brakes, the use of
e
ngine braking is recommended.
Ty r e s
F Check the tyre pressures of the towing v
ehicle and of the trailer, observing the
re
commended
p
ressures.
Lighting
F Check the electrical lighting and signalling o
n the trailer and the headlamp beam
height
of your vehicle.
For more information on Adjusting the
headlamp beam height , refer to the
corresponding
s
ection.
Driving