CITROEN C4 PICASSO 2020 Owners Manual
Manufacturer: CITROEN, Model Year: 2020, Model line: C4 PICASSO, Model: CITROEN C4 PICASSO 2020Pages: 316, PDF Size: 10.36 MB
Page 211 of 316
209
F Park the vehicle without obstructing any traffic and apply the parking brake.
F
F
ollow the safety instructions (hazard
warning lamps, warning triangle, wearing
high visibility vest, etc.) according to the
legislation in force in the country where you
are driving.
F
S
witch off the ignition.
F
U
ncoil the pipe stowed under the
compressor. Avoid removing any foreign bodies which
have penetrated into the tyre.F
R
emove the valve cap from the tyre to be
repaired, and place it in a
clean area.
F
C
heck that the compressor switch is at the
" O " position.
F U ncoil fully the electric cable, stowed under
the compressor.
Only the 12
V socket located at the front of
the vehicle can be used.
F
A
ffix the speed limit sticker.
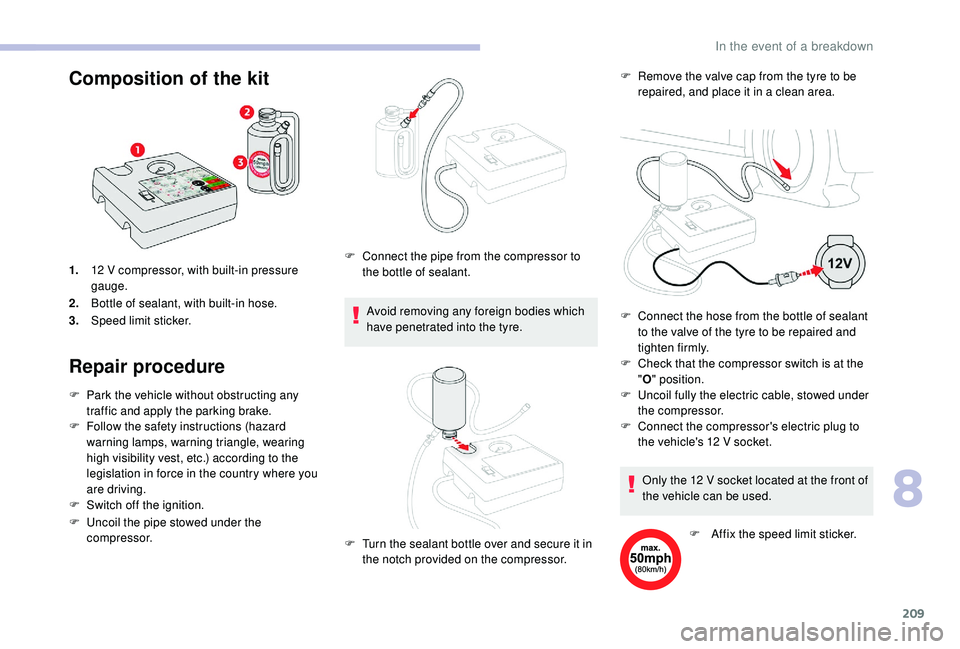
1.
12 V compressor, with built-in pressure
gauge.
2. Bottle of sealant, with built-in hose.
3. Speed limit sticker.
Repair procedure Composition of the kit
F Connect the pipe from the compressor to
the bottle of sealant.
F
T
urn the sealant bottle over and secure it in
the notch provided on the compressor. F
C
onnect the hose from the bottle of sealant
to the valve of the tyre to be repaired and
tighten firmly.
F
C
onnect the compressor's electric plug to
the vehicle's 12
V socket.
8
In the event of a breakdown
Page 212 of 316
210
The speed limit sticker must be secured
to the interior of the vehicle in the driver's
field of vision, to remind you that a wheel
is in temporary use.
The tyre inflation pressures are given on
this label.
F
S
witch on the ignition.
F
S
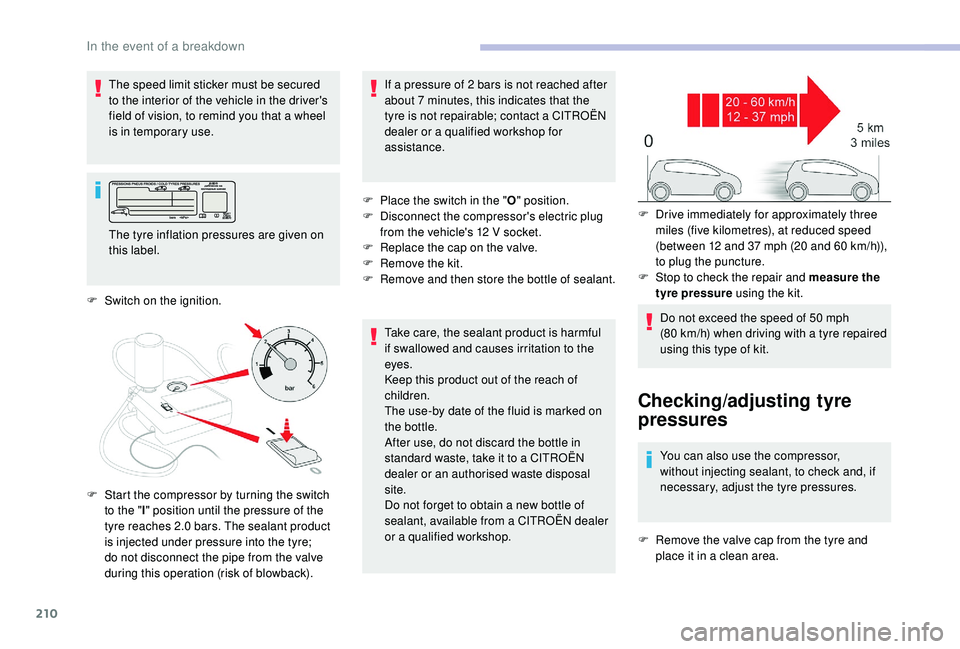
tart the compressor by turning the switch
to the " l" position until the pressure of the
tyre reaches 2.0
bars. The sealant product
is injected under pressure into the tyre;
do not disconnect the pipe from the valve
during this operation (risk of blowback). If a
pressure of 2 bars is not reached after
about 7 minutes, this indicates that the
tyre is not repairable; contact a
CITROËN
dealer or a
qualified workshop for
assistance.
F
P
lace the switch in the "O" position.
F
D
isconnect the compressor's electric plug
from the vehicle's 12
V socket.
F
R
eplace the cap on the valve.
F
R
emove the kit.
F
R
emove and then store the bottle of sealant.
Take care, the sealant product is harmful
if swallowed and causes irritation to the
eyes.
Keep this product out of the reach of
children.
The use-by date of the fluid is marked on
the bottle.
After use, do not discard the bottle in
standard waste, take it to a
CITROËN
dealer or an authorised waste disposal
site.
Do not forget to obtain a
new bottle of
sealant, available from a
CITROËN dealer
or a
qualified workshop.F
D
rive immediately for approximately three
miles (five kilometres), at reduced speed
(between 12
and 37 mph (20 and 60 km/h)),
to plug the puncture.
F
S
top to check the repair and measure the
tyre pressure using the kit.
Do not exceed the speed of 50
mph
(80
km/h) when driving with a tyre repaired
using this type of kit.
Checking/adjusting tyre
pressures
You can also use the compressor,
without injecting sealant, to check and, if
necessary, adjust the tyre pressures.
F
R
emove the valve cap from the tyre and
place it in a
clean area.
In the event of a breakdown
Page 213 of 316

211
F Check that the compressor switch is at the "O " position.
F
U
ncoil fully the electric cable, stowed under
the compressor.
Only the 12
V socket located at the front
of the vehicle can be used to power the
compressor. F
S
tart the compressor by placing the switch
at position " I" and adjust the pressure to the
value shown on the vehicle's tyre pressure
label. To deflate: press the black button
located on the compressor pipe, near the
valve connection.
If a pressure of 2 bars is not reached after
7 minutes, this indicates that the tyre is
not repairable; contact a CITROËN dealer
or a
qualified workshop for assistance.
F
O
nce the correct pressure is reached, put
the switch to the " O" position.
F
R
emove the kit then stow it.
Do not drive more than 125
miles (200 km)
with the repaired tyre; see a
CITROËN
dealer or a
qualified workshop to change
the tyre.
Should the pressure of one or more tyres
be adjusted, it is necessary to reinitialise
the under-inflation detection system.
For more information on Tyre under-
inflation detection , refer to the
corresponding section.
F
U
ncoil the pipe stowed under the
compressor.
F
S
crew the pipe onto the valve and tighten
f i r m l y.
F
C
onnect the compressor's electric plug to
the vehicle's 12
V socket.
F
S
witch on the ignition.
The tyre inflation pressures are given on
this label.
Spare wheel
Scan the QR code on page 3 to view
e xplanatory videos.
Access to tooling
Procedure for changing a wheel with
a damaged or punctured tyre for the spare
wheel using the tools provided with the vehicle.
The tools are installed in the boot under the
f l o o r.
Remove the boot carpet to access them.
8
In the event of a breakdown
Page 214 of 316

212
List of tools
(Depending on equipment.)4.
Wheel bolt cover removal tool.
Removes the wheel bolt covers on alloy
wheels.
5. Socket for the security bolts (located in
the glove box).
For adapting the wheelbrace to the special
"security" bolts.
6. Towing eye and tool to open the front
protective cover.
1. Wheelbrace.
For removing the wheel trim and the wheel
fastening bolts.
2. Chock to immobilise the vehicle (except
versions with manual gearbox).
3. Jack with integrated handle.
Used to raise the vehicle. For more information on To w i n g
, refer to the
corresponding section.
All of these tools are specific to your
vehicle and may vary according to the
level of equipment.
Do not use them for any other purposes.
The jack must only be used to change
a wheel with a damaged or punctured tyre.
Do not use any jack other than the one
supplied with this vehicle.
If the vehicle does not have its original jack,
contact a
CITROËN dealer or a qualified
workshop to obtain the correct jack for it.
The jack meets European standards,
as defined in the Machinery Directive
2006/42/EC.
The jack does not require any
maintenance.
Access to the spare wheel
The spare wheel is located in the boot, under
t h e f l o o r.
Taking out the wheel
F Loosen the central nut.
F R emove the fastening device (nut and bolt).
F
R
aise the spare wheel towards you from the
r e a r.
F
T
ake the wheel out of the boot.
In the event of a breakdown
Page 215 of 316
213
Putting the spare wheel back in
placeSince the width of the spare wheel is
smaller than the width of the wheels of
the vehicle, in the event of a puncture, the
punctured wheel must be stored in the boot.
F Put the wheel back in its housing.
F L oosen the nut on the bolt by a few turns.
F
P
osition the fastening device (nut and bolt)
in the middle of the wheel.
F
T
ighten fully until the central nut clicks to
retain the wheel correctly.
F
P
ut the box back in place in the centre of
the wheel.
Spare wheel
Scan the QR code on page 3 to view
e xplanatory videos.
Access to tooling
(Depending on version. The full set of tools is
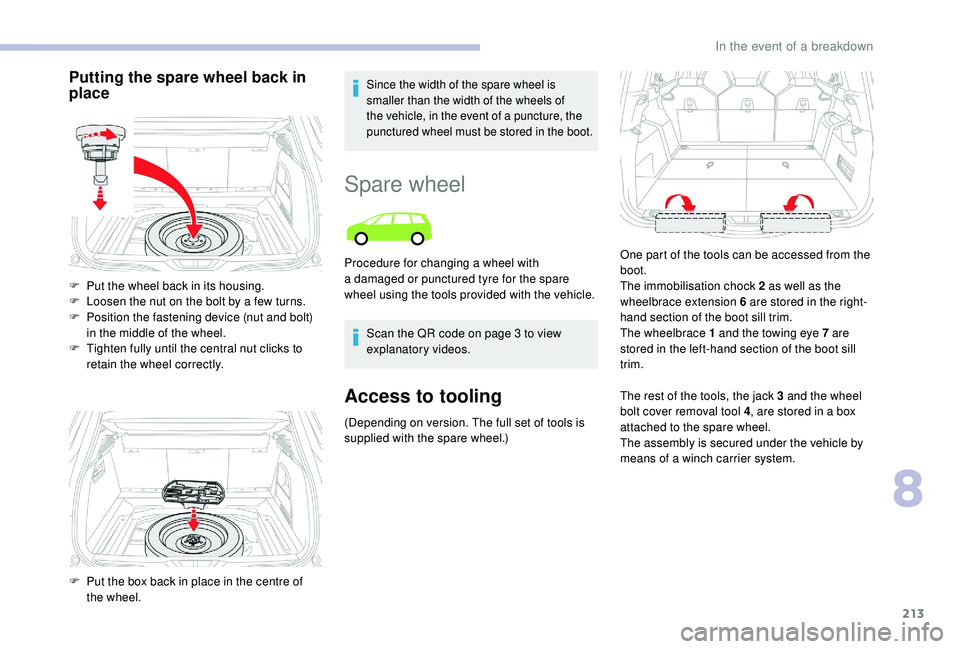
supplied with the spare wheel.) The rest of the tools, the jack 3
and the wheel
bolt cover removal tool 4 , are stored in a box
attached to the spare wheel.
The assembly is secured under the vehicle by
means of a
winch carrier system.
Procedure for changing a
wheel with
a damaged or punctured tyre for the spare
wheel using the tools provided with the vehicle. One part of the tools can be accessed from the
boot.
The immobilisation chock 2 as well as the
wheelbrace extension 6 are stored in the right-
hand section of the boot sill trim.
The wheelbrace 1 and the towing eye 7 are
stored in the left-hand section of the boot sill
trim.
8
In the event of a breakdown
Page 216 of 316

214
List of tools
(Depending on version. The full set of tools is
supplied with the spare wheel.)
1.Wheelbrace.
For removing the wheel trim and removing
the wheel bolts.
2. Chock to immobilise the vehicle (except
for versions with manual gearbox).
3. Jack with integrated handle.
Used to raise the vehicle. 4.
Wheel bolt cover removal tool.
Removes the wheel bolt covers on alloy
wheels.
5. Socket for wheel security bolts (stored in
the glove box).
For adapting the wheelbrace to the special
"security" bolts.
6. Wheelbrace extension.
For slackening/tightening the spare wheel
winch cable carrier nut.
7. Towing eye and tool to open the front
protective cover.
For more information on To w i n g , refer to the
corresponding section.
All of these tools are specific to your
vehicle and may vary according to the
level of equipment.
Do not use them for any other purposes.
The jack must only be used to change
a wheel with a damaged or punctured tyre.
Do not use any jack other than the one
supplied with this vehicle.
If the vehicle does not have its original jack,
contact a
CITROËN dealer or a qualified
workshop to obtain the correct jack for it.
The jack meets European standards,
as defined in the Machinery Directive
2006/42/EC.
The jack does not require any
maintenance.
Wheel with wheel trim
When removing the wheel , first remove the
trim using the wheelbrace 1 by pulling at the
valve aperture.
When refitting the wheel , refit the trim
starting by placing its notch facing the valve
and press around its edge with the palm of your
hand.
Access to the spare wheel
(Depending on version.)
Only a "space-saver" type spare wheel
may be fixed underneath the vehicle.
The spare wheel is supported by a
winch
carrier system underneath the vehicle.
In the event of a breakdown
Page 217 of 316

215
Taking out the spare wheel
F Fold back the concertina board and install the third row seat, on the left-hand side (if
your vehicle is equipped with it).
F
L
ift the pre-cut section of carpet to remove
the fixing winch nut from the spare wheel. F
D
etach the assembly of wheel and box from
the rear of the vehicle.
Tool storage
F Put the tools back in the box and store the box in the boot of the vehicle.
F
R
eel in the winch by turning the key in
the clockwise direction: once the cable is
completely reeled in, you should no longer
feel any resistance.
F
S
tore the rest of the tools in the storage
areas in the boot.
The wheel with the punctured tyre cannot
be fitted under the vehicle. It must be
stored in the boot. Use a
cover to protect
the interior of the boot.
F
W
ith the extension 6 placed on the end of
wheelbrace 1 , "tighten" the nut to unwind
the winch cable until the spare wheel is
flat on the ground. Unwind as much as
necessary in order to access the wheel
easily. F
S
traighten the spare wheel to access tool
box ( A).
F
D
etach the connecting piece from the cover
of the tool box ( B – C).
F
P
ass the connecting piece through the
wheel hub to release it ( D). F
P
ress the tab, slide the lid on the box up
to the middle and remove it to access the
other tools ( jack and alloy wheel bolt cover
removal tool).
8
In the event of a breakdown
Page 218 of 316
216
Putting the winch carrier and
spare wheel back in place
When the spare wheel is fitted in place of
a wheel with a punctured tyre, the winch
and tool box must be refitted underneath
the vehicle again before restarting.
F
S
traighten the wheel.
F
P
lace the appropriate tools in the box and
close the cover again.
F
P
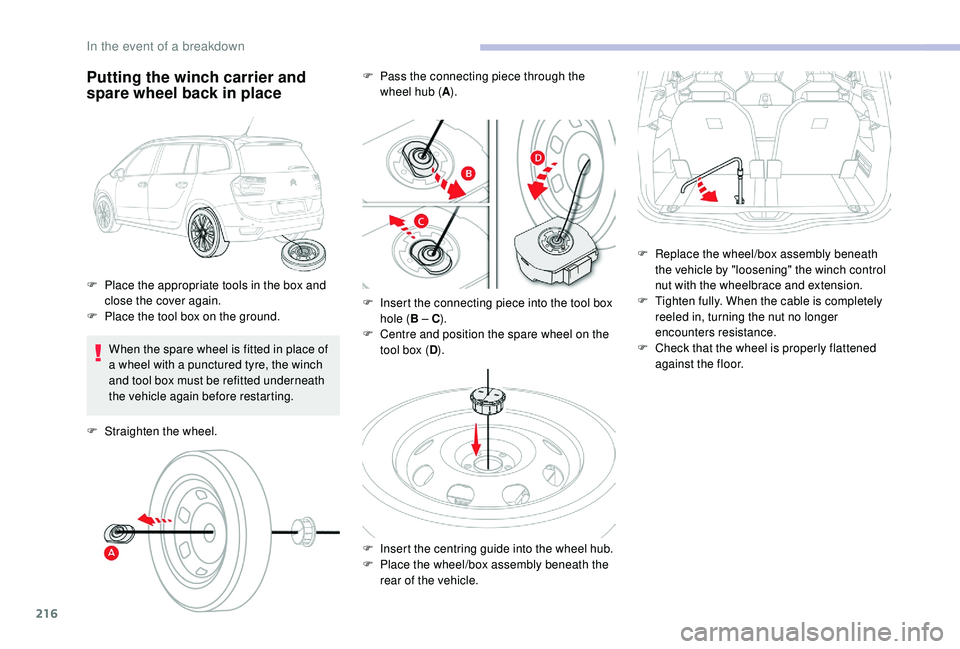
lace the tool box on the ground. F
P
ass the connecting piece through the
wheel hub ( A).
F
I
nsert the connecting piece into the tool box
hole ( B – C).
F C entre and position the spare wheel on the
tool box ( D).
F
I
nsert the centring guide into the wheel hub.
F
P
lace the wheel/box assembly beneath the
rear of the vehicle. F
R
eplace the wheel/box assembly beneath
the vehicle by "loosening" the winch control
nut with the wheelbrace and extension.
F
T
ighten fully. When the cable is completely
reeled in, turning the nut no longer
encounters resistance.
F C heck that the wheel is properly flattened
against the floor.
In the event of a breakdown
Page 219 of 316

217
Removing a wheel
* position P for the automatic gearbox
Parking the vehicle
Stop the vehicle where it does not block
traffic: the ground must be level, stable
and non-slippery.
Apply the parking brake, unless it is
programmed in automatic mode; switch
off the ignition and put the vehicle into first
gear* so as to block the wheels.
Check that the braking warning lamp and
the P warning lamp in the parking brake
control lever come on.
For more safety, position the
chock
2 against the wheel opposite the one you
are replacing.
Make absolutely certain that all the
occupants have left the vehicle and are
waiting in a safe area.
Never go underneath a vehicle raised
using a jack; use an axle stand.
Do not use:
-
t
he jack for any other purpose than
lifting the vehicle,
-
a j
ack other than the one supplied by
the manufacturer.
List of operationsF Place the foot of the jack 3 on the ground
and ensure that it is directly below the front
A or rear B jacking point provided on the
underbody, whichever is closest to the
wheel to be changed.
Ensure that the jack is stable. If the
ground is slippery or loose, the jack may
slip or collapse – Risk of injury!
Ensure that the jack is positioned only at
one of the jacking points A or B under the
vehicle, making sure that the vehicle's
contact sur face is centred on the head of
the jack. Otherwise, the vehicle could be
damaged and/or the jack could collapse –
Risk of injury!
F
R
emove the bolt cover(s) using the tool 4
(according to equipment).
F
F
it security socket 5
on wheelbrace 1
to
slacken the security bolt (according to
equipment).
F
S
lacken the other bolts (no more than
a
1/4
turn) using the wheelbrace 1
o n l y. F
E
xtend the jack 3 until its head comes into
contact with jacking point A or B used,
with contact sur face A or B on the vehicle
correctly engaged with the central part of
the head of the jack.
8
In the event of a breakdown
Page 220 of 316
218
Fitting a wheel
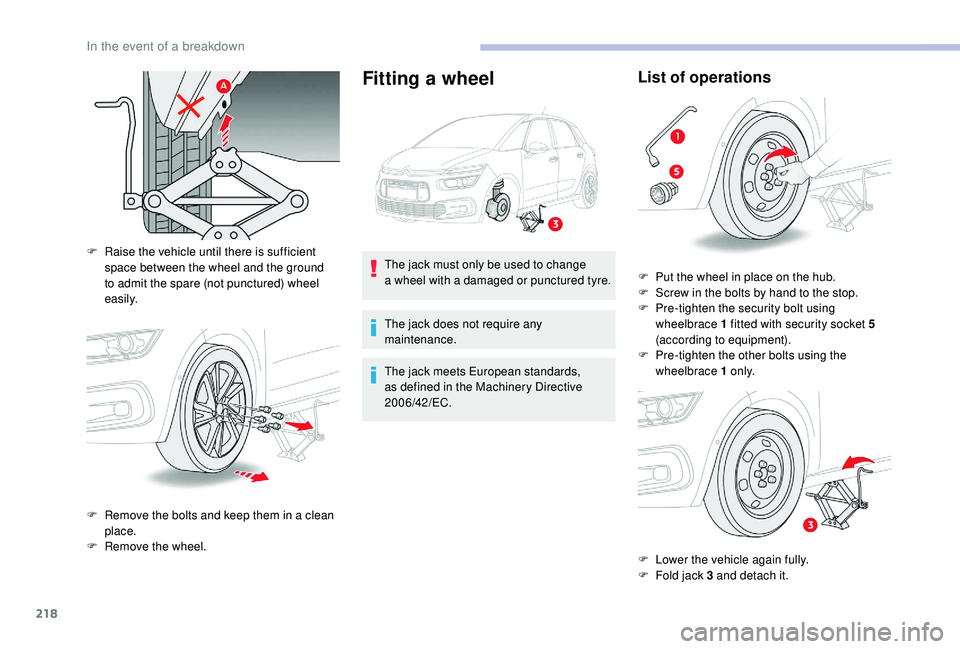
F Raise the vehicle until there is sufficient
space between the wheel and the ground
to admit the spare (not punctured) wheel
easily.
F
R
emove the bolts and keep them in a clean
place.
F
R
emove the wheel. The jack must only be used to change
a
wheel with a damaged or punctured tyre.
The jack does not require any
maintenance.
The jack meets European standards,
as defined in the Machinery Directive
2006/42/EC.
List of operations
F Put the wheel in place on the hub.
F S crew in the bolts by hand to the stop.
F
P
re-tighten the security bolt using
wheelbrace 1
fitted with security socket 5
(according to equipment).
F
P
re-tighten the other bolts using the
wheelbrace 1
o n l y.
F
L
ower the vehicle again fully.
F
F
old jack 3 and detach it.
In the event of a breakdown