remove seats CITROEN C4 PICASSO 2020 Owners Manual
[x] Cancel search | Manufacturer: CITROEN, Model Year: 2020, Model line: C4 PICASSO, Model: CITROEN C4 PICASSO 2020Pages: 316, PDF Size: 10.36 MB
Page 65 of 316

63
Rear head restraintsRelax head restraints
Never drive with the head restraints
removed; they must be fitted and correctly
adjusted.
Flat floor
Folding the seat
F Place the seats in the maximum rear wards longitudinal position.
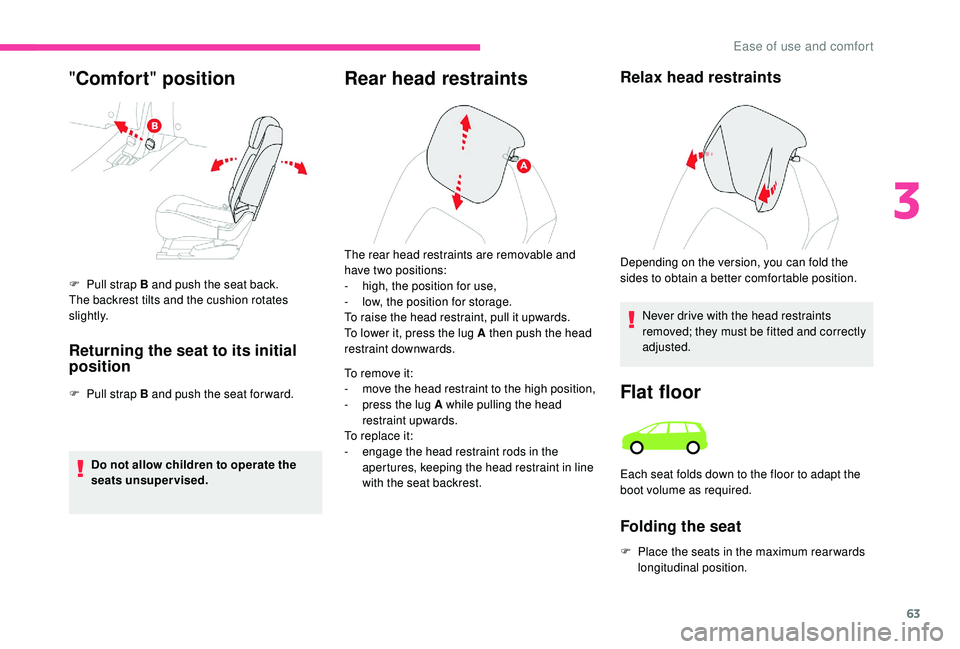
The rear head restraints are removable and
have two positions:
-
h
igh, the position for use,
-
l
ow, the position for storage.
To raise the head restraint, pull it upwards.
To lower it, press the lug A then push the head
restraint downwards.
To remove it:
-
m
ove the head restraint to the high position,
-
p
ress the lug A while pulling the head
restraint upwards.
To replace it:
-
e
ngage the head restraint rods in the
apertures, keeping the head restraint in line
with the seat backrest. Depending on the version, you can fold the
sides to obtain a better comfortable position.
Each seat folds down to the floor to adapt the
boot volume as required.
" Comfort " position
F Pull strap B and push the seat back.
The backrest tilts and the cushion rotates
s l i g ht l y.
Returning the seat to its initial
position
F Pull strap B and push the seat forward.
Do not allow children to operate the
seats unsupervised.
3
Ease of use and comfort
Page 68 of 316

66
Each of the two boards can support
a maximum load of 100 kg.
Folding the concertina
boards
Pull the strap, the 3 parts of the board fold into
c oncertina form.
When the third row seats are straightened,
these folded concertina boards can be left:
-
ei
ther flat behind the seats,
-
o
r in the vertical position,
thus clearing the inside of the seat as a
storage
space.
Installing the seats Seat storage
F Remove the load space cover.
For more information on the Interior
fittings and particularly on the load space
cover, refer to the corresponding section.
F
S
traighten the continuity panels of the
second row of seats and lock them in place.
F
F
old the concertina board and straighten it
vertically.
F
P
ull strap F , located behind the backrest
of the seat. The backrest tilts backwards
bringing the cushion. The seat locks in the
open position. F
S traighten the continuity panels of the
second row of seats and lock them in place.
F
L
ower the head restraints.
F
C
orrectly position the concertina board
vertically behind the seat.
F
M
ake sure that the seat belts of the 3
rd row
of seats are correctly fastened to the loops
and that they do not have any creases.
F
P
ull strap G , located at the bottom of the
backrest of the seat. The seat is unlocked.
F
T
hen, push the backrest slightly for wards.
The backrest tilts and folds on the cushion.
The folded seat is arranged at the back of
its storage area provided for this purpose.
F
P
ut the concertina boards back above the
folded down seats.
Ease of use and comfort
Page 85 of 316

83
Removing
To remove the mat on the driver's side:
F m ove the seat as far back as possible,
F
un
clip the fixings,
F
r
emove the mat.
Refitting
To refit the mat on the driver's side:
F p osition the mat correctly,
F
p
ut on the fixings again by pressing,
F
c
heck that the mat is secured correctly.
To avoid any risk of jamming of the pedals:
-
o
nly use mats which are suited to the
fixings already present in the vehicle;
these fixings must be used,
-
n
ever fit one mat on top of another.
The use of mats not approved by
CITROËN may inter fere with access to
the pedals and hinder the operation of the
cruise control/speed limiter.
The mats approved by CITROËN have two
fixings located below the seat.
Storage boxes
Depending on equipment, there are storage
boxes located under the front seats.
Opening
F Lift the handle and lower the storage box c ove r.
Do not place heavy objects in the storage
boxes.
Storage compartment
below the steering wheel
This storage below the steering wheel is used
to store the vehicle's on-board documentation.
3
Ease of use and comfort
Page 87 of 316

85
12 V accessory socket
Do not exceed the maximum power rating
of the socket (risk of damage to your
device).
The connection of an electrical device
not approved by CITROËN, such as
a
USB charger, may adversely affect the
operation of vehicle electrical systems,
causing faults such as poor radio
reception or inter ference with displays in
the screens.
Boot fittings
1. Rear shelf
(see details opposite)
2. Hooks
(see details opposite)
3. Strap
4. Stowing rings
5. 12
V socket (max power: 120 Watts)
Rear shelf
To remove the shelf:
F r elease the two cords,
F
g
ently lift the shelf, then remove it.
There are several ways of storing it:
-
ei
ther upright behind the front seats,
-
o
r flat on the bottom of the boot.
Hooks
F To connect a 12 V accessory (max power:
120 Watts), lift the cover and connect
a
suitable adaptor.
These can be used to secure shopping bags.
3
Ease of use and comfort
Page 89 of 316

87
To fold the 3rd row seats with the roller stored at
the back, it is necessary to raise the concertina
boards in order to give access to the seat
unlocking controls (red straps). When sharp deceleration occurs, objects
placed on the load space cover can turn
into projectiles.
Courtesy lampsFront – rear courtesy lamps
In this position, the courtesy lamp
comes on gradually:
-
w
hen you unlock the vehicle,
-
w
hen the electronic key is removed from the
reader,
-
w
hen opening a
door,
-
w
hen the remote control locking button is
activated, in order to locate your vehicle.
It will only be possible to switch on the door
mirror spotlamps if the courtesy lamp is in this
position.
It switches off gradually:
-
w
hen the vehicle is locked,
-
w
hen the ignition is switched on,
-
3
0
seconds after the last door is closed. Permanently off.
Permanent lighting.
Storage behind the 3rd row seats
F Make sure that the 3rd row seats are folded.
F
F
old the first two concertina boards.
F
P
osition the roller in the space located
above the armrest, side by side, tilting it
s l i g ht l y.
F
S
lide the roller to the stop position, until it
reaches the notches arranged at the back of
the boot, with the two hinges facing down.
F
U
nfold the third row seats.
The folded concertina boards can be placed in
the horizontal or upright position. 1.
Front courtesy lamp
2. Front map reading lamps
3. Rear courtesy lamp
4. Rear map reading lamps
3
Ease of use and comfort
Page 114 of 316

112
Lateral airbags
Use only approved covers on the seats,
compatible with the deployment of the
lateral airbags. For information on the
product range of seat covers suitable for
your vehicle, contact a CITROËN dealer.
Do not fix or attach anything to the seat
backrests (clothes, etc.) as this could
cause injuries to the thorax or arm when
the lateral airbag is deployed.
Do not sit with the upper part of the body
any nearer to the door than necessary.
The vehicle's front door panels include
side impact sensors.
A damaged door or any unauthorised or
incorrectly executed work (modification or
repair) on the front doors or their interior
trim could compromise the operation of
these sensors – risk of malfunction of the
lateral airbags!
Such work must only be done by
a
CITROËN dealer or a qualified
workshop.General points relating to
child seats
The regulations on carrying children are
specific to each country. Refer to the
legislation in force in your country.
For maximum safety, please obser ve the
following recommendations:
-
I
n accordance with European regulations,
all children under the age of 12
or less
than one and a
half metres tall must
travel in approved child seats suited to
their weight , on seats fitted with a
seat belt
or ISOFIX mountings.
-
S
tatistically, the safest seats in your
vehicle for carr ying children are the rear
seats.
-
A c
hild weighing less than 9 kg must
travel in the rear ward facing position
both in the front and in the rear.
It is recommended that children travel on
the rear seats of your vehicle:
-
"rearward facing " up to the age of 3,
-
"forward facing " over the age of 3. Ensure that the seat belt is positioned and
tightened correctly.
For child seats with a
support leg, ensure
that the support leg is in firm and steady
contact with the floor.
At the front: if necessary, adjust the
passenger seat.
At the rear: if necessary, adjust the
relevant front seat.
Remove and stow the head restraint
before installing a
child seat with backrest
on a
passenger seat.
Refit the head restraint once the child seat
has been removed.
Child seat at the rear
" Rearward facing"
When a "rear ward facing" child seat is installed
on a
rear passenger seat , move the vehicle's
front seat for ward and straighten the backrest
so that the "rear ward facing" child seat does
not touch the vehicle's front seat.
Safety
Page 119 of 316

117
Recommended child seats
Range of recommended child seats which are
secured using a three-point seat belt .Groups 2
and 3: from 15 to 36 kg
L5
"RÖMER KIDFIX XP"
Can be fitted to the vehicle's ISOFIX mountings.
The child is restrained by the seat belt.
Is only installed on the outer rear seats.
The head restraint on the vehicle seat must be removed.
Group 0+: from bir th to 13
kg
L1
"RÖMER Baby-Safe Plus"
Is installed in the "rearward facing" position.
Groups 2
and 3: from 15 to 36 kg
L6
"GRACO Booster"
The child is restrained by the seat belt.
Is only installed on the front passenger seat or on the outer rear seats.
5
Safety
Page 121 of 316

119
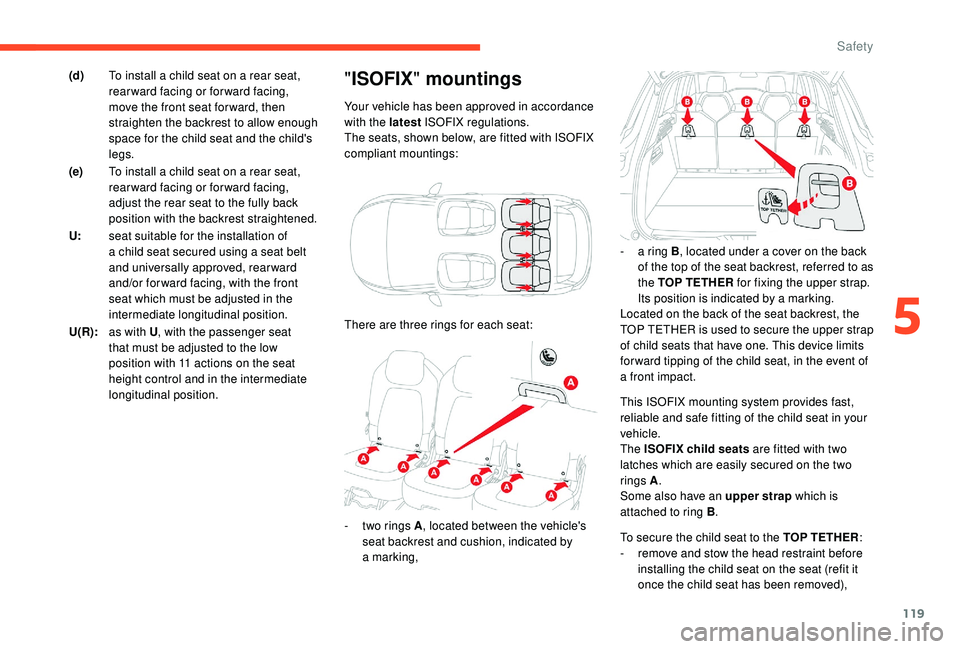
This ISOFIX mounting system provides fast,
reliable and safe fitting of the child seat in your
vehicle.
The ISOFIX child seats are fitted with two
latches which are easily secured on the two
rings A.
Some also have an upper strap which is
attached to ring B .
"ISOFIX " mountings
Your vehicle has been approved in accordance
with the latest ISOFIX regulations.
The seats, shown below, are fitted with ISOFIX
compliant mountings:
(d)
To install a
child seat on a
rear seat,
rearward facing or forward facing,
move the front seat for ward, then
straighten the backrest to allow enough
space for the child seat and the child's
legs.
(e) To install a
child seat on a
rear seat,
rearward facing or forward facing,
adjust the rear seat to the fully back
position with the backrest straightened.
U: seat suitable for the installation of
a
child seat secured using a
seat belt
and universally approved, rearward
and/or for ward facing, with the front
seat which must be adjusted in the
intermediate longitudinal position.
U(R): as with U , with the passenger seat
that must be adjusted to the low
position with 11
actions on the seat
height control and in the intermediate
longitudinal position. There are three rings for each seat:
-
t
wo rings A , located between the vehicle's
seat backrest and cushion, indicated by
a
marking, -
a r
ing B, located under a
cover on the back
of the top of the seat backrest, referred to as
the TOP TETHER for fixing the upper strap.
Its position is indicated by a
marking.
Located on the back of the seat backrest, the
TOP TETHER is used to secure the upper strap
of child seats that have one. This device limits
for ward tipping of the child seat, in the event of
a
front impact.
To secure the child seat to the TOP TETHER :
-
r
emove and stow the head restraint before
installing the child seat on the seat (refit it
once the child seat has been removed),
5
Safety
Page 122 of 316

120
- detach the TOP TETHER cover by pulling its cut-out,
-
p
ass the upper strap of the child seat over
the seat backrest, centring it between the
openings for the head restraint rods,
-
f
ix the hook of the upper strap to ring B ,
-
t
ighten the upper strap.The incorrect installation of a
child seat in
a
vehicle compromises the protection of
the child in the event of an accident.
Strictly obser ve the fitting instructions
provided with the child seat.
For information on the possibilities for
installing ISOFIX child seats in your
vehicle, refer to the summary table.
Recommended ISOFIX child
seats
Also consult the user guide from the child
seat's manufacturer to find out how to
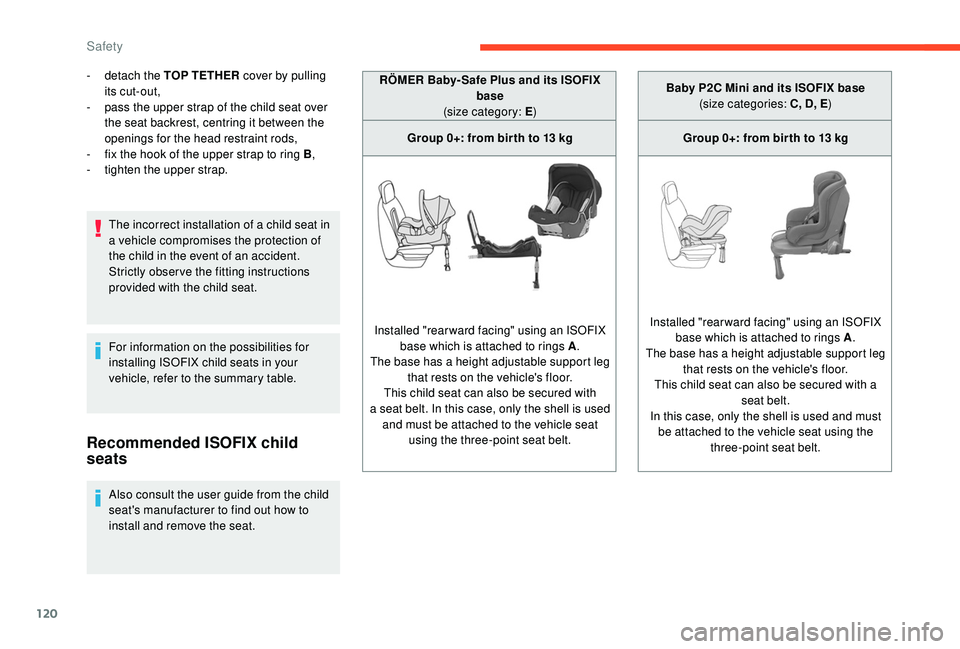
install and remove the seat. RÖMER Baby- Safe Plus and its ISOFIX
base
(size category: E )
Group 0+: from bir th to 13 kg
Installed "rearward facing" using an ISOFIX base which is attached to rings A .
The base has a height adjustable support leg
that rests on the vehicle's floor.
This child seat can also be secured with
a seat belt. In this case, only the shell is used
and must be attached to the vehicle seat using the three-point seat belt. Baby P2C Mini and its ISOFIX base
(size categories: C, D, E )
Group 0+: from bir th to 13 kg
Installed "rearward facing" using an ISOFIX base which is attached to rings A .
The base has a height adjustable support leg that rests on the vehicle's floor.
This child seat can also be secured with a seat belt.
In this case, only the shell is used and must be attached to the vehicle seat using the three-point seat belt.
Safety
Page 126 of 316

124
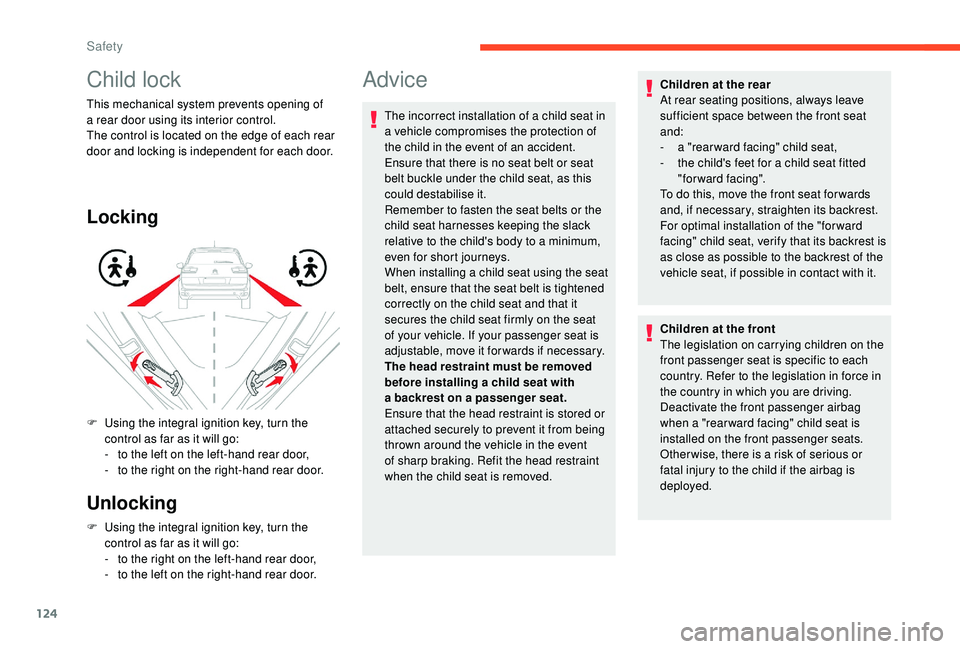
Child lock
This mechanical system prevents opening of
a rear door using its interior control.
The control is located on the edge of each rear
door and locking is independent for each door.
Locking
Unlocking
F Using the integral ignition key, turn the control as far as it will go:
-
t
o the right on the left-hand rear door,
-
t
o the left on the right-hand rear door.
F
U
sing the integral ignition key, turn the
control as far as it will go:
-
t
o the left on the left-hand rear door,
-
t
o the right on the right-hand rear door.
Advice
The incorrect installation of a child seat in
a vehicle compromises the protection of
the child in the event of an accident.
Ensure that there is no seat belt or seat
belt buckle under the child seat, as this
could destabilise it.
Remember to fasten the seat belts or the
child seat harnesses keeping the slack
relative to the child's body to a
minimum,
even for short journeys.
When installing a
child seat using the seat
belt, ensure that the seat belt is tightened
correctly on the child seat and that it
secures the child seat firmly on the seat
of your vehicle. If your passenger seat is
adjustable, move it forwards if necessary.
The head restraint must be removed
before installing a
child seat with
a
backrest on a passenger seat.
Ensure that the head restraint is stored or
attached securely to prevent it from being
thrown around the vehicle in the event
of sharp braking. Refit the head restraint
when the child seat is removed. Children at the rear
At rear seating positions, always leave
sufficient space between the front seat
and:
-
a "
rear ward facing" child seat,
-
t
he child's feet for a child seat fitted
"forward facing".
To do this, move the front seat for wards
and, if necessary, straighten its backrest.
For optimal installation of the "forward
facing" child seat, verify that its backrest is
as close as possible to the backrest of the
vehicle seat, if possible in contact with it.
Children at the front
The legislation on carrying children on the
front passenger seat is specific to each
country. Refer to the legislation in force in
the country in which you are driving.
Deactivate the front passenger airbag
when a "rear ward facing" child seat is
installed on the front passenger seats.
Other wise, there is a
risk of serious or
fatal injury to the child if the airbag is
deployed.
Safety