instrument panel CITROEN C4 PICASSO 2022 User Guide
[x] Cancel search | Manufacturer: CITROEN, Model Year: 2022, Model line: C4 PICASSO, Model: CITROEN C4 PICASSO 2022Pages: 316, PDF Size: 10.36 MB
Page 19 of 316

17
Warning/indicator lampStateCause Actions/Observations
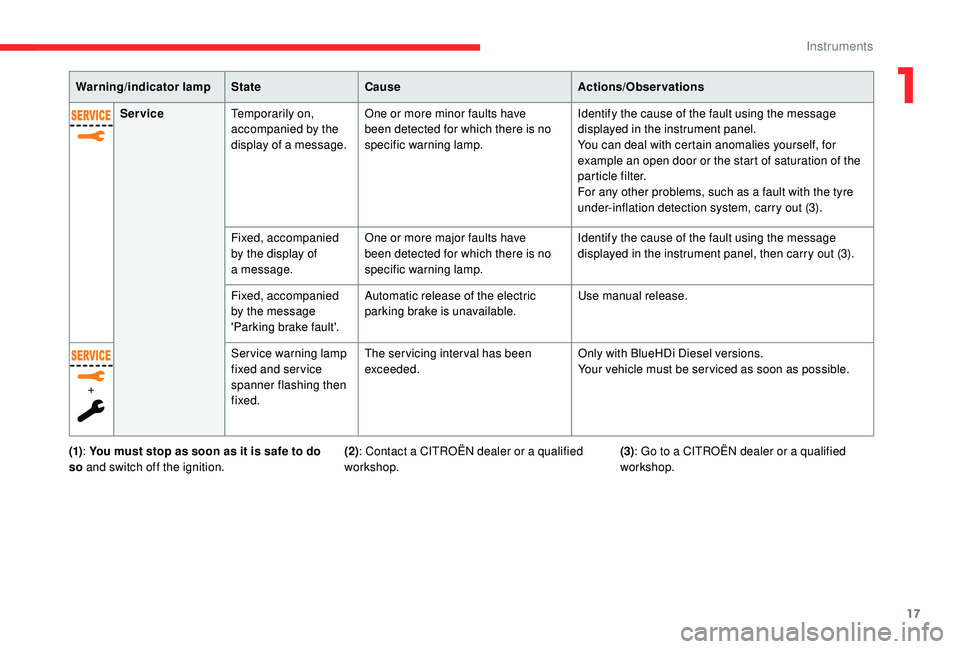
Service Temporarily on,
accompanied by the
display of a
message.One or more minor faults have
been detected for which there is no
specific warning lamp. Identify the cause of the fault using the message
displayed in the instrument panel.
You can deal with certain anomalies yourself, for
example an open door or the start of saturation of the
particle filter.
For any other problems, such as a
fault with the tyre
under-inflation detection system, carry out (3).
Fixed, accompanied
by the display of
a
message.One or more major faults have
been detected for which there is no
specific warning lamp. Identify the cause of the fault using the message
displayed in the instrument panel, then carry out (3).
Fixed, accompanied
by the message
'Parking brake fault'. Automatic release of the electric
parking brake is unavailable.
Use manual release.
+ Service warning lamp
fixed and ser vice
spanner flashing then
fixed.The servicing interval has been
exceeded.
Only with BlueHDi Diesel versions.
Your vehicle must be ser viced as soon as possible.
(1) : You must stop as soon as it is safe to do
so and switch off the ignition. (2): Contact a
CITROËN dealer or a qualified
workshop. (3)
: Go to a
CITROËN dealer or a qualified
workshop.
1
Instruments
Page 26 of 316

24
Warning/indicator lampStateCause Actions/Observations
Foot on the
brake * Fixed.
Omission or insufficient pressure on
the brake pedal. With an automatic gearbox, with the engine running,
before releasing the parking brake, to move out of
position P
.
Foot on the
clutch * Fixed.
Stop & Start: the change to START
mode is rejected because the clutch
pedal is not fully depressed. Fully depress the clutch pedal.
Rear foglamp Fixed. The lamp is on.
Green warning/indicator lamps
Stop & Star tFixed.When the vehicle stops, the Stop &
Start puts the engine into STOP mode.
Flashing temporarily. STOP mode is momentarily
unavailable or START mode is
automatically triggered.
Park Assist Fixed. The function is active.
Blind spot
monitoring Fixed.
The function has been activated.
*
O
nly with digital monochrome instrument panel.
Instruments
Page 28 of 316

26
Indicators
Service indicator
The ser vice indicator is displayed in the
instrument panel. Depending on the vehicle
version:
-
t
he distance recorder display line indicates
the distance remaining before the next
ser vice is due, or the distance travelled
since it was due preceded by the sign "-".
-
a
n alert message indicates the distance
remaining, as well as the period before the
next ser vice is due or how long it is overdue.
Warning/indicator
lamp State
CauseActions/
Observations
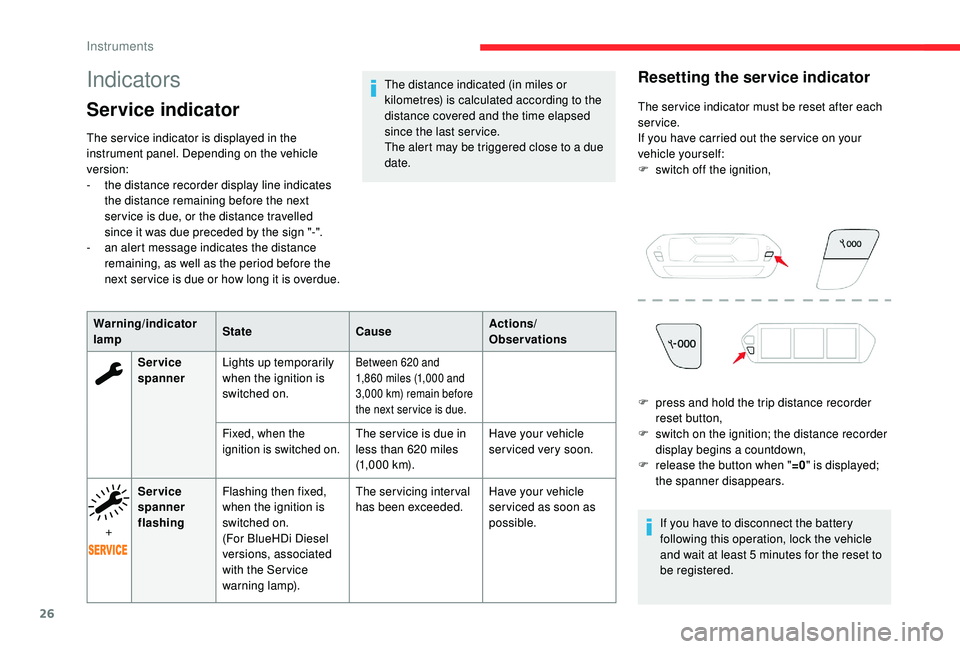
Ser vice
spanner Lights up temporarily
when the ignition is
switched on.
Between 620 and
1 ,860 miles (1,000 and
3,000
km) remain before
the next ser vice is due.
Fixed, when the
ignition is switched on.The ser vice is due in
less than 620 miles
(1,000
km). Have your vehicle
serviced very soon.
+ Ser vice
spanner
flashing
Flashing then fixed,
when the ignition is
switched on.
(For BlueHDi Diesel
versions, associated
with the Ser vice
warning lamp). The servicing interval
has been exceeded.
Have your vehicle
ser viced as soon as
possible.
The distance indicated (in miles or
kilometres) is calculated according to the
distance covered and the time elapsed
since the last ser vice.
The alert may be triggered close to a
due
date.
Resetting the service indicator
The ser vice indicator must be reset after each
service.
If you have carried out the ser vice on your
vehicle yourself:
F
s
witch off the ignition,
If you have to disconnect the battery
following this operation, lock the vehicle
and wait at least 5
minutes for the reset to
be registered.
F
p
ress and hold the trip distance recorder
reset button,
F
s
witch on the ignition; the distance recorder
display begins a
countdown,
F
r
elease the button when " =0" is displayed;
the spanner disappears.
Instruments
Page 29 of 316

27
You can access the ser vice information at any
time.
F
P
ress the trip distance recorder reset
button.
The ser vice information is displayed for
a
few seconds, then disappears.
Engine coolant temperature
gauge
(Only with the 12" colour instrument panel.)
With the engine running, when the needle is:
-
i
n zone A , the temperature is correct,
-
i
n zone B , the temperature is too high;
the maximum temperature and the
central STOP warning lamps come on,
accompanied by an audible signal and
a
warning message.
You MUST stop as soon as it is safe to do
so.
Wait a few minutes before switching off the
e ngine.
Contact a
CITROËN dealer or a qualified
workshop.
After driving for a
few minutes, the temperature
and pressure in the cooling system increase.
To top up the level:
F
w
ait for the engine to cool,
F
u
nscrew the cap slightly to allow the
pressure to drop,
F
w
hen the pressure has dropped, remove the
cap,
F
t
op up the level to the "MA X" mark.Be aware of the risk of scalding when
topping up the coolant. Do not fill above
the maximum level (indicated on the
reservoir).
Engine oil level indicator
(Depending on version.)
On versions fitted with an electric oil level
indicator, the state of the engine oil level is
displayed in the instrument panel for a few
seconds, after the servicing information. The level read will only be correct if the
vehicle is on level ground and the engine
has been off for more than 30
minutes.
Oil level correct
Oil level incorrect
Oil level indicator fault
Retrieving the service
information
This is indicated by the display of the message
"Oil level incorrect" in the instrument panel
screen, accompanied by the Ser vice warning
lamp and an audible signal.
If the low oil level is confirmed by a
check using
the dipstick, the level must be topped up to
avoid damage to the engine.
For more information on Checking levels ,
refer to the corresponding section.
1
Instruments
Page 30 of 316

28
This is signalled by the display of the message "Oil
level measurement invalid" in the instrument panel.
Contact a CITROËN dealer or a qualified
workshop.
In the event of a fault with the electric
i ndicator, the engine oil level is no longer
monitored.
If the system is faulty, you must check the
engine oil level using the manual dipstick
located under the bonnet.
For more information on Checking levels ,
refer to the corresponding section.
AdBlue® range indicators
These range indicators are present only on
BlueHDi Diesel versions.
Once the AdBlue
® tank is on reser ve or after
detection of a
fault with the SCR emissions
control system, when the ignition is switched
on, an indicator displays an estimate of the
distance that can be covered, the range, before
engine starting is prevented.
In the event of the risk of non-
starting related to a lack of
AdBlue
®
The engine starting prevention system
required by regulations is activated
automatically once the AdBlue
® tank is
e m pt y.
Range greater than 1,500
miles (2,400 km)
When switching on the ignition, there is no
automatic display of range in the instrument
panel.
With the 12" colour instrument panel, pressing
this button temporarily displays the driving
range.
With access via the boot
Remaining range between 1,500 and
3 75 miles (2,400 and 600 km) When driving, the message is displayed every
185
miles (300 km) until the level is topped up.
The reser ve level has been reached; it is
recommended that you top up as soon as
possible.
When switching on the ignition, this warning
lamp comes on, accompanied by an audible
signal and the display of a message ("Top
up AdBlue: Starting impossible in x miles")
indicating the remaining range expressed in
miles or kilometres.
Remaining range less than 375 miles (600 km)
When switching on the ignition, this warning
lamp flashes, accompanied by the permanent
lighting of the Ser vice warning lamp, an audible
signal and the display of a
message ("Top
up AdBlue: Starting impossible in x miles")
indicating the remaining range in miles or
kilometres.
When driving, this message is displayed every
30
seconds until the AdBlue level has been
topped up.
It is essential to top up as soon as possible and
before the tank is completely empty; other wise
it will not be possible to restart the engine after
the next stop.
Breakdown related to a
lack of AdBlue
®
When switching on the ignition, this warning lamp
flashes, and the Ser vice warning lamp comes on,
accompanied by an audible signal and the display of
the message "Top up AdBlue: Starting impossible".
Instruments
Page 34 of 316

32
Menus
For more information on Heating, Manual
air conditioning and Automatic air
conditioning , refer to the corresponding
sections.
Upper bar
* Depending on equipment Certain information is always present in the
upper bar of the touch screen:
-
S
ummary of air conditioning information and
access to the simplified menu (temperature
and air flow adjustment only).
-
S
ummary of information from the Radio
Media , Telephone menus and navigation
instructions*.
-
N
otifications zone (texts and email)*.
Air conditioning.
Allows adjustment of the various
settings for temperature, air flow,
etc.
Connected navigation.
See the "Audio and telematics" section.
Radio Media.
See the "Audio and telematics" section. Telephone.
See the "Audio and telematics" section.
Applications.
Enables the trip computer to
be displayed with the digital
monochrome instrument panel.
See the "Audio and telematics" section. Driving.
Allows the activation, deactivation
and adjustment of settings for
certain functions.
The functions accessible from this menu are
arranged under two tabs: " Vehicle settings"
and " Driving functions ".
Volume control/mute.
See the "Audio and telematics"
section. Access to Configuration
.
Instruments
Page 38 of 316

36
The functions available through the
upper menu bar are detailed in the
table below. Certain settings can be
accessed on the second page.
Configuration
ButtonComments
Switch off the screen.
Brightness adjustment.
Choice and configuration of
three personalised profiles and
a
common profile.
Touch screen and instrument
panel settings, etc.
Activation and adjustment of the
Wi-Fi settings. Button
Comments
Adjustment of the display
parameters (text scrolling,
animations, etc.) and
brightness.
Choose an ambience for the 12-
inch colour instrument panel.
Choice of the type of
information displayed in the 12-
inch colour instrument panel.
Choice of units:
- t
emperature (°Celsius or
°Fahrenheit)
-
d
istances and fuel consumption
(l/100
km, mpg or km/l).
Choice of language for the
touch screen and 12-inch colour
instrument panel.
Setting the date and time.
Trip computer
System that gives you information on
the current journey (range, current fuel
consumption, average fuel consumption, etc.).
Digital monochrome
instrument panel
The data is accessible in the
"Driving " menu.
Permanent display:
F
Sel
ect the " Applications " menu, then " Tr i p
computer ".
The information of the trip computer is
displayed in tabs.
F
P
ress one of the buttons to display the
desired tab.
Instruments
Page 39 of 316

37
F When the desired trip is displayed, press the reset button or on the end of the wiper
control stalk.
Tr i p s " 1" and " 2" are independent and are used
identically.
For example, trip 1 can be used for daily
calculations, and trip 2 for monthly calculations.
12" colour instrument panel
Display of data on the instrument
panel
Trip computer data is displayed permanently
when you select the "Dials" or "Personal"
display mode.
F
P
ress the button on the end of the wiper
control stalk to display the various tabs in
succession.
The current information tab with:
-
Range.
-
C
urrent fuel consumption.
-
S
top & Start time counter.
The trip " 1" tab with:
-
A
verage speed for the first trip.
-
A
verage fuel consumption.
-
D
istance travelled.
The trip " 2" tab with:
-
A
verage speed for the second trip.
-
A
verage fuel consumption.
-
D
istance travelled.
Trip resetTemporar y display in a specific window:
F P ress the end of the wiper control stalk for
access to the information and to display the
different tabs.
In all other display modes, pressing the end of
the wiper control stalk will cause this data to
appear temporarily in a specific window.
1
Instruments
Page 46 of 316

44
The indicator lamp also goes off when
unlocking one or more doors.
The central locking does not work if one of
the doors is open.
If the vehicle is locked from the outside or
deadlocked, this button does not work. To
unlock the vehicle from the inside:
F
A
fter normal locking, pull one of the
interior door controls.
F
A
fter deadlocking, use the remote
control, the Keyless Entry and Starting
system or the integral key.
Automatic (anti-intrusion
security)
The doors and boot lock automatically when
driving (speed above 6 mph (10 km/h)).
To deactivate or reactivate this function
(activated by default):
F
P
ress the button until a message appears in
the instrument panel. Transporting long or voluminous
objects
Press the central locking control to
drive with the boot open and the doors
unlocked.
Advice
Remote control
The high frequency remote control is
a
sensitive system; do not operate it while
it is in your pocket as there is a
possibility
that it may unlock the vehicle, without you
being aware of it.
Do not press the buttons of your remote
control out of range and out of sight of
your vehicle. The remote control may stop
working and would have to be reinitialised.
The remote control cannot operate when
the key is in the reader, even when the
ignition is switched on.
Electrical interference
The
K
eyless Entry and Starting electronic
key may not operate if close to certain
electronic devices: telephone, laptop
computer, strong magnetic fields, etc.
Anti-theft protection
Do not make any modifications to the
electronic engine immobiliser system; this
could cause malfunctions.
Do not forget to turn the steering wheel to
engage the steering lock.
Access
Page 49 of 316

47
Changing the battery
Do not throw the remote control
batteries away, they contain metals
which are harmful to the environment.
Take them to an approved collection
point.
Doors
Opening
From outside
F After unlocking the vehicle or with the electronic key of the K eyless Entry and
Starting system in the recognition zone, pull
the door handle.
From inside
F Pull the interior opening control of a front
door; this unlocks the vehicle completely.
Closing
When a door is not closed correctly:
- e ngine running , this warning
lamp and a
message appear
in the instrument panel (digital
monochrome) for a
few seconds,
-
v
ehicle moving (speed above
6
mph (10 km/h)), this warning
lamp and a
message appear
in the instrument panel (digital
monochrome and 12
inch colour)
for a
few seconds, accompanied
by an audible signal.
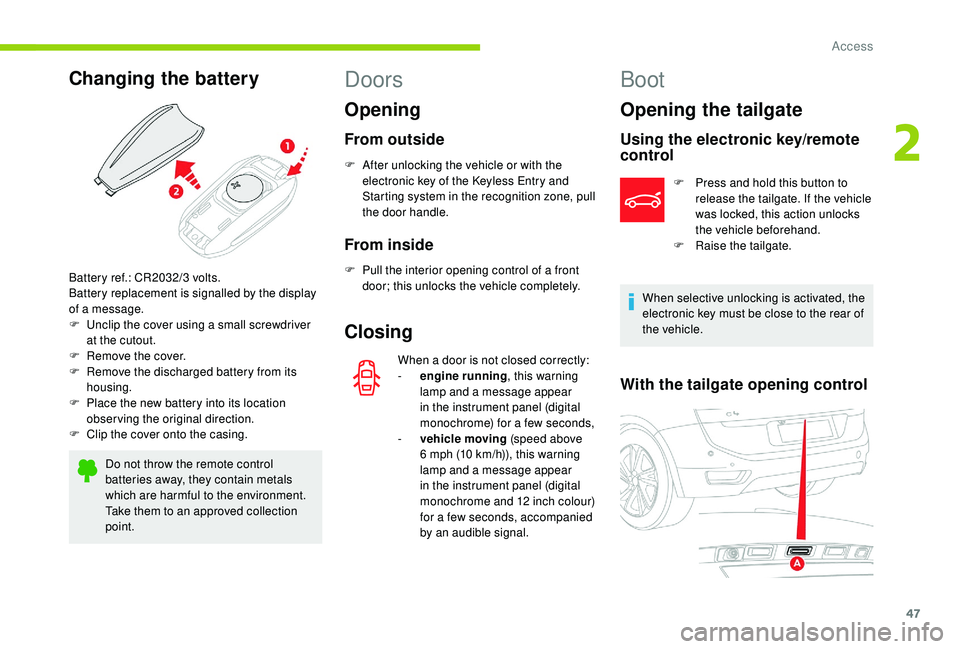
Battery ref.: CR2032/3
volts.
Battery replacement is signalled by the display
of a
message.
F
U
nclip the cover using a
small screwdriver
at the cutout.
F
R
emove the cover.
F
R
emove the discharged battery from its
housing.
F
P
lace the new battery into its location
observing the original direction.
F
C
lip the cover onto the casing.
Boot
Opening the tailgate
Using the electronic key/remote
control
F Press and hold this button to release the tailgate. If the vehicle
was locked, this action unlocks
the vehicle beforehand.
F
Ra
ise the tailgate.
When selective unlocking is activated, the
electronic key must be close to the rear of
the vehicle.
With the tailgate opening control
2
Access