oil Citroen C4 PICASSO RHD 2014.5 1.G Owner's Manual
[x] Cancel search | Manufacturer: CITROEN, Model Year: 2014.5, Model line: C4 PICASSO RHD, Model: Citroen C4 PICASSO RHD 2014.5 1.GPages: 428, PDF Size: 10.03 MB
Page 12 of 428
10
Limit the causes of excess consumption
Spread loads throughout the vehicle; place the heaviest items in the bottom of the boot, as close as possible to the rear seats.
Limit
the loads carried in the vehicle and reduce wind resistance (roof
b
ars, roof rack, bicycle carrier, trailer...). Use a roof box in preference.
Remove
roof bars and roof racks after use.
At
the end of winter, remove snow tyres and refit your summer tyres.
Observe the recommendations on
maintenance
Check the tyre pressures regularly, when cold, referring to the label in the door aperture, driver's side.
Carry
out this check in particular:
-
b
efore a long journey,
-
a
t each change of season,
-
a
fter a long period out of use.
Don't
forget the spare wheel and the tyres on any trailer or caravan.
Have
your vehicle serviced regularly (engine oil, oil filter, air filter,
p
assenger compartment filter...) and observe the schedule of
o
perations recommended in the manufacturer's service schedule.
With
a BlueHDi Diesel engine, if the SCR system is faulty your vehicle
b
ecomes polluting; go to a CITROËN dealer or a qualified workshop
w
ithout delay to have the emissions of nitrous oxides brought back to
t
he legal level.
When
refuelling, do not continue after the third cut-off of the nozzle to
a
void any over flow.
At
the wheel of your new vehicle, it is only after the first 1 800 miles
(
3 000 kilometres) that you will see the fuel consumption settle down
t
o a consistent average.
Eco-driving
Page 38 of 428
36
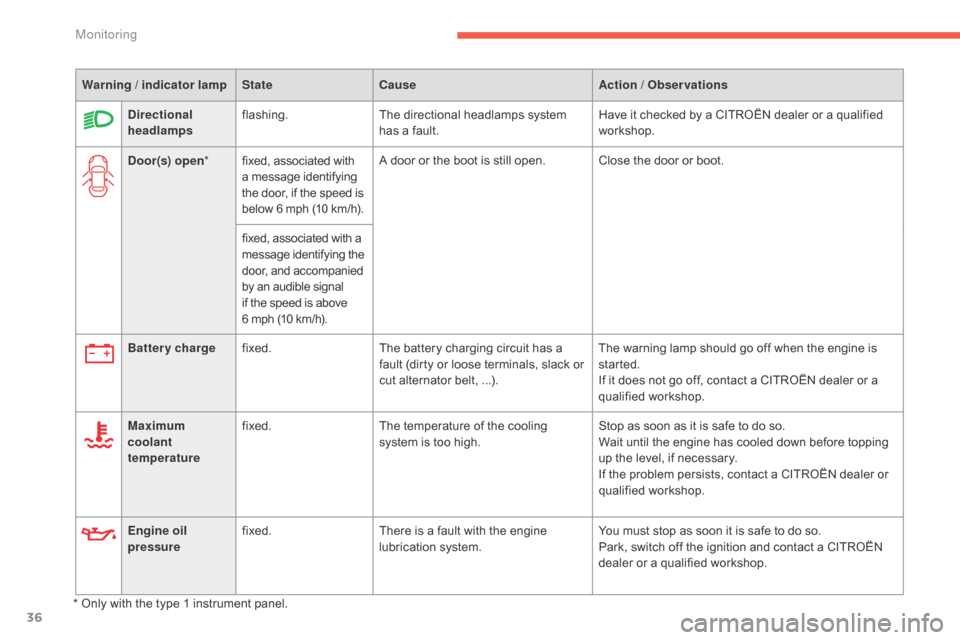
Warning / indicator lampStateCause Action / Observations
Battery charge fixed. The
battery charging circuit has a
f
ault (dirty or loose terminals, slack or
c
ut alternator belt, ...).The
warning lamp should go off when the engine is
s
tarted.
If
it does not go off, contact a CITROËN dealer or a
q
ualified
w
orkshop.
Maximum
coolant
temperature fixed.
The
temperature of the cooling
s
ystem is too high.Stop
as soon as it is safe to do so.
Wait
until the engine has cooled down before topping
u
p the level, if necessary.
If
the problem persists, contact a CITROËN dealer or
q
ualified
w
orkshop.
Directional
headlamps
flashing.
The
directional headlamps system
h
as a fault.Have
it checked by a CITROËN dealer or a qualified
w
orkshop.
Door(s) open *fixed,
associated with
a m
essage
id
entifying
t
he door, if the speed is
b
elow 6 mph (10 km/h).A
door or the boot is still open. Close the door or boot.
fixed,
associated with a
m
essage
id
entifying
th
e
d
oor, and accompanied
b
y an audible signal
i
f the speed is above
6
mph (10 km/h).
*
Only with the type 1 instrument panel.
Engine oil
pressure
fixed.
There
is a fault with the engine
l
ubrication system.You
must stop as soon it is safe to do so.
Park,
switch off the ignition and contact a CITROËN
d
ealer or a qualified workshop.
Monitoring
Page 42 of 428
40
Service indicator
System which informs the driver when the next service is due, in accordance with the
ma
nufacturer's
ser
vicing
s
chedule.
The
point at which the service is due is
c
alculated from the last indicator zero reset,
a
ccording to the mileage covered and the time
e
lapsed since the last service.
For
BlueHDi Diesel versions, depending on the
c
ountry of sale, the degree of deterioration of
t
he engine oil may also be taken into account.
More than 1 800 miles (3 000 km)
remain before the next service is due
When the ignition is switched on, no service information appears in the screen.
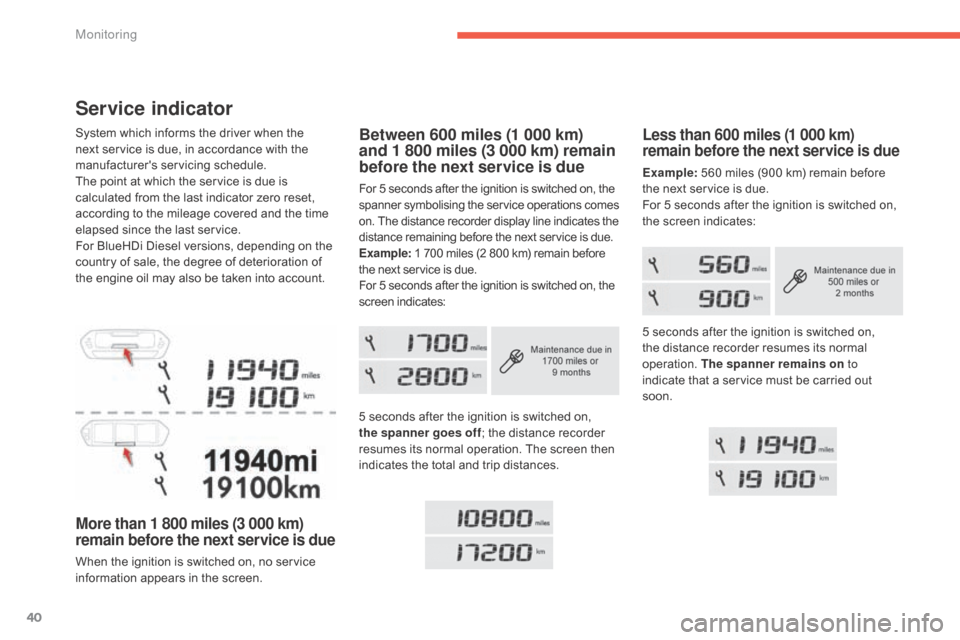
Less than 600 miles (1 000 km)
remain before the next service is due
Example: 560 miles (900 km) remain before t
he next service is due.
For
5 seconds after the ignition is switched on,
t
he screen indicates:
Between 600 miles (1 000 km)
and 1 800 miles (3 000 km) remain
before the next service is due
For 5 seconds after the ignition is switched on, the spanner s ymbolising t he ser vice o perations c omes o
n. The distance recorder display line indicates the
d
istance remaining before the next service is due.
Example:
1 700 miles (2 800 km) remain before
t
he next service is due.
For
5 seconds after the ignition is switched on, the
s
creen indicates:
5
seconds after the ignition is switched on,
t
he spanner goes off ;
the distance recorder
r
esumes its normal operation. The screen then
i
ndicates the total and trip distances.5
seconds after the ignition is switched on,
t
he distance recorder resumes its normal
ope
ration.
T
he spanner remains on to
indicate
that a service must be carried out
s
oon.
Monitoring
Page 43 of 428
41
Service overdue
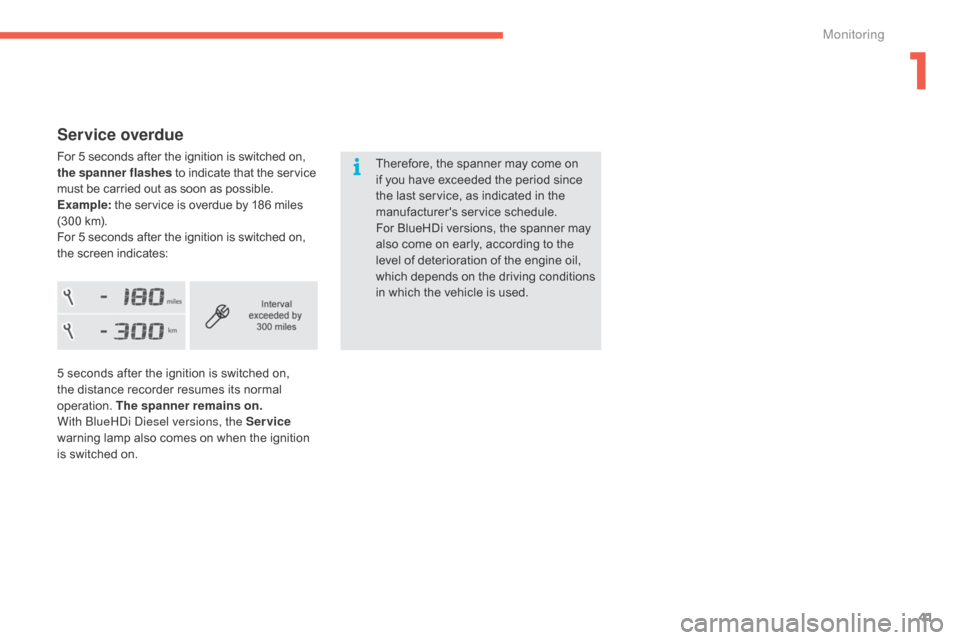
For 5 seconds after the ignition is switched on, the spanner flashes to indicate that the service m
ust be carried out as soon as possible.
Example:
the service is overdue by 186 miles
(
300 km).
For
5 seconds after the ignition is switched on,
t
he screen indicates: Therefore,
the spanner may come on
i
f you have exceeded the period since
t
he last service, as indicated in the
ma
nufacturer's
ser
vice
s
chedule.
For
BlueHDi versions, the spanner may
a
lso come on early, according to the
l
evel of deterioration of the engine oil,
w
hich
d
epends
o
n
t
he
d
riving
c
onditions
i
n which the vehicle is used.
5
seconds after the ignition is switched on,
t
he distance recorder resumes its normal
ope
ration.
T
he spanner remains on .
With
b
l
ueH
di
d
i
esel versions, the Service
warning
lamp also comes on when the ignition
i
s switched on.
1
Monitoring
Page 45 of 428
43
Engine oil level indicator*
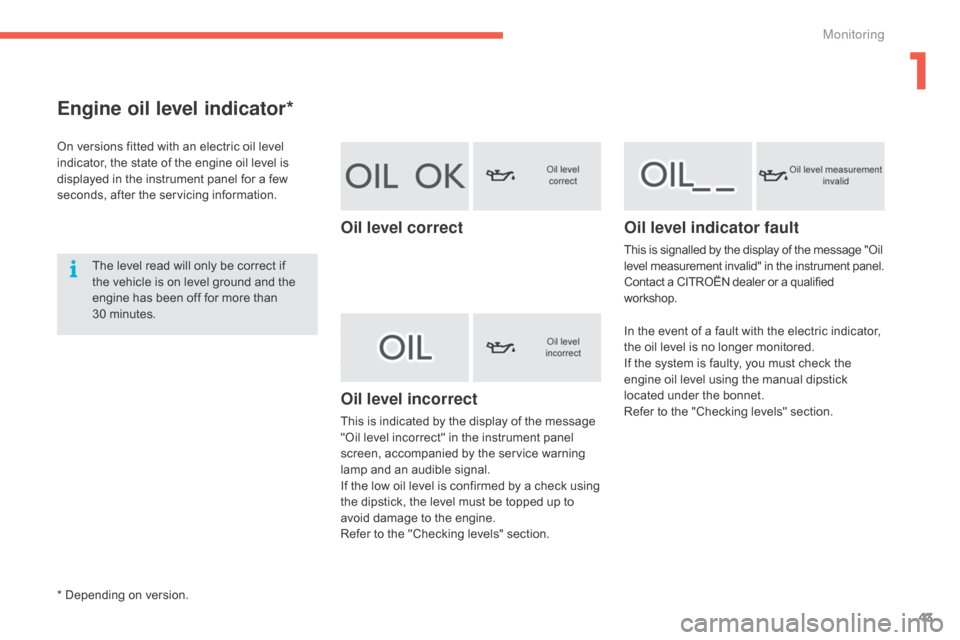
On versions fitted with an electric oil level indicator, the state of the engine oil level is
d
isplayed in the instrument panel for a few
s
econds, after the servicing information.
The
level read will only be correct if
t
he vehicle is on level ground and the
e
ngine has been off for more than
3
0 minutes.
Oil level correct
Oil level incorrect
This is indicated by the display of the message "Oil level incorrect" in the instrument panel
s
creen, accompanied by the service warning
l
amp and an audible signal.
If
the low oil level is confirmed by a check using
t
he dipstick, the level must be topped up to
a
void damage to the engine.
Refer
to the "Checking levels" section.
Oil level indicator fault
This is signalled by the display of the message "Oil level measurement invalid" in the instrument panel.
Contact
a CITROËN dealer or a qualified
w
orkshop.
In
the event of a fault with the electric indicator,
t
he oil level is no longer monitored.
If
the system is faulty, you must check the
e
ngine oil level using the manual dipstick
l
ocated under the bonnet.
Refer
to the "Checking levels" section.
* Depending on version.
1
Monitoring
Page 258 of 428
256
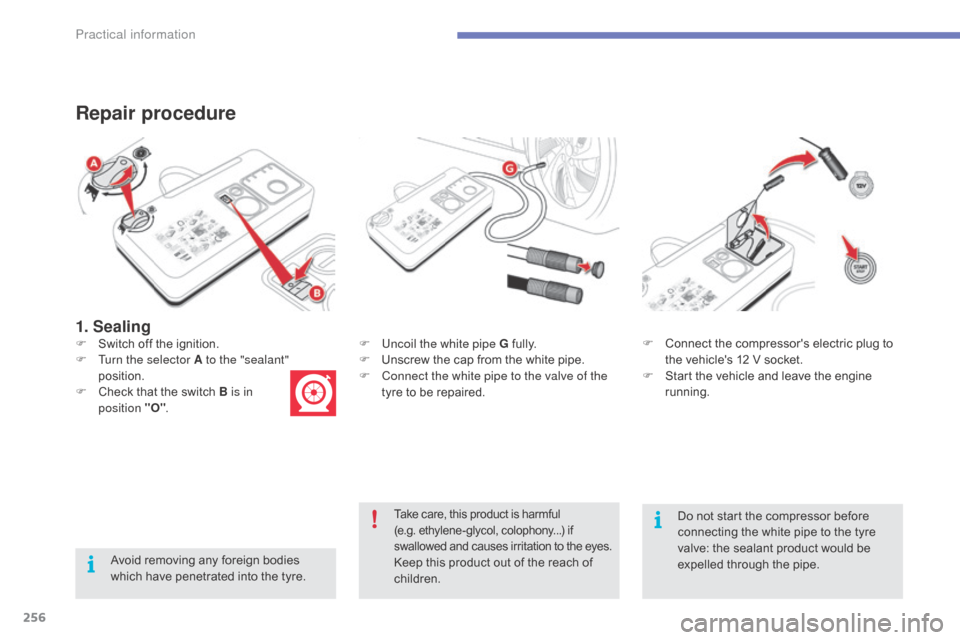
1. Sealing
Repair procedure
Avoid removing any foreign bodies which have penetrated into the tyre.F
U
ncoil the white pipe G
f
ully.
F
U
nscrew the cap from the white pipe.
F
C
onnect the white pipe to the valve of the
tyre to be repaired.
F
S
witch off the ignition.
F
T
urn the selector A to the "sealant"
position.
F
C
heck that the switch B is in
position "O" . F
C
onnect the compressor's electric plug to
t
he vehicle's 12 V socket.
F
S
tart the vehicle and leave the engine
r
unning.
Take care, this product is harmful (
e.g. ethylene-glycol, colophony...) if s
wallowed and causes irritation to the eyes.
Keep this product out of the reach of children. Do
not start the compressor before
c
onnecting the white pipe to the tyre v
alve: the sealant product would be e
xpelled through the pipe.
Practical information
Page 260 of 428
258
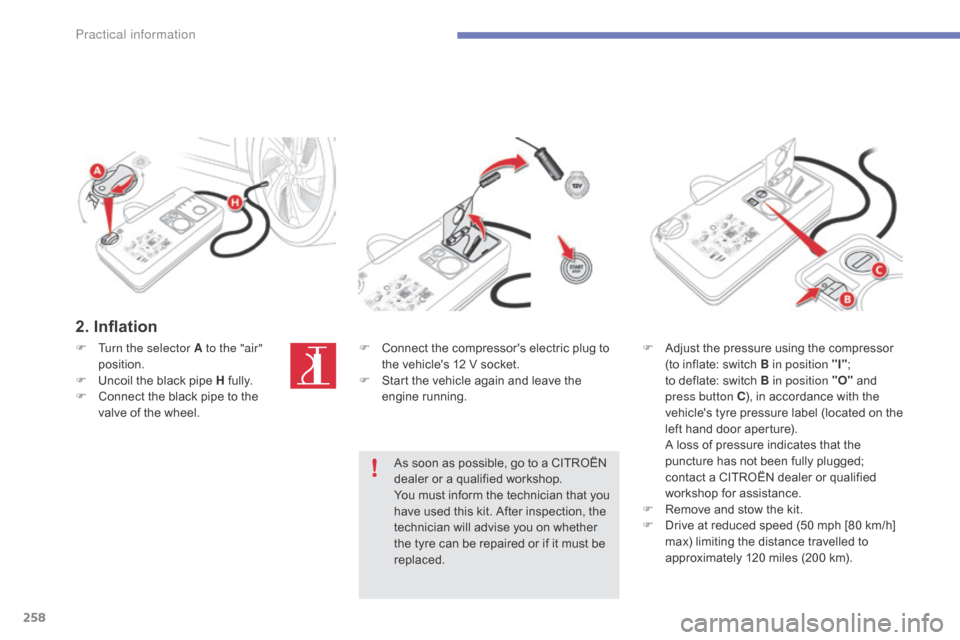
2. Inflation
F Turn the selector A to the "air" position.
F
U
ncoil the black pipe H
f
ully.
F
C
onnect the black pipe to the
v
alve of the wheel. F
C onnect the compressor's electric plug to t
he vehicle's 12 V socket.
F
S
tart the vehicle again and leave the
e
ngine
r
unning.
As
soon as possible, go to a CITROËN
d
ealer or a qualified workshop.
You
must inform the technician that you
h
ave used this kit. After inspection, the
t
echnician will advise you on whether
t
he tyre can be repaired or if it must be
r
eplaced.F
A djust the pressure using the compressor (
to inflate: switch B in position "I";
t
o deflate: switch B in position "O"
and
p
ress button C),
in accordance with the
v
ehicle's
t
yre pressure label (located on the
l
eft hand door aperture).
A
loss of pressure indicates that the
p
uncture has not been fully plugged;
c
ontact a CITROËN dealer or qualified
w
orkshop for assistance.
F
R
emove and stow the kit.
F
D
rive at reduced speed (50 mph [80 km/h]
m
ax) limiting the distance travelled to
a
pproximately 120 miles (200 km).
Practical information
Page 262 of 428
260
Checking tyre pressures /
inflating accessories
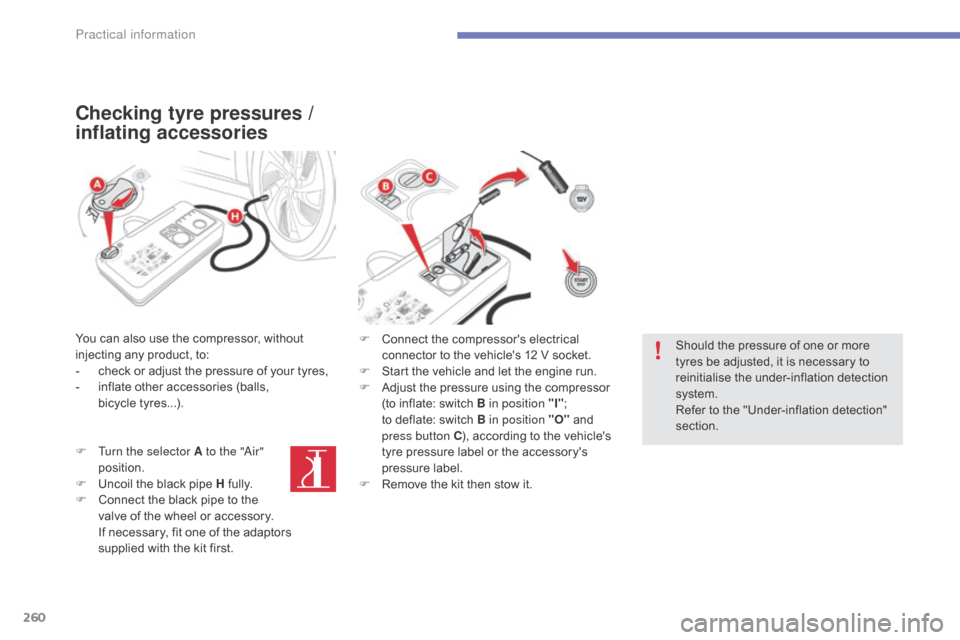
You can also use the compressor, without injecting any product, to:
-
c
heck or adjust the pressure of your tyres,
-
i
nflate other accessories (balls,
b
icycle tyres...).
F
T
urn the selector A to the "
ai
r"
position.
F
U
ncoil the black pipe H
f
ully.
F
C
onnect the black pipe to the
v
alve of the wheel or accessory.
I
f necessary, fit one of the adaptors
s
upplied with the kit first. F
C onnect the compressor's electrical
c
onnector to the vehicle's 12 V socket.
F
S
tart the vehicle and let the engine run.
F
A
djust the pressure using the compressor
(
to inflate: switch B in position "I";
t
o deflate: switch B in position "O"
and
p
ress button C),
according to the vehicle's
t
yre pressure label or the accessory's
p
ressure label.
F
R
emove the kit then stow it.Should
the pressure of one or more
t
yres be adjusted, it is necessary to
r
einitialise the under-inflation detection
s
ystem.
Refer
to the "Under-inflation detection"
s
ection.
Practical information
Page 308 of 428
306
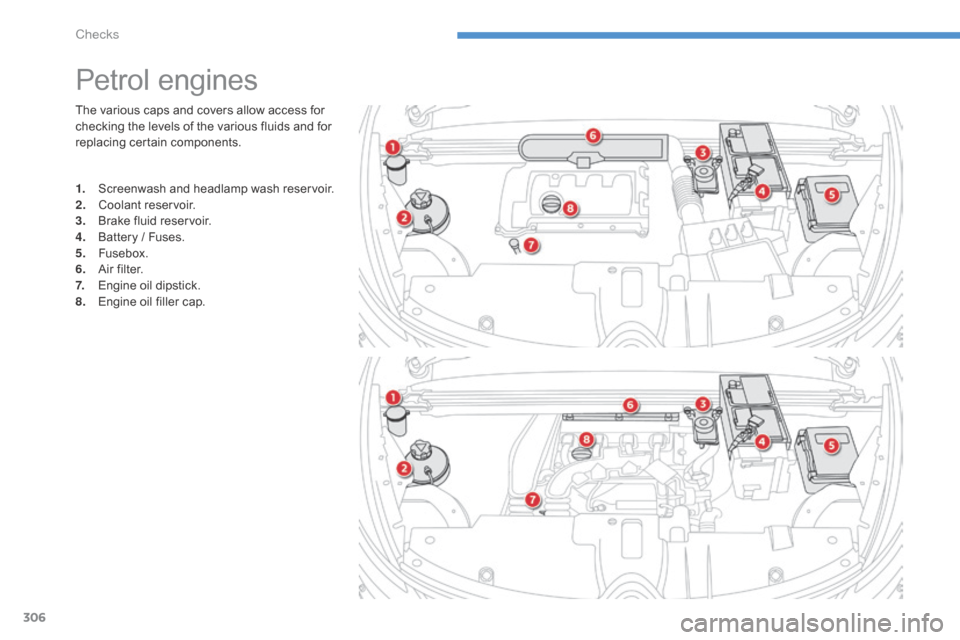
The various caps and covers allow access for checking the levels of the various fluids and for
r
eplacing certain components.
Petrol engines
1. Screenwash and headlamp wash reservoir.
2. C oolant r eservoir.
3.
B
rake fluid reservoir.
4.
B
attery / Fuses.
5.
F
usebox.
6.
A
ir filter.
7.
E
ngine oil dipstick.
8.
E
ngine oil filler cap.
Checks
Page 309 of 428
307
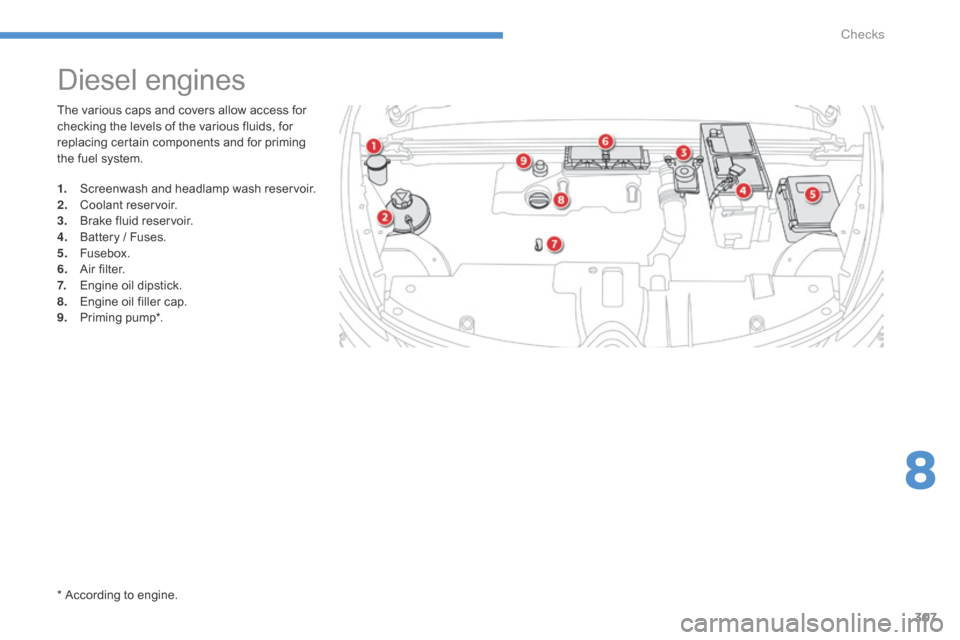
The various caps and covers allow access for checking the levels of the various fluids, for
r
eplacing certain components and for priming
t
he fuel system.
Diesel engines
1. Screenwash and headlamp wash reservoir.
2. C oolant r eservoir.
3.
B
rake fluid reservoir.
4.
B
attery / Fuses.
5.
F
usebox.
6.
A
ir filter.
7.
E
ngine oil dipstick.
8.
E
ngine oil filler cap.
9.
P
riming
pu
mp*.
*
According to engine.
8
Checks