key Citroen C4 PICASSO RHD 2015 1.G Owner's Guide
[x] Cancel search | Manufacturer: CITROEN, Model Year: 2015, Model line: C4 PICASSO RHD, Model: Citroen C4 PICASSO RHD 2015 1.GPages: 428, PDF Size: 10.09 MB
Page 230 of 428
228
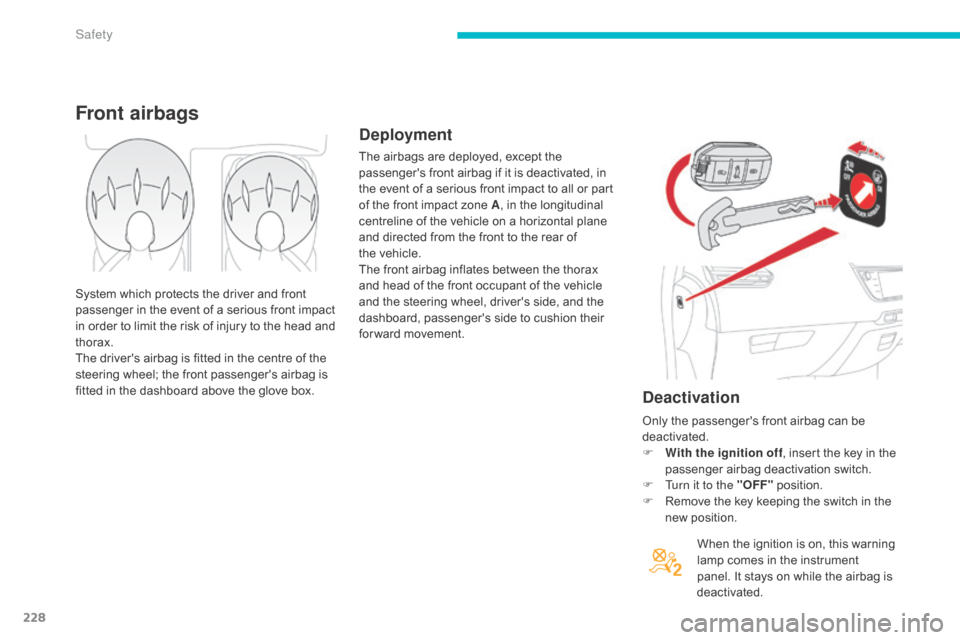
Deactivation
When the ignition is on, this warning lamp comes in the instrument
p
anel. It stays on while the airbag is
d
eactivated.
Front airbags
Deployment
The airbags are deployed, except the p assenger's front airbag if it is deactivated, in
t
he event of a serious front impact to all or part
o
f the front impact zone A,
in the longitudinal
c
entreline of the vehicle on a horizontal plane
a
nd directed from the front to the rear of
t
he vehicle.
The
front airbag inflates between the thorax
a
nd head of the front occupant of the vehicle
a
nd the steering wheel, driver's side, and the
d
ashboard, passenger's side to cushion their
f
or ward movement.
System
which
protects
the
driver
and
front
p
assenger
in
the
event
of
a
serious
front
impact
i
n
order
to
limit
the
risk
of
injury
to
the
head
and
t
horax.
The
driver's
airbag
is
fitted
in
the
centre
of
the
s
teering
wheel;
the
front
passenger's
airbag
is
f
itted
in
the
dashboard
above
the
glove
box. Only
the passenger's front airbag can be
d
eactivated.
F
W
ith the ignition off,
insert the key in the
p
assenger airbag deactivation switch.
F
T
urn it to the "OFF"
p
osition.
F
R
emove the key keeping the switch in the
n
ew position.
Safety
Page 253 of 428
251
Child seats
The incorrect installation of a child seat in a vehicle compromises the child's protection in
t
he event of an accident.
Check
that there is no seat belt or seat belt
b
uckle under the child seat as this could
de
stabilise
i
t.
Remember
to fasten the seat belts or the
c
hild seat harnesses keeping the slack in
relation
to the child's body to a minimum,
even
for short journeys.
For
the installation of a child seat using a
s
eat belt, ensure that this is well tensioned
o
n the child seat and that it is holding the
c
hild seat firmly against the seat of your
v
ehicle. If your front passenger seat is
a
djustable, move it for ward if necessary.
at t
he rear seats, always leave sufficient
space
between the front seat and:
-
a
rear ward facing child seat,
-
t
he feet of a child seated in a for ward
f
acing child seat.
Recommendations
For this, move the front seat for ward and if necessary straighten its backrest.
For
o
ptimum
in
stallation
o
f
t
he
fo
rward
f
acing
c
hild seat, ensure that the back of the child
s
eat is as close as possible to the backrest
o
f the vehicle's seat, or in contact if possible.
The
head restraint must be removed before
i
nstalling a child seat with a backrest on the
p
assenger
sea
t.
Ensure
that the head restraint is stowed or
a
ttached securely so that it is not thrown
a
round the vehicle in the event of sharp
b
raking.
Refit
the head restraint as soon as the child
s
eat is removed.Installing a booster
cushion
As a safety precaution, do not leave:
- o ne or more children alone and
u
nsupervised in a vehicle,
-
a
child or an animal in a vehicle which
i
s exposed to the sun, with the windows
c
losed,
-
t
he keys within reach of children inside
t
he vehicle.
To
prevent accidental opening of the doors,
u
se the child lock.
Take
care not to open the rear windows by
m
ore than one third.
To
protect young children from the rays of
t
he sun, fit side blinds on the rear windows.
The
chest part of the seat belt must be
p
ositioned on the child's shoulder without
t
ouching the neck.
Ensure that the lap part of the seat belt
passes correctly over the child's thighs.
CITROËN recommends the use of a booster
s
eat which has a back, fitted with a seat belt
g
uide at shoulder level.
The
legislation
on
carrying
a
child
on
the
f
ront
passenger
seat
is
specific
to
each
c
ountry.
Refer
to
the
legislation
in
force
in
t
he
country
in
which
you
are
driving.
Deactivate
the
passenger's
front
airbag
w
hen
a
rear ward
facing
child
seat
is
installed
o
n
the
front
passenger
seat.
Other wise,
the
c
hild
would
risk
being
seriously
injured
or
k
illed
if
the
airbag
were
deployed.
Children at the front
6
Safety
Page 254 of 428
252
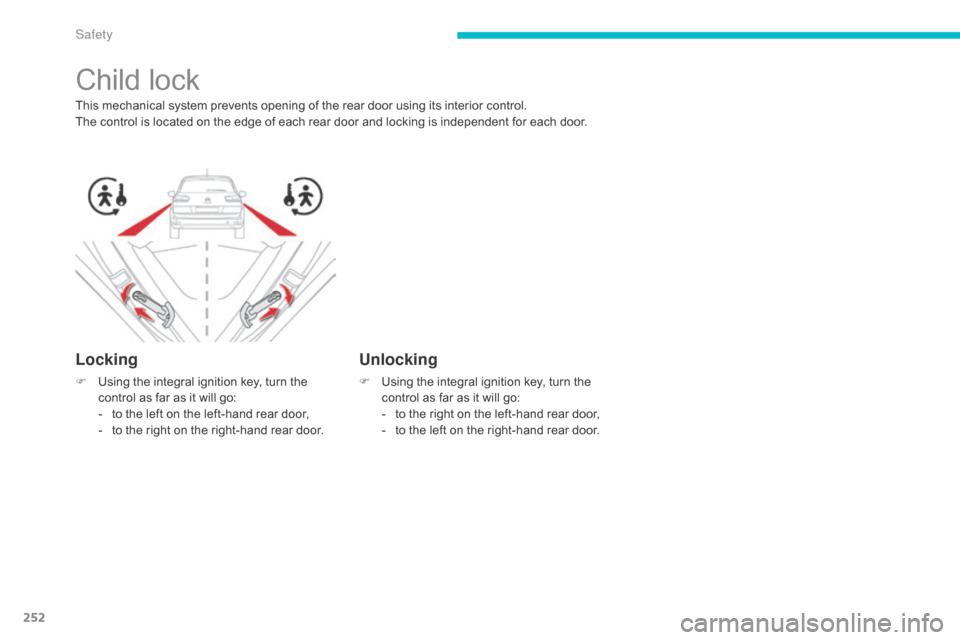
Child lock
This mechanical system prevents opening of the rear door using its interior control.
T he control is located on the edge of each rear door and locking is independent for each door.
Locking
F Using the integral ignition key, turn the c
ontrol as far as it will go:
-
t
o the left on the left-hand rear door,
-
t
o the right on the right-hand rear door.
Unlocking
F Using the integral ignition key, turn the c
ontrol as far as it will go:
-
t
o the right on the left-hand rear door,
-
t
o the left on the right-hand rear door.
Safety
Page 285 of 428
283
Type 1 fuse tables
Fusebox 1
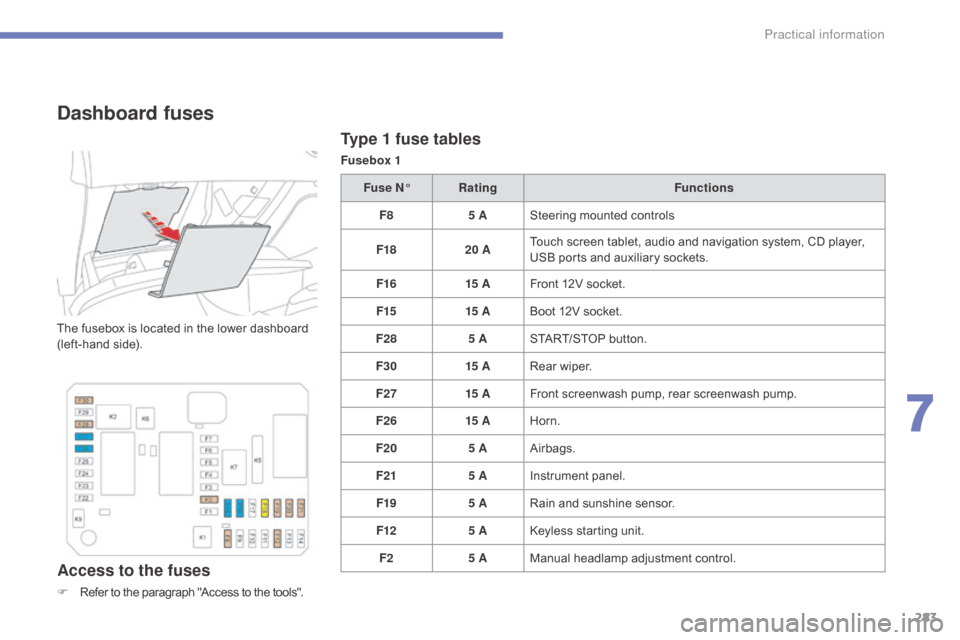
Dashboard fuses
The fusebox is located in the lower dashboard (left-hand side).
Access to the fuses
F Refer to the paragraph "Access to the tools".Fuse N°
Rating Functions
F8 5 ASteering mounted controls
F18 20 ATouch screen tablet, audio and navigation system, CD player,
U
SB ports and auxiliary sockets.
F16 15 AFront 12V socket.
F15 15 ABoot 12V socket.
F28 5 ASTART/STOP button.
F30 15 ARear wiper.
F27 15 AFront screenwash pump, rear screenwash pump.
F26 15 AHorn.
F20 5 AAirbags.
F21 5 AInstrument panel.
F19 5 ARain and sunshine sensor.
F12 5 AKeyless starting unit.
F2 5 AManual
h
eadlamp
a
djustment
c
ontrol.
7
Practical information
Page 291 of 428
289
Before disconnecting the battery
Wait 2 minutes after switching off the ignition before disconnecting the battery.
Close
the windows and the doors before
d
isconnecting the battery.
Following reconnection
of the battery
Following reconnection of the battery, switch on t
he ignition and wait 1 minute before starting to
p
ermit initialisation of the electronic systems.
H
owever, if problems remain following this
o
peration, contact a CITROËN dealer or a
q
ualified
w
orkshop.
Referring
to the corresponding section, you
m
ust
y
ourself
r
einitialise
(
depending
o
n
ve
rsion):
-
t
he remote control key,
-
t
he electric blind(s),
-
...
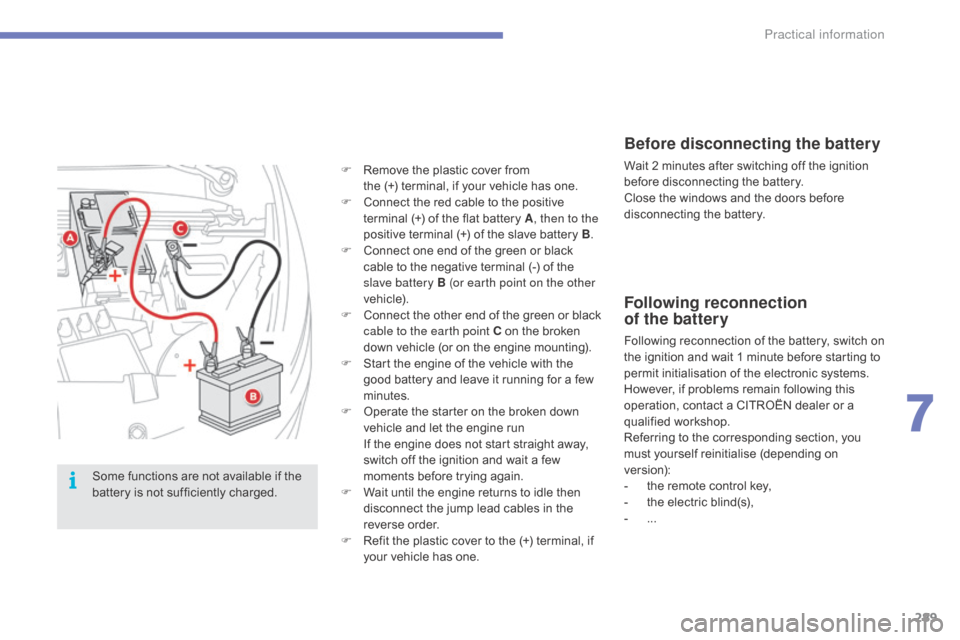
F
R
emove
the
plastic
cover
from
the
(+)
terminal,
if
your
vehicle
has
one.
F
C
onnect
the
red
cable
to
the
positive
t
erminal
(+)
of
the
flat
battery
A
, then to the
positive
terminal
(+)
of
the
slave
battery
B.
F
C
onnect
one
end
of
the
green
or
black
c
able
to
the
negative
terminal
(-)
of
the
s
lave battery B (or earth point on the other
vehicle).
F
C
onnect
t
he
o
ther
e
nd
o
f
t
he
g
reen
o
r
b
lack
c
able to the earth point C
on
the
broken
d
own
vehicle
(or
on
the
engine
mounting).
F
S
tart
the
engine
of
the
vehicle
with
the
g
ood
battery
and
leave
it
running
for
a
few
m
inutes.
F
O
perate
the
starter
on
the
broken
down
v
ehicle
and
let
the
engine
run
I
f
the
engine
does
not
start
straight
away,
s
witch
off
the
ignition
and
wait
a
few
m
oments
before
trying
again.
F
W
ait
until
the
engine
returns
to
idle
then
d
isconnect
the
jump
lead
cables
in
the
r
everse
o
rder.
F
R
efit
the
plastic
cover
to
the
(+)
terminal,
if
y
our
vehicle
has
one.
Some
functions
are
not
available
if
the
b
attery
is
not
sufficiently
charged.
7
Practical information
Page 296 of 428

294
Towing another vehicle
F On the rear bumper, unclip the cover by p
ressing at the bottom.
F
S
crew the towing eye in fully.
F
I
nstall the towing bar.
F
S
witch on the hazard warning lamps on
b
oth vehicles.
F
M
ove off gently, drive slowly and for a short
di
stance.
F
O
n
the
front
bumper,
unclip
the
cover
by
p
ressing
on
the
left.
F
S
crew
the
towing
eye
in
fully.
F
I
nstall
the
towing
bar.
F
P
lace
the
gear
lever
in
neutral
(position
N
on
an
electronic
or
automatic
gearbox).
Towing your vehicle
Failure to observe this instruction could r esult in damage to certain components
(
braking, transmission...) and the
a
bsence of braking assistance the next
t
ime the engine is started.
F
U
nlock the steering by turning the key
i
n
the ignition one notch and release the
par
king
b
rake.
F
S
witch on the hazard warning lamps on
b
oth vehicles.
F
M
ove off gently, drive slowly and for a short
di
stance.
Practical information
Page 329 of 428
327
Never dispose of AdBlue® additive b
ottles
in
the
household
waste. Place
t
hem
in
a
special
container provided
t
his
p
urpose
o
r
t
ake
t
hem
t
o
y
our
d
ealer.
Important:
w
hen topping up after
running out of additive ,
signalled
b
y
the
message
"Top
up
emissions
a
dditive:
Starting
prevented", you must
w
ait
for
approximately
5
minutes before
s
witching
on
the
ignition,
without
opening the driver's door, unlocking
the vehicle, placing the key of the
"Keyless Entr y and Star ting" system
inside the vehicle or inser ting the
electronic key in the reader.
Switch
on
the
ignition,
wait for
1
0 seconds,
then
start
the engine.
If
any
additive
is
split
or
splashed,
wash
i
mmediately
w
ith
c
old
w
ater
o
r
w
ipe
w
ith
a
damp
cloth.
If
the
additive
has
crystallised,
clean
it
o
ff
using
a
sponge
and
hot
water.
F
A
fter
emptying
the
bottle,
wipe
away
any
s
pillage
around
the
tank
filler
using
a
damp
c
loth.
F
R
efit
the
blue
cap
to
the
tank
and
turn
it
a
6th of a turn clockwise, to its stop.
F
R
efit the black cap and turn it a quarter of
a
turn clockwise without pressing. Ensure
t
hat the indicator on the cap lines up with
t
he indicator on the support.
F
D
epending on equipment, return the spare
w
heel and/or the storage box to the bottom
o
f
the boot.
F
R
efit the boot carpet and close the tailgate.
8
Checks
Page 346 of 428
01
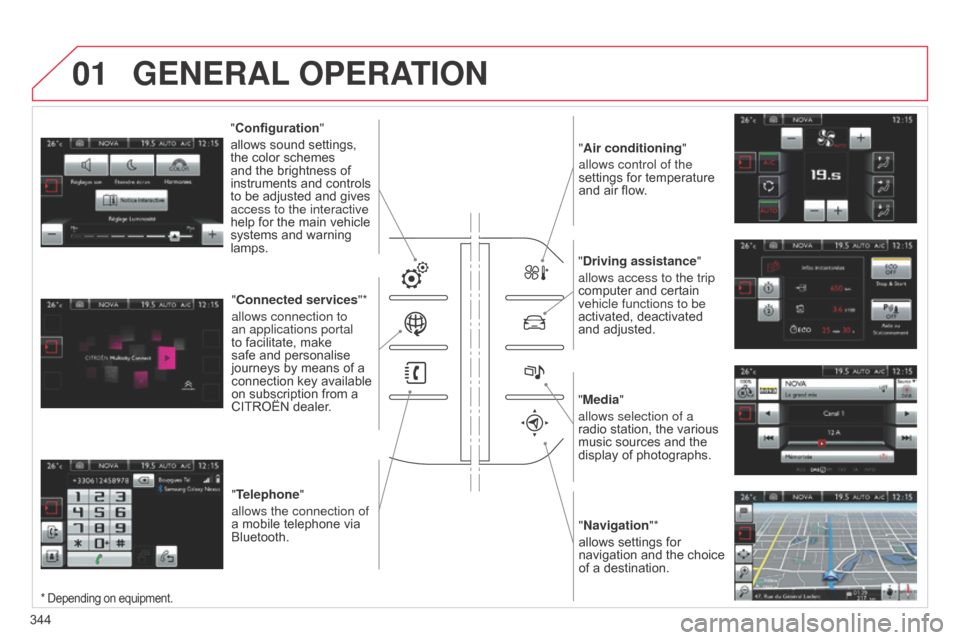
"Air conditioning"
allows control of the
settings
for temperature
and
air flow.
"Driving assistance"
allows access to the trip
computer
and certain
vehicle functions to be
activated,
deactivated
and
adjusted.
"Media"
allows selection of a
radio
station, the various
music
sources and the
display
of photographs.
"Navigation"*
allows
settings for
navigation
and
the
choice
of
a destination.
"Configuration
"
allows
sound
settings,
the
color
schemes
and
the
brightness
of
instruments
and
controls
to
be
adjusted
and
gives
access to the interactive
help
for
the
main
vehicle
systems
and
warning
lamps. "
Connected services "*
allows connection to
an applications portal
to
facilitate,
make
safe
and
personalise
journeys
by
means
of
a
connection
key
available
on
subscription
from
a
CITROËN
dealer.
"Telephone"
allows the connection of
a
mobile
telephone
via
Bluetooth.
GENERAL OPERATION
344
* Depending on equipment.
Page 357 of 428
04
355
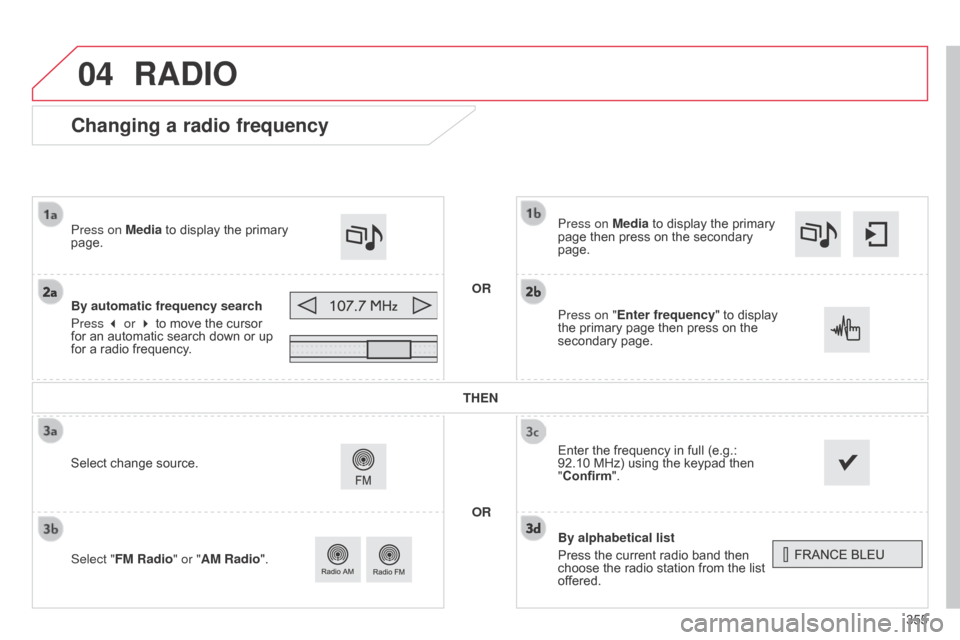
Changing a radio frequency
By alphabetical list
Press the current radio band then
choose
the radio station from the list
of
fered.
Press on Media
to display the primary
page
then press on the secondary
page.
Enter
the frequency in full (e.g.:
92.10 MHz) using the keypad then
"
Confirm".
By automatic frequency search
Press 3 or 4
to
move
the
cursor
for
an
automatic
search
down
or
up
for
a
radio
frequency.
Press on Media
to
display
the
primary
page.
Press on "
Enter frequency" to display
the
primary page then press on the
secondary
page.
OR
RADIO
Select change source.
Select " FM Radio" or "AM Radio". THEN
OR
Page 399 of 428
07
397
CITROËN MULTICITY CONNECT
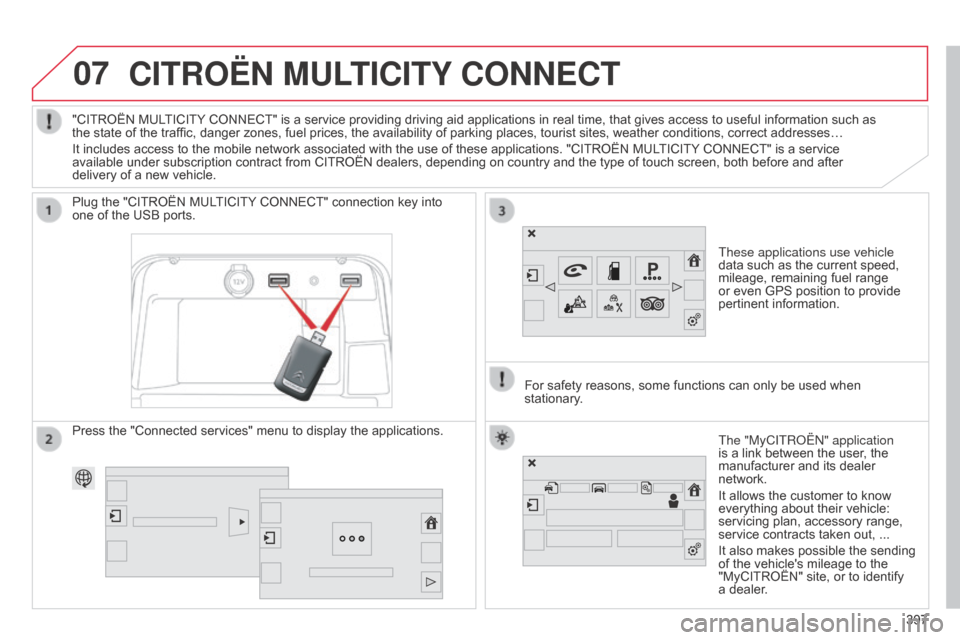
These applications use vehicle
data such as the current speed,
mileage,
remaining fuel range
or
even GPS position to provide
pertinent
information.
Plug
the
"CITROËN
MULTICITY
CONNECT"
connection
key
into
one
of
the
USB
ports.
The "MyCITRo Ë n " application
is
a link between the user, the
manufacturer
and its dealer
network.
It
allows the customer to know
everything
about their vehicle:
servicing
plan, accessory range,
service
contracts taken out, ...
It
also makes possible the sending
of
the vehicle's mileage to the
"MyCITROËN"
site, or to identify
a
dealer.
"CITROËN
MULTICITY
CONNECT"
is
a
service
providing
driving
aid
applications
in
real
time,
that
gives
access
to useful information such as
the
state
of
the
traffic,
danger
zones,
fuel
prices,
the
availability
of
parking
places,
tourist
sites,
weather
conditions, correct addresses…
It
includes
access
to
the
mobile
network
associated
with
the
use
of
these
applications.
"CITROËN
MULTICITY
CONNECT" is a service
available
under
subscription
contract
from
CITROËN
dealers,
depending
on
country
and
the
type
of
touch
screen, both before and after
delivery
of
a
new
vehicle.
For
safety
reasons,
some
functions can only be used when
stationary
.
Press
the
"Connected
services"
menu
to
display
the
applications.
397