towing Citroen C4 RHD 2015 2.G Owner's Manual
[x] Cancel search | Manufacturer: CITROEN, Model Year: 2015, Model line: C4 RHD, Model: Citroen C4 RHD 2015 2.GPages: 328, PDF Size: 12.72 MB
Page 5 of 328
3
Direction indicators 117
Hazard warning lamps 1 17
Horn
1
17
Braking
assistance systems
1
18
Trajectory
control systems
1
19
Emergency
or assistance call
120
Front
seat belts
121
Airbags
124
8 - SAFETY 1 17 127
Driving recommendations 128
Starting-switching off the engine 129
Electric
parking brake
132
Manual
parking brake
138
Manual
gearbox
138
Electronic
gearbox
139
Automatic
gearbox
142
Hill
start assist
145
Gear
efficiency indicator
146
T
yre under-inflation detection
147
Stop
& Start
149
Blind
spot sensors
152
Speed
limiter
156
Cruise
control
158
Parking
space sensors
160
Parking
sensors
162
9 - DRIVING 128 163
Fuel tank 165
Misfuel prevention (Diesel) 167
Running
out of fuel (Diesel)
168
Bonnet
169
Petrol
engines
170
Diesel
engines
171
Checking
levels
172
Checks
175
AdBlue® additive and SCR
system (BlueHDi Diesel) 177
10 - CHECKS 164 183
Temporary puncture repair kit 184
Changing a wheel 189
Snow
chains
195
Changing
a bulb
196
Changing
a fuse
202
12
V battery
206
Energy
economy mode
209
Changing
a wiper blade
209
Fitting
roof bars
210
V
ery cold climate screen
210
T
owing the vehicle
21
1
Towing
a trailer
213
Audio
pre-equipment
214
Accessories
215
11 - PRACTICAL
INFORMATION 184 216
Petrol engines 217
Petrol weights 219
Diesel
engines
221
Diesel
weights
223
Dimensions
225
Identification
markings
226
12 - TECHNICAL
DATA 217 226
Emergency or assistance 227
eMyW ay 229
Audio
system
285
AUDIO and
TELEMATICS 227 318
ALPHABETICAL
INDEX
319
323
CONTENTS
Page 50 of 328

33
48
RECOMMENDATIONS FOR VENTILA TION AND AIR CONDITIONING
In order for these systems to be fully ef fective, follow the operation and maintenance
guidelines below:
F
T
o
obtain
an
even
air
distribution,
take
care
not
to
obstruct
the
exterior
air
intake
grille
s
located
at
the
base
of
the
windscreen,
the
nozzles,
the
vents
and
the
air
outlets,
as
well
as
the
air
extractor
located
in
the
boot.
F
Do
not
cover
the
sunshine
sensor
,
located
on
the
dashboard;
this
is
used
for regulation of the air conditioning system.
F
Operate
the
air
conditioning
system
for
at
least
5
to
10
minutes,
once
or
twice
a month to keep it in perfect working order.
F
Ensure
that
the
passenger
compartment
filter
is
in
good
condition
and
have
the filter elements replaced regularly.
W
e
recommend
the
use
of
a
combined
passenger
compartment
filter
.
Thanks
to
its
special
active
additive,
it
contributes
to
the
purification
of
the
air
breathed
by
the
occupants
and
the
cleanliness
of
the
passenger
compartment
(reduction
of
allergic
symptoms,
bad
odours
and
greasy
deposits).
F
T
o
ensure
correct
operation
of
the
air
conditioning
system,
you
are
also
advised
to
have
it
checked
regularly
as
recommended
in
the
mainte
-
nance
and warranty guide.
F
If
the
system
does
not
produce
cold
air
,
switch
it
of
f
and
contact
a
CITROËN
dealer or a qualified workshop.
When
towing
the
maximum
load
on
a
steep
gradient
in
high
temperatures,
switching
of
f
the
air
conditioning
increases
the
available
engine
power
and
so
improves the towing ability. If
after
an
extended
stop
in
sun
-
shine,
the
interior
temperature
is
very
high, first ventilate the pas -
senger compartment for a few moments.
Put
the
air
flow
control
at
a
set
-
ting
high
enough
to
quickly
change
the
air
in
the
passenger
compartment.
The
air
conditioning
system
does
not
contain
chlorine
and
does
not
present
any
danger
to
the
ozone layer.
The
condensation
created
by
the
air
conditioning
results
in
a
discharge
of
water
under
the
ve
-
hicle
which is perfectly normal.
Stop & Start
The
heating
and
air
conditioning
systems
only
work
when
the
engine
is
running.
T
o
maintain
a
comfortable
temperature
in
the
passenger
compart
-
ment,
you
can
temporarily
deactivate
the
Stop
&
Start
system
(see
the
corresponding
section).
COMFORT
Page 119 of 328
88
117
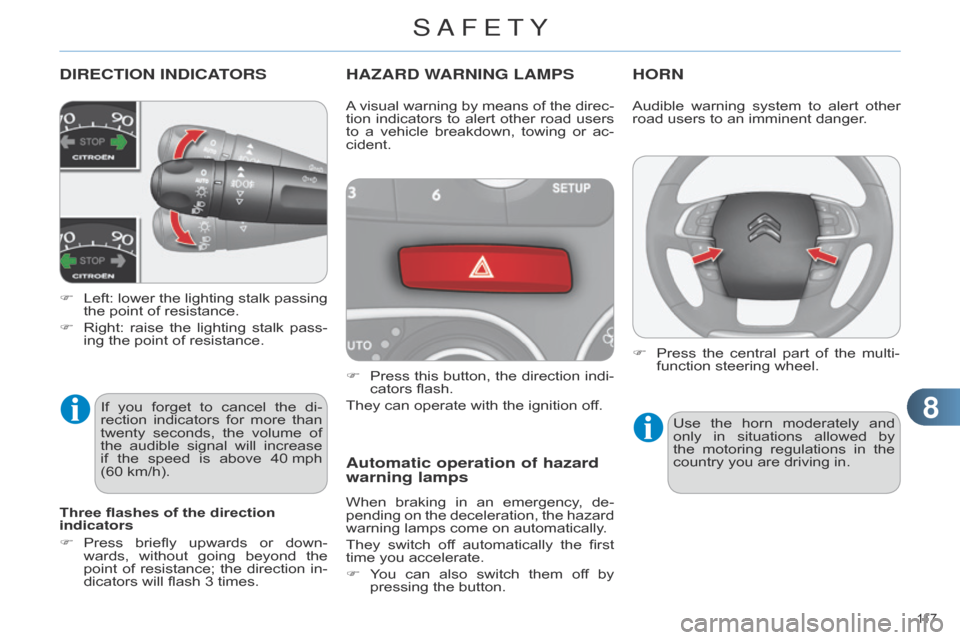
DIRECTION INDICATORS
F Left: lower the lighting stalk passing the
point of resistance.
F
Right:
raise
the
lighting
stalk
pass
-
ing
the point of resistance.
HAZARD WARNING LAMPS
F Press this button, the direction indi -
cators flash.
They
can operate with the ignition off.
Automatic operation of hazard
warning lamps
When braking in an emergency , de -
pending on the deceleration, the hazard
warning
lamps come on automatically.
They
switch
of
f
automatically
the
first
time
you accelerate.
F
Y
ou
can
also
switch
them
of
f
by
pressing
the button.
HORN
A visual warning by means of the direc -
tion indicators to alert other road users
to
a
vehicle
breakdown,
towing
or
ac
-
cident.
Three flashes of the direction
indicators
F
Press
briefly
upwards
or
down
-
wards,
without
going
beyond
the
point
of
resistance;
the
direction
in
-
dicators
will
flash
3
times.
If
you
forget
to
cancel
the
di
-
rection
indicators
for
more
than
twenty
seconds,
the
volume
of
the
audible
signal
will
increase
if
the
speed
is
above
40
mph
(60
km/h). Audible
warning system to alert other road
users to an imminent danger.
Use
the
horn
moderately
and
only
in
situations
allowed
by
the
motoring
regulations
in
the
country
you are driving in.
F
Press
the
central
part
of
the
multi
-
function
steering wheel.
SAFETY
Page 134 of 328
99
132
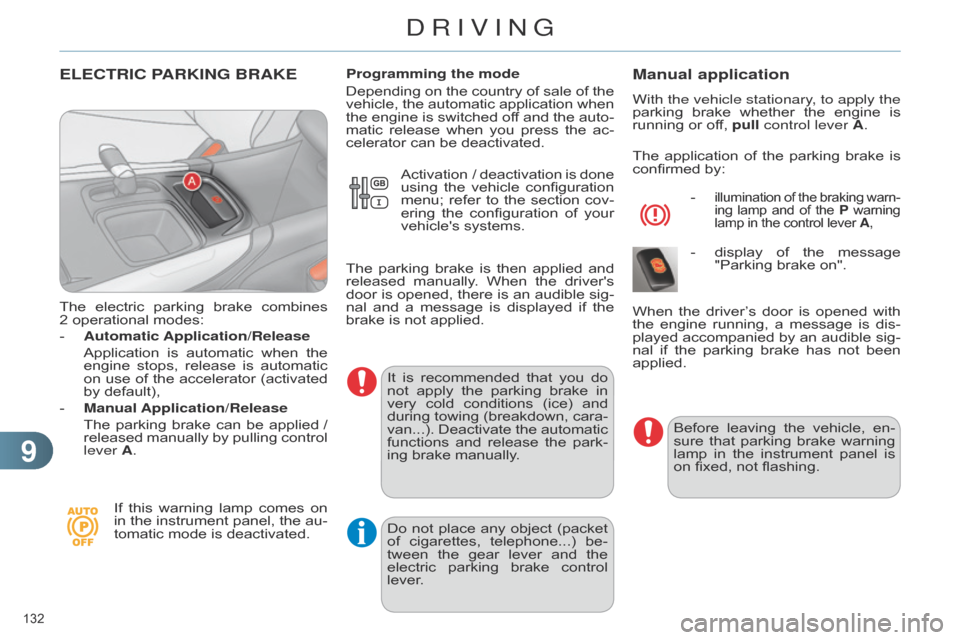
ELECTRIC PARKING BRAKE
The electric parking brake combines 2 operational
modes:
-
Automatic Application/Release
Application
is
automatic
when
the
engine
stops,
release
is
automatic
on
use
of
the
accelerator
(activated
by
default),
-
Manual Application/Release
The
parking
brake
can
be
applied
/
released
manually
by
pullin
g
control
lever
A.
If
this
warning
lamp
comes
on
in
the
instrument
panel,
the
au
-
tomatic
mode is deactivated.Programming the mode
Depending
on
the
country
of
sale
of
the
vehicle,
the
automatic
application
when
the
engine
is
switched
of
f
and
the
auto
-
matic
release
when
you
press
the
ac
-
celerator can be deactivated.
It
is
recommended
that
you
do
not
apply
the
parking
brake
in
very
cold
conditions
(ice)
and
during
towing
(breakdown,
cara
-
van...).
Deactivate
the
automatic
functions
and
release
the
park
-
ing
brake manually.
Manual application
With the vehicle stationary, to apply the
parking brake whether the engine is
running
or off, pull control lever A.
The
application
of
the
parking
brake
is
confirmed
by:
-
illumination of the braking warn -
ing lamp and of the P warning lamp
in the control lever A,
- display of the message "Parking
brake on".
Before
leaving
the
vehicle,
en
-
sure
that
parking
brake
warning
lamp
in
the
instrument
panel
is
on
fixed, not flashing.
When
the
driver
’s
door
is
opened
with
the
engine
running,
a
message
is
dis
-
played
accompanied
by
an
audible
sig
-
nal
if
the
parking
brake
has
not
been
applied.
Activation
/
deactivation
is
done
using
the
vehicle
configuration
menu;
refer
to
the
section
cov
-
ering
the
configuration
of
your
vehicle's
systems.
The
parking
brake
is
then
applied
and
released
manually
.
When
the
driver's
door
is
opened,
there
is
an
audible
sig
-
nal
and
a
message
is
displayed
if
the
brake
is
not
applied.
Do
not
place
any
object
(packet
of
cigarettes,
telephone...)
be
-
tween
the
gear
lever
and
the
electric
parking
brake
control
lever
.
DRIVING
Page 135 of 328
99
133
Manual release
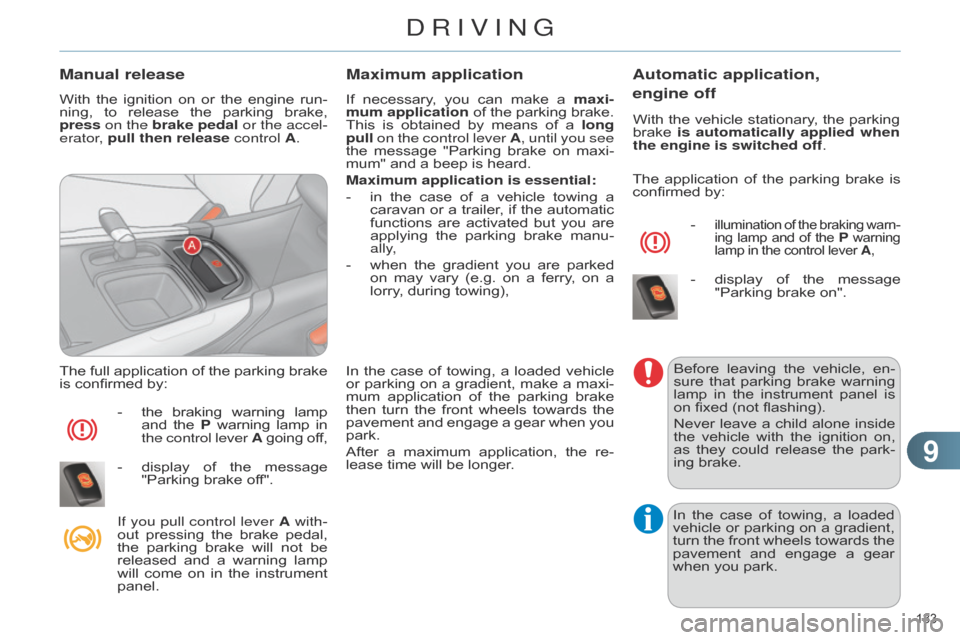
With the ignition on or the engine run -
ning, to release the parking brake,
press
on the brake pedal or the accel-
erator, pull then release control A.
The
full
application
of
the
parking
brake
is
confirmed by:
-
the
braking
warning
lamp and
the
P warning
lamp
in the control lever
A
going
of
f,
-
display
of
the
message
"Parking
brake off".
If you pull control lever A with-
out
pressing
the
brake
pedal,
the
parking
brake
will
not
be
released
and
a
warning
lamp
will
come
on
in
the
instrument
panel.
Maximum application
If necessary, you can make a maxi -
mum application of the parking brake.
This
is
obtained
by
means
of
a
long
pull
on the control lever A, until you see
the
message
"Parking
brake
on
maxi
-
mum"
and a beep is heard.
Maximum application is essential:
-
in
the
case
of
a
vehicle
towing
a
caravan
or
a
trailer
,
if
the
automatic
functions
are
activated
but
you
are
applying
the
parking
brake
manu
-
ally,
-
when
the
gradient
you
are
parked
on
may
vary
(e.g.
on
a
ferry
,
on
a
lorry
, during towing),
In
the
case
of
towing,
a
loaded
vehicle
or
parking
on
a
gradient,
make
a
maxi
-
mum
application
of
the
parking
brake
then
turn
the
front
wheels
towards
the
pavement
and
engage
a
gear
when
you
park.
After
a
maximum
application,
the
re
-
lease
time will be longer.
Automatic application,
engine off
- illumination of the braking warn -
ing lamp and of the P warning lamp
in the control lever A,
- display of the message "Parking
brake on".
Before
leaving
the
vehicle,
en
-
sure
that
parking
brake
warning
lamp
in
the
instrument
panel
is
on
fixed (not flashing).
Never
leave
a
child
alone
inside
the
vehicle
with
the
ignition
on,
as
they
could
release
the
park
-
ing
brake.
In
the
case
of
towing,
a
loaded
vehicle
or
parking
on
a
gradient,
turn
the
front
wheels
towards
the
pavement
and
engage
a
gear
when
you park.
The
application
of
the
parking
brake
is
confirmed
by:
With
the
vehicle
stationary
,
the
parking
brake
is
automatically applied when
the engine is switched off.
DRIVING
Page 156 of 328

99
154
The system may suf fer tem -
porary interference in certain
weather
conditions (rain, hail...).
In
particular
,
driving
on
a
wet
sur
-
face
or
moving
from
a
dry
area
to
a wet area can cause false alerts
(for
example,
the
presence
of
a
fog
of
water
droplets
in
the
blind
spot
angle
is
interpreted
as
a
ve
-
hicle).
In
bad
or
wintry
weather
,
ensure
that
the
sensors
are
not
covered
by
mud, ice or snow.
Take
care
not
to
cover
the
warn
-
ing
zone
in
the
door
mirrors
or
the
detection
zones
on
the
front
and
rear
bumpers
with
adhesive
labels
or
other
objects;
they
may
hamper
the
correct
operation
of
the
system.
F
T
o
deactivate
the
system,
press
this
button
again;
the
warning
lamp
goes
off.
The
state
of
the
system
remains
in
memory
on
switching
off
the
ignition.
Operating fault
In the event of a fault, the warning lamp in
the button flashes then goes off.
Have
it
checked
by
a
CITROËN
dealer
or
a qualified workshop.
The
system
is
automatically
de
-
activated
when
towing
with
a
towbar
approved
by
CITROËN.
DRIVING
Page 161 of 328
99
159
When the cruise control is
switched on, be careful if you
maintain
the
pressure
on
one
of
the
programmed
speed
chang
-
ing
buttons:
this
may
result
in
a
very
rapid
change
in
the
speed
of
your vehicle.
d
o not use the cruise control on
slippery
roads
or
in
heavy
traffic.
On
a
steep
descent,
the
cruise
control will not be able to prevent
the
vehicle
from
exceeding
the
programmed
speed.
On
steep
climbs
or
when
towing,
the
programmed
speed
may
not
be
reached or maintained.
To
avoid
any
risk
of
jamming
of
the
pedals:
-
ensure
that
the
mat
is
posi
-
tioned
correctly,
-
never
fit
one
mat
on
top
of
another
.
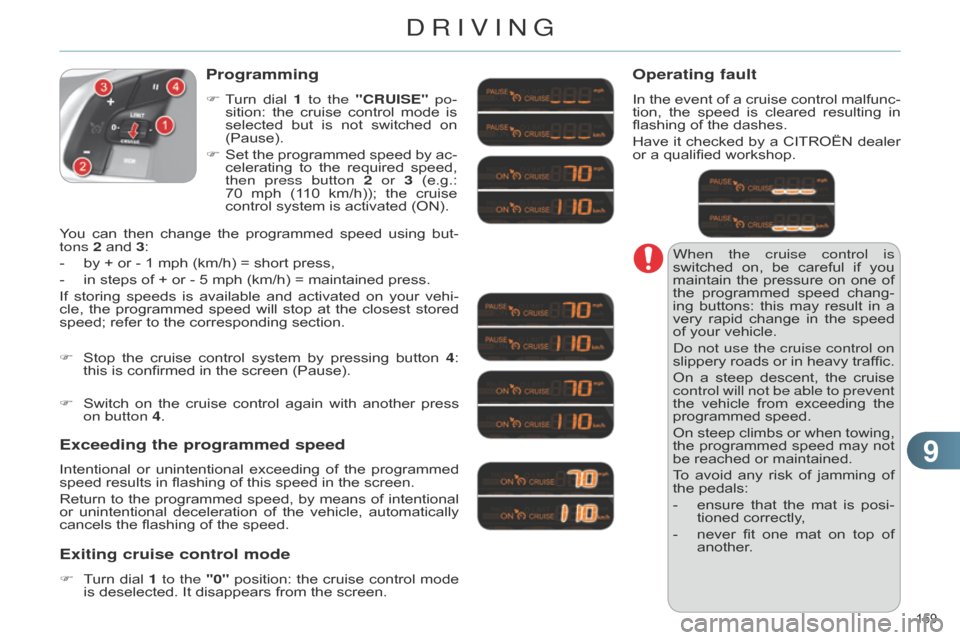
Programming
F Turn dial 1 to the "CRUISE" po-
sition: the cruise control mode is
selected
but
is
not
switched
on
(Pause).
F
Set
the
programmed
speed
by
ac
-
celerating
to
the
required
speed,
then press button
2 or 3
(e.g.:
70
mph
(1
10
km/h));
the
cruise
control
system is activated (ON).
Exceeding the programmed speed
Intentional or unintentional exceeding of the programmed speed
results in flashing of this speed in the screen.
Return
to
the
programmed
speed,
by
means
of
intentional
or
unintentional
deceleration
of
the
vehicle,
automatically
cancels
the flashing of the speed.
Exiting cruise control mode
F Turn dial 1 to the "0" position: the cruise control mode is
deselected. It disappears from the screen.
F
Stop
the
cruise
control
system
by
pressing
button
4
:
this
is confirmed in the screen (Pause).
Operating fault
In the
event of a cruise control malfunc -
tion, the speed is cleared resulting in
flashing
of the dashes.
Have
it
checked
by
a
CITROËN
dealer
or
a qualified workshop.
You
can
then
change
the
programmed
speed
using
but
-
tons
2
and
3:
-
by
+
or
-
1
mph
(km/h)
=
short
press,
-
in
steps
of
+
or
-
5
mph
(km/h)
=
maintained
press.
If
storing
speeds
is
available
and
activated
on
your
vehi
-
cle,
the
programmed
speed
will
stop
at
the
closest
stored
speed;
refer
to
the
corresponding
section.
F
Switch
on
the
cruise
control
again
with
another
press
on button
4.
DRIVING
Page 212 of 328
1111
210
VERY COLD CLIMATE SCREEN *
* According to country.
Fitting
F Offer up the very cold climate screen to the front of the lower sec
-
tion
of the front bumper.
F
Press
around
its
edge
to
engage
its
fixing
clips one by one.
Removal
F Use a screwdriver as a lever to re -
lease each fixing clip in turn.
Do
not
forget
to
remove
the
very
cold
climate screen when:
-
the
ambient
temperature
ex
-
ceeds
10 °C,
-
towing,
-
driving at speeds above 75 mph
(120
km/h).
Removable
protective
screen
which
prevents
the
accumulation
of
snow
at
the
radiator
cooling
fan.
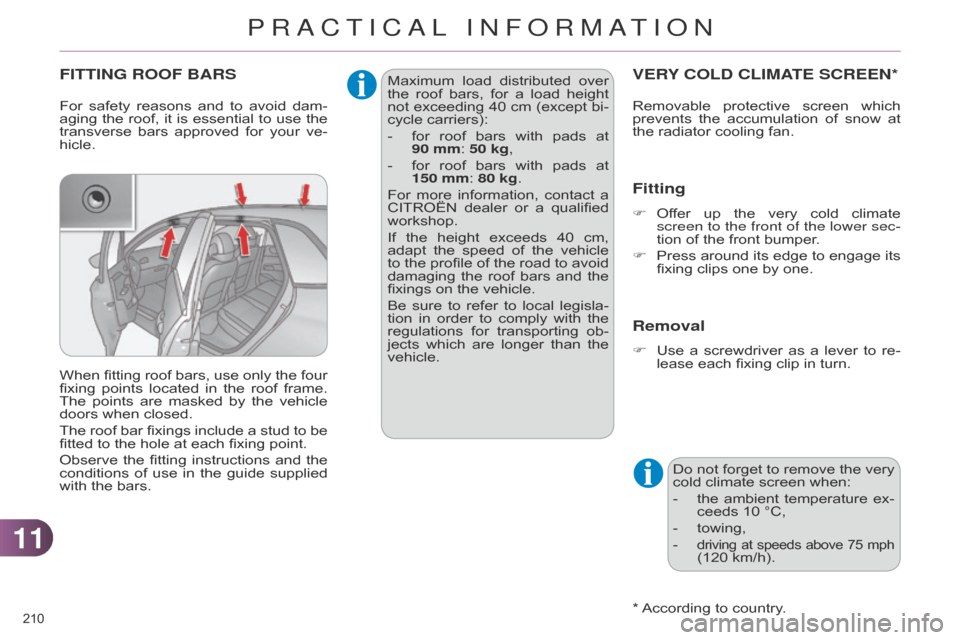
FITTING ROOF BARS
For safety
reasons and to avoid dam -
aging the roof, it is essential to use the
transverse
bars
approved
for
your
ve
-
hicle.
When
fitting
roof
bars,
use
only
the
four
fixing
points
located
in
the
roof
frame.
The
points
are
masked
by
the
vehicle
doors
when closed.
The
roof
bar
fixings
include
a
stud
to
be
fitted
to the hole at each fixing point.
Observe
the
fitting
instructions
and
the
conditions
of
use
in
the
guide
supplied
with
the bars. Maximum
load
distributed
over
the
roof bars, for a load height not
exceeding 40 cm (except bi -
cycle
carriers):
-
for
roof
bars
with
pads
at
90
mm: 50 kg,
-
for
roof
bars
with
pads
at
150
mm: 80 kg.
For
more
information,
contact
a
CITROËN
dealer
or
a
qualified
workshop.
If
the
height
exceeds
40
cm,
adapt
the
speed
of
the
vehicle
to
the
profile
of
the
road
to
avoid
damaging
the
roof
bars
and
the
fixings
on the vehicle.
Be
sure
to
refer
to
local
legisla
-
tion
in
order
to
comply
with
the
regulations
for
transporting
ob
-
jects
which
are
longer
than
the
vehicle.
PRACTICAL INFORMATION
Page 213 of 328
1111
211
TOWING THE VEHICLE
Procedure for having your vehicle towed
or for towing another vehicle us -
ing
a removable towing eye.
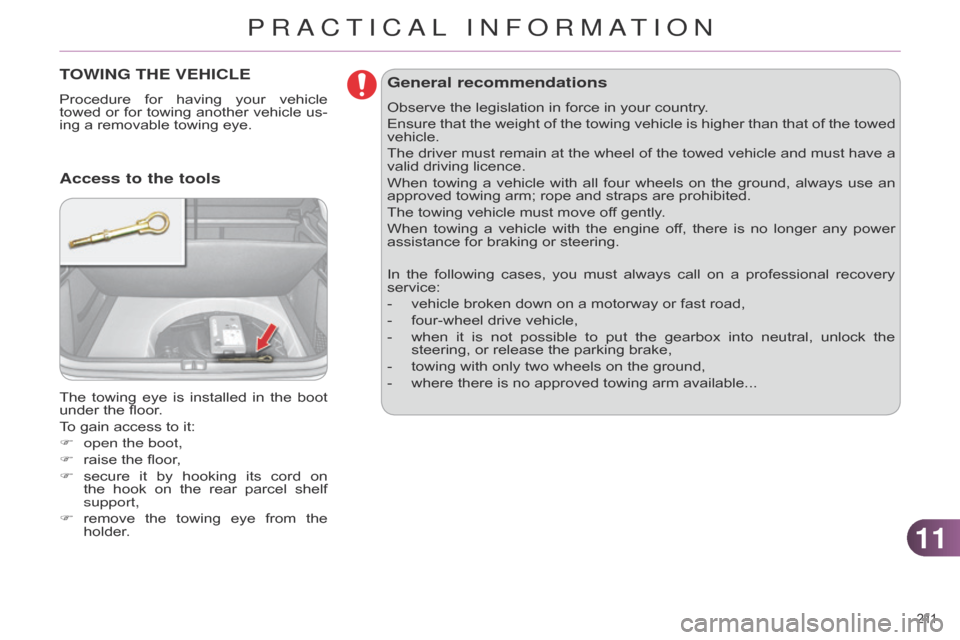
The
towing
eye
is
installed
in
the
boot
under
the floor.
To
gain access to it:
F
open the boot,
F
raise
the floor,
F
secure
it
by
hooking
its
cord
on
the
hook
on
the
rear
parcel
shelf
support,
F
remove
the
towing
eye
from
the
holder
.
Access to the tools General recommendations
Observe the legislation in force in your country.
Ensure
that
the
weight
of
the
towing
vehicle
is
higher
than
that
of
the
towed
vehicle.
The
driver
must
remain
at
the
wheel
of
the
towed
vehicle
and
must
have
a
valid
driving licence.
When
towing
a
vehicle
with
all
four
wheels
on
the
ground,
always
use
an
approved
towing arm; rope and straps are prohibited.
The
towing vehicle must move off gently.
When
towing
a
vehicle
with
the
engine
of
f,
there
is
no
longer
any
power
assistance
for braking or steering.
In
the
following
cases,
you
must
always
call
on
a
professional
recovery
service:
-
vehicle
broken down on a motorway or fast road,
-
four-wheel
drive vehicle,
-
when
it
is
not
possible
to
put
the
gearbox
into
neutral,
unlock
the
steering,
or release the parking brake,
-
towing
with only two wheels on the ground,
-
where
there is no approved towing arm available...
PRACTICAL INFORMATION
Page 214 of 328
1111
212
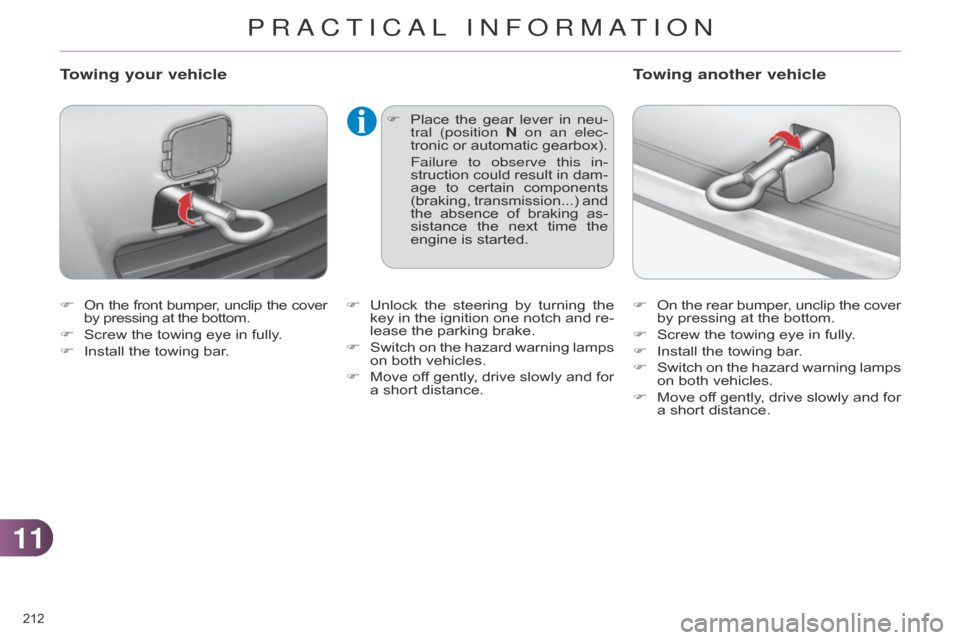
F On the front bumper , unclip the cover by
pressing at the bottom.
F
Screw
the towing eye in fully.
F
Install
the towing bar.
Towing your vehicle
F Place the gear lever in neu -
tral (position N on an elec-
tronic
or automatic gearbox).
Failure to observe this in
-
struction
could
result
in
dam
-
age
to
certain
components
(braking,
transmission...)
and
the
absence
of
braking
as
-
sistance
the
next
time
the
engine
is started. F
On
the
rear
bumper
,
unclip
the
cover by
pressing at the bottom.
F
Screw
the towing eye in fully.
F
Install
the towing bar.
F
Switch
on
the
hazard
warning
lamps
on
both vehicles.
F
Move
of
f
gently
,
drive
slowly
and
for
a
short distance.
Towing another vehicle
F Unlock the steering by turning the key
in the ignition one notch and re -
lease
the parking brake.
F
Switch
on
the
hazard
warning
lamps
on
both vehicles.
F
Move
of
f
gently
,
drive
slowly
and
for
a
short distance.
PRACTICAL INFORMATION