fuel Citroen C5 2012 (RD/TD) / 2.G Owner's Guide
[x] Cancel search | Manufacturer: CITROEN, Model Year: 2012, Model line: C5, Model: Citroen C5 2012 (RD/TD) / 2.GPages: 316, PDF Size: 9.75 MB
Page 138 of 316
IX
!
136
DRIVING
GEAR EFFICIENCY
INDICATOR *
System which reduces fuel con-
sumption by advising the driver to
change up on vehicles fi tted with a
manual gearbox.
Operation
The system intervenes only when
driving economically.
Depending on the driving situation
and your vehicle's equipment, the
system may advise you to skip one
or more gears. You can follow this
instruction without engaging the in-
termediate gears.
The gear engagement recommen-
dations must not be considered
compulsory. In fact, the confi gu-
ration of the road, the amount of
traffi c and safety remain determin-
ing factors when choosing the best
gear. Therefore, the driver remains
responsible for deciding whether or
not to follow the advice given by the
system.
This function cannot be deactivated.
*
According to engine.
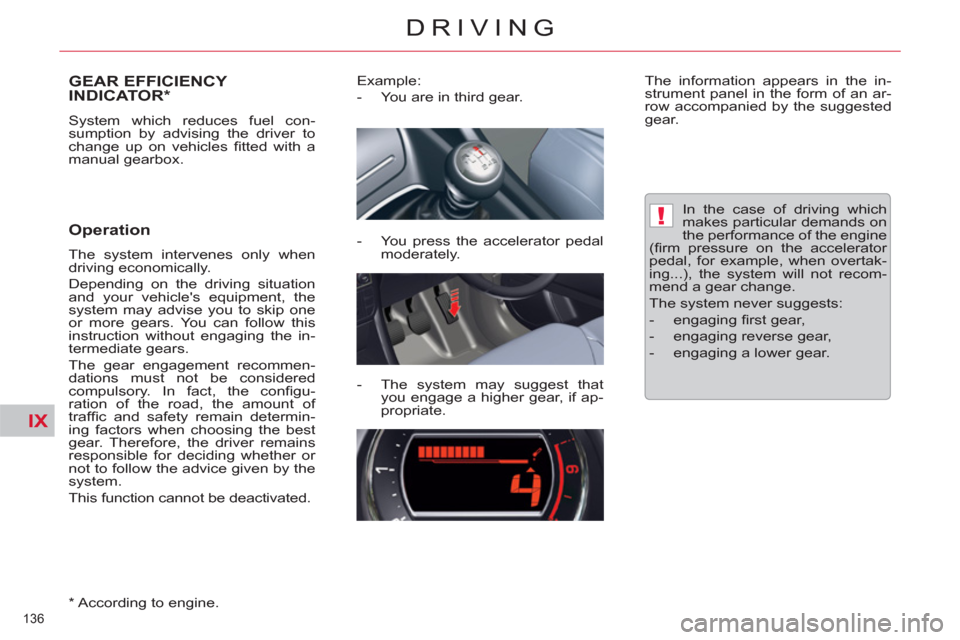
Example:
- You are in third gear.
- You press the accelerator pedal
moderately.
- The system may suggest that
you engage a higher gear, if ap-
propriate.
The information appears in the in-
strument panel in the form of an ar-
row accompanied by the suggested
gear.
In the case of driving which
makes particular demands on
the performance of the engine
(fi rm pressure on the accelerator
pedal, for example, when overtak-
ing...), the system will not recom-
mend a gear change.
The system never suggests:
- engaging fi rst gear,
- engaging reverse gear,
- engaging a lower gear.
Page 143 of 316
IX!
141
DRIVING
STOP & START
The Stop & Start system puts the en-
gine temporarily into standby - STOP
mode - during stops in the traffi c
(red lights, traffi c jams, or other...).
The engine restarts automatically -
START mode - as soon as you want
to move off. The restart takes place
instantly, quickly and silently.
Perfect for urban use, the Stop &
Start system reduces fuel consump-
tion and exhaust emissions as well
as the noise level when stationary.
Operation
- with the electronic gearbox
system
, at speeds below 4 mph
(6 km/h), press the brake pedal or
put the gear lever in position N
.
Going into engine STOP mode
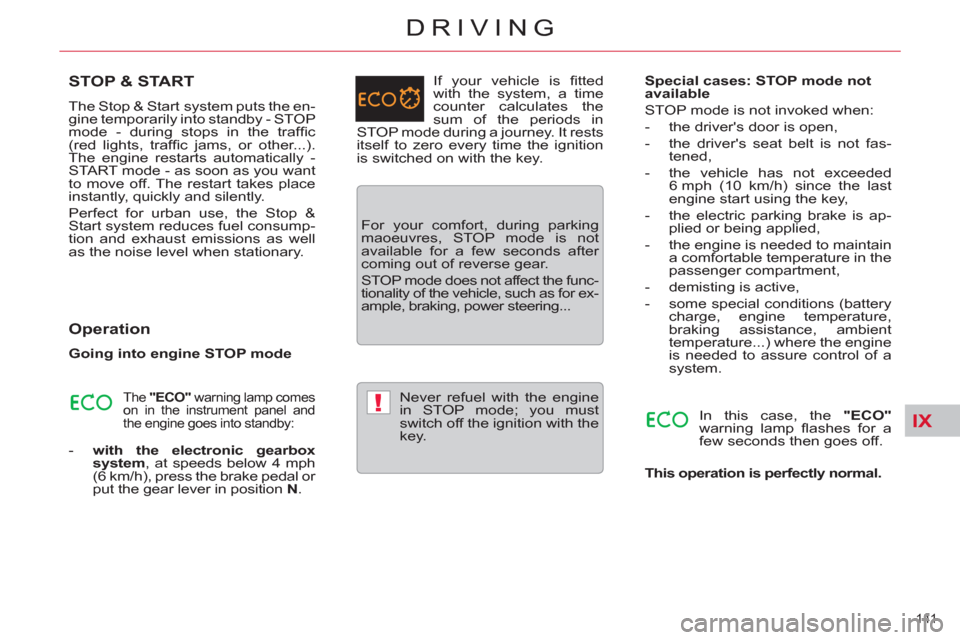
The "ECO"
warning lamp comes
on in the instrument panel and
the engine goes into standby:
If your vehicle is fi tted
with the system, a time
counter calculates the
sum of the periods in
STOP mode during a journey. It rests
itself to zero every time the ignition
is switched on with the key.
For your comfort, during parking
maoeuvres, STOP mode is not
available for a few seconds after
coming out of reverse gear.
STOP mode does not affect the func-
tionality of the vehicle, such as for ex-
ample, braking, power steering...
Never refuel with the engine
in STOP mode; you must
switch off the ignition with the
key.
Special cases: STOP mode not
available
In this case, the "ECO"
warning lamp fl ashes for a
few seconds then goes off.
This operation is perfectly normal.
STOP mode is not invoked when:
- the driver's door is open,
- the driver's seat belt is not fas-
tened,
- the vehicle has not exceeded
6 mph (10 km/h) since the last
engine start using the key,
- the electric parking brake is ap-
plied or being applied,
- the engine is needed to maintain
a comfortable temperature in the
passenger compartment,
- demisting is active,
- some special conditions (battery
charge, engine temperature,
braking assistance, ambient
temperature...) where the engine
is needed to assure control of a
system.
Page 165 of 316
BLEEDING THE DIESEL FUEL
FILTER
Protective cover
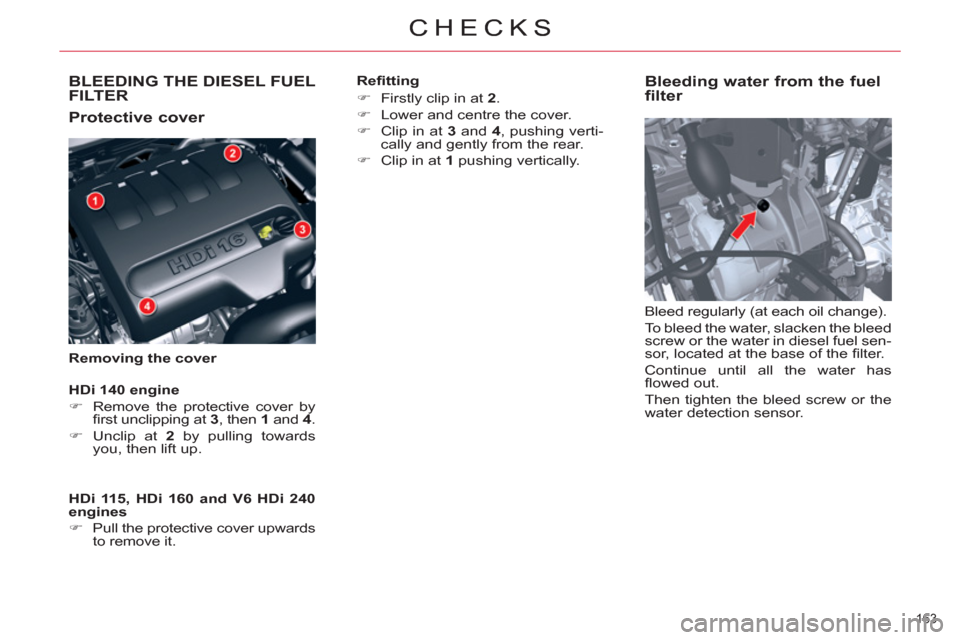
Removing the cover
Bleeding water from the fuel
filter
Bleed regularly (at each oil change).
To bleed the water, slacken the bleed
screw or the water in diesel fuel sen-
sor, located at the base of the fi lter.
Continue until all the water has
fl owed out.
Then tighten the bleed screw or the
water detection sensor.
HDi 115, HDi 160 and V6 HDi 240
engines
)
Pull the protective cover upwards
to remove it.
HDi 140 engine
)
Remove the protective cover by
fi rst unclipping at 3
, then 1
and 4.
)
Unclip at 2
by pulling towards
you, then lift up.
Refi tting
)
Firstly clip in at 2
.
)
Lower and centre the cover.
)
Clip in at 3
and 4
, pushing verti-
cally and gently from the rear.
)
Clip in at 1
pushing vertically.
CHECKS
163
CHECKS
Page 166 of 316

!
X
RUNNING OUT OF FUEL(DIESEL)
HDi 115 engine
)
Unclip the protective cover to gain
access to the priming pump.
HDi 140 and HDi 160 engines
)
Unclip the protective cover to gain
access to the priming pump.
Priming the fuel system
In the event of running out of fuel:
)
after fi lling (minimum 5 litres) and
removing the protective cover,
operate the manual priming pump,
until some resistance is felt,
)
operate the starter motor while
depressing the accelerator pedal
slightly until the engine starts. HDi engines make use of ad-
vanced technology.
For any work on your vehicle, con-
tact a qualifi ed workshop that has
the skills and equipment required,
which a CITROËN dealer is able to
provide.
V6 HDi 240 engine with electric
pump
In the event of running out of fuel:
)
after adding fuel, turn the ignition
key to position M
, wait for a few
seconds,
)
operate the starter motor until
the engine starts.
If the engine fails to start after sev-
eral attempts, contact a CITROËN
dealer or a qualifi ed workshop. If the engine fails to start at the fi rst
attempt, wait fi fteen seconds before
trying again.
If the engine fails to start after a few
attempts, operate the priming pump
again and then try to start the en-
gine.
When the engine is idling, accelerate
slightly to complete the bleeding of
the circuit.
CHECKS
164
CHECKS
Page 169 of 316
X
!
167
CHECKS
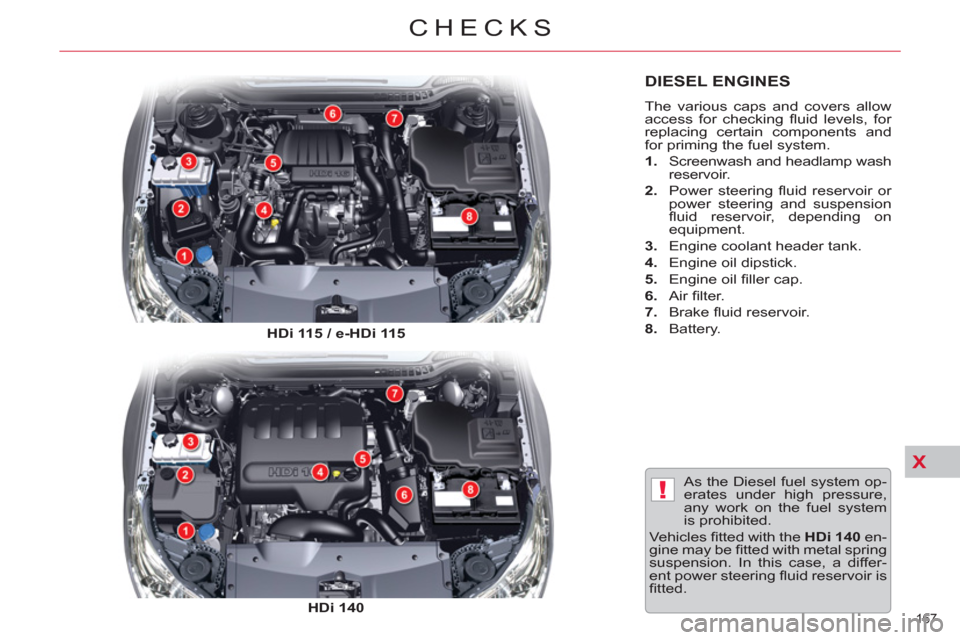
DIESEL ENGINES
The various caps and covers allow
access for checking fl uid levels, for
replacing certain components and
for priming the fuel system.
1.
Screenwash and headlamp wash
reservoir.
2.
Power steering fl uid reservoir or
power steering and suspension
fl uid reservoir, depending on
equipment.
3.
Engine coolant header tank.
4.
Engine oil dipstick.
5.
Engine oil fi ller cap.
6.
Air fi lter.
7.
Brake fl uid reservoir.
8.
Battery.
As the Diesel fuel system op-
erates under high pressure,
any work on the fuel system
is prohibited.
Vehicles fi tted with the HDi 140
en-
gine may be fi tted with metal spring
suspension. In this case, a differ-
ent power steering fl uid reservoir is
fi tted.
HDi 115
/ e-HDi 115
HDi 140
Page 170 of 316
X!
168
CHECKS
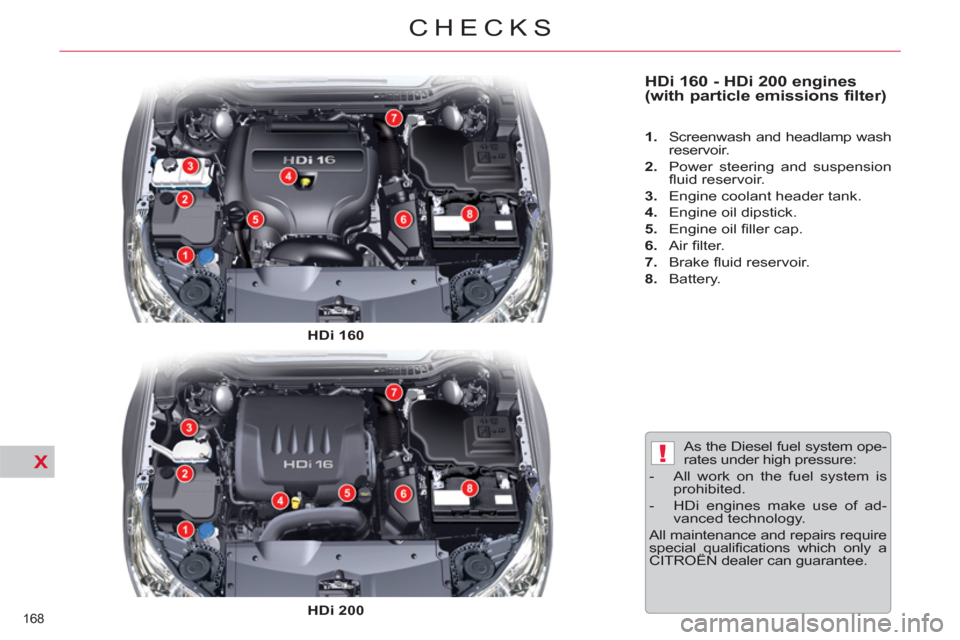
HDi 160 - HDi 200 engines
(with particle emissions filter)
1.
Screenwash and headlamp wash
reservoir.
2.
Power steering and suspension
fl uid reservoir.
3.
Engine coolant header tank.
4.
Engine oil dipstick.
5.
Engine oil fi ller cap.
6.
Air fi lter.
7.
Brake fl uid reservoir.
8.
Battery.
As the Diesel fuel system ope-
rates under high pressure:
- All work on the fuel system is
prohibited.
- HDi engines make use of ad-
vanced technology.
All maintenance and repairs require
special qualifi cations which only a
CITROËN dealer can guarantee.
HDi 160
HDi 200
Page 171 of 316
X!
169
CHECKS
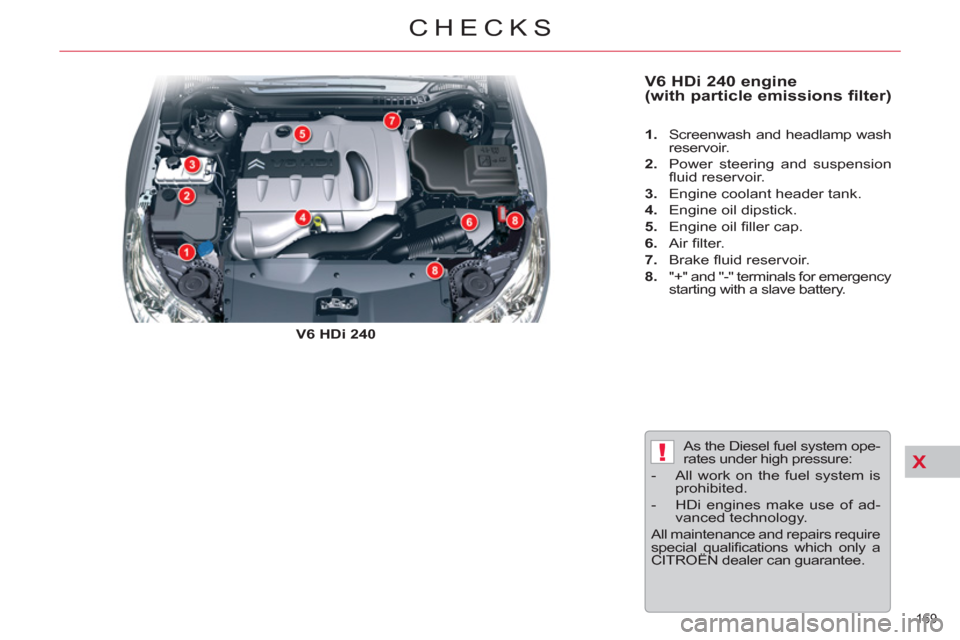
V6 HDi 240 engine
(with particle emissions filter)
V6 HDi 240
1.
Screenwash and headlamp wash
reservoir.
2.
Power steering and suspension
fl uid reservoir.
3.
Engine coolant header tank.
4.
Engine oil dipstick.
5.
Engine oil fi ller cap.
6.
Air fi lter.
7.
Brake fl uid reservoir.
8.
"+" and "-" terminals for emergency
starting with a slave battery.
As the Diesel fuel system ope-
rates under high pressure:
- All work on the fuel system is
prohibited.
- HDi engines make use of ad-
vanced technology.
All maintenance and repairs require
special qualifi cations which only a
CITROËN dealer can guarantee.
Page 206 of 316

XI
!
204
PRACTICAL INFORMATION
Matt paint
If you vehicle is fi nished with a clear
matt lacquer, please observe the fol-
lowing recommendations to avoid
damaging the paintwork by the use
of an inappropriate cleaning proce-
dures.
These recommendations are also
valid for alloy road wheels fi nished
with clear matt lacquer.
Never clean the vehicle without water.
Never wash your vehicle in an automatic roller brush car wash.
Never polish the vehicle body, nor the alloy wheels. Doing this will make the
paintwork shiny.
Do not use paint cleaners, abrasive products or paint polishing or preserving
products (such as wax, for example) on the paintwork. These products are
only suitable for bright fi nishes. Application of these products on vehicles with
a matt fi nish will seriously damage the paint surface of the vehicle, giving rise
to irreversible shiny or stained areas.
Never use a high pressure jet wash with a lance fi tted with a brush, this may
scratch the paintwork.
Never select a wash programme that fi nishes with a hot wax cycle.
We recommend the use of a high pressure jet wash, or at least a water hose
with a high output.
We recommend that the vehicle be rinsed using de-ionised water.
Use only a microfi bre cloth to dry the vehicle. It must be clean and used
without heavy pressure.
Lightly wipe off any fuel stains present on the bodywork using a soft cloth,
then leave to dry.
From the range of cleaning and maintenance products in the "TECHNATURE"
range recommended and approved by CITROËN, use only the insect remover
and car shampoo, which are the only products to be used on the bodywork.
The insect remover can also be used to remove minor marks (for example:
fi nger marks...).
Always have paint repairs done by a CITROËN dealer or a qualifi ed workshop.
Page 209 of 316

XII
207
TECHNICAL DATA
* In Russia, the maximum power is 110 kW and in Brazil, the maximum power is 120 kW.
207
TECHNICAL DATA
Engines and gearboxes
Model codes:
RD... RW...
5FS-8/P
5FV-5FN/A
5FV-5FN/8
RFJF
PETROL ENGINES
1.6 litre VTi 120
1.6 litre THP 155
2 litre 16V
Cubic capacity (cc)
1 598
1 598
1 997
Bore x stroke (mm)
77 x 85.8
77 x 85.8
85 x 88
EU standard maximum power (kW) /
hp DIN
88 / 120
115 * / 159
103 / 143
Maximum power engine speed (rpm)
6 000
6 000
6 000
EU standard maximum torque (Nm)
160
240
200
Maximum torque engine speed (rpm)
4 250
1 400
4 000
Fuel
Unleaded
Unleaded
Unleaded
Catalytic converter
Yes
Yes
Yes
GEARBOXES
Electronic gearbox system
(6-speed)
Automatic
(6-speed)
Manual
(6-speed)
Automatic
(4-speed)
OIL CAPACITIES (in litres)
Engine (with fi lter replacement)
4.25
4.25
4.25
5
Page 212 of 316

XII
210
TECHNICAL DATA
*
In Belgium, the maximum power is 100 kW.
Engines and gearboxes
Model codes:
RD... RW...
9HL/8
9HR
/8
RHR-RHF/H-8
DIESEL ENGINES
HDi 115
e-HDi 115
HDi 140
Cubic capacity (cc)
1 560
1 560
1 997
Bore x stroke (mm)
75 x 88.3
75 x 88.3
85 x 88
EU standard maximum power (kW) /
hp DIN
84 / 115
84 / 115
103 * / 140
Maximum power engine speed (rpm)
3 600
3 600
4 000
EU standard maximum torque (Nm)
240
270
320
Maximum torque engine speed (rpm)
1 500
1 750
2 000
Fuel
Diesel
Diesel
Diesel
Catalytic converter
Yes
Yes
Yes
Particle emission fi lter (PEF)
Yes
Yes
Yes
GEARBOXES
Manual
(5-speed)
Electronic gearbox system
(6-speed)
Manual
(6-speed)
OIL CAPACITIES (in litres)
Engine (with fi lter replacement)
3.75
5.25