service Citroen C5 2012 (RD/TD) / 2.G Owner's Manual
[x] Cancel search | Manufacturer: CITROEN, Model Year: 2012, Model line: C5, Model: Citroen C5 2012 (RD/TD) / 2.GPages: 316, PDF Size: 9.75 MB
Page 2 of 316
On-line owner's handbook
Referring to the owner's handbook on-line also gives you
access to the latest information available, easily identifi ed by
the bookmarks, associated with this pictogram:
If the heading "MyCitroën" is not available on the public website for
your country, you can fi nd your handbook at the following address:
http://service.citroen.com
Select:
You can fi nd your handbook on the CITROËN website, under the
heading "MyCitroën".
This personal space provides you with information on your products
and services, a direct and special contact with CITROËN and
becomes a space tailored for you.
the link in "Private customer access",
the language,
the model,
the edition date appropriate for the date of registration of your vehicle.
You will fi nd your handbook, presented in the same way as the paper
version.
Page 27 of 316
25
Limit the causes of excess
consumption
Spread loads throughout the vehicle;
place the heaviest items in the bottom
of the boot, as close as possible to the
rear seats.
Limit the loads carried in the vehicle
and reduce wind resistance (roof bars,
roof rack, bicycle carrier, trailer...). Use
a roof box in preference.
Remove roof bars and roof racks after
use.
At the end of winter, remove snow
tyres and refi t your summer tyres.
Observe the recommendations
on maintenance
Check the tyre pressures regularly,
when cold, referring to the label in the
door aperture, driver's side.
Carry out this check in particular:
- before a long journey,
- at each change of season,
- after a long period out of use.
Don't forget the spare wheel and the
tyres on any trailer or caravan.
Have your vehicle serviced regularly (en-
gine oil, oil fi lter, air fi lter...) and observe
the schedule of operations recommend-
ed by the manufacturer.
When refuelling, do not continue after
the 3 rd cut-off of the nozzle to avoid
any overfl ow.
At the wheel of your new vehicle,
it is only after the fi rst 1 800 miles
(3 000 kilometres) that you will see
the fuel consumption settle down to a
consistent average.
Page 28 of 316
I
26
MONITORING
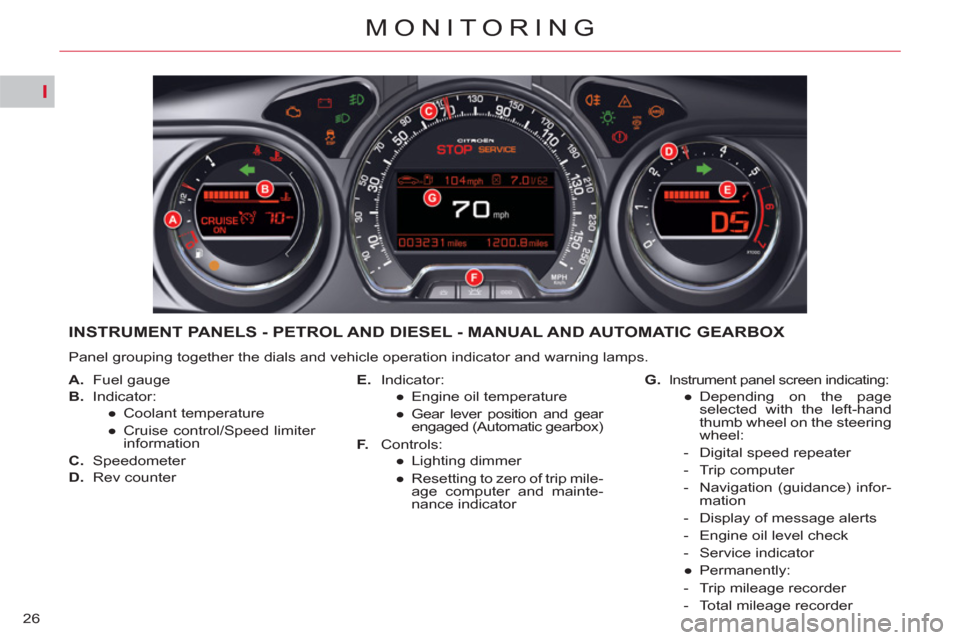
INSTRUMENT PANELS - PETROL AND DIESEL - MANUAL AND AUTOMATIC GEARBOX
Panel grouping together the dials and vehicle operation indicator and warning lamps.
A.
Fuel gauge
B.
Indicator:
●
Coolant temperature
●
Cruise control/Speed limiter
information
C.
Speedometer
D.
Rev counter
E.
Indicator:
●
Engine oil temperature
●
Gear lever position and gear
engaged (Automatic gearbox)
F.
Controls:
●
Lighting dimmer
●
Resetting to zero of trip mile-
age computer and mainte-
nance indicator
G.
Instrument panel screen indicating:
●
Depending on the page
selected with the left-hand
thumb wheel on the steering
wheel:
- Digital speed repeater
- Trip computer
- Navigation (guidance) infor-
mation
- Display of message alerts
- Engine oil level check
- Service indicator
●
Permanently:
- Trip mileage recorder
- Total mileage recorder
Page 33 of 316
I
31
MONITORING
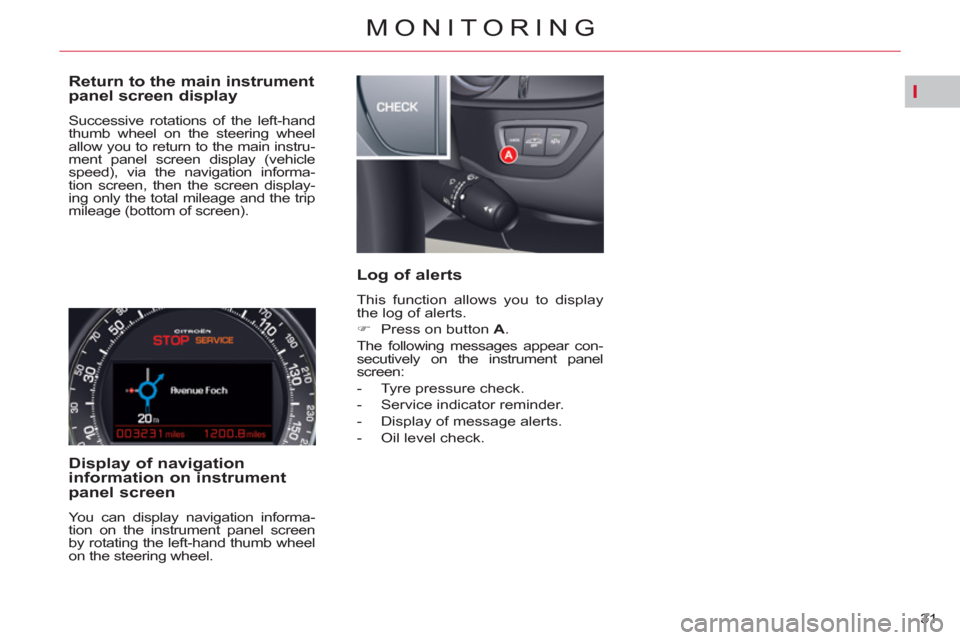
Return to the main instrument
panel screen display
Successive rotations of the left-hand
thumb wheel on the steering wheel
allow you to return to the main instru-
ment panel screen display (vehicle
speed), via the navigation informa-
tion screen, then the screen display-
ing only the total mileage and the trip
mileage (bottom of screen).
Display of navigation
information on instrument
panel screen
You can display navigation informa-
tion on the instrument panel screen
by rotating the left-hand thumb wheel
on the steering wheel.
Log of alerts
This function allows you to display
the log of alerts.
�)
Press on button A
.
The following messages appear con-
secutively on the instrument panel
screen:
- Tyre pressure check.
- Service indicator reminder.
- Display of message alerts.
- Oil level check.
Page 34 of 316
I
32
MONITORING
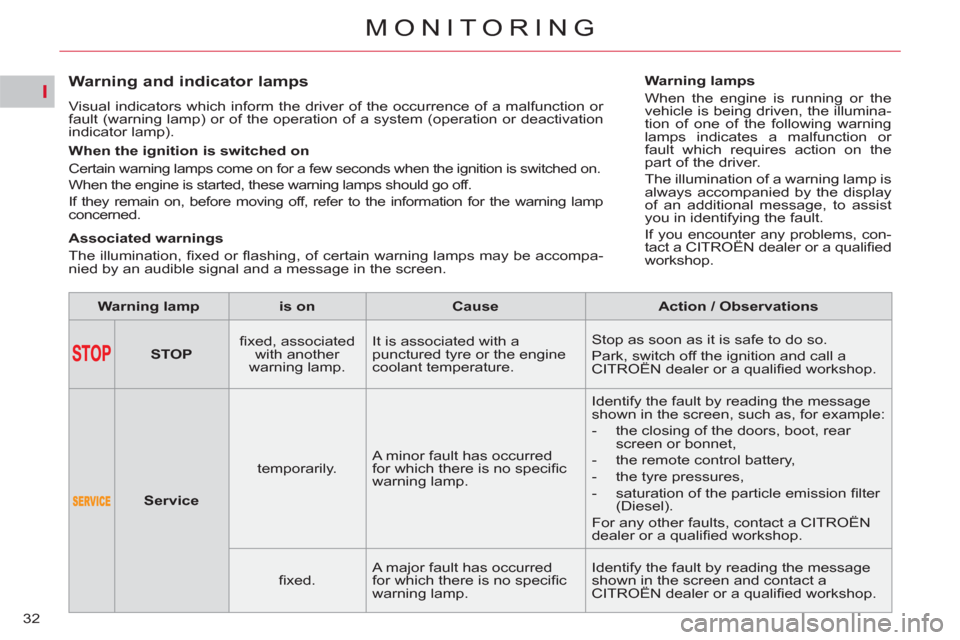
Warning and indicator lamps
Visual indicators which inform the driver of the occurrence of a malfunction or
fault (warning lamp) or of the operation of a system (operation or deactivation
indicator lamp).
Warning lamp
is on
Cause
Action / Observations
STOP
fi xed, associated
with another
warning lamp. It is associated with a
punctured tyre or the engine
coolant temperature. Stop as soon as it is safe to do so.
Park, switch off the ignition and call a
CITROËN dealer or a qualifi ed workshop.
Service
temporarily. A minor fault has occurred
for which there is no specifi c
warning lamp. Identify the fault by reading the message
shown in the screen, such as, for example:
- the closing of the doors, boot, rear
screen or bonnet,
- the remote control battery,
- the tyre pressures,
- saturation of the particle emission fi lter
(Diesel).
For any other faults, contact a CITROËN
dealer or a qualifi ed workshop.
fi xed. A major fault has occurred
for which there is no specifi c
warning lamp. Identify the fault by reading the message
shown in the screen and contact a
CITROËN dealer or a qualifi ed workshop.
When the ignition is switched on
Certain warning lamps come on for a few seconds when the ignition is switched on.
When the engine is started, these warning lamps should go off.
If they remain on, before moving off, refer to the information for the warning lamp
concerned.
Associated warnings
The illumination, fi xed or fl
ashing, of certain warning lamps may be accompa-
nied by an audible signal and a message in the screen.
Warning lamps
When the engine is running or the
vehicle is being driven, the illumina-
tion of one of the following warning
lamps indicates a malfunction or
fault which requires action on the
part of the driver.
The illumination of a warning lamp is
always accompanied by the display
of an additional message, to assist
you in identifying the fault.
If you encounter any problems, con-
tact a CITROËN dealer or a qualifi ed
workshop.
Page 41 of 316
I
39
MONITORING
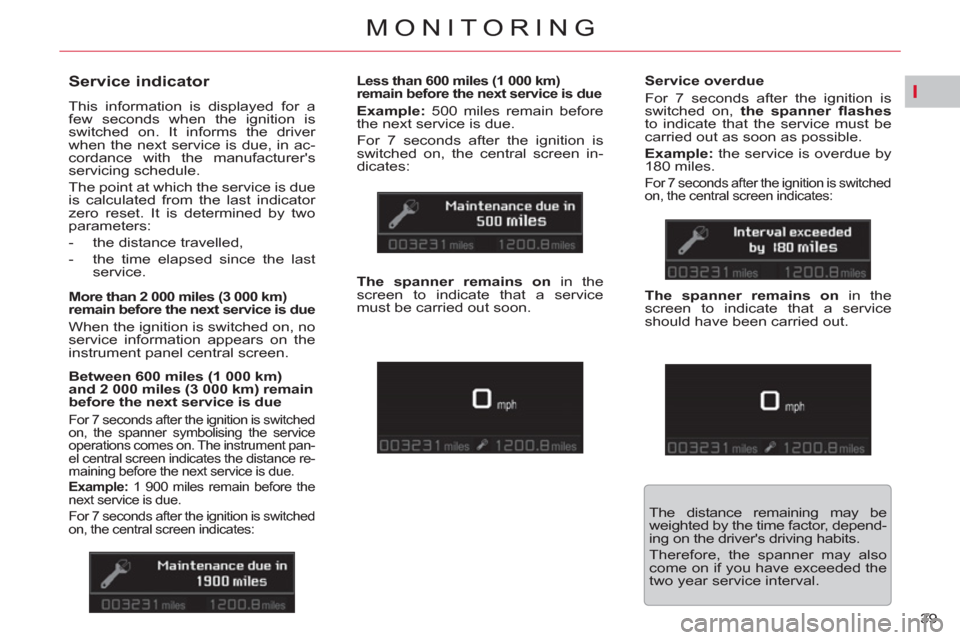
Service indicator
This information is displayed for a
few seconds when the ignition is
switched on. It informs the driver
when the next service is due, in ac-
cordance with the manufacturer's
servicing schedule.
The point at which the service is due
is calculated from the last indicator
zero reset. It is determined by two
parameters:
- the distance travelled,
- the time elapsed since the last
service.
More than 2 000 miles (3 000 km)
remain before the next service is due
When the ignition is switched on, no
service information appears on the
instrument panel central screen.
Between 600 miles (1 000 km)
and 2 000 miles (3 000 km) remain
before the next service is due
For 7 seconds after the ignition is switched
on, the spanner symbolising the service
operations comes on. The instrument pan-
el central screen indicates the distance re-
maining before the next service is due.
Example:
1 900 miles remain before the
next service is due.
For 7 seconds after the ignition is switched
on, the central screen indicates:
Less than 600 miles (1 000 km)
remain before the next service is due
Example:
500 miles remain before
the next service is due.
For 7 seconds after the ignition is
switched on, the central screen in-
dicates:
Service overdue
For 7 seconds after the ignition is
switched on, the spanner fl ashes
to indicate that the service must be
carried out as soon as possible.
Example:
the service is overdue by
180 miles.
For 7 seconds after the ignition is switched
on, the central screen indicates:
The spanner remains on
in the
screen to indicate that a service
must be carried out soon.
The distance remaining may be
weighted by the time factor, depend-
ing on the driver's driving habits.
Therefore, the spanner may also
come on if you have exceeded the
two year service interval.
The spanner remains on
in the
screen to indicate that a service
should have been carried out.
Page 42 of 316
I
40
MONITORING
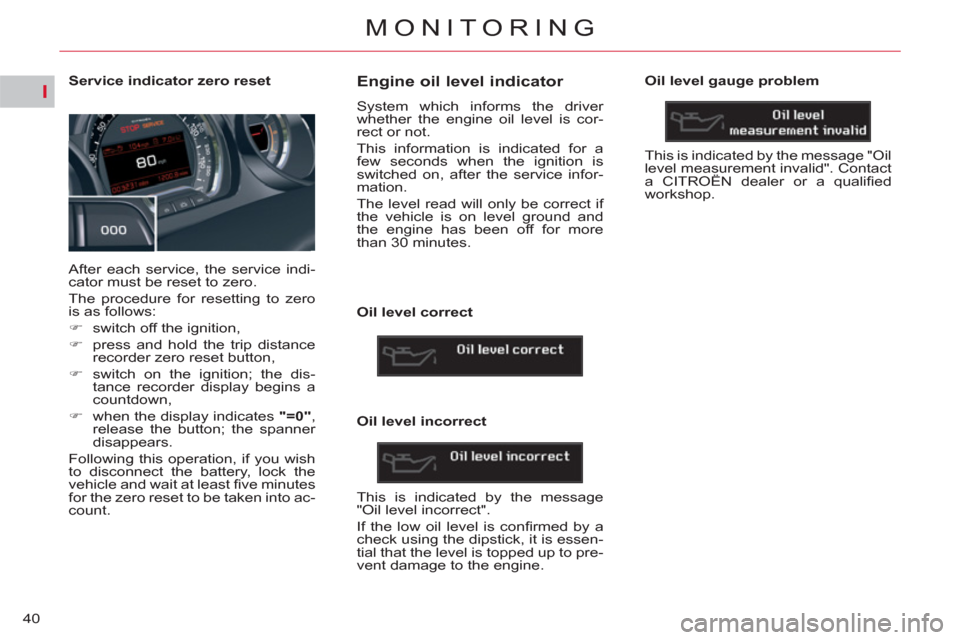
Service indicator zero reset
After each service, the service indi-
cator must be reset to zero.
The procedure for resetting to zero
is as follows:
�)
switch off the ignition,
�)
press and hold the trip distance
recorder zero reset button,
�)
switch on the ignition; the dis-
tance recorder display begins a
countdown,
�)
when the display indicates "=0"
,
release the button; the spanner
disappears.
Following this operation, if you wish
to disconnect the battery, lock the
vehicle and wait at least fi ve minutes
for the zero reset to be taken into ac-
count.
Engine oil level indicator
System which informs the driver
whether the engine oil level is cor-
rect or not.
This information is indicated for a
few seconds when the ignition is
switched on, after the service infor-
mation.
The level read will only be correct if
the vehicle is on level ground and
the engine has been off for more
than 30 minutes.
Oil level correct
Oil level incorrect
This is indicated by the message
"Oil level incorrect".
If the low oil level is confi rmed by a
check using the dipstick, it is essen-
tial that the level is topped up to pre-
vent damage to the engine.
Oil level gauge problem
This is indicated by the message "Oil
level measurement invalid". Contact
a CITROËN dealer or a qualifi ed
workshop.
Page 43 of 316
I
41
MONITORING
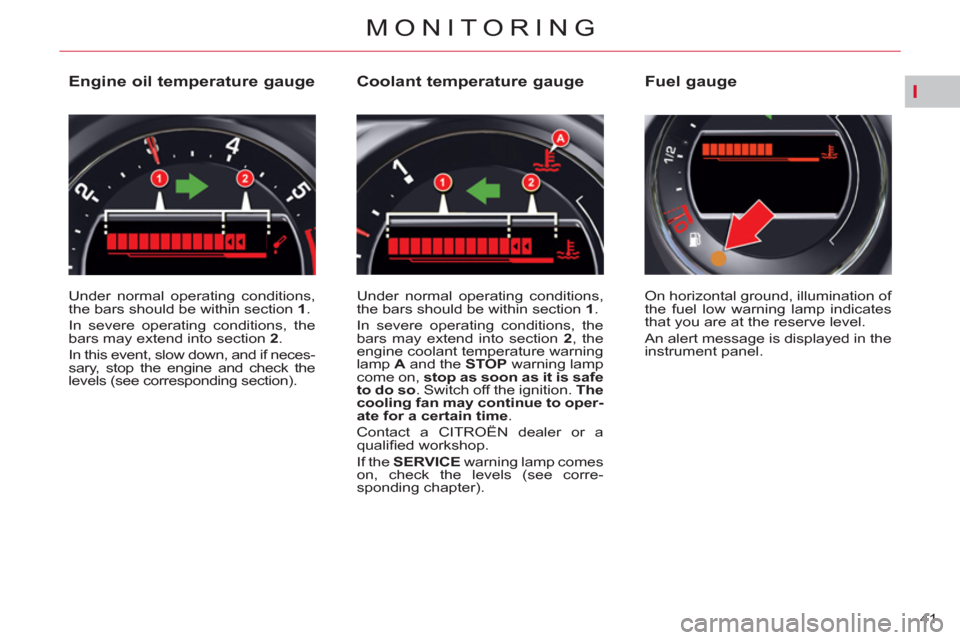
Engine oil temperature gauge
Under normal operating conditions,
the bars should be within section 1
.
In severe operating conditions, the
bars may extend into section 2
.
In this event, slow down, and if neces-
sary, stop the engine and check the
levels (see corresponding section).
Coolant temperature gauge
Under normal operating conditions,
the bars should be within section 1
.
In severe operating conditions, the
bars may extend into section 2
, the
engine coolant temperature warning
lamp A
and the STOP
warning lamp
come on, stop as soon as it is safe
to do so
. Switch off the ignition. The
cooling fan may continue to oper-
ate for a certain time
.
Contact a CITROËN dealer or a
qualifi ed workshop.
If the SERVICE
warning lamp comes
on, check the levels (see corre-
sponding chapter). On horizontal ground, illumination of
the fuel low warning lamp indicates
that you are at the reserve level.
An alert message is displayed in the
instrument panel.
Fuel gauge
Page 74 of 316
IV
72
ACCESS
Lost keys
Visit a CITROËN dealer with the ve-
hicle's registration document, your
personal identifi cation documents
and if possible the key code label.
The CITROËN dealer will be able to
look up the key code and the tran-
sponder code required to order a
new key.
Remote control
The high frequency remote control
is a sensitive system; do not operate
it while it is in your pocket as there
is a possibility that it may unlock the
vehicle, without you being aware
of it.
Do not repeatedly press the buttons
of your remote control out of range
and out of sight of your vehicle. You
run the risk of stopping it from work-
ing and the remote control would
have to be reinitialised.
The remote control does not operate
when the key is in the ignition switch,
even when the ignition is switched
off, except for reinitialisation.
Locking the vehicle
Driving with the doors locked may
make access to the passenger com-
partment by the emergency services
more diffi cult in an emergency.
However, the vehicle unlocks auto-
matically in the event of a serious
impact causing airbag deployment.
As a safety precaution (with children
on board), remove the key from the
ignition switch when you leave the
vehicle, even for a short time.
Anti-theft protection
Do not make any modifi cations to
the electronic engine immobiliser
system; this could cause malfunc-
tions.
When purchasing a second-
hand vehicle
Have the pairing of all of the keys
in your possession checked by a
CITROËN dealer, to ensure that
only your keys can be used to open
and start the vehicle.
Do not throw the remote con-
trol batteries away, they contain
metals which are harmful to the
environment.
Take them to an approved collection
point.
Page 75 of 316
IV
!
73
ACCESS
ALARM *
System which protects and provides
a deterrent against theft and break-
ins. It provides the following types of
monitoring.
- exterior perimeter
The system checks for opening of
the vehicle.
The alarm is triggered if anyone tries
to open a door, the boot, the bonnet...
- interior volumetric
The system checks for any variation
in the volume in the passenger com-
partment.
The alarm is triggered if anyone breaks
a window, enters the passenger com-
partment or moves inside the vehicle.
- tilt
The system checks for any change
in the attitude of the vehicle.
The alarm is triggered if the vehicle
is lifted, moved or knocked.
Self-protection function
The system checks for the
putting out of service of its
components.
The alarm is triggered if the bat-
tery, the central control or the si-
ren wiring are put out of service or
damaged.
For all work on the alarm system,
contact a CITROËN dealer or a
qualifi ed workshop.
Locking the vehicle with full
alarm system
Activation
�)
Switch off the ignition and get out
of the vehicle.
�)
Press the locking button on the
remote control.
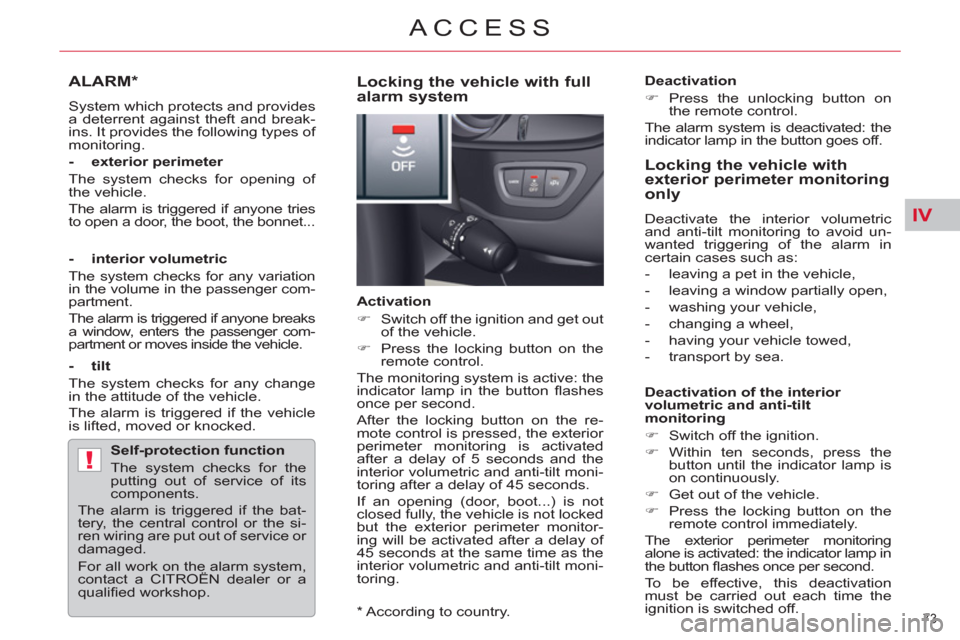
The monitoring system is active: the
indicator lamp in the button fl ashes
once per second.
After the locking button on the re-
mote control is pressed, the exterior
perimeter monitoring is activated
after a delay of 5 seconds and the
interior volumetric and anti-tilt moni-
toring after a delay of 45 seconds.
If an opening (door, boot...) is not
closed fully, the vehicle is not locked
but the exterior perimeter monitor-
ing will be activated after a delay of
45 seconds at the same time as the
interior volumetric and anti-tilt moni-
toring.
Deactivation
�)
Press the unlocking button on
the remote control.
The alarm system is deactivated: the
indicator lamp in the button goes off.
Locking the vehicle with
exterior perimeter monitoring
only
Deactivate the interior volumetric
and anti-tilt monitoring to avoid un-
wanted triggering of the alarm in
certain cases such as:
- leaving a pet in the vehicle,
- leaving a window partially open,
- washing your vehicle,
- changing a wheel,
- having your vehicle towed,
- transport by sea.
Deactivation of the interior
volumetric and anti-tilt
monitoring
�)
Switch off the ignition.
�)
Within ten seconds, press the
button until the indicator lamp is
on continuously.
�)
Get out of the vehicle.
�)
Press the locking button on the
remote control immediately.
The exterior perimeter monitoring
alone is activated: the indicator lamp in
the button fl ashes once per second.
To be effective, this deactivation
must be carried out each time the
ignition is switched off.
*
According to country.