change wheel Citroen C5 2014.5 (RD/TD) / 2.G Owner's Manual
[x] Cancel search | Manufacturer: CITROEN, Model Year: 2014.5, Model line: C5, Model: Citroen C5 2014.5 (RD/TD) / 2.GPages: 344, PDF Size: 12.9 MB
Page 16 of 344

14
Limit the causes of excess consumption
Spread loads throughout the vehicle; place the heaviest items in the
bottom of the boot, as close as possible to the rear seats.
Limit the loads carried in the vehicle and reduce wind resistance
(roof bars, roof rack, bicycle carrier, trailer...). Use a roof box in
preference.
Remove roof bars and roof racks after use.
At the end of winter, remove snow tyres and refit your summer tyres.
Observe the recommendations on
maintenance
Check the tyre pressures regularly, when cold, referring to the label in
the door aperture, driver's side.
Carry out this check in particular:
-
b
efore a long journey,
-
a
t each change of season,
-
a
fter a long period out of use.
Don't forget the spare wheel and the tyres on any trailer or caravan.
Have your vehicle serviced regularly (engine oil, oil filter, air filter,
passenger compartment filter...) and observe the schedule of
operations recommended in the manufacturer's service schedule.
With a BlueHDi Diesel engine, if the SCR system is faulty your vehicle
becomes polluting; go to a CITROËN dealer or a qualified workshop
without delay to have the emissions of nitrous oxides brought back to
the legal level.
When refuelling, do not continue after the third cut-off of the nozzle to
avoid any over flow.
At the wheel of your new vehicle, it is only after the first 1 800 miles
(3 000 kilometres) that you will see the fuel consumption settle down to
a consistent average.
Eco-driving
Page 36 of 344

34
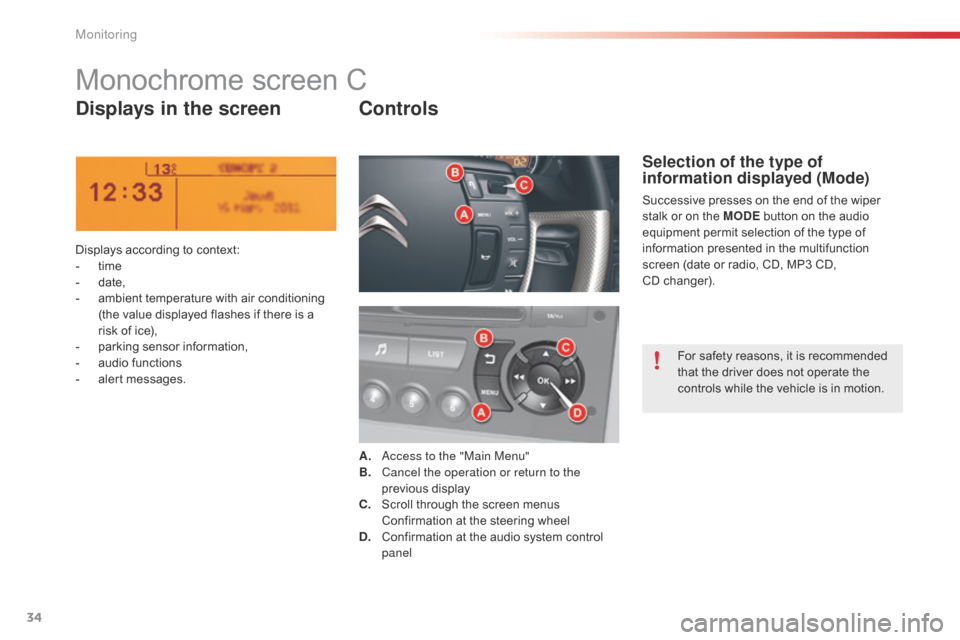
Monochrome screen C
Displays in the screenControls
Displays according to context:
-
t ime
-
d
ate,
-
a
mbient temperature with air conditioning
(the value displayed flashes if there is a
risk of ice),
-
p
arking sensor information,
-
a
udio functions
-
a
lert messages. A.
a
c
cess to the "Main Menu"
B.
C
ancel the operation or return to the
previous display
C.
S
croll through the screen menus
C
onfirmation at the steering wheel
D.
C
onfirmation at the audio system control
panel
Selection of the type of
information displayed (Mode)
Successive presses on the end of the wiper
stalk or on the MODE button on the audio
equipment permit selection of the type of
information presented in the multifunction
screen (date or radio, CD, MP3 CD,
CD
changer).For safety reasons, it is recommended
that the driver does not operate the
controls while the vehicle is in motion.
Monitoring
Page 70 of 344

68
We recommend use of the automatic regulation
of the air conditioning.
It permits automatic and optimised control
of all of the following functions: air flow,
temperature in the passenger compartment
and air distribution, by means of various
sensors (ambient temperature, sunshine).
This eliminates any need for you to change
your settings other than the temperature value
displayed.
F Take care not to cover the sunshine sensor A .
If you select the automatic mode
(by pressing the "AUTO" control) and leave
all of the vents open, optimum comfort will be
maintained and humidity and condensation will
be removed regardless of the exterior climatic
conditions.
The temperature in the passenger compartment
can only be lower than the ambient temperature
if the air conditioning is on.
In order to be effective, the air conditioning must
be used with the windows closed. If the vehicle
has been parked in the sun for a long period and
the interior temperature is very high, first ventilate
the passenger compartment with the windows
open for a few minutes, then close the windows.
Heating, ventilation and air conditioning recommendations
To keep the air conditioning system in
good working order it is essential that it is
operated at least once a month.
The air conditioning uses engine power
during its operation. As a result, the fuel
consumption of the vehicle increases.
In certain cases of particularly arduous use
(e.g. towing the maximum load on a steep
gradient in high temperatures), switching off
the air conditioning saves engine power and
improves the towing capacity.
Air inlet
Check that the exterior grille for the air inlet,
at the bottom of the windscreen, is clean and
free of dead leaves, snow, etc.
When washing the vehicle using a high
pressure nozzle, avoid spraying at the air
inlet. Maximum comfort is obtained by means of
a good distribution of air in the passenger
compartment, both in the front and in the rear.
To obtain a uniform distribution of air, take
care not to block the exterior air intake grille
located at the base of the windscreen, the
vents, the air outlets under the front seats and
the air extractor located behind the flaps in
the boot.
The front and rear vents are fitted with
thumbwheels to adjust the air flow and
direction. We recommend that you leave all of
the vents open.
Dust filter / Odour filter
(active carbon)
There is a filter for excluding odours and
dust.
This filter must be changed in line with the
vehicle's servicing schedule. (Refer to the
maintenance and warranty guide).
Air conditioning
Air circulation
Ease of use and comfort
Page 93 of 344

91
Boot fittings (Saloon)
1. Boot floor (spare wheel storage).2. B oot lamp.
3. L ocation for 6 CD changer.
Luggage securing rings
F Use the 4 securing rings on the boot floor to secure your luggage.
For safety reasons in the event of sharp
braking, you are advised to place heavy objects
as far for ward in the boot as possible.
3
Ease of use and comfort
Page 113 of 344

111
6-speed electronic gearbox system
F automatic mode: gear lever in position A,
F m anual mode: gear lever in position M ,
F
S
PORT mode: gear lever in position A and
a press on button 1 .
Six-speed electronic gearbox system which
offers a choice between the comfort of fully
automatic operation or the pleasure of manual
gear changing.
There are two driving modes:
-
a
utomatic
operation for electronic control
of the gears by the gearbox,
-
m
anual
operation for sequential gear
changing by the driver.
In automated mode, it remains possible to
change gear manually by using the steering
mounted control paddles, when overtaking, for
example.
a
SPORT
programme is available in automated
mode, providing a more dynamic driving style.
Mode selection
+. Change up paddle to the right of the steering
wheel.
F
P
ress the back of the "+" steering mounted
paddle to change up a gear.
-.
C
hange down paddle to the left of the
steering wheel.
F
P
ress the back of the "-" steering mounted
paddle to change down a gear.
Steering mounted control paddles
The steering mounted paddles cannot
be used to select neutral or to engage
or disengage reverse gear.
4
Driving
Page 160 of 344

158
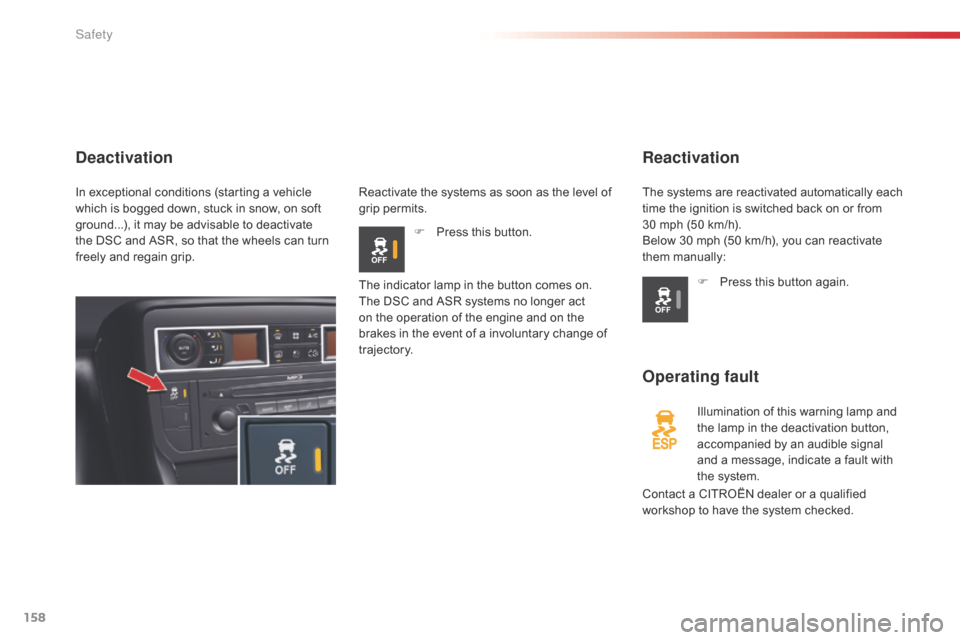
Reactivation
Operating fault
Illumination of this warning lamp and
the lamp in the deactivation button,
accompanied by an audible signal
and a message, indicate a fault with
the system.
Deactivation
Reactivate the systems as soon as the level of
grip permits.F
P
ress this button.
Contact a CITROËN dealer or a qualified
workshop to have the system checked.
The indicator lamp in the button comes on.
The DSC and ASR systems no longer act
on the operation of the engine and on the
brakes in the event of a involuntary change of
trajectory.
F
P
ress this button again.
The systems are reactivated automatically each
time the ignition is switched back on or from
30
mph (50 km/h).
Below 30 mph (50 km/h), you can reactivate
them manually:
In exceptional conditions (starting a vehicle
which is bogged down, stuck in snow, on soft
ground...), it may be advisable to deactivate
the DSC and ASR, so that the wheels can turn
freely and regain grip.
Safety
Page 197 of 344

195
F Position the foot of the jack 2 on the ground, ensuring that it is directly below the
front A or rear B jacking point provided on
the underbody, closest to the wheel to be
changed. Ensure that the jack is stable. If the
ground is slippery or loose, the jack
may slip or drop - Risk of injury!
Ensure that the jack is positioned only
at one of the jacking points under the
vehicle, making sure that the vehicle's
contact sur face is centred on the head
of the jack. Other wise there is a risk of
damage to the vehicle and/or of the jack
dropping - Risk of injury!
F E xtend the jack 2 until its head comes into
contact with the jacking point A or B used;
the contact sur face A or B
on the vehicle
must engage with the central part of the
head of the jack.
F
Ra
ise the vehicle until there is sufficient
space between the wheel and the ground
to easily fit the spare (non punctured) spare
wheel.
F
R
emove the bolts and stow them in a clean
place.
F
R
emove the wheel.
8
Practical information
Page 199 of 344

197
If your vehicle is fitted with a spare
wheel of a different size to those on the
vehicle, you must not exceed 50 mph
(80 km/h) whilst using the spare wheel.
The wheel bolts are specific to the type
of wheel.
If the type of wheel is changed,
check with your CITROËN dealer or a
qualified workshop that the wheel bolts
are compatible with the new wheels.
Take care to note down the code
number engraved on the head of the
security bolt socket. This will enable
you to obtain a replacement security
bolt socket from your dealer.
F
T
ighten the security bolt using
wheelbrace
1 and security bolt socket
(depending on equipment).
F
T
ighten the other bolts using just the
wheelbrace 1 .
F
R
efit the protectors on the bolts.
F
S
tow the tools in the carrier box.
F
R
eturn the suspension to the normal
position.
F
E
nsure the tyre pressure is correct and
have the balancing checked.Tyre under-inflation detection
The space-saver type or steel spare
wheel does not have a sensor.
The punctured wheel must be repaired
by a CITROËN dealer or a qualified
workshop.
8
Practical information
Page 294 of 344

07
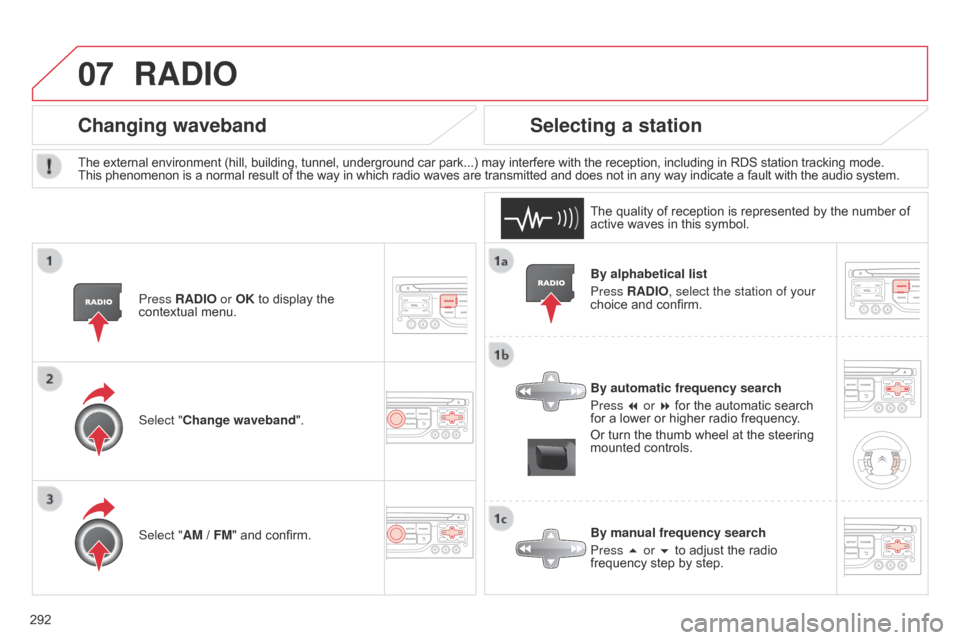
292By alphabetical list
Press RADIO, select the station of your
choice and confirm.
By automatic frequency search
Press 7 or 8 for the automatic search
for a lower or higher radio frequency.
Or turn the thumb wheel at the steering
mounted controls.
By manual frequency search
Press 5 or 6 to adjust the radio
frequency step by step.
Selecting a station
The external environment (hill, building, tunnel, underground car park...) may interfere with the reception, including in RDS station tracking mode.
This
phenomenon is a normal result of the way in which radio waves are transmitted and does not in any way indicate a fault with the audio system.
The quality of reception is represented by the number of
active waves in this symbol.
Press RADIO or OK to display the
contextual menu.
Changing waveband
Select "Change waveband".
Select "AM
/ FM" and confirm.
RADIO