STOP Citroen C5 2015 (RD/TD) / 2.G User Guide
[x] Cancel search | Manufacturer: CITROEN, Model Year: 2015, Model line: C5, Model: Citroen C5 2015 (RD/TD) / 2.GPages: 344, PDF Size: 12.95 MB
Page 34 of 344
32
C5_en_Chap01_controle-de-marche_ed01-2014
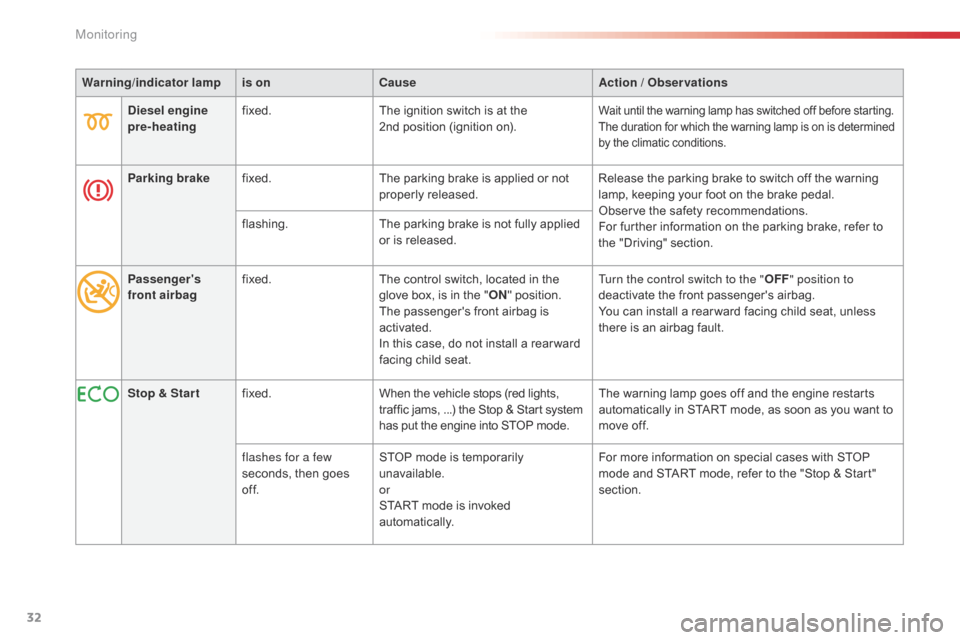
Warning/indicator lampis onCause Action / Observations
Diesel engine
pre-heating fixed.
The ignition switch is at the
2nd
position (ignition on).
Wait until the warning lamp has switched off before starting.
The duration for which the warning lamp is on is determined
by the climatic conditions.
Parking brakefixed. The parking brake is applied or not
properly released. Release the parking brake to switch off the warning
lamp, keeping your foot on the brake pedal.
Observe the safety recommendations.
For further information on the parking brake, refer to
the "Driving" section.
flashing.
The parking brake is not fully applied
or is released.
Passenger's
front airbag fixed.
The control switch, located in the
glove box, is in the "ON" position.
The passenger's front airbag is
activated.
In this case, do not install a rear ward
facing child seat. Turn the control switch to the "
OFF" position to
deactivate the front passenger's airbag.
You can install a rear ward facing child seat, unless
there is an airbag fault.
Stop & Star t fixed. When the vehicle stops (red lights,
traffic jams, ...) the Stop & Start system
has put the engine into STOP mode. The warning lamp goes off and the engine restarts
automatically in START mode, as soon as you want to
move off.
flashes for a few
seconds, then goes
of f. STOP mode is temporarily
unavailable.
or
START mode is invoked
automatically. For more information on special cases with STOP
mode and START mode, refer to the "Stop & Start"
section.
Monitoring
Page 45 of 344
43
C5_en_Chap02_ouverture_ed01-2014
Lost keys
Go to a CITROËN dealer with the vehicle's registration document, your personal
identification documents and if possible the key code label.
The CITROËN dealer will be able to look up the key code and the transponder code
required to order a new key.
Remote control
The high frequency remote control is a sensitive system; do not operate it while it is in your
pocket as there is a possibility that it may unlock the vehicle, without you being aware of it.
Do not repeatedly press the buttons of your remote control out of range and out of sight of
your vehicle. You run the risk of stopping it from working and the remote control would have
to be reinitialised.
No remote control can operate when the key is in the ignition switch, even when the ignition
is switched off, except for reinitialisation.
Locking the vehicle
Driving with the doors locked may make access to the passenger compartment by the
emergency services more difficult in an emergency.
As a safety precaution, never leave children alone in the vehicle, except for a very short
period.
In all cases, it is essential to remove the key from the ignition switch when leaving the vehicle.
Anti-theft protection
Do not make any modifications to the electronic engine immobiliser system; this could
cause malfunctions.
When purchasing a second-hand vehicle
Have the pairing of all of the keys in your possession checked by a CITROËN dealer, to
ensure that only your keys can be used to open and start the vehicle.Do not throw the remote control
batteries away, they contain metals
which are harmful to the environment.
Take them to an approved collection
point.
2
Access
Page 48 of 344
46
C5_en_Chap02_ouverture_ed01-2014
Triggering of the alarm
This is indicated by sounding of the siren
and flashing of the direction indicators for
thirty seconds.
The monitoring functions remain active until
the alarm has been triggered eleven times in
succession.
When the vehicle is unlocked using the remote
control, rapid flashing of the indicator lamp
in the button informs you that the alarm was
triggered during your absence. When the
ignition is switched on, this flashing stops
immediately.
Failure of the remote control
F unlock the vehicle using the key in the driver's door lock,
F
o
pen the door; the alarm is triggered,
F
s
witch on the ignition; the alarm stops; the
indicator lamp in the button goes off.
Locking the vehicle without
activating the alarm
F Lock or deadlock the vehicle using the key in the driver's door lock.
Operating fault
When the ignition is switched on, fixed
illumination of the indicator lamp in the button
indicates a fault with the system.
Have it checked by a CITROËN dealer or a
qualified workshop.
Automatic activation*
2 minutes after closing the last door or the
boot, the system is activated automatically.
F
T
o avoid triggering the alarm when entering
the vehicle, first press the remote control
unlocking button.
* Depending on country of sale.
To deactivate the monitoring functions:
Access
Page 49 of 344

47
C5_en_Chap02_ouverture_ed01-2014
Electric windows
1. Driver's electric window control.
2. Passenger's electric window control.
3.
R
ear right electric window control.
4.
R
ear left electric window control.
5.
D
eactivation of the rear electric window
and door controls.
One-touch electric windows
- automatic mode F P ress or pull the control firmly. The
window opens or closes fully when the
control is released.
F
P
ressing the control again stops the
movement of the window.
Safety anti-pinch
When the window rises and meets an obstacle,
it stops and partially lowers again.
The electric window controls remain
operational for approximately
45
seconds after the ignition is switched
off or until the vehicle is locked after a
door is opened.
If one of the passenger windows cannot
be operated from the driver's door
control panel, carry out the operation
from the control panel of the passenger
door concerned, and vice versa. If the window cannot be closed (for
example, in the presence of ice),
immediately after the movement is
reversed:
F
p
ress and hold the control until the
window opens fully,
F
t
hen pull the control immediately
and hold it until the window closes,
F
c
ontinue to hold the control for
approximately one second after the
window has closed.
The safety anti-pinch function is not
operational during these operations.
There are two options:
-
m
anual mode
F
P
ress or pull the control gently. The
window stops when the control is
released.
2
Access
Page 50 of 344
48
C5_en_Chap02_ouverture_ed01-2014
Reinitialisation
If a window does not rise automatically, its
operation must be reinitialised:
F
p
ull the control until the window stops,
F
r
elease the control and pull it again until
the window closes fully,
F
c
ontinue to hold the control for
approximately one second after the window
has closed,
F
p
ress the control to lower the window
automatically to the low position,
F
w
hen the window has reached the low
position, press the control again for
approximately one second.
The safety anti-pinch function is not
operational during these operations.
Deactivation of the rear
electric window and door
controls
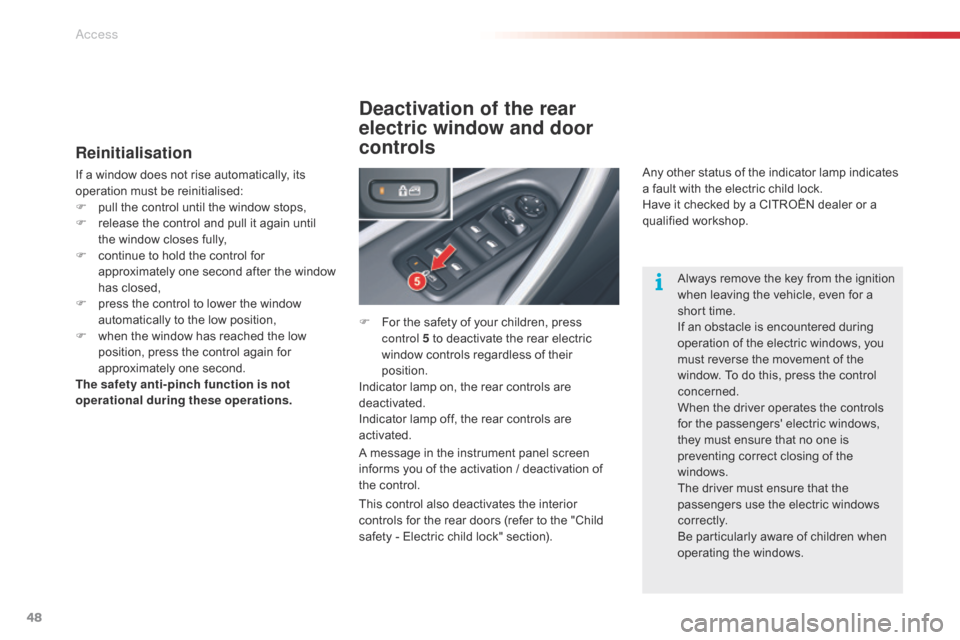
F For the safety of your children, press control 5 to deactivate the rear electric
window controls regardless of their
position.
Indicator lamp on, the rear controls are
deactivated.
Indicator lamp off, the rear controls are
activated.
A message in the instrument panel screen
informs you of the activation / deactivation of
the control. Any other status of the indicator lamp indicates
a fault with the electric child lock.
Have it checked by a CITROËN dealer or a
qualified workshop.
Always remove the key from the ignition
when leaving the vehicle, even for a
short time.
If an obstacle is encountered during
operation of the electric windows, you
must reverse the movement of the
window. To do this, press the control
concerned.
When the driver operates the controls
for the passengers' electric windows,
they must ensure that no one is
preventing correct closing of the
windows.
The driver must ensure that the
passengers use the electric windows
c o r r e c t l y.
Be particularly aware of children when
operating the windows.
This control also deactivates the interior
controls for the rear doors (refer to the "Child
safety - Electric child lock" section).
Access
Page 55 of 344
53
C5_en_Chap02_ouverture_ed01-2014
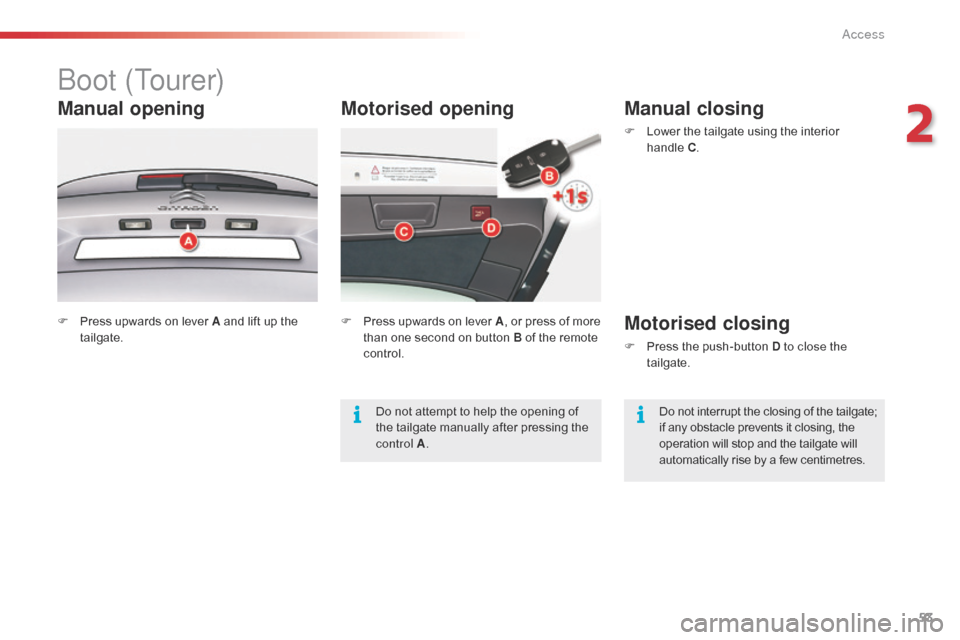
Motorised opening
boot (Tourer)
Manual opening
F Press upwards on lever A and lift up the tailgate. F
P ress upwards on lever A, or press of more
than one second on button B of the remote
control.
Manual closing
F Lower the tailgate using the interior handle C.
Motorised closing
F Press the push-button D to close the
tailgate.
Do not interrupt the closing of the tailgate;
if any obstacle prevents it closing, the
operation will stop and the tailgate will
automatically rise by a few centimetres.
Do not attempt to help the opening of
the tailgate manually after pressing the
control A
.
2
Access
Page 57 of 344

55
C5_en_Chap02_ouverture_ed01-2014
Panoramic sunroof (Saloon)
Sunroof closed
- Press B to first notch: tilting.
- P ress B to second notch: automatic
complete tilting.
-
P
ress A to first notch: sliding towards rear.
-
P
ress A to second notch: automatic total
sliding towards rear.
Sunroof open
- Press B to first notch: closure.
- P ress B to second notch: automatic total
closure.
Operation
Tilted sunroof
- Press A to first notch: closure.
- P ress A to second notch: automatic total
closure.
Your sun roof is fitted with a manually-operated
blind.
Anti-pinch
An anti-pinch device stops the sun roof from
closing, whether sliding or tilting. If it meets an
obstacle, it re-opens.
Reinitialisation
After a battery disconnection or if there has
been a malfunction, you have to re-initialise the
anti-pinch function.
F
m
ove control B until the roof is in the
complete tilting position,
F
k
eep control B pressed down for a
minimum of 1 second.
During these operations, the anti-pinch
function does not operate .
Always remove the ignition key when
leaving the vehicle, even if for a short
time.
In the event of anything being caught by
the sunroof closing, you must reverse
the roof movement.
Do this by reversing the position of the
control switch.
When the driver is operating the
sunroof, they must always make sure
that the passengers are not preventing
it from closing properly.
The driver must ensure that passengers
use the sunroof control correctly.
Pay special attention to where children
are when operating the sun oof.
The fitting of a sunroof as an accessory
is prohibited.
2
Access
Page 58 of 344

56
C5_en_Chap02_ouverture_ed01-2014
Panoramic sunroof (Tourer)
This comprises a tinted glass panoramic
area 1 to improve brightness and vision in the
passenger compartment.
It is fitted with an electric blind 2 to help
maintain a comfortable temperature and
reduce noise.Opening
F Press control A.
Pressing to the 1st notch allows you to open
the blind step by step.
Pressing to the 2nd notch allows you to fully
open the blind.
The blind stops in the closest pre-defined
position (11 positions) as soon as you release
the control.
Closing
F Press control B .
Press to the first notch to close the blind step
by step.
Press to the second notch to close the blind
completely.
The blind stops at the nearest pre-set position
(11 positions) as soon as you release the
control.
Sequential electric blind
access
Page 59 of 344

57
C5_en_Chap02_ouverture_ed01-2014
Anti-pinch
If the blind meets an obstacle whilst closing, it
stops and opens partially again.
You must re-initialise the anti-pinch function
within 5 seconds of the blind stopping:
F
p
ress control B until the blind is fully closed
(closing in steps of a few centimetres).
After a battery disconnection, or if there has
been a malfunction, you have to re-initialise the
anti-pinch function:
F
p
ress control B to the 2nd notch (fully
closed),
F
w
ait until the blind is fully closed,
F
p
ress control B for at least 3 seconds.
If the blind opens randomly during a closing
operation, and straight after the blind stops:
F
P
ress control B until the blind closes fully.
During these operations, the anti-pinch
function does not operate. In the event of anything being caught
when the blind is moving, you must
reverse the movement of the blind.
To do so, reverse the position of the
control.
When the driver is operating the blind,
he or she must always make sure that
the passengers are not preventing it
from closing properly.
The driver must ensure that passengers
use the blind correctly.
Pay particular attention to children
when operating the blind.
2
Access
Page 60 of 344

58
C5_en_Chap03_ergo-et-confort_ed01-2014
Front seats
Manual adjustments
1. Adjustments to the height and angle of the head restraint
T
o raise it, pull upwards.
T
o lower it, press on the release button A
and simultaneously on the head restraint
itself. The adjustment is correct when the
top edge of the head restraint is at the
same height as the top of the head. It is
also tilt adjustable.
T
o remove it, press the release button A ,
then pull it upwards. It may be necessary to
adjust the backrest angle.
2.
A
djustment of the backrest angle
O
perate the control and adjust the position
of the backrest to the front or to the rear.
3.
A
djustment of the seat height
R
aise or lower the control the number
of times required to obtain the desired
position.
4.
L
ongitudinal adjustment of seat
L
ift the control bar and adjust to the desired
position.
5.
A
djustment of lumbar support
T
urn the control and adjust to the desired
position.
6.
H
eated seat controls
T
he heated seats only operate when the
engine is running.
Seat consisting of a seat cushion, seat back and head restraint which can all be adjusted for optimum driving comfort.
For your safety, do not drive with the
head restraints removed; they must be
in place and correctly adjusted.Before moving the seat backwards,
ensure that there is nothing that might
prevent the full travel of the seat, so
as to avoid the risk of of jamming the
seat caused by the presence of objects
on the floor behind the seat or rear
passengers. If the seat jams, stop the
movement immediately.
Ease of use and comfort