Citroen C5 2016 (RD/TD) / 2.G Owner's Manual
Manufacturer: CITROEN, Model Year: 2016, Model line: C5, Model: Citroen C5 2016 (RD/TD) / 2.GPages: 366, PDF Size: 30.93 MB
Page 171 of 366
169
C5_en_Chap07_securite-enfant_ed01-2015
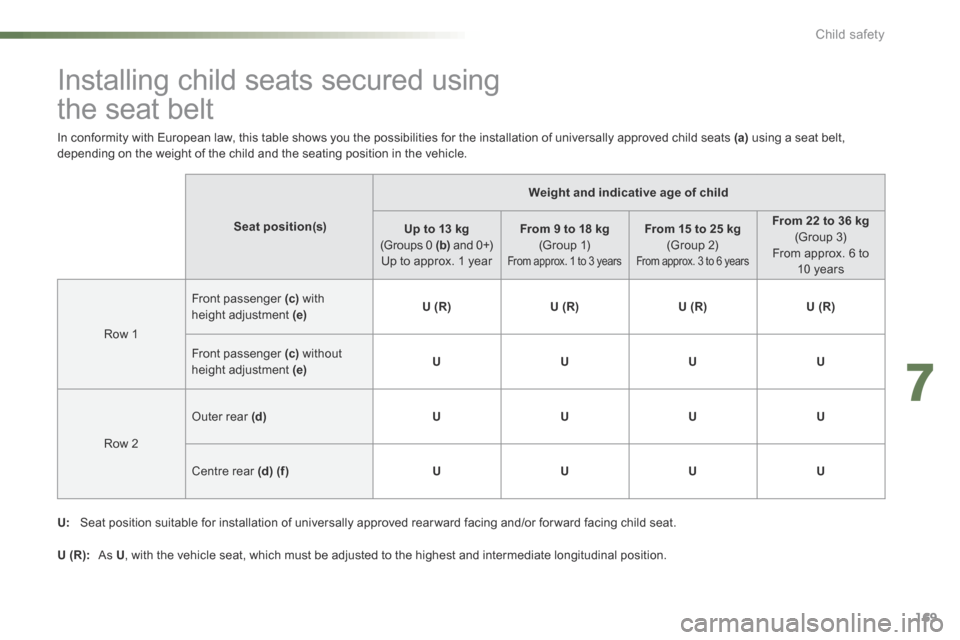
Installing child seats secured using
the seat belt
Seat position(s)Weight and indicative age of child
Up to 13 kg
(Groups 0 (b) and 0+)
Up to approx. 1 year From 9 to 18 kg
(Group 1)
From approx. 1 to 3 years
From 15 to 25 kg (Group 2)
From approx. 3 to 6 years
From 22 to 36 kg (Group 3)
From approx. 6 to 10 years
Row 1 Front passenger
(c) with
height adjustment (e) U (R)
U (R)U (R)U (R)
Front passenger (c) without
height adjustment (e) U
UUU
Row 2 o
uter rear (d) UUUU
Centre rear (d) (f ) UUUU
In conformity with European law, this table shows you the possibilities for the installation of universally approved child seats (a)
using a seat belt,
depending on the weight of the child and the seating position in the vehicle.
U: Seat position suitable for installation of universally approved rear ward facing and/or for ward facing child seat.
U (R): as U, with the vehicle seat, which must be adjusted to the highest and intermediate longitudinal position.
7
Child safety
Page 172 of 366

170
C5_en_Chap07_securite-enfant_ed01-2015
(a) Universal child seat: child seat which can
be installed in all vehicles using the seat
belt.
( b ) Group 0: from birth to 10 kg. Shells and
"car cots" cannot be installed on the front
passenger seat.
( c ) Consult the current legislation for your
country before driving with your child in this
seat.
(d) To install a child seat on a rear seat,
rear ward facing or for ward facing, move
the front seat for ward, then straighten the
backrest to allow enough space for the
child seat and the child's legs. Remove and stow the head restraint
before installing a child seat with a
backrest on a passenger seat. Refit the
head restraint once the child seat has
been removed.
(e)
When a rear ward facing child seat is
installed on the front passenger seat , the
passenger airbag must be deactivated.
o therwise the child would risk being
seriously injured or killed if the
airbag were deployed . When a for ward
facing child seat is installed on the front
passenger seat , the passenger airbag
must remain active.
(f ) A child seat with a support leg must never
be installed on the centre rear seat .
Child safety
Page 173 of 366
171
C5_en_Chap07_securite-enfant_ed01-2015
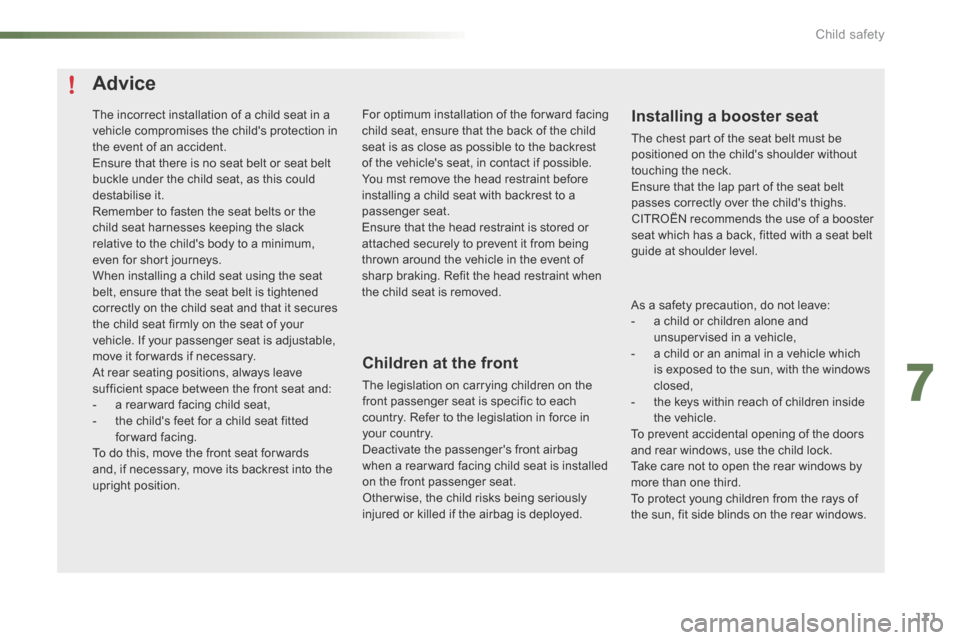
Advice
Children at the front
The legislation on carrying children on the
front passenger seat is specific to each
country. Refer to the legislation in force in
your country.
Deactivate the passenger's front airbag
when a rear ward facing child seat is installed
on the front passenger seat.
Otherwise, the child risks being seriously
injured or killed if the airbag is deployed.
Installing a booster seat
The chest part of the seat belt must be
positioned on the child's shoulder without
touching the neck.
Ensure that the lap part of the seat belt
passes correctly over the child's thighs.
CITROËN recommends the use of a booster
seat which has a back, fitted with a seat belt
guide at shoulder level.
The incorrect installation of a child seat in a
vehicle compromises the child's protection in
the event of an accident.
Ensure that there is no seat belt or seat belt
buckle under the child seat, as this could
destabilise it.
Remember to fasten the seat belts or the
child seat harnesses keeping the slack
relative to the child's body to a minimum,
even for short journeys.
When installing a child seat using the seat
belt, ensure that the seat belt is tightened
correctly on the child seat and that it secures
the child seat firmly on the seat of your
vehicle. If your passenger seat is adjustable,
move it for wards if necessary.
At rear seating positions, always leave
sufficient space between the front seat and:
-
a rear ward facing child seat,
- the child's feet for a child seat fitted
forward facing.
To do this, move the front seat for wards
and, if necessary, move its backrest into the
upright position. For optimum installation of the forward facing
child seat, ensure that the back of the child
seat is as close as possible to the backrest
of the vehicle's seat, in contact if possible.
You mst remove the head restraint before
installing a child seat with backrest to a
passenger seat.
Ensure that the head restraint is stored or
attached securely to prevent it from being
thrown around the vehicle in the event of
sharp braking. Refit the head restraint when
the child seat is removed.
As a safety precaution, do not leave:
- a child or children alone and
unsupervised in a vehicle,
- a child or an animal in a vehicle which
is exposed to the sun, with the windows
closed,
- the keys within reach of children inside
the vehicle.
To prevent accidental opening of the doors
and rear windows, use the child lock.
Take care not to open the rear windows by
more than one third.
To protect young children from the rays of
the sun, fit side blinds on the rear windows.
7
Child safety
Page 174 of 366
172
C5_en_Chap07_securite-enfant_ed01-2015
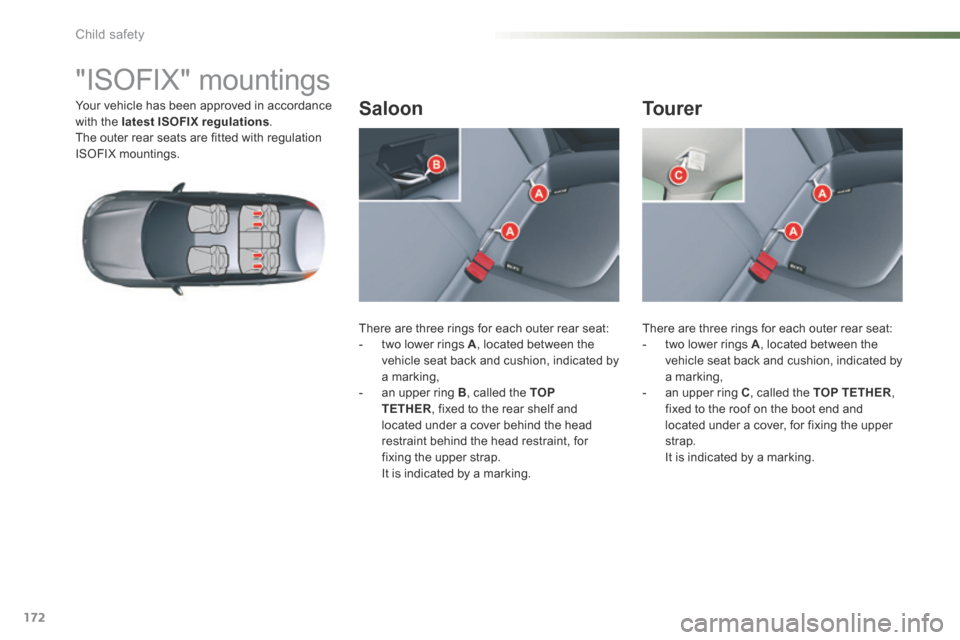
"ISOFIX" mountings
Your vehicle has been approved in accordance
with the latest ISOFIX regulations.
The outer rear seats are fitted with regulation
ISOFIX mountings.
There are three rings for each outer rear seat:
- two lower rings A , located between the
vehicle seat back and cushion, indicated by
a marking,
- an upper ring B , called the TOP
TETHER , fixed to the rear shelf and
located under a cover behind the head
restraint behind the head restraint, for
fixing the upper strap.
It is indicated by a marking. There are three rings for each outer rear seat:
-
two lower rings A , located between the
vehicle seat back and cushion, indicated by
a marking,
- an upper ring C , called the TOP TETHER ,
fixed to the roof on the boot end and
located under a cover, for fixing the upper
strap.
It is indicated by a marking.Saloon Tourer
Child safety
Page 175 of 366
173
C5_en_Chap07_securite-enfant_ed01-2015
To attach the child seat to the TOP TETHER:
- remove and stow the head restraint before
installing a child seat on this seat (refit it
once the child seat has been removed),
- pass the strap of the child seat centrally
between the head restraint rod apertures,
- raise the T oP TETHER cover, located on
the rear shelf (Saloon) or the roof (Tourer),
- secure the upper strap fixing to the ring B
or C ,
- tighten the upper strap.
The T
oP TETHER is used to secure the
upper strap of child seats that have one. This
arrangement limits the for ward tipping of the
child seat in the event of a front impact. The incorrect installation of a child seat
in a vehicle compromises the child's
protection in the event of an accident.
Observe strictly the fitting instructions
provided with the child seat.
This ISOFIX mounting system provides fast,
reliable and safe fitting of the child seat in
your vehicle.
The ISOFIX child seats are fitted with
two latches which are secured easily on the
two rings A
, following installation of the guides
(supplied with the seat).
Some also have an upper strap which is
attached to the ring B or C . For information on the possibilities for
installing ISOFIX child seats in your
vehicle, refer to the summary table.
7
Child safety
Page 176 of 366
174
C5_en_Chap07_securite-enfant_ed01-2015
ISOFIX child seat recommended by CITROËN and type
approved for your vehicle
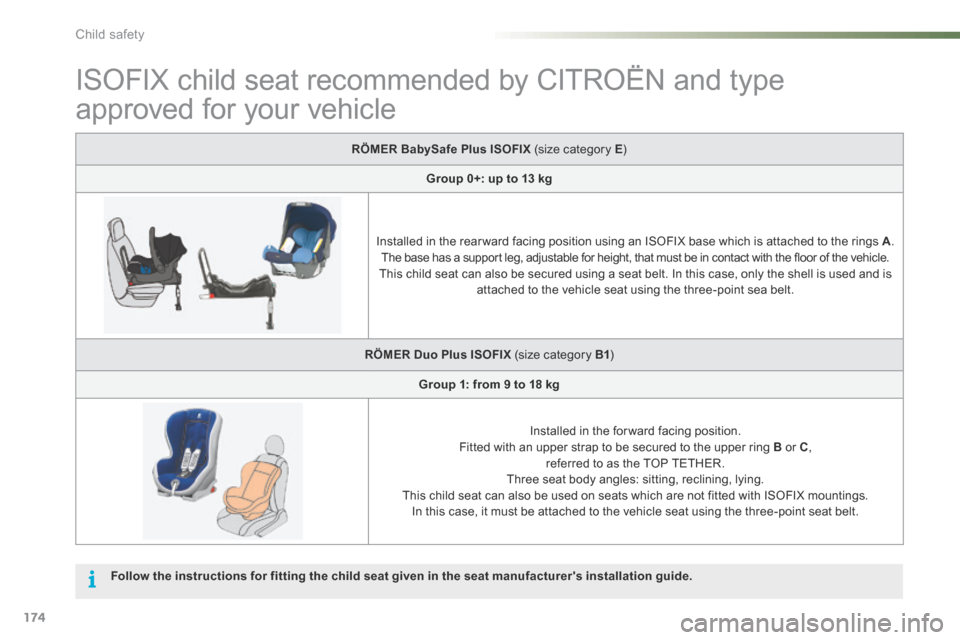
RÖMER BabySafe Plus ISOFIX (size category E)
Group 0+: up to 13 kg
Installed in the rear ward facing position using an ISOFIX base which is attached to the rings A .
The base has a support leg, adjustable for height, that must be in contact with the floor of the vehicle.
This child seat can also be secured using a seat belt. In this case, only the shell is used and is attached to the vehicle seat using the three-point sea belt.
RÖMER Duo Plus ISOFIX (size category B1 )
Group 1: from 9 to 18 kg
Installed in the for ward facing position.
Fitted with an upper strap to be secured to the upper ring B or C ,
referred to as the TOP TETHER.
Three seat body angles: sitting, reclining, lying.
This child seat can also be used on seats which are not fitted with ISOFIX mountings. In this case, it must be attached to the vehicle seat using the three-point seat belt.
Follow the instructions for fitting the child seat given in the seat manufacturer's installation guide.
Child safety
Page 177 of 366
175
C5_en_Chap07_securite-enfant_ed01-2015
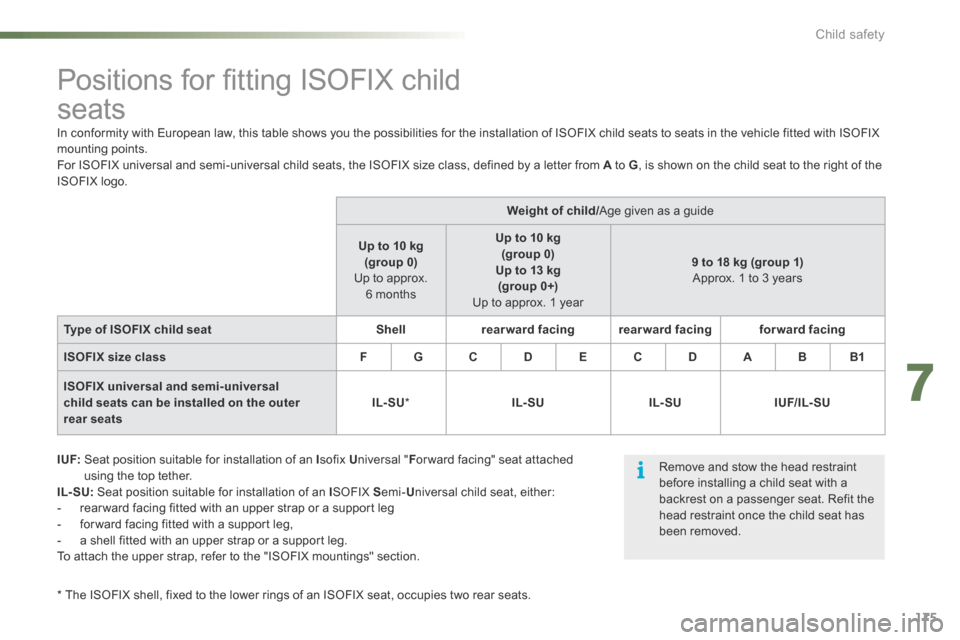
Positions for fitting ISOFIX child
seats
I UF: Seat position suitable for installation of an I sofix Universal " For ward facing" seat attached
using the top tether.
IL- SU: Seat position suitable for installation of an I So FIX S emi-Universal child seat, either:
- rear ward facing fitted with an upper strap or a support leg
- for ward facing fitted with a support leg,
- a shell fitted with an upper strap or a support leg.
To attach the upper strap, refer to the "ISOFIX mountings" section. Weight of child/
Age given as a guide
Up to 10 kg (group 0)
Up to approx. 6 months Up to 10 kg
(group 0)
Up to 13 kg (group 0+)
Up to approx. 1 year 9 to 18 kg (group 1)
Approx. 1 to 3 years
Type of ISOFIX child seat Shellrearward facing rearward facing forward facing
ISOFIX size class FG CD EC DABB1
ISOFIX universal and semi-universal
child seats can be installed on the outer
rear seats IL- SU
* IL- SU IL- SUIUF/IL- SU
* The ISOFIX shell, fixed to the lower rings of an ISOFIX seat, occupies two rear seats.
In conformity with European law, this table shows you the possibilities for the installation of ISOFIX child seats to seats in the vehicle fitted with ISOFIX
mounting points.
For ISOFIX universal and semi-universal child seats, the ISOFIX size class, defined by a letter from A to G
, is shown on the child seat to the right of the
ISOFIX logo.
Remove and stow the head restraint
before installing a child seat with a
backrest on a passenger seat. Refit the
head restraint once the child seat has
been removed.
7
Child safety
Page 178 of 366

176
C5_en_Chap07_securite-enfant_ed01-2015
Electric child lock
Activation
F Press button A .
The indicator lamp in button A comes on,
accompanied by a message in the instrument
panel screen. Remote control system to prevent opening of the rear doors using their interior controls and use of
the rear electric windows.
The control is located on the driver's door, with the electric window controls.
Deactivation
F Press button A again.
The indicator lamp in button A goes off,
accompanied by a message in the instrument
panel screen.
This indicator lamp remains off until the child
lock is activated. This system is independent and in no
circumstances does it take the place of
the central locking control.
Check the status of the child lock each
time you switch on the ignition.
Always remove the key from the ignition
when leaving the vehicle, even for a
short time.
In the event of a serious impact,
the electric child lock is deactivated
automatically to permit the exit of the
rear passengers. Any other status of the indicator lamp
indicates a fault with the electric child
lock. Have it checked by a CITROËN
dealer or a qualified workshop.
Child safety
Page 179 of 366

177
C5_en_Chap08_information_ed01-2015
Fuel tank
Capacity of the tank: approximately 71 litres*.
Low fuel level
When the low fuel level in the
tank is reached, this warning
lamp comes on in the instrument
panel, accompanied by an
audible warning and a message in the display
screen. When it first comes on, there remains
around 5 litres of fuel in the tank.
You must refuel to avoid running out of fuel.
F Press at the top left corner, then pull on its
edge. While you are refuelling, the engine must be
stopped and the ignition switched off.
F
Turn the key a quarter turn to lock and
unlock the filler cap.
F When refuelling, place the cap on hook A .
F Fill the tank, but do not persist after the
third cut-off ; this could cause your vehicle
to malfunction.
For a petrol engine with a catalytic
converter, the use of unleaded fuel is
compulsory.
The filler neck is narrower to ensure that only
unleaded petrol nozzles can be put in.
Opening the fuel flap Refuelling
Additions of fuel must be of at least
5 litres to be taken into account by the
fuel gauge.
Opening the filler cap may create a
noise of an inrush of air. This vacuum,
which is entirely normal, is caused by
the sealing of the fuel system.
With Stop & Start, never refuel with the
system in STOP mode; you must switch
off the ignition with the key.
* 55 litres for Slovakia.
8
Practical information
Page 180 of 366
178
C5_en_Chap08_information_ed01-2015
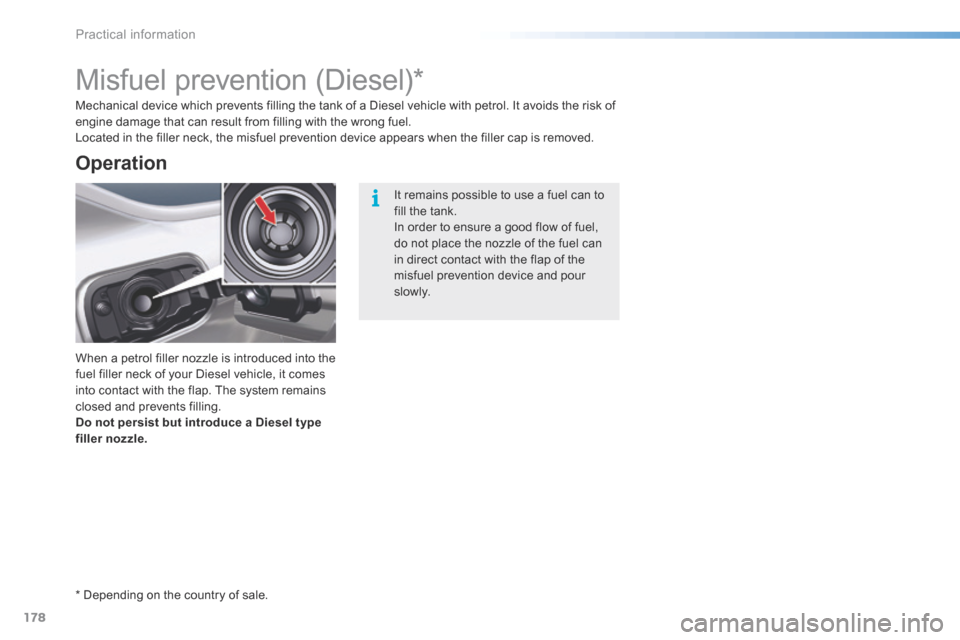
Misfuel prevention (Diesel)*
When a petrol filler nozzle is introduced into the
fuel filler neck of your Diesel vehicle, it comes
into contact with the flap. The system remains
closed and prevents filling.
Do not persist but introduce a Diesel type
filler nozzle. Mechanical device which prevents filling the tank of a Diesel vehicle with petrol. It avoids the risk of
engine damage that can result from filling with the wrong fuel.
Located in the filler neck, the misfuel prevention device appears when the filler cap is removed.
Operation
It remains possible to use a fuel can to
fill the tank.
In order to ensure a good flow of fuel,
do not place the nozzle of the fuel can
in direct contact with the flap of the
misfuel prevention device and pour
s l ow l y.
* Depending on the country of sale.
Practical information