engine Citroen C5 2016 (RD/TD) / 2.G Owner's Guide
[x] Cancel search | Manufacturer: CITROEN, Model Year: 2016, Model line: C5, Model: Citroen C5 2016 (RD/TD) / 2.GPages: 366, PDF Size: 30.93 MB
Page 50 of 366
48
C5_en_Chap02_ouverture_ed01-2015
Operating problem
Following disconnection of the vehicle battery,
replacement of the remote control battery or in
the event of a remote control fault, you can no
longer unlock, lock or locate your vehicle.
F First of all, use the key in the lock to unlock
or lock your vehicle.
F Then, reinitialise the remote control.
If the problem persists, contact a CITROËN
dealer or a qualified workshop as soon as
possible.
Reinitialisation
F Switch off the ignition.
F Turn the key to position 2 (Igntion on) .
(Refer to the "Starting-switching off the
engine" section).
F Press the closed padlock immediately for a
few seconds, until the operation requested
is triggered.
F Switch off the ignition and remove the key
from the ignition switch.
The remote control is fully operational again.
Changing the battery
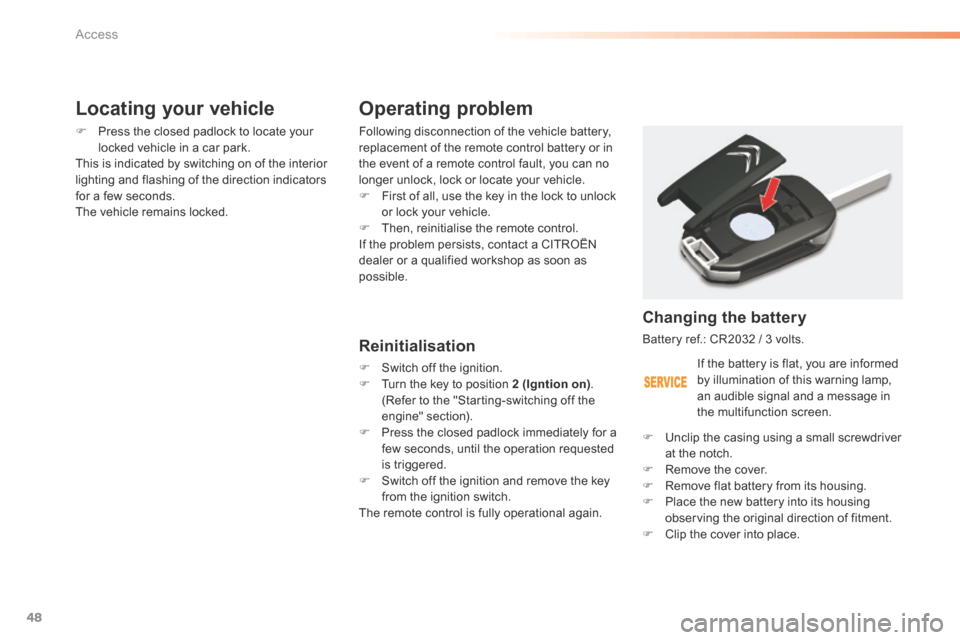
Battery ref.: CR2032 / 3 volts.
F Unclip the casing using a small screwdriver
at the notch.
F Remove the cover.
F Remove flat battery from its housing.
F Place the new battery into its housing
observing the original direction of fitment.
F Clip the cover into place.
Locating your vehicle
F Press the closed padlock to locate your
locked vehicle in a car park.
This is indicated by switching on of the interior
lighting and flashing of the direction indicators
for a few seconds.
The vehicle remains locked.
If the battery is flat, you are informed
by illumination of this warning lamp,
an audible signal and a message in
the multifunction screen.
access
Page 51 of 366
49
C5_en_Chap02_ouverture_ed01-2015
Lost keys
Go to a CITROËN dealer with the vehicle's registration document, your personal
identification documents and if possible the key code label.
The CITROËN dealer will be able to look up the key code and the transponder code
required to order a new key.
Remote control
The high frequency remote control is a sensitive system; do not operate it while it is in your
pocket as there is a possibility that it may unlock the vehicle, without you being aware of it.
Do not repeatedly press the buttons of your remote control out of range and out of sight of
your vehicle. You run the risk of stopping it from working and the remote control would have
to be reinitialised.
No remote control can operate when the key is in the ignition switch, even when the ignition
is switched off, except for reinitialisation.
Locking the vehicle
Driving with the doors locked may make access to the passenger compartment by the
emergency services more difficult in an emergency.
As a safety precaution, never leave children alone in the vehicle, except for a very short
period.
In all cases, it is essential to remove the key from the ignition switch when leaving the vehicle.
Anti-theft protection
Do not make any modifications to the electronic engine immobiliser system; this could
cause malfunctions.
When purchasing a second-hand vehicle
Have the pairing of all of the keys in your possession checked by a CITROËN dealer, to
ensure that only your keys can be used to open and start the vehicle.Do not throw the remote control
batteries away, they contain metals
which are harmful to the environment.
Take them to an approved collection
point.
2
access
Page 57 of 366
55
C5_en_Chap02_ouverture_ed01-2015
doors
Opening
From inside
Manual central locking
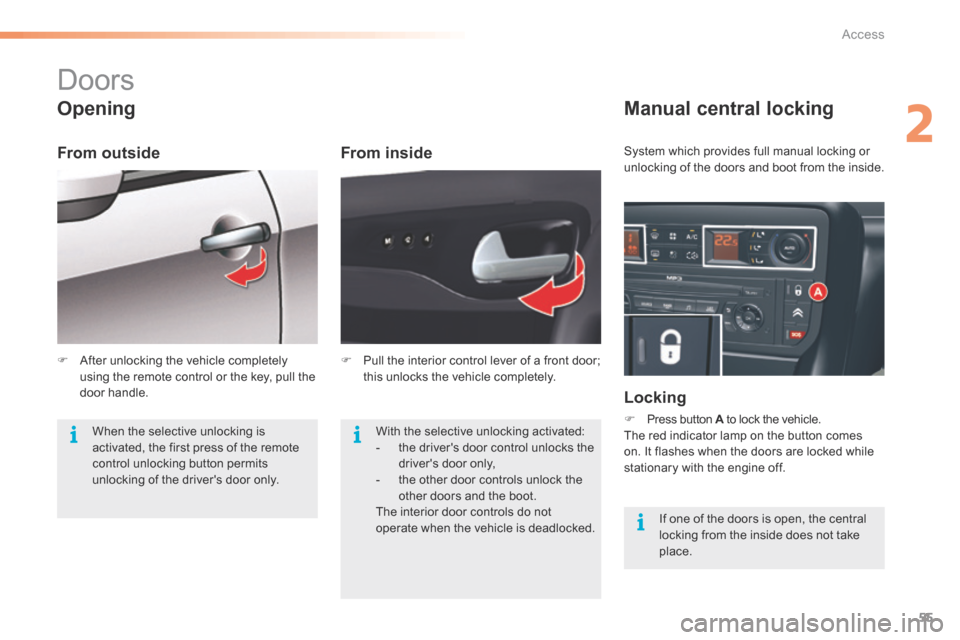
Locking
F Press button A to lock the vehicle.
The red indicator lamp on the button comes
on. It flashes when the doors are locked while
stationary with the engine off.
From outside
When the selective unlocking is
activated, the first press of the remote
control unlocking button permits
unlocking of the driver's door only. With the selective unlocking activated:
-
the driver's door control unlocks the
driver's door only,
- the other door controls unlock the
other doors and the boot.
The interior door controls do not
operate when the vehicle is deadlocked. If one of the doors is open, the central
locking from the inside does not take
place.
System which provides full manual locking or
unlocking of the doors and boot from the inside.
F After unlocking the vehicle completely
using the remote control or the key, pull the
door handle. F
Pull the interior control lever of a front door;
this unlocks the vehicle completely.
2
access
Page 66 of 366
64
C5_en_Chap03_ergo-et-confort_ed01-2015
Front seats
Manual adjustments
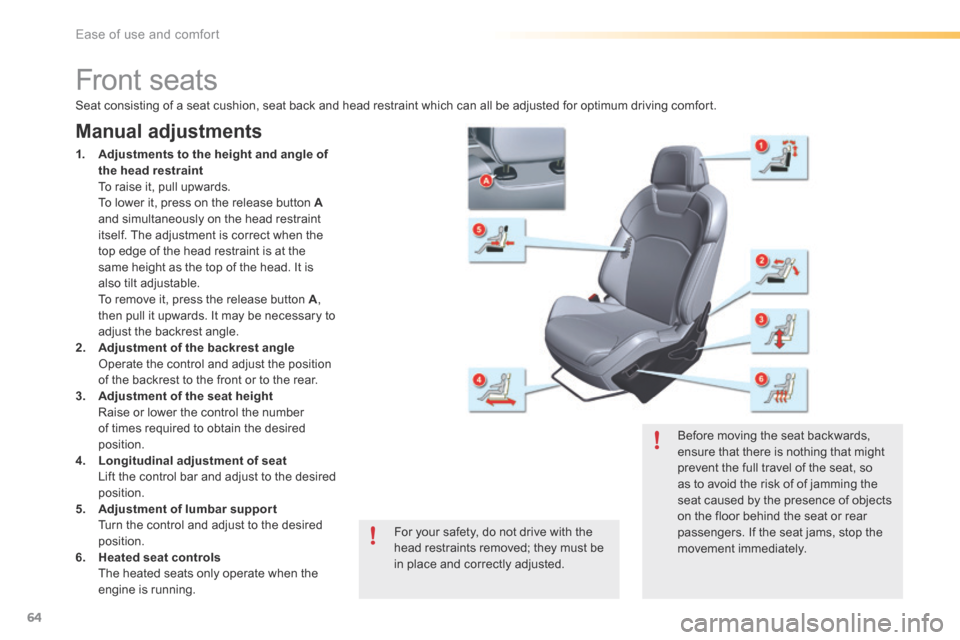
1. Adjustments to the height and angle of
the head restraint
To raise it, pull upwards.
To lower it, press on the release button A
and simultaneously on the head restraint
itself. The adjustment is correct when the
top edge of the head restraint is at the
same height as the top of the head. It is
also tilt adjustable.
To remove it, press the release button A ,
then pull it upwards. It may be necessary to
adjust the backrest angle.
2. Adjustment of the backrest angle
Operate the control and adjust the position
of the backrest to the front or to the rear.
3. Adjustment of the seat height
Raise or lower the control the number
of times required to obtain the desired
position.
4. Longitudinal adjustment of seat
Lift the control bar and adjust to the desired
position.
5. Adjustment of lumbar support
Turn the control and adjust to the desired
position.
6. Heated seat controls
The heated seats only operate when the
engine is running.
Seat consisting of a seat cushion, seat back and head restraint which can all be adjusted for optimum driving comfort.
For your safety, do not drive with the
head restraints removed; they must be
in place and correctly adjusted.Before moving the seat backwards,
ensure that there is nothing that might
prevent the full travel of the seat, so
as to avoid the risk of of jamming the
seat caused by the presence of objects
on the floor behind the seat or rear
passengers. If the seat jams, stop the
movement immediately.
Ease of use and comfort
Page 67 of 366
65
C5_en_Chap03_ergo-et-confort_ed01-2015
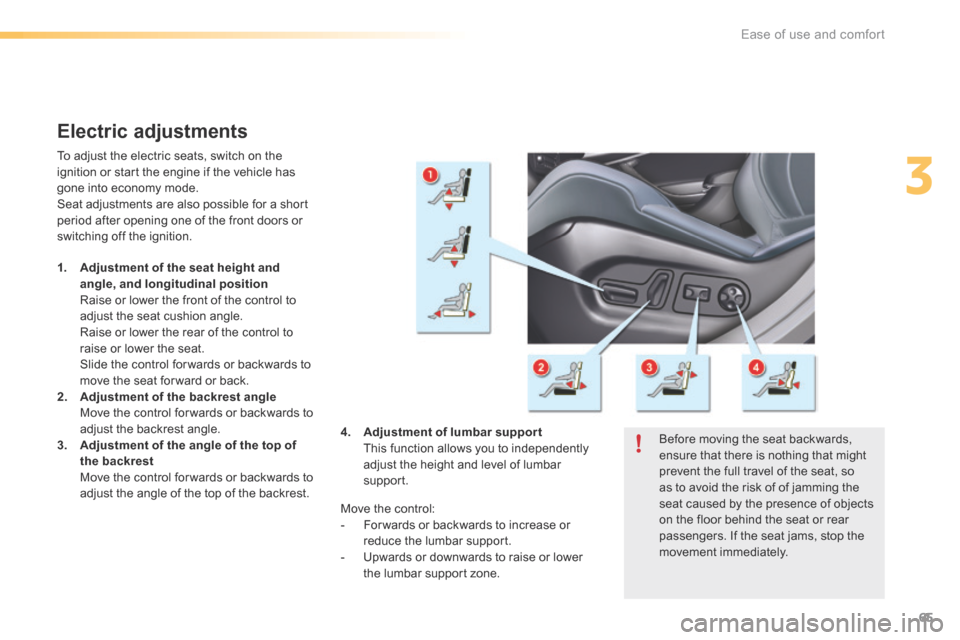
Electric adjustments
To adjust the electric seats, switch on the
ignition or start the engine if the vehicle has
gone into economy mode.
Seat adjustments are also possible for a short
period after opening one of the front doors or
switching off the ignition.
1. Adjustment of the seat height and
angle, and longitudinal position
Raise or lower the front of the control to
adjust the seat cushion angle.
Raise or lower the rear of the control to
raise or lower the seat.
Slide the control for wards or backwards to
move the seat for ward or back.
2. Adjustment of the backrest angle
Move the control for wards or backwards to
adjust the backrest angle.
3. Adjustment of the angle of the top of
the backrest
Move the control for wards or backwards to
adjust the angle of the top of the backrest. Before moving the seat backwards,
ensure that there is nothing that might
prevent the full travel of the seat, so
as to avoid the risk of of jamming the
seat caused by the presence of objects
on the floor behind the seat or rear
passengers. If the seat jams, stop the
movement immediately.
Move the control:
-
For wards or backwards to increase or
reduce the lumbar support.
- Upwards or downwards to raise or lower
the lumbar support zone.
4.
Adjustment of lumbar support
This function allows you to independently
adjust the height and level of lumbar
support.
3
Ease of use and comfort
Page 68 of 366
66
C5_en_Chap03_ergo-et-confort_ed01-2015
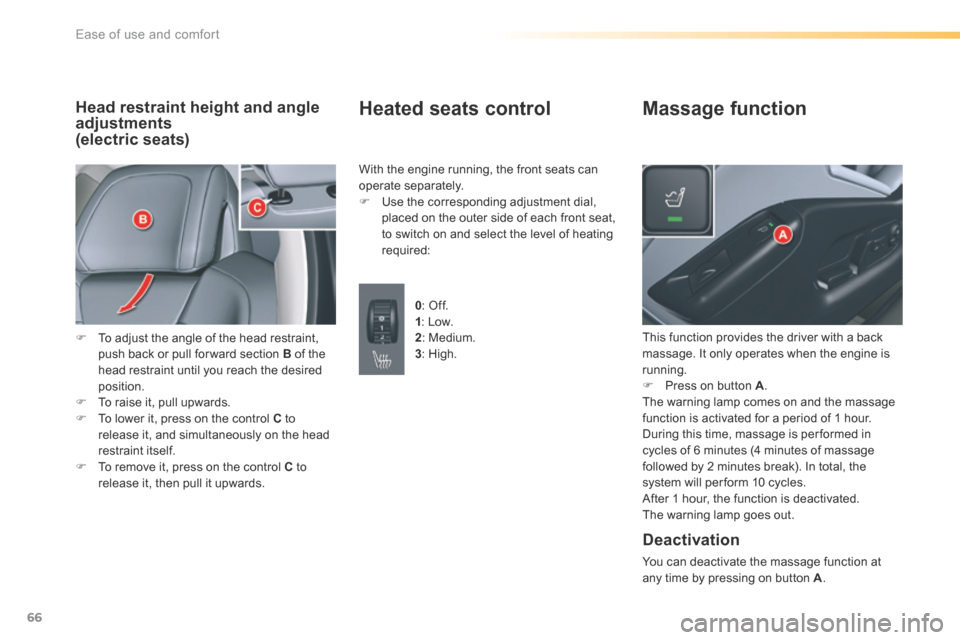
Head restraint height and angle
adjustments
(electric seats)
F To adjust the angle of the head restraint,
push back or pull for ward section B of the
head restraint until you reach the desired
position.
F To raise it, pull upwards.
F To lower it, press on the control C to
release it, and simultaneously on the head
restraint itself.
F To remove it, press on the control C to
release it, then pull it upwards.
Heated seats control
With the engine running, the front seats can
operate separately.
F Use the corresponding adjustment dial,
placed on the outer side of each front seat,
to switch on and select the level of heating
required:
0: Off.
1 : Low.
2 : Medium.
3 : High. This function provides the driver with a back
massage. It only operates when the engine is
running.
F
Press on button A .
The warning lamp comes on and the massage
function is activated for a period of 1 hour.
During this time, massage is per formed in
cycles of 6 minutes (4 minutes of massage
followed by 2 minutes break). In total, the
system will per form 10 cycles.
After 1 hour, the function is deactivated.
The warning lamp goes out.
Massage function
Deactivation
You can deactivate the massage function at
any time by pressing on button A .
Ease of use and comfort
Page 69 of 366

67
C5_en_Chap03_ergo-et-confort_ed01-2015
Storing driving positions
System which stores the settings of the driver's
seat. It allows two positions to be stored.
Use the buttons located on the door, driver's
side.
When storing a driving position, the air
conditioning settings are also memorised.
Storing a position
Using buttons M / 1 / 2
F Switch on the ignition.
F Adjust your seat.
F Press button M , then press button 1 or 2
within four seconds.
An audible signal confirms that the settings
have been stored.
Storing a new position cancels the previous
position.
Welcome function
The welcome function assists entry and exit
from the vehicle.
After switching off the ignition and opening
the driver’s door, the driver's seat moves back
automatically and then stays in this position,
ready for the next entry to the vehicle.
When switching on the ignition, the seat moves
for ward to the memorised driving position.
When moving the seat, take care that no
person or object hinders the automatic
movement of the seat.
This function is deactivated by default.
You can activate or deactivate this function in
the vehicle parameters menu.
To adjust the air conditioning, refer to
the "Air conditioning" section.For your safety, avoid storing a driving
position while driving.
Recalling a stored position
Ignition on or engine running
F b
riefly press button 1 or 2 to recall the
corresponding position.
An audible signal indicates the end of the
adjustment.
When the ignition is on, after a few consecutive
position recalls, the function will be deactivated
until the engine is started, to prevent
discharging of the battery.
3
Ease of use and comfort
Page 76 of 366
74
C5_en_Chap03_ergo-et-confort_ed01-2015
We recommend use of the automatic regulation
of the air conditioning.
It permits automatic and optimised control
of all of the following functions: air flow,
temperature in the passenger compartment
and air distribution, by means of various
sensors (ambient temperature, sunshine).
This eliminates any need for you to change
your settings other than the temperature value
displayed.
F Take care not to cover the sunshine
sensor A.
If you select the automatic mode
(by pressing the "AUTO" control) and leave
all of the vents open, optimum comfort will be
maintained and humidity and condensation will
be removed regardless of the exterior climatic
conditions.
The temperature in the passenger compartment
can only be lower than the ambient temperature
if the air conditioning is on.
In order to be effective, the air conditioning must
be used with the windows closed. If the vehicle
has been parked in the sun for a long period
and the interior temperature is very high, first
ventilate the passenger compartment with the
windows open for a few minutes, then close the
windows.
Heating, ventilation and air conditioning recommendations
To keep the air conditioning system in
good working order it is essential that it is
operated at least once a month.
The air conditioning uses engine power
during its operation. As a result, the fuel
consumption of the vehicle increases.
In certain cases of particularly arduous use
(e.g. towing the maximum load on a steep
gradient in high temperatures), switching off
the air conditioning saves engine power and
improves the towing capacity.
Air inlet
Check that the exterior grille for the air inlet,
at the bottom of the windscreen, is clean and
free of dead leaves, snow, etc.
When washing the vehicle using a high
pressure nozzle, avoid spraying at the air
inlet. Maximum comfort is obtained by means of
a good distribution of air in the passenger
compartment, both in the front and in the rear.
To obtain a uniform distribution of air, take
care not to block the exterior air intake grille
located at the base of the windscreen, the
vents, the air outlets under the front seats and
the air extractor located behind the flaps in
the boot.
The front and rear vents are fitted with
thumbwheels to adjust the air flow and
direction. We recommend that you leave all of
the vents open.
Dust filter / Odour filter
(active carbon)
There is a filter for excluding odours and
dust.
This filter must be changed in line with the
vehicle's servicing schedule. (Refer to the
maintenance and warranty guide).
Air conditioning
Air circulation
Ease of use and comfort
Page 77 of 366
75
C5_en_Chap03_ergo-et-confort_ed01-2015
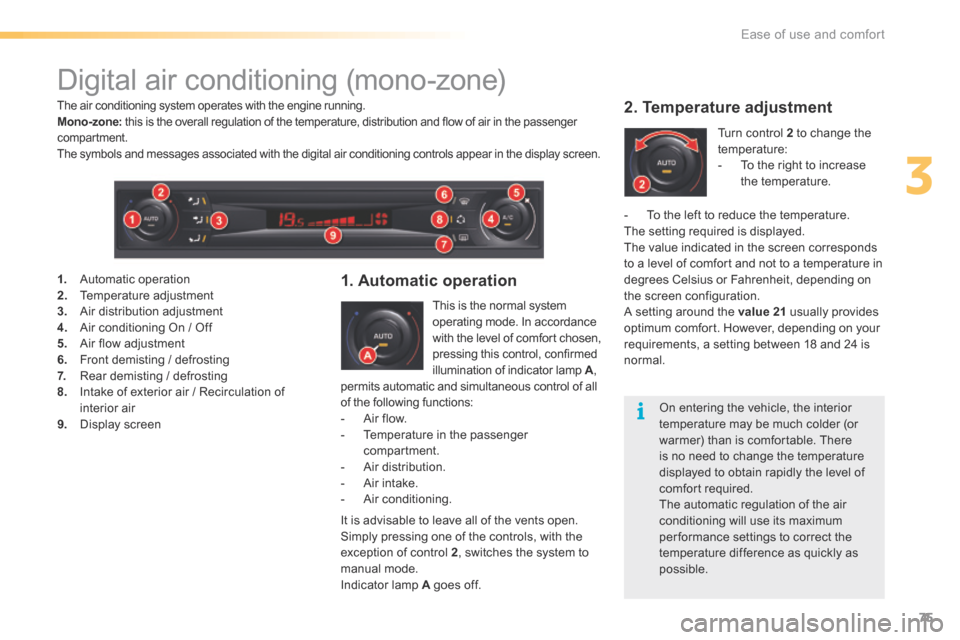
Digital air conditioning (mono-zone)
This is the normal system
operating mode. In accordance
with the level of comfor t chosen,
pressing this control, confirmed
illumination of indicator lamp A,
permits automatic and simultaneous control of all
of the following functions:
- Air flow.
- Temperature in the passenger
compartment.
- Air distribution.
- Air intake.
- Air conditioning.
1. Automatic operation
It is advisable to leave all of the vents open.
Simply pressing one of the controls, with the
exception of control 2 , switches the system to
manual mode.
Indicator lamp A goes off.
2. Temperature adjustment
Turn control 2 to change the
temperature:
- To the right to increase
the temperature.
1. Automatic operation
2. Temperature adjustment
3. Air distribution adjustment
4. Air conditioning On / Off
5. Air flow adjustment
6. Front demisting / defrosting
7. Rear demisting / defrosting
8. Intake of exterior air / Recirculation of
interior air
9. d isplay screen -
To the left to reduce the temperature.
The setting required is displayed.
The value indicated in the screen corresponds
to a level of comfort and not to a temperature in
degrees Celsius or Fahrenheit, depending on
the screen configuration.
A setting around the value 21 usually provides
optimum comfort. However, depending on your
requirements, a setting between 18 and 24 is
normal.
The air conditioning system operates with the engine running.
Mono-zone: this is the overall regulation of the temperature, distribution and flow of air in the passenger
compartment.
The symbols and messages associated with the digital air conditioning controls appear in the display screen.
On entering the vehicle, the interior
temperature may be much colder (or
warmer) than is comfortable. There
is no need to change the temperature
displayed to obtain rapidly the level of
comfort required.
The automatic regulation of the air
conditioning will use its maximum
per formance settings to correct the
temperature difference as quickly as
possible.
3
Ease of use and comfort
Page 78 of 366

76
C5_en_Chap03_ergo-et-confort_ed01-2015
Control via the manual controls
It is possible to adjust one or more functions
manually, while leaving the other functions in
automatic mode.
F Press one of the controls, with the
exception of the one that regulates the
temperature 2. Indicator lamp A goes off.
Switching to manual mode may result in
discomfort (temperature, humidity, odour,
condensation) and may not provide optimum
comfort.
To return to automatic mode, press the "AUTO"
control.
3. Air distribution adjustment
F Press the controls 3 to
change the distribution of the
air flow.
4. Air conditioning
F Press control 4 . Indicator
lamp B comes on.
In order to be effective, the air conditioning
must be used with the windows closed.
Deactivating the air conditioning may result
in discomfort (temperature, humidity, odour,
condensation).
The indicator lamps corresponding to the
distribution chosen come on:
-
Windscreen and front side windows.
- Front ventilation (central and side vents
and air diffusion grille if open) and rear
ventilation.
- Front and rear footwells. The air conditioning will only operate when the
engine is running. The air blower control (air
flow adjustment) must be active to obtain air
conditioning.
Simultaneous display of the distribution of
air to the windscreen and side windows and
of front and rear ventilation is not possible.
Ease of use and comfort