light Citroen C5 2016 (RD/TD) / 2.G Service Manual
[x] Cancel search | Manufacturer: CITROEN, Model Year: 2016, Model line: C5, Model: Citroen C5 2016 (RD/TD) / 2.GPages: 366, PDF Size: 30.93 MB
Page 195 of 366
193
C5_en_Chap08_information_ed01-2015
Changing a bulb
Front lamps
Model with Xenon headlamps (D1S)
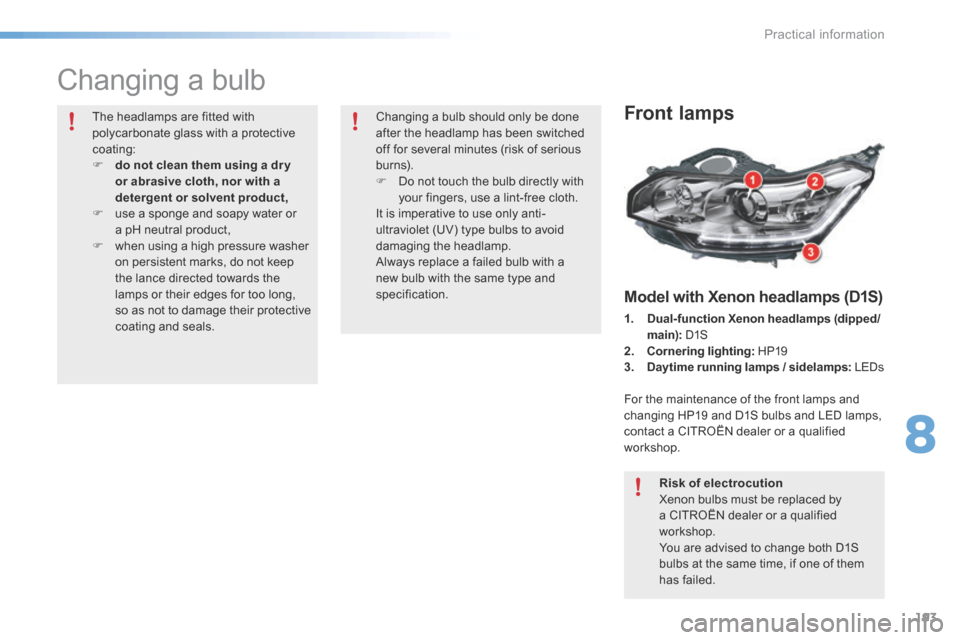
1. Dual-function Xenon headlamps (dipped/
main): d1S
2. Cornering lighting: HP19
3. Daytime running lamps / sidelamps: LEd s
For the maintenance of the front lamps and
changing HP19 and D1S bulbs and LED lamps,
contact a CITROËN dealer or a qualified
workshop.
Risk of electrocution
Xenon bulbs must be replaced by
a CITROËN dealer or a qualified
workshop.
You are advised to change both D1S
bulbs at the same time, if one of them
has failed.
The headlamps are fitted with
polycarbonate glass with a protective
coating:
F
do not clean them using a dr y
or abrasive cloth, nor with a
detergent or solvent product,
F use a sponge and soapy water or
a pH neutral product,
F when using a high pressure washer
on persistent marks, do not keep
the lance directed towards the
lamps or their edges for too long,
so as not to damage their protective
coating and seals. Changing a bulb should only be done
after the headlamp has been switched
off for several minutes (risk of serious
burns).
F d
o not touch the bulb directly with
your fingers, use a lint-free cloth.
It is imperative to use only anti-
ultraviolet (UV) type bulbs to avoid
damaging the headlamp.
a lways replace a failed bulb with a
new bulb with the same type and
specification.
8
Practical information
Page 196 of 366
194
C5_en_Chap08_information_ed01-2015
Dipped beam headlamps
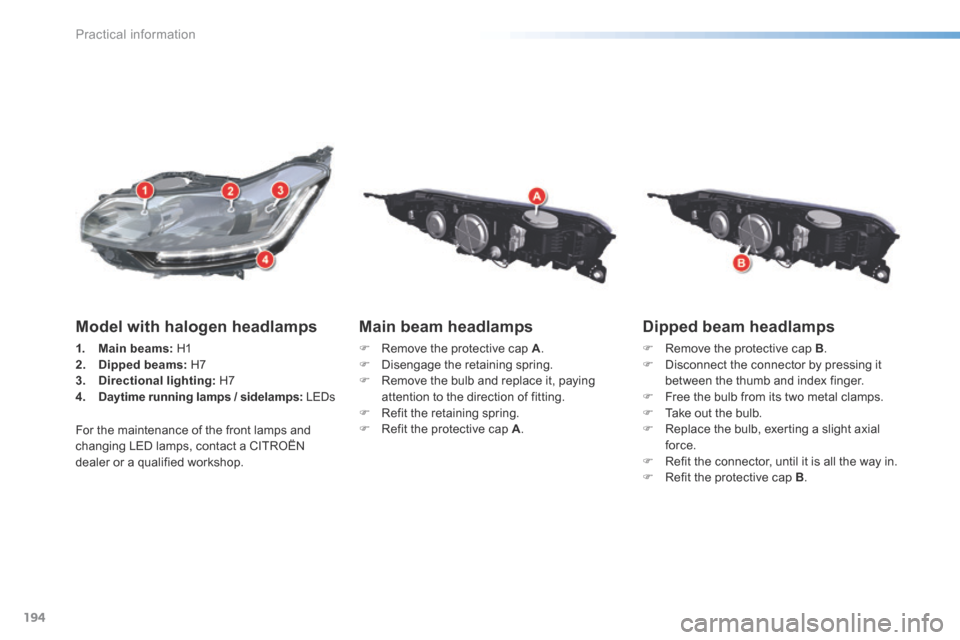
F Remove the protective cap B .
F Disconnect the connector by pressing it
between the thumb and index finger.
F Free the bulb from its two metal clamps.
F Take out the bulb.
F Replace the bulb, exerting a slight axial
force.
F Refit the connector, until it is all the way in.
F Refit the protective cap B .
Main beam headlamps
F Remove the protective cap A .
F Disengage the retaining spring.
F Remove the bulb and replace it, paying
attention to the direction of fitting.
F Refit the retaining spring.
F Refit the protective cap A .
Model with halogen headlamps
1. Main beams: H1
2. Dipped beams: H7
3. Directional lighting: H7
4. Daytime running lamps / sidelamps: LEd s
For the maintenance of the front lamps and
changing LED lamps, contact a CITROËN
dealer or a qualified workshop.
Practical information
Page 197 of 366
195
C5_en_Chap08_information_ed01-2015
Directional lamp
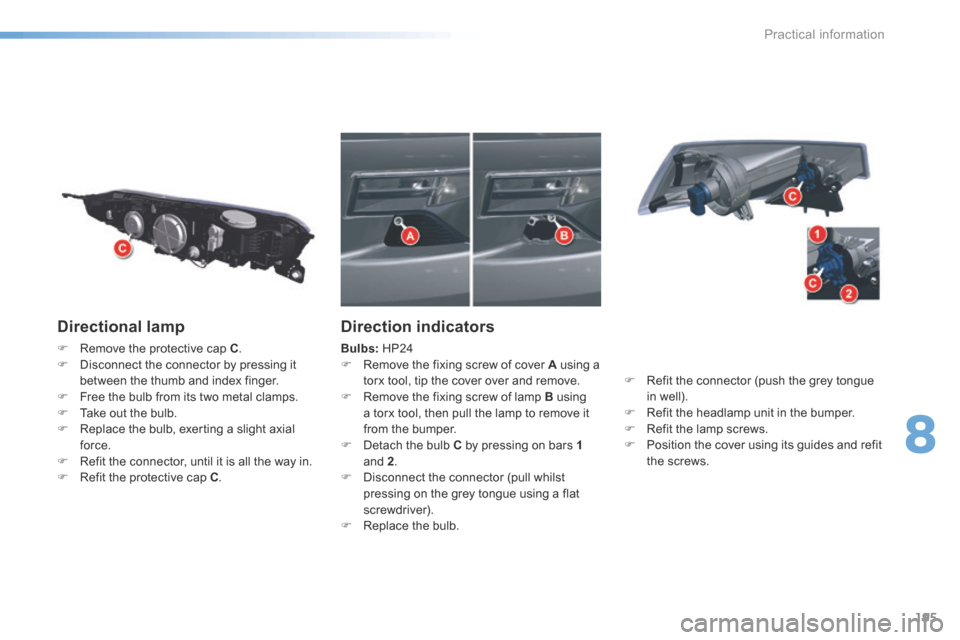
F Remove the protective cap C .
F Disconnect the connector by pressing it
between the thumb and index finger.
F Free the bulb from its two metal clamps.
F Take out the bulb.
F Replace the bulb, exerting a slight axial
force.
F Refit the connector, until it is all the way in.
F Refit the protective cap C .
Direction indicators
Bulbs: HP24
F Remove the fixing screw of cover A using a
torx tool, tip the cover over and remove.
F Remove the fixing screw of lamp B using
a torx tool, then pull the lamp to remove it
from the bumper.
F d etach the bulb C by pressing on bars 1
and 2 .
F Disconnect the connector (pull whilst
pressing on the grey tongue using a flat
screwdriver).
F Replace the bulb. F
Refit the connector (push the grey tongue
in well).
F Refit the headlamp unit in the bumper.
F Refit the lamp screws.
F Position the cover using its guides and refit
the screws.
8
Practical information
Page 203 of 366
201
C5_en_Chap08_information_ed01-2015
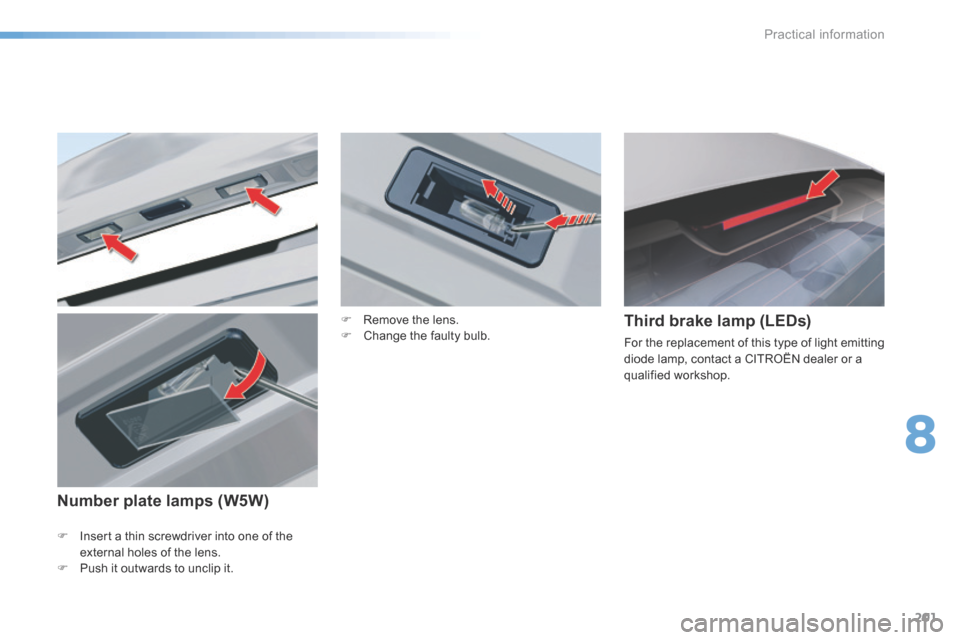
F Insert a thin screwdriver into one of the
external holes of the lens.
F Push it outwards to unclip it.
Third brake lamp (LEDs)
For the replacement of this type of light emitting
diode lamp, contact a CITROËN dealer or a
qualified workshop.
F
Remove the lens.
F Change the faulty bulb.
Number plate lamps (W5W)
8
Practical information
Page 205 of 366

203
C5_en_Chap08_information_ed01-2015
Door aperture lamps
Bulb: W5W
F Detach the lamp cover for access to the
bulb.
Footwell lighting
Bulb: W5W
F Detach the lamp cover for access to the
bulb.
Glove box
Bulb: W5W
F Detach the lamp cover for access to the
bulb.
8
Practical information
Page 208 of 366
206
C5_en_Chap08_information_ed01-2015
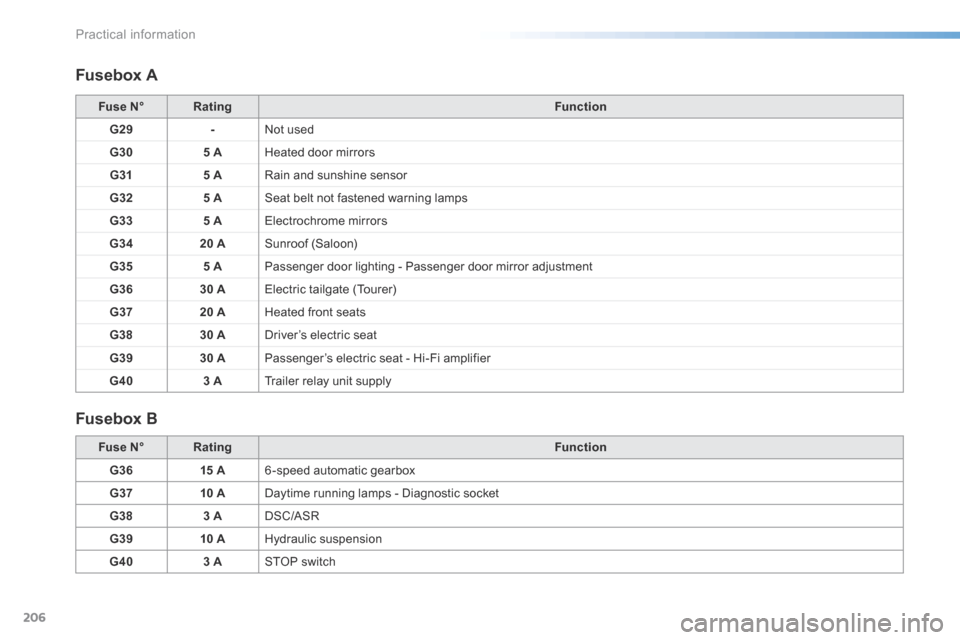
Fusebox A
Fusebox B
Fuse N°Rating Function
G29 -not used
G30 5 AHeated door mirrors
G31 5 ARain and sunshine sensor
G32 5 ASeat belt not fastened warning lamps
G33 5 AElectrochrome mirrors
G34 20 ASunroof (Saloon)
G35 5 APassenger door lighting - Passenger door mirror adjustment
G36 30 AElectric tailgate (Tourer)
G37 20 AHeated front seats
G38 30 Adriver’s electric seat
G39 30 APassenger’s electric seat - Hi-Fi amplifier
G40 3 ATrailer relay unit supply
Fuse N° Rating Function
G36 15 A6 -speed automatic gearbox
G37 10 ADaytime running lamps - Diagnostic socket
G38 3 ADSC/ASR
G39 10 AHydraulic suspension
G40 3 ASToP switch
Practical information
Page 209 of 366
207
C5_en_Chap08_information_ed01-2015
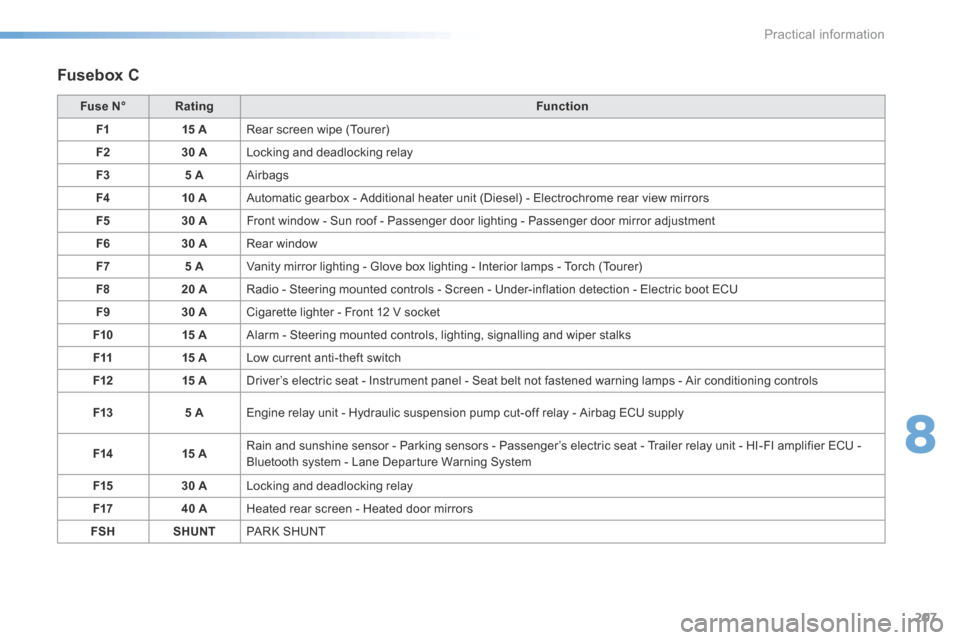
Fusebox C
Fuse N°Rating Function
F1 15 ARear screen wipe (Tourer)
F2 30 ALocking and deadlocking relay
F3 5 AAirbags
F4 10 AAutomatic gearbox - Additional heater unit (Diesel) - Electrochrome rear view mirrors
F5 30 AFront window - Sun roof - Passenger door lighting - Passenger door mirror adjustment
F6 30 ARear window
F7 5 AVanity mirror lighting - Glove box lighting - Interior lamps - Torch (Tourer)
F8 20 ARadio - Steering mounted controls - Screen - Under-inflation detection - Electric boot ECU
F9 30 ACigarette lighter - Front 12 V socket
F10 15 AAlarm - Steering mounted controls, lighting, signalling and wiper stalks
F11 15 ALow current anti-theft switch
F12 15 ADriver’s electric seat - Instrument panel - Seat belt not fastened warning lamps - Air conditioning controls
F13 5 AEngine relay unit - Hydraulic suspension pump cut-off relay - Airbag ECU supply
F14 15 ARain and sunshine sensor - Parking sensors - Passenger’s electric seat - Trailer relay unit - HI-FI amplifier ECU -
Bluetooth system - Lane Departure Warning System
F15 30 ALocking and deadlocking relay
F17 40 AHeated rear screen - Heated door mirrors
FSH SHUNTPaRk S H U nT
8
Practical information
Page 213 of 366
211
C5_en_Chap08_information_ed01-2015
Following reconnection of
the battery
Following reconnection of the battery,
switch on the ignition and wait 1 minute
before starting to permit initialisation
of the electronic systems. However, if
slight malfunctions remain following this
operation, contact a CITRoËn dealer
or a qualified workshop.
Referring to the corresponding section,
you must yourself reinitialise:
- the remote control key,
- the glass panoramic roof blind,
- the radio station presets, the date
and time in the audio system.
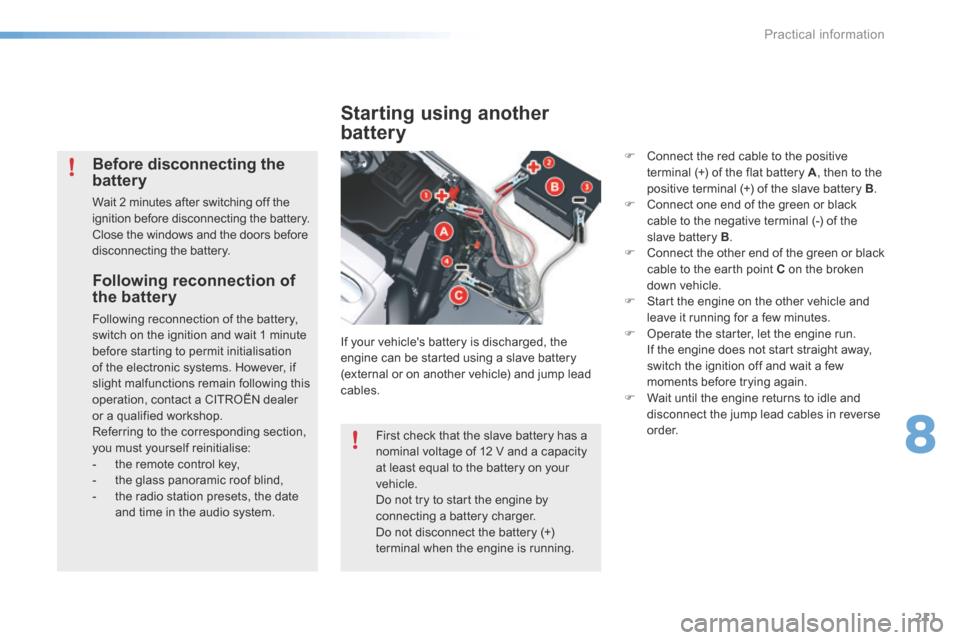
Starting using another
battery
If your vehicle's battery is discharged, the
engine can be started using a slave battery
(external or on another vehicle) and jump lead
cables.
Before disconnecting the
battery
Wait 2 minutes after switching off the
ignition before disconnecting the battery.
Close the windows and the doors before
disconnecting the battery. F
Connect the red cable to the positive
terminal (+) of the flat battery A , then to the
positive terminal (+) of the slave battery B .
F Connect one end of the green or black
cable to the negative terminal (-) of the
slave battery B .
F Connect the other end of the green or black
cable to the earth point C on the broken
down vehicle.
F Start the engine on the other vehicle and
leave it running for a few minutes.
F Operate the starter, let the engine run.
If the engine does not start straight away,
switch the ignition off and wait a few
moments before trying again.
F Wait until the engine returns to idle and
disconnect the jump lead cables in reverse
o r d e r.
First check that the slave battery has a
nominal voltage of 12 V and a capacity
at least equal to the battery on your
vehicle.
Do not try to start the engine by
connecting a battery charger.
Do not disconnect the battery (+)
terminal when the engine is running.
8
Practical information
Page 219 of 366
217
C5_en_Chap08_information_ed01-2015
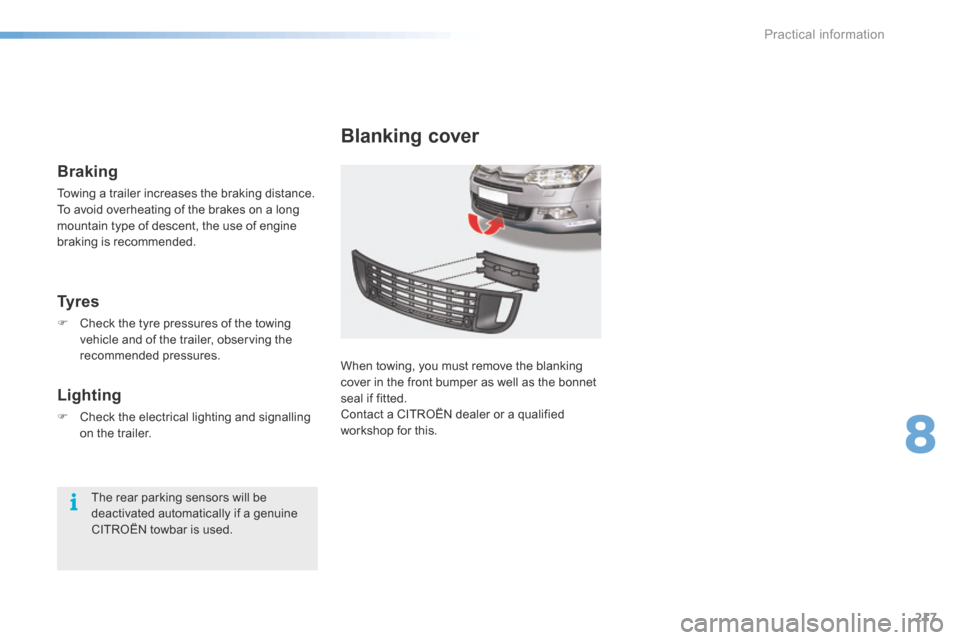
Blanking cover
When towing, you must remove the blanking
cover in the front bumper as well as the bonnet
seal if fitted.
Contact a CITROËN dealer or a qualified
workshop for this.
Ty r e s
F Check the tyre pressures of the towing
vehicle and of the trailer, observing the
recommended pressures.
Lighting
F Check the electrical lighting and signalling
on the trailer.
The rear parking sensors will be
deactivated automatically if a genuine
CITROËN towbar is used.
Braking
Towing a trailer increases the braking distance.
To avoid overheating of the brakes on a long
mountain type of descent, the use of engine
braking is recommended.
8
Practical information
Page 235 of 366

233
C5_en_Chap09_verification_ed01-2015
Brake pads
Brake wear depends on the style
of driving, particularly in the case
of vehicles used in town, over short
distances. It may be necessary to have
the condition of the brakes checked,
even between vehicle services.
Brake disc wear
For information on checking brake
disc wear, contact a CITRoËn dealer
or a qualified workshop.
Unless there is a leak in the circuit, a drop in
the brake fluid level indicates that the brake
pads are worn.
Manual parking brake
Only use products recommended by
CITROËN or products of equivalent
quality and specification.
In order to optimise the operation of
units as important as those in the
braking system, CITROËN selects and
offers very specific products.
After washing the vehicle, dampness,
or in wintry conditions, ice can form
on the brake discs and pads: braking
efficiency may be reduced. Make light
brake applications to dry and defrost
the brakes.
If a loss of effectiveness of this
system is noticed, the parking
brake must be checked, even
between two services.
Checking this system must be done by a
CITROËN dealer or a qualified workshop.
Electric parking
brake
This system does not require any
routine servicing. However, in the
event of a problem, have the system
checked by a CITROËN dealer or a
qualified workshop.
For more information, refer to the
"Electric parking brake - Operating
faults" section.
9
Checks