headlamp CITROEN C5 2020 Owner's Manual
[x] Cancel search | Manufacturer: CITROEN, Model Year: 2020, Model line: C5, Model: CITROEN C5 2020Pages: 348, PDF Size: 10.72 MB
Page 143 of 348
141
C5_en_Chap05_eclairage-et-visibilite_ed01-2016
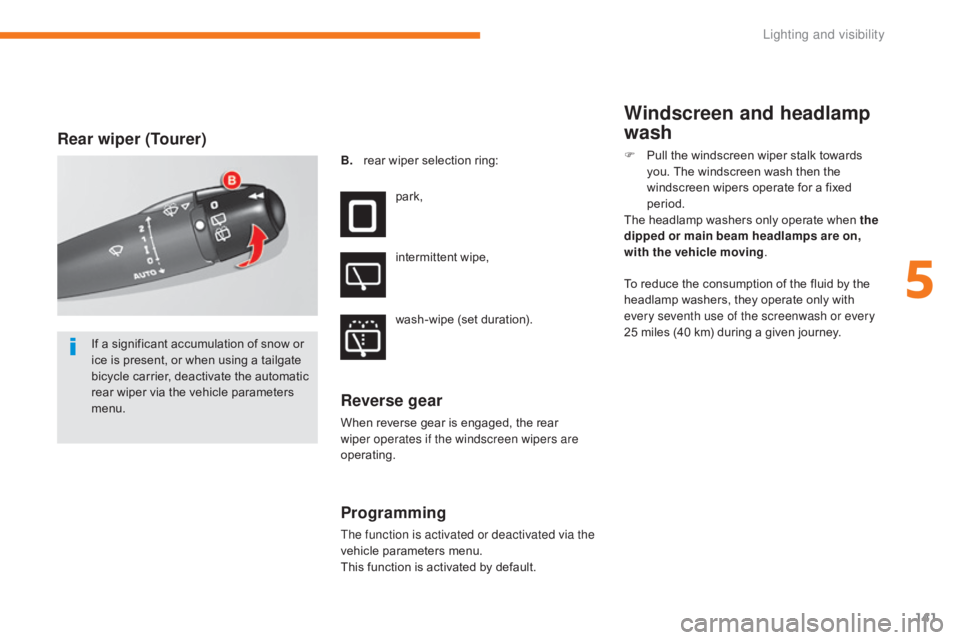
Rear wiper (Tourer)
B. rear wiper selection ring:park,
intermittent wipe,
wash-wipe (set duration).
Reverse gear
When reverse gear is engaged, the rear
wiper operates if the windscreen wipers are
operating.
Programming
The function is activated or deactivated via the
vehicle parameters menu.
This function is activated by default.
Windscreen and headlamp
wash
F Pull the windscreen wiper stalk towards you. The windscreen wash then the
windscreen wipers operate for a fixed
period.
The headlamp washers only operate when the
dipped or main beam headlamps are on,
with the vehicle moving .
If a significant accumulation of snow or
ice is present, or when using a tailgate
bicycle carrier, deactivate the automatic
rear wiper via the vehicle parameters
menu. To reduce the consumption of the fluid by the
headlamp washers, they operate only with
every seventh use of the screenwash or every
25 miles (40 km) during a given journey.
5
Lighting and visibility
Page 181 of 348
179
C5_en_Chap07_info-pratiques_ed01-2016
Energy economy mode
System which manages the duration of use of
certain functions to conserve a sufficient level
of charge in the battery.
After the engine has stopped, you can still use
functions such as the audio and telematics
system, windscreen wipers, dipped beam
headlamps,
courtesy lamps, etc. for a
maximum combined duration of about forty
minutes.Switching to economy mode
A message appears in the instrument panel
screen indicating that the vehicle has switched
to economy mode and the active functions are
put on standby.
If a telephone call is being made at this
time, it will be maintained for around
10
minutes with the Bluetooth
® hands-
free system of your audio system.
Exiting economy mode
These functions are reactivated automatically
next time the vehicle is driven.
In order to restore the use of these functions
immediately, start the engine and let it run:
-
f
or less than ten minutes, to use the
equipment for approximately five minutes,
-
f
or more than ten minutes, to use the
equipment for up to approximately
thirty
m
inutes.
Let the engine run for the duration specified to
ensure that the battery charge is sufficient.
Do not repeatedly and continuously restart the
engine in order to charge the battery.
A flat battery prevents the engine from
starting.
For more information on the
12
V batter y, refer to the corresponding
section.
7
Practical information
Page 183 of 348
181
C5_en_Chap07_info-pratiques_ed01-2016
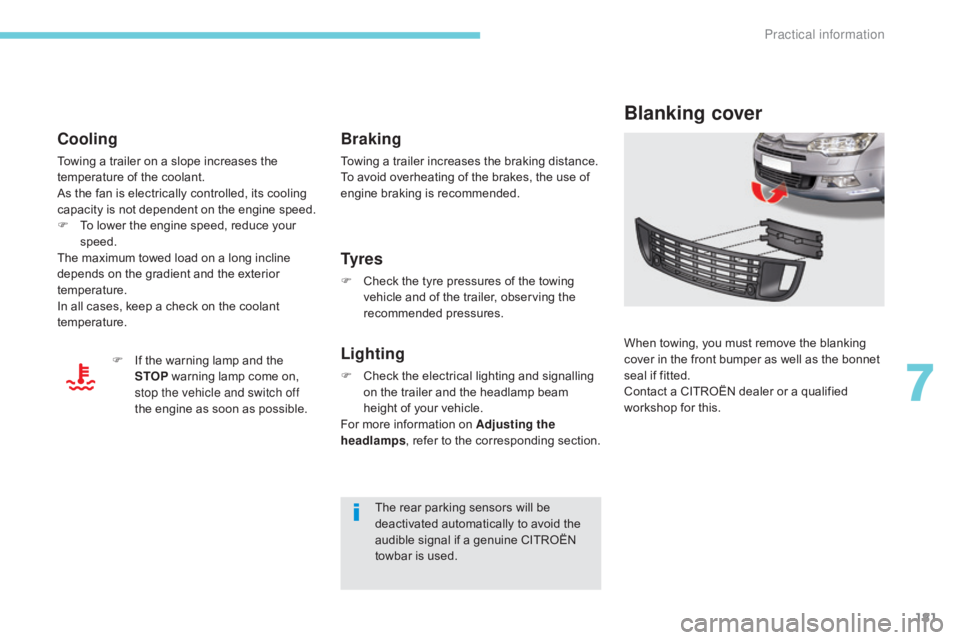
Blanking cover
When towing, you must remove the blanking
cover in the front bumper as well as the bonnet
seal if fitted.
Contact a CITROËN dealer or a qualified
workshop for this.
Ty r e s
F Check the tyre pressures of the towing vehicle and of the trailer, observing the
recommended pressures.
Lighting
F Check the electrical lighting and signalling on the trailer and the headlamp beam
height of your vehicle.
For more information on Adjusting the
headlamps , refer to the corresponding section.
The rear parking sensors will be
deactivated automatically to avoid the
audible signal if a genuine CITROËN
towbar is used.
Braking
Towing a trailer increases the braking distance.
To avoid overheating of the brakes, the use of
engine braking is recommended.
Cooling
Towing a trailer on a slope increases the
temperature of the coolant.
As the fan is electrically controlled, its cooling
capacity is not dependent on the engine speed.
F
T
o lower the engine speed, reduce your
speed.
The maximum towed load on a long incline
depends on the gradient and the exterior
temperature.
In all cases, keep a check on the coolant
temperature.
F
I
f the warning lamp and the
STOP warning lamp come on,
stop the vehicle and switch off
the engine as soon as possible.
7
Practical information
Page 188 of 348
186
C5_en_Chap07_info-pratiques_ed01-2016
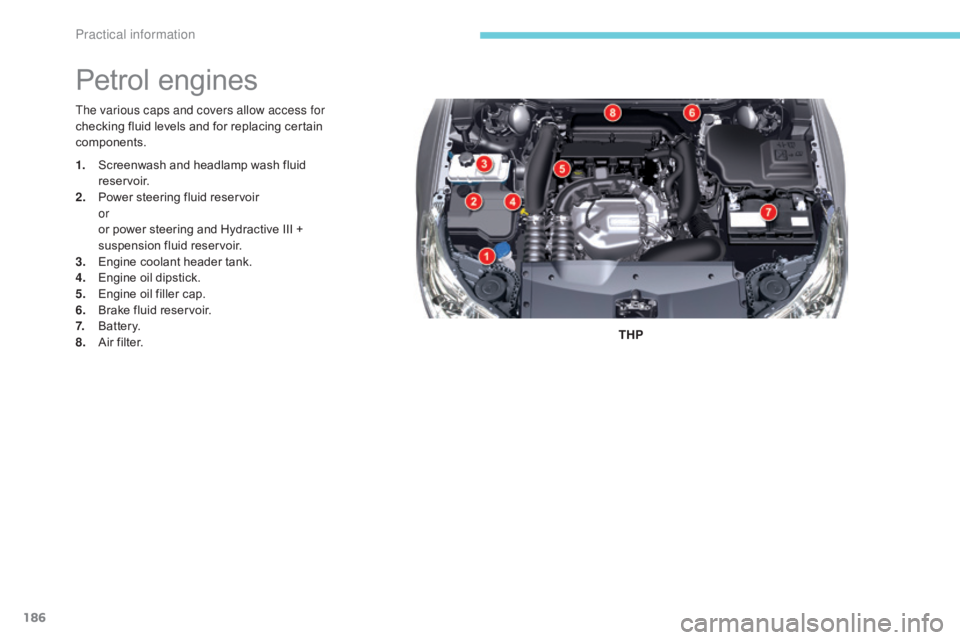
The various caps and covers allow access for
checking fluid levels and for replacing certain
components.THP
Petrol engines
1. Screenwash and headlamp wash fluid reservoir.
2.
P
ower steering fluid reservoir
or
o
r power steering and Hydractive III +
suspension fluid reservoir.
3.
E
ngine coolant header tank.
4.
E
ngine oil dipstick.
5.
E
ngine oil filler cap.
6.
B
rake fluid reservoir.
7.
B
attery.
8.
A
ir filter.
Practical information
Page 189 of 348
187
C5_en_Chap07_info-pratiques_ed01-2016
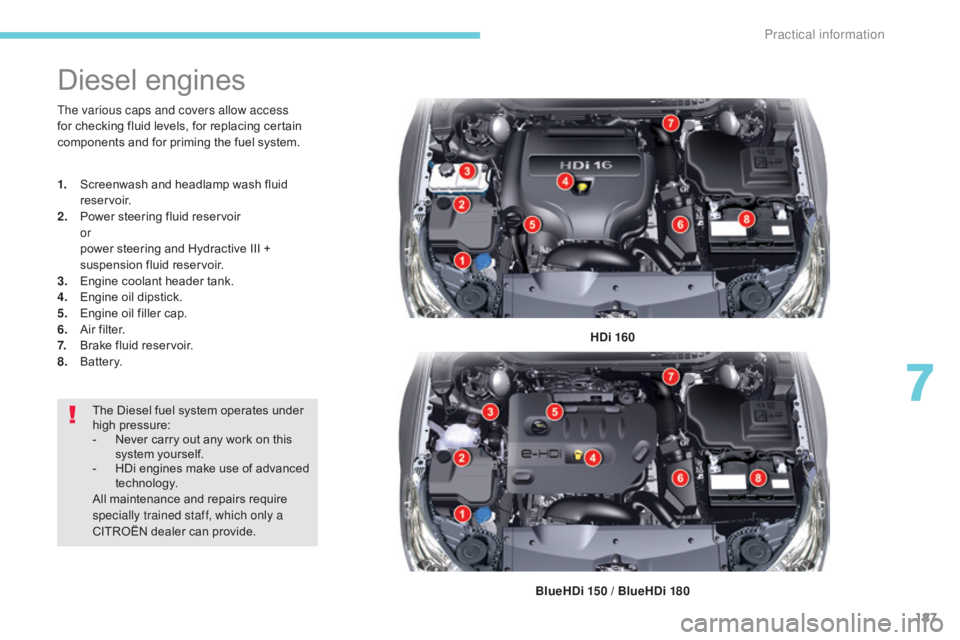
Diesel engines
HDi 160
BlueHDi 150 / BlueHDi 180
The various caps and covers allow access
for checking fluid levels, for replacing certain
components and for priming the fuel system.
1.
S
creenwash and headlamp wash fluid
reservoir.
2.
P
ower steering fluid reservoir
or
p
ower steering and Hydractive III +
suspension fluid reservoir.
3.
E
ngine coolant header tank.
4.
E
ngine oil dipstick.
5.
E
ngine oil filler cap.
6. A
ir filter.
7. B
rake fluid reservoir.
8.
B
attery.
The Diesel fuel system operates under
high pressure:
-
N
ever carry out any work on this
system yourself.
-
H
Di engines make use of advanced
technology.
All maintenance and repairs require
specially trained staff, which only a
CITROËN dealer can provide.
7
Practical information
Page 193 of 348
191
C5_en_Chap07_info-pratiques_ed01-2016
Diesel additive level
(Diesel engine with
particle filter)
To p p i n g u p
This additive must be topped up by a CITROËN
dealer or a qualified workshop without delay.
Used products
A low additive level is indicated by
illumination of this warning lamp,
accompanied by an audible warning
and a message in the instrument
panel screen.
Screenwash and headlamp
wash fluid
In the case of vehicles fitted with
headlamp washers, the low fluid level
is indicated by an audible signal and
a message in the screen.
Fluid specification
For optimum cleaning and to avoid freezing,
this fluid must not be topped up with or
replaced with plain water.
Reservoir capacity (depending on version).
-
s
creenwash fluid: approximately 3.5 litres,
-
s
creenwash and headlamp wash fluid:
approximately 6.15 litres.
Top up the reservoir when you next stop
the
vehicle. Avoid prolonged contact of used oil or
fluids with the skin.
Most of these fluids are harmful to
health or indeed very corrosive.
Do not discard used oil or fluids into
sewers or onto the ground.
Take used oil to a CITROËN dealer or
a qualified workshop (France) or to an
authorised waste disposal site.
7
Practical information
Page 220 of 348
218
C5_en_Chap08_en-cas-de-panne_ed01-2016
Changing a bulb
Front lamps
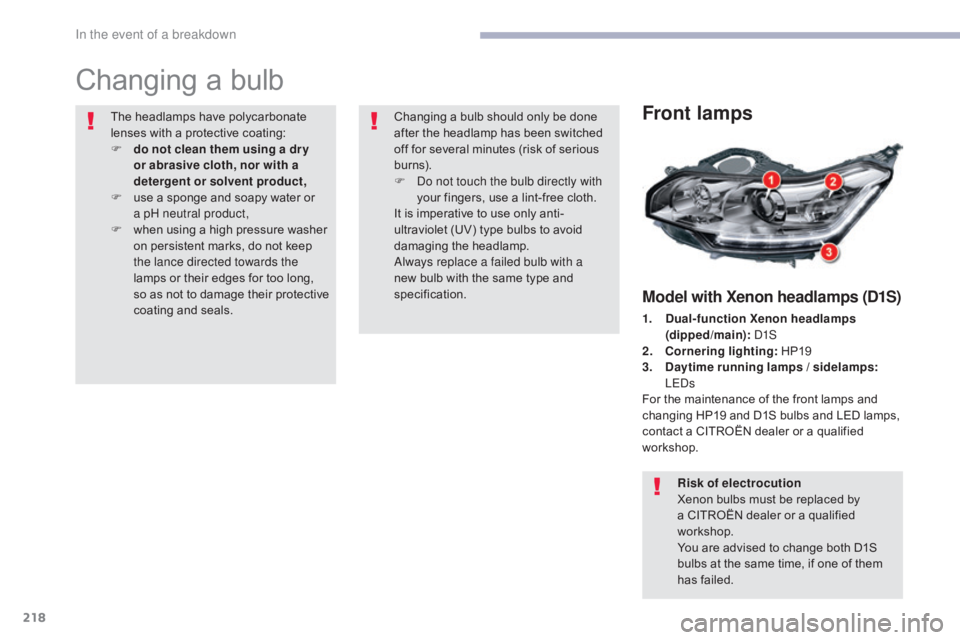
Model with Xenon headlamps (D1S)
1. Dual-function Xenon headlamps (dipped/main): D1S
2.
C
ornering lighting: HP19
3.
D
aytime running lamps / sidelamps:
LEDs
For the maintenance of the front lamps and
changing HP19 and D1S bulbs and LED lamps,
contact a CITROËN dealer or a qualified
workshop.
Risk of electrocution
Xenon bulbs must be replaced by
a CITROËN dealer or a qualified
workshop.
You are advised to change both D1S
bulbs at the same time, if one of them
has failed.
The headlamps have polycarbonate
lenses with a protective coating:
F
d
o not clean them using a dr y
or abrasive cloth, nor with a
detergent or solvent product,
F
u
se a sponge and soapy water or
a
pH neutral product,
F
w
hen using a high pressure washer
on persistent marks, do not keep
the lance directed towards the
lamps or their edges for too long,
so as not to damage their protective
coating and seals. Changing a bulb should only be done
after the headlamp has been switched
off for several minutes (risk of serious
burns).
F
D
o not touch the bulb directly with
your fingers, use a lint-free cloth.
It is imperative to use only anti-
ultraviolet (UV) type bulbs to avoid
damaging the headlamp.
Always replace a failed bulb with a
new bulb with the same type and
specification.
In the event of a breakdown
Page 221 of 348
219
C5_en_Chap08_en-cas-de-panne_ed01-2016
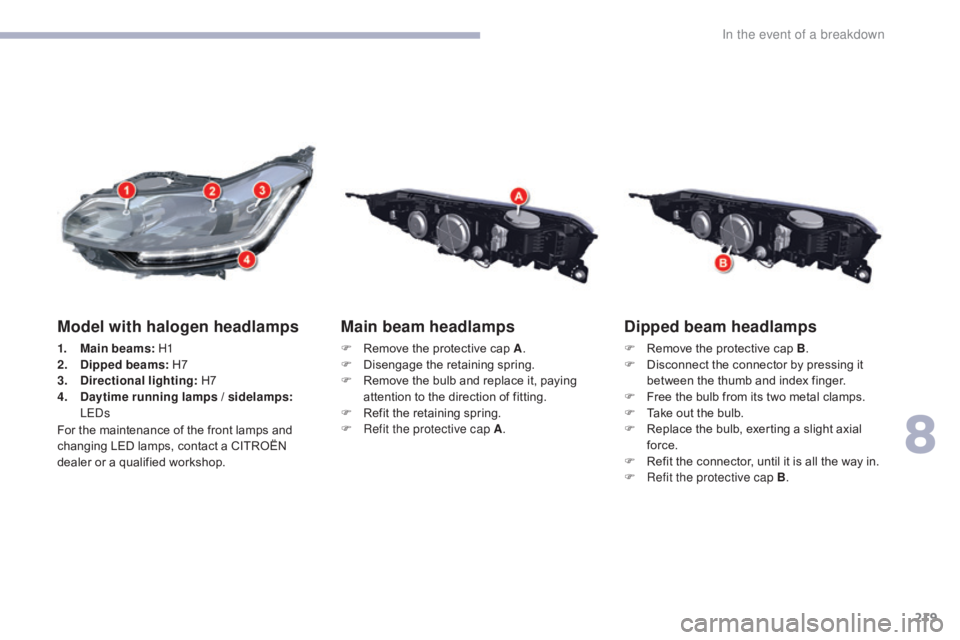
Dipped beam headlamps
F Remove the protective cap B.
F D isconnect the connector by pressing it
between the thumb and index finger.
F
F
ree the bulb from its two metal clamps.
F
T
ake out the bulb.
F
R
eplace the bulb, exerting a slight axial
force.
F
R
efit the connector, until it is all the way in.
F
R
efit the protective cap B .
Main beam headlamps
F Remove the protective cap A .
F D isengage the retaining spring.
F
R
emove the bulb and replace it, paying
attention to the direction of fitting.
F
R
efit the retaining spring.
F
R
efit the protective cap A .
Model with halogen headlamps
1. Main beams: H1
2. D ipped beams: H7
3.
D
irectional lighting: H7
4.
D
aytime running lamps / sidelamps:
LEDs
For the maintenance of the front lamps and
changing LED lamps, contact a CITROËN
dealer or a qualified workshop.
8
In the event of a breakdown
Page 222 of 348
220
C5_en_Chap08_en-cas-de-panne_ed01-2016
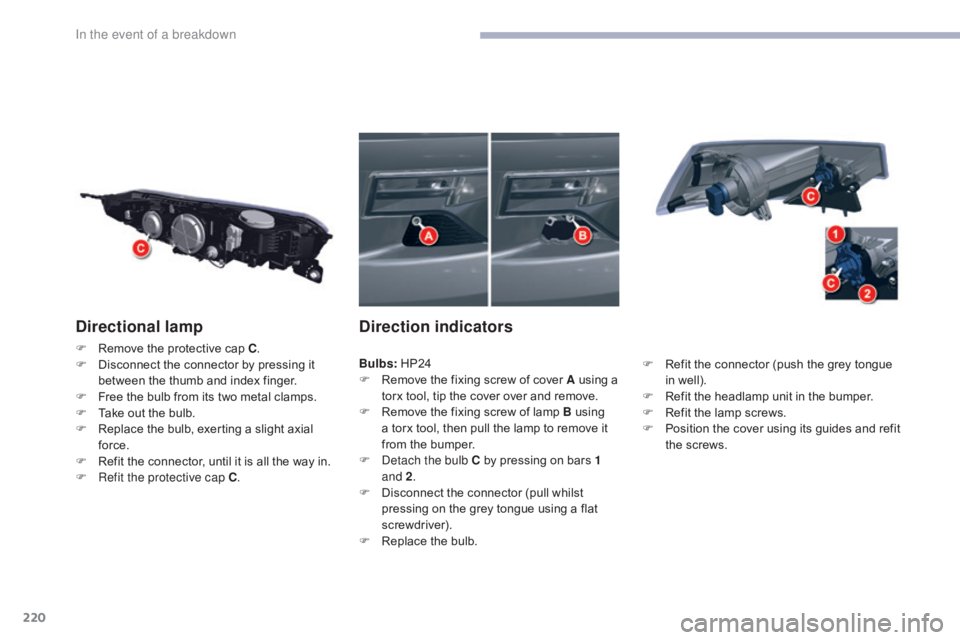
Directional lamp
F Remove the protective cap C.
F D isconnect the connector by pressing it
between the thumb and index finger.
F
F
ree the bulb from its two metal clamps.
F
T
ake out the bulb.
F
R
eplace the bulb, exerting a slight axial
force.
F
R
efit the connector, until it is all the way in.
F
R
efit the protective cap C .
Direction indicators
F Refit the connector (push the grey tongue
in well).
F
R
efit the headlamp unit in the bumper.
F
R
efit the lamp screws.
F
P
osition the cover using its guides and refit
the screws.
Bulbs:
HP24
F
R
emove the fixing screw of cover A using a
torx tool, tip the cover over and remove.
F
R
emove the fixing screw of lamp B using
a torx tool, then pull the lamp to remove it
from the bumper.
F
D
etach the bulb C by pressing on bars 1
and 2 .
F
D
isconnect the connector (pull whilst
pressing on the grey tongue using a flat
screwdriver).
F
R
eplace the bulb.
In the event of a breakdown
Page 223 of 348
221
C5_en_Chap08_en-cas-de-panne_ed01-2016
Side repeaters
The side repeater is sealed.
If the bulb is faulty, replace the side repeater.
Contact a CITROËN dealer or a qualified
workshop.
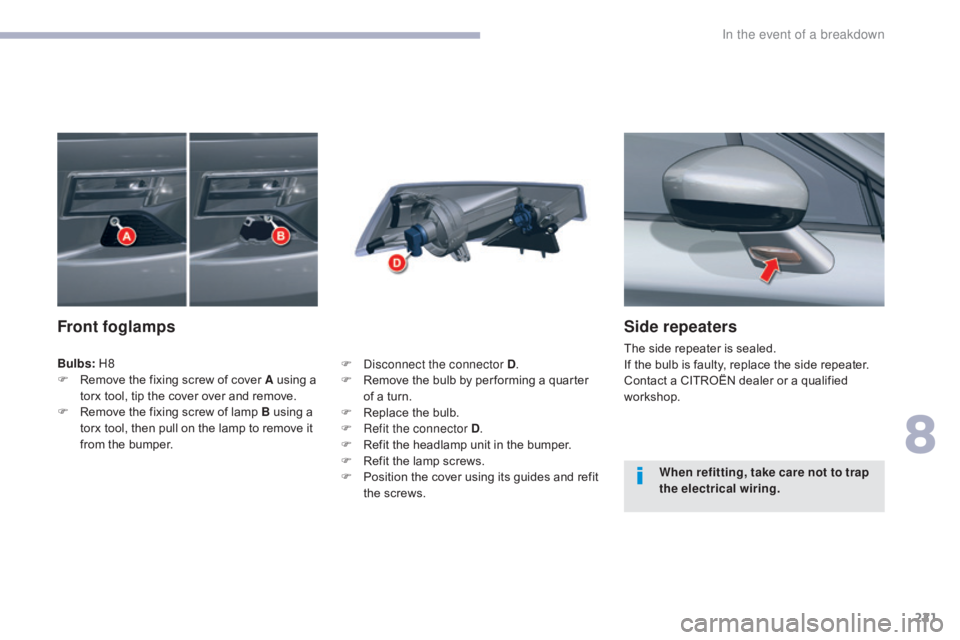
Front foglamps
F Disconnect the connector D.
F R emove the bulb by per forming a quarter
of a turn.
F
R
eplace the bulb.
F
R
efit the connector D .
F
R
efit the headlamp unit in the bumper.
F
R
efit the lamp screws.
F
P
osition the cover using its guides and refit
the screws. When refitting, take care not to trap
the electrical
wiring.
Bulbs:
H8
F
R
emove the fixing screw of cover A using a
torx tool, tip the cover over and remove.
F
R
emove the fixing screw of lamp B using a
torx tool, then pull on the lamp to remove it
from the bumper.
8
In the event of a breakdown