ignition CITROEN C5 2021 Manual PDF
[x] Cancel search | Manufacturer: CITROEN, Model Year: 2021, Model line: C5, Model: CITROEN C5 2021Pages: 228, PDF Size: 6.78 MB
Page 161 of 228
159
Practical information
7level: the correct level is between marks A (max)
and B (min).
Do not start the engine if the level is:
–
above mark
A: contact a CITROËN dealer or a
qualified workshop.
–
below mark B
: top up the engine oil
immediately.
Oil grade
Before topping up or changing the
engine oil, check that the oil is suitable
for your engine and complies with the
recommendations in the service schedule
supplied with the vehicle (or available from
your CITROËN dealer or qualified workshop).
Use of non-recommended oil may invalidate
your warranty in the event of engine failure.
Topping up the engine oil level
For the location of the engine oil filler cap, please
refer to the corresponding engine compartment
illustration.
►
Add oil in small quantities, avoiding any spills
on engine components (risk of fire).
►
W
ait a few minutes before checking the level
again using the dipstick.
►
T
op up the level if necessary.
►
After checking the level, carefully screw the
oil filler cap back on
and replace the dipstick in
its tube.
The oil level indication displayed on the instrument panel when the ignition is
switched on is not valid for 30 minutes
following an addition of oil.
Brake fluid
The level of this fluid should be close to
the "MAX" mark. If not, check the brake
pads for wear.
To know how often the brake fluid should be
replaced, refer to the manufacturer's servicing
schedule.
Clean the cap before removing it to refill.
Use only DOT4 brake fluid from a sealed
container.
Engine coolant
It is normal to top up this fluid between
two services.
The check and top-up must only be done with
the engine cold.
A level of coolant that is too low risks causing
major damage to the engine; the coolant level
must be close to the "MAX" mark without ever
going above it.
If the level is close to or below the " MIN” mark, it
is essential to top up.
When the engine is hot, the temperature of the
coolant is regulated by the fan.
As the cooling system is pressurised, wait at
least one hour after switching off the engine
before carrying out any work.
In order to avoid the risk of scalding if you need
to top up in an emergency, wrap a cloth around
the cap and unscrew the cap by two turns to
allow the pressure to drop.
Once the pressure has dropped, remove the cap
and top up to the required level.
Screenwash fluid
Top up to the required level when necessary.
Fluid specification
The fluid must be topped up with a pre-mixed
product.
In winter (temperatures below zero), a fluid
containing an anti-freeze agent which is
appropriate for the temperature conditions
must be used in order to protect the system's
components (pump, tank, ducts, jets).
Filling with pure water is prohibited in all
circumstances (risk of freezing,
limescale, etc.).
Checks
Unless otherwise indicated, check these
components in accordance with the
manufacturer's service schedule and according
to your engine.
Otherwise, have them checked by a CITROËN
dealer or a qualified workshop.
Page 163 of 228
161
Practical information
7pressures cause tyres to wear prematurely
and have an adverse effect on the vehicle's
road holding - risk of accident!
Driving with worn or damaged tyres reduces the
braking and road holding performance of the
vehicle. Regularly check the condition of the
tyres (tread and sidewalls) and rims as well as
the presence of the valve caps.
When the wear indicators no longer appear set
back from the tread, the depth of the grooves is
less than 1.6 mm; replace the tyres as soon as
possible.
Using different size wheels and tyres from those
specified can affect the lifetime of tyres, wheel
rotation, ground clearance, the speedometer
reading and have an adverse effect on road
holding.
Fitting different tyres on the front and rear axles
can cause the ESC to mistime.
Always mark the direction of rotation on the tyres
that will be stored when fitting winter or summer
tyres. Store them in a cool, dry place and away
from direct exposure to the sun's rays.
Winter or 4-seasons tyres can be
identified by this symbol on their
sidewalls.
Shock absorbers
It is not easy for drivers to detect when
shock absorbers are worn. Nevertheless,
the shock absorbers have a major impact on
road holding and braking performance.
For your safety and driving comfort, it is
important to have them regularly checked by a
CITROËN dealer or a qualified workshop.
Timing and accessory kits
The timing and accessory kits are used
from the time the engine is started until it
is switched off. It is normal for them to wear over
time.
A
faulty timing or accessory kit can damage
the engine, rendering it unusable. Observe the
recommended replacement frequency, stated in
distance travelled or time elapsed, whichever is
reached first.
Free-wheeling
In certain situations, it is necessary to put the
vehicle in neutral (e.g. towing, on a rolling road,
automatic car wash (Wash mode), rail or sea
transport).
Never leave the vehicle unattended with
the vehicle into free-wheeling mode.
Keyless Entry and Starting
You must not depress the brake pedal
while switching the ignition on again, then
switching it off. If you do, the engine will start,
requiring you to restart the procedure.
/
Release procedure
► With the vehicle stationary and the engine
running, depress the brake pedal and select
mode
N.
Within 5
seconds:
►
Depress and hold the brake pedal, then
observe this order: switch off the engine and
move the push selector forwards or backwards.
►
Release the brake pedal, then switch on the
ignition.
►
Place your foot on the brake and press the
electric parking brake control to release it.
►
Release the brake pedal, then switch off the
ignition.
A message is displayed on the instrument panel to confirm the unlocking
of the wheels for 15 minutes.
When the vehicle is free-wheeling, the
audio system cannot be updated (message
displayed on the instrument panel).
After 15 minutes or to revert to normal
operation
► While depressing the brake pedal, restart the
engine and select mode P
.
Page 169 of 228
167
In the event of a breakdown
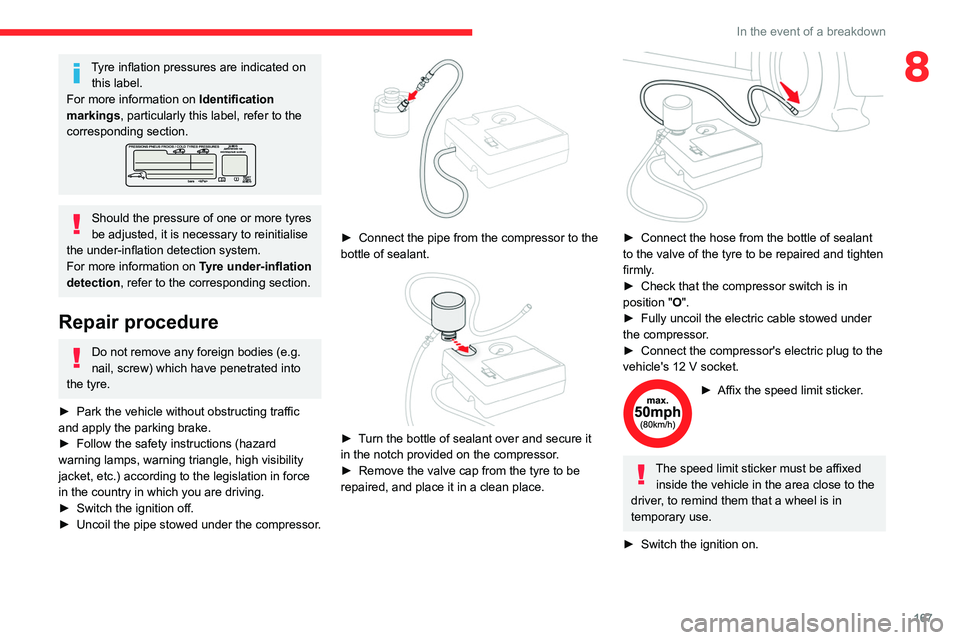
8Tyre inflation pressures are indicated on this label.
For more information on Identification
markings, particularly this label, refer to the
corresponding section.
Should the pressure of one or more tyres
be adjusted, it is necessary to reinitialise
the under-inflation detection system.
For more information on Tyre under-inflation
detection, refer to the corresponding section.
Repair procedure
Do not remove any foreign bodies (e.g.
nail, screw) which have penetrated into
the tyre.
►
Park the vehicle without obstructing traffic
and apply the parking brake.
►
Follow the safety instructions (hazard
warning lamps, warning triangle, high visibility
jacket, etc.) according to the legislation in force
in the country in which you are driving.
►
Switch the ignition off.
►
Uncoil
the pipe stowed under the compressor.
► Connect the pipe from the compressor to the
bottle of sealant.
► Turn the bottle of sealant over and secure it
in the notch provided on the compressor.
►
Remove the valve cap from the tyre to be
repaired, and place it in a clean place.
► Connect the hose from the bottle of sealant
to the valve of the tyre to be repaired and tighten
firmly
.
►
Check that the compressor switch is in
position
"O".
►
Fully uncoil the electric cable stowed under
the compressor
.
►
Connect the compressor's electric plug to the
vehicle's 12
V socket.
► Affix the speed limit sticker .
The speed limit sticker must be affixed
inside the vehicle in the area close to the
driver, to remind them that a wheel is in
temporary use.
►
Switch the ignition on.
Page 170 of 228

168
In the event of a breakdown
► Switch on the compressor by moving the
switch to position " I
" until the tyre pressure
reaches 2 bar. The sealant product is injected
under pressure into the tyre; do not disconnect
the pipe from the valve during this operation (risk
of blowback).
If after approximately 7 minutes, the
pressure of 2 bar is not reached, this
indicates that the tyre is not repairable;
contact a CITROËN dealer or a qualified
workshop for assistance.
►
Move the switch to position " O
".
►
Disconnect the compressor's electric plug
from the vehicle's 12
V socket.
►
Remove the kit.
►
Refit the cap on the valve.
►
Remove and store the bottle of sealant.
The sealant product is harmful if swallowed and causes irritation to the
eyes.
Keep this product out of the reach of children.
The use-by date of the fluid is marked on the
bottle.
After use, do not discard the bottle into the
environment; take it to a CITROËN dealer or
an authorised waste disposal site.
Do not forget to obtain a new bottle of
sealant, available from a CITROËN dealer or
a qualified workshop.
► Drive immediately for approximately 3 miles
(5 kilometres) at reduced speed (between
12 and 37 mph (20 and 60
km/h)) to plug the
puncture.
►
Stop to check the repair
and the tyre
pressure using the kit.
With a tyre repaired using this type of kit,
do not exceed a speed of 50
mph
(80
km/h) and do not drive more than
125
miles (200 km).
Contact a CITROËN dealer or a qualified
workshop to have the tyre changed.
Checking/adjusting tyre
pressures
The compressor can be used, without injecting
sealant, to check and, if necessary, adjust the
tyre pressures.
►
Remove the valve cap from the tyre and keep
it in a clean place.
►
Uncoil
the pipe stowed under the compressor.
►
Screw the pipe onto the valve and tighten
firmly
.
►
Check that the compressor switch is in
position " O
".
►
Fully uncoil the electric cable stowed under
the compressor
.
►
Connect the compressor's electric plug to the
vehicle's 12
V socket.
►
Switch the ignition on.
►
Start the compressor by placing the switch at
position " I
" and adjust the pressure to the value
shown on the vehicle's tyre pressure label. To
deflate: press the black button located on the
compressor pipe, near the valve connection.
If after 7 minutes the pressure of 2 bar is
not reached, the tyre is damaged;
contact a CITROËN dealer or a qualified
workshop for assistance.
►
Once the correct pressure is reached, put the
switch in position " O
".
►
Remove the kit and stow it.
►
Refit the cap on the valve.
Page 171 of 228
169
In the event of a breakdown
8Spare wheel
Visit this link to view explanatory videos:
http://q-r.to/bagGI9
For more information on the Tool kit,
refer to the corresponding section.
Accessing the spare wheel
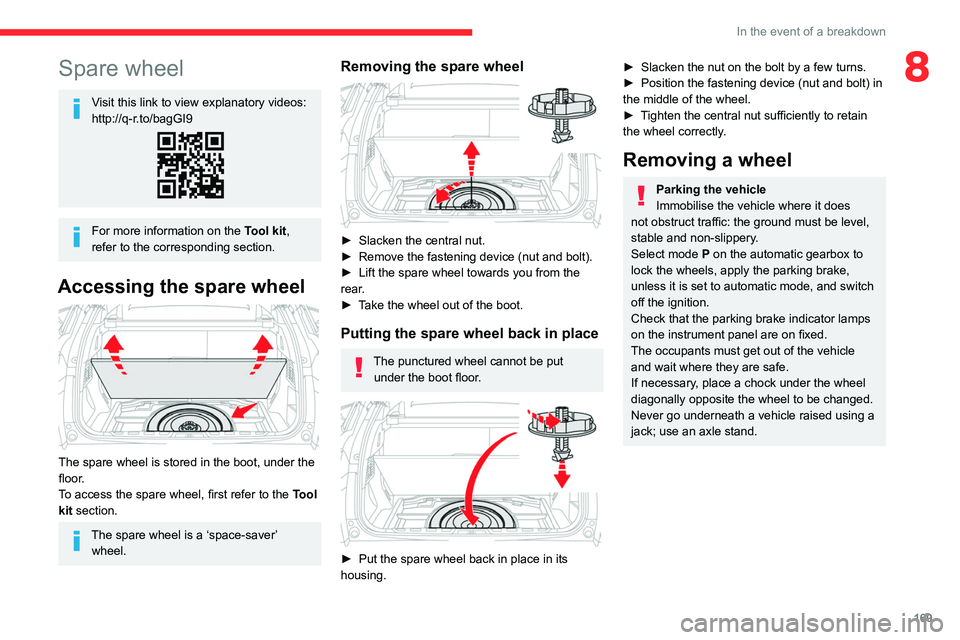
The spare wheel is stored in the boot, under the
floor.
To access the spare wheel, first refer to the
Tool
kit
section.
The spare wheel is a ‘space-saver’ wheel.
Removing the spare wheel
► Slacken the central nut.
► Remove the fastening device (nut and bolt).
►
Lift the spare wheel towards you from the
rear
.
►
T
ake the wheel out of the boot.
Putting the spare wheel back in place
The punctured wheel cannot be put under the boot floor.
► Put the spare wheel back in place in its
housing.
► Slacken the nut on the bolt by a few turns.
► Position the fastening device (nut and bolt) in
the middle of the wheel.
►
T
ighten the central nut sufficiently to retain
the wheel correctly.
Removing a wheel
Parking the vehicle
Immobilise the vehicle where it does
not obstruct traffic: the ground must be level,
stable and non-slippery.
Select mode
P on the automatic gearbox to
lock the wheels, apply the parking brake,
unless it is set to automatic mode, and switch
off the ignition.
Check that the parking brake indicator lamps
on the instrument panel are on fixed.
The occupants must get out of the vehicle
and wait where they are safe.
If necessary, place a chock under the wheel
diagonally opposite the wheel to be changed.
Never go underneath a vehicle raised using a
jack; use an axle stand.
Page 176 of 228

174
In the event of a breakdown
Accessing the battery
The battery is located under the bonnet.
For access to the (+) terminal:
► Release the bonnet by pulling the internal
release lever
, then the external safety catch.
►
Raise the bonnet.
(+)
Positive terminal with a quick-release clamp.
(-) Negative terminal.
As the battery's negative terminal is not
accessible, a remote earth point is located near
the battery.
Starting using another battery
If the vehicle's battery is flat, the engine can be
started using a backup battery (either external or
from another vehicle) and jump leads or using a
battery booster.
Never start the engine by connecting a
battery charger.
Never use a 24
V or higher battery booster.
Check beforehand that the backup battery
has a nominal voltage of 12
V and a capacity
at least equal to that of the discharged
battery.
The two vehicles must not be in contact with
each other.
Switch off all electricity-consuming equipment
on both vehicles (audio system, wipers,
lighting, etc.).
Make sure that the jump leads are well away
from the engine’s moving parts (fan, belt,
etc.).
Do not disconnect the (+) terminal while the
engine is running.
► Lift the plastic cover on the (+) terminal, if the
vehicle has one.
►
Connect the red cable to the (+) terminal of
flat battery
A (at the metal elbow), then to the
(+) terminal of the backup battery
B or of the
booster.
►
Connect one end of the green or black cable
to the (-) terminal of the backup battery
B or of
the booster (or to an earth point on the assisting
vehicle).
► Connect the other end of the green or black
cable to the earth point C .
►
Start the engine on the assisting vehicle and
leave it running for a few minutes.
►
Operate the starter on the broken down
vehicle and let the engine run.
If the engine does not start immediately
, switch
off the ignition and wait a few moments before
trying again.
►
W
ait for it to return to idle.
►
Disconnect the jump leads in reverse order.
►
Refit the plastic cover to the (+) terminal, if
the vehicle has one.
►
Allow the engine to run for at least
30
minutes, with the vehicle stationary, so that
the battery reaches an adequate state of charge.
Driving immediately without having
reached a sufficient level of charge may
affect some of the vehicle's functionalities.
Charging the battery using a battery
charger
For optimum service life of the battery, it is
essential to maintain an adequate state of
charge.
In some circumstances, it may be necessary to
charge the battery:
–
When using the vehicle mainly for short
journeys.
–
If the vehicle is to be taken off the road for
several weeks.
Page 177 of 228
175
In the event of a breakdown
8Contact a CITROËN dealer or a qualified
workshop.
To charge the vehicle's battery yourself, use only a charger compatible with
lead-acid batteries with a nominal voltage of
12
V.
Follow the instructions provided by the
manufacturer of the charger.
Never reverse polarities.
It is not necessary to disconnect the
battery.
►
Switch the ignition off.
►
Switch off all electrical consumers (audio
system, lighting, wipers, etc.).
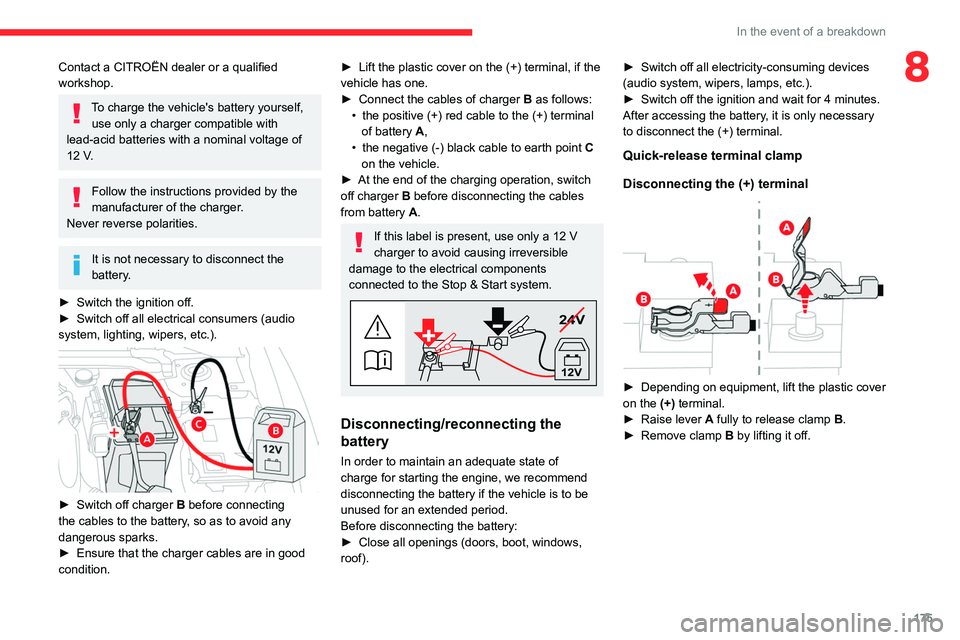
► Switch off charger B before connecting
the cables to the battery, so as to avoid any
dangerous sparks.
►
Ensure that the charger cables are in good
condition.
► Lift the plastic cover on the (+) terminal, if the
vehicle has one.
►
Connect the cables of charger B
as follows:
•
the positive (+) red cable to the (+) terminal
of battery
A,
•
the negative (-) black cable to earth point C
on the vehicle.
►
At the end of the charging operation, switch
off charger B
before disconnecting the cables
from battery A.
If this label is present, use only a 12 V
charger to avoid causing irreversible
damage to the electrical components
connected to the Stop & Start system.
24V
12V
Disconnecting/reconnecting the
battery
In order to maintain an adequate state of
charge for starting the engine, we recommend
disconnecting the battery if the vehicle is to be
unused for an extended period.
Before disconnecting the battery:
►
Close all openings (doors, boot, windows,
roof). ►
Switch off all electricity-consuming devices
(audio system, wipers, lamps, etc.).
►
Switch off the ignition and wait for 4
minutes.
After accessing the battery, it is only necessary
to disconnect the (+) terminal.
Quick-release terminal clamp
Disconnecting the (+) terminal
► Depending on equipment, lift the plastic cover
on the (+) terminal.
►
Raise lever
A
fully to release clamp
B
.
►
Remove clamp
B
by lifting it off.
Page 179 of 228
177
In the event of a breakdown
8In some circumstances, it may be necessary to
charge the front battery:
–
When using the vehicle mainly for short
journeys.
–
If the vehicle is to be taken off the road for
several weeks.
Contact a CITROËN dealer or a qualified
workshop.
To charge the vehicle's front battery yourself, use only a charger compatible
with lead-acid batteries with a nominal voltage
of 12
V.
Follow the instructions provided by the
manufacturer of the charger.
Never reverse polarities.
It is not necessary to disconnect the
battery.
►
Switch the ignition off.
►
Switch off all electrical consumers (audio
system, lighting, wipers, etc.).
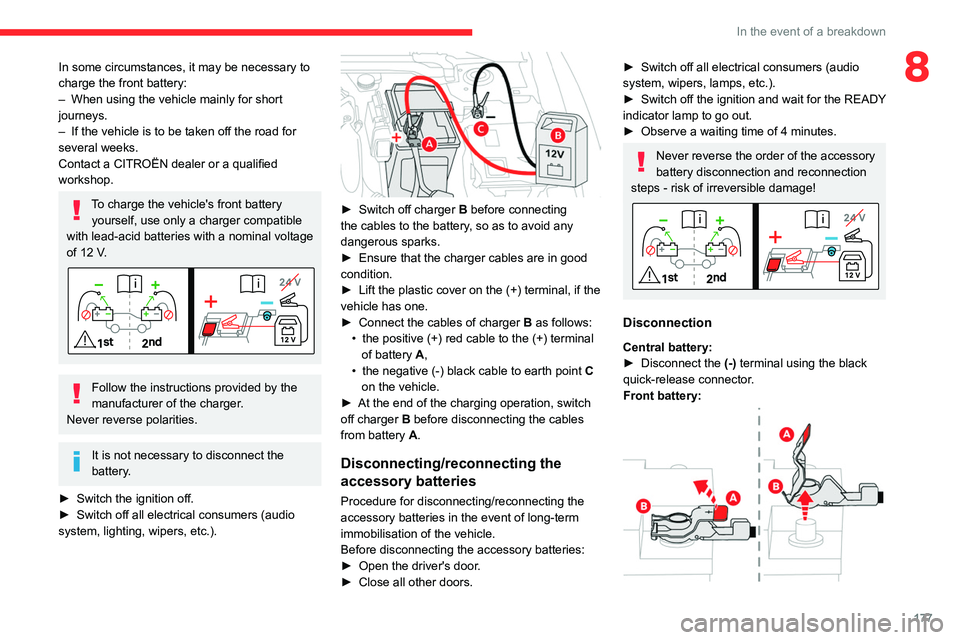
► Switch off charger B before connecting
the cables to the battery, so as to avoid any
dangerous sparks.
►
Ensure that the charger cables are in good
condition.
►
Lift the plastic cover on the (+) terminal, if the
vehicle has one.
►
Connect the cables of charger B
as follows:
•
the positive (+) red cable to the (+) terminal
of battery
A,
•
the negative (-) black cable to earth point C
on the vehicle.
►
At the end of the charging operation, switch
off charger B
before disconnecting the cables
from battery A.
Disconnecting/reconnecting the
accessory batteries
Procedure for disconnecting/reconnecting the
accessory batteries in the event of long-term
immobilisation of the vehicle.
Before disconnecting the accessory batteries:
►
Open the driver's door
.
►
Close all other doors.
► Switch off all electrical consumers (audio
system, wipers, lamps, etc.).
►
Switch
off the ignition and wait for the READY
indicator lamp to go out.
►
Observe a waiting time of 4 minutes.
Never reverse the order of the accessory
battery disconnection and reconnection
steps - risk of irreversible damage!
Disconnection
Central battery:
► Disconnect the (-)
terminal using the black
quick-release connector.
Front battery:
Page 180 of 228
178
In the event of a breakdown
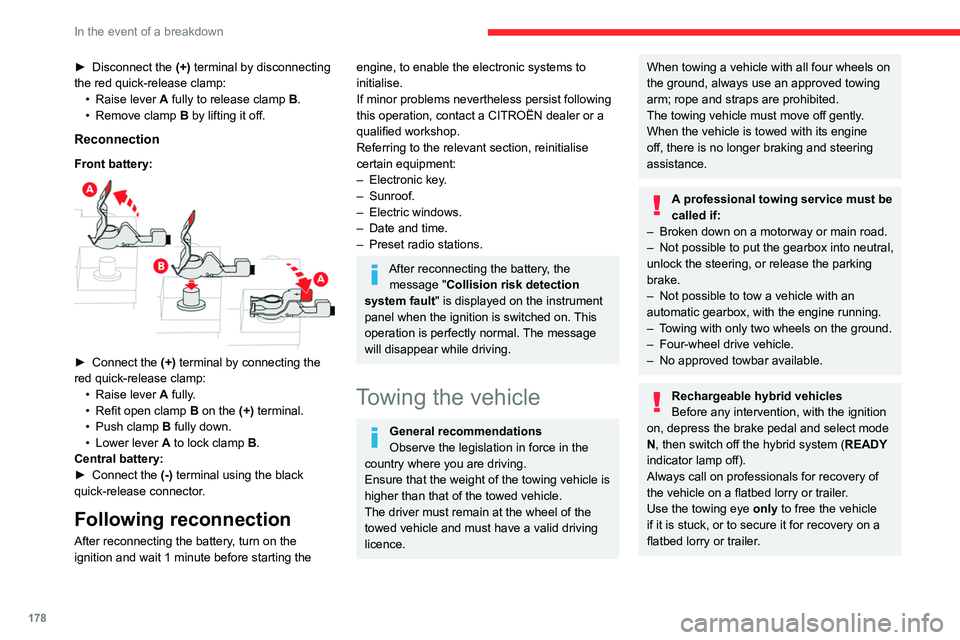
► Disconnect the (+) terminal by disconnecting
the red quick-release clamp: •
Raise lever
A
fully to release clamp
B
.
•
Remove clamp
B
by lifting it off.
Reconnection
Front battery:
► Connect the (+) terminal by connecting the
red quick-release clamp: •
Raise lever
A
fully.
•
Refit open clamp
B
on the (+) terminal.
•
Push clamp
B fully down.
•
Lower lever
A
to lock clamp B.
Central battery:
►
Connect the
(-) terminal using the black
quick-release connector.
Following reconnection
After reconnecting the battery, turn on the
ignition and wait 1 minute before starting the
engine, to enable the electronic systems to
initialise.
If minor problems nevertheless persist following
this operation, contact a CITROËN dealer or a
qualified workshop.
Referring to the relevant section, reinitialise
certain equipment:
–
Electronic key
.
–
Sunroof.
–
Electric windows.
–
Date and time.
–
Preset radio stations.
After reconnecting the battery, the message "Collision risk detection
system fault" is displayed on the instrument
panel when the ignition is switched on. This
operation is perfectly normal. The message
will disappear while driving.
Towing the vehicle
General recommendations
Observe the legislation in force in the
country where you are driving.
Ensure that the weight of the towing vehicle is
higher than that of the towed vehicle.
The driver must remain at the wheel of the
towed vehicle and must have a valid driving
licence.
When towing a vehicle with all four wheels on
the ground, always use an approved towing
arm; rope and straps are prohibited.
The towing vehicle must move off gently.
When the vehicle is towed with its engine
off, there is no longer braking and steering
assistance.
A professional towing service must be
called if:
–
Broken down on a motorway or main road.
–
Not possible to put
the gearbox into neutral,
unlock the steering, or release the parking
brake.
–
Not possible to tow a vehicle with an
automatic gearbox, with the engine running.
–
T
owing with only two wheels on the ground.
–
Four-wheel drive vehicle.
–
No approved towbar available.
Rechargeable hybrid vehicles
Before any intervention, with the ignition
on, depress the brake pedal and select mode
N, then switch off the hybrid system (READY
indicator lamp off).
Always call on professionals for recovery of
the vehicle on a flatbed lorry or trailer.
Use the towing eye only
to free the vehicle
if it is stuck, or to secure it for recovery on a
flatbed lorry or trailer.
Page 187 of 228
185
MYCITROËN DRIVE PLUS - MYCITROËN PLAY PLUS
10MYCITROËN DRIVE
PLUS - MYCITROËN
PLAY PLUS
GPS navigation -
Applications - Multimedia
audio system - Bluetooth
®
telephone
The functions and settings described
vary according to the version and
configuration of the vehicle, and according to
the country of sale.
For safety reasons and because they
require sustained attention by the driver,
the following operations must be carried out
with the vehicle stationary and the ignition
on:
–
Pairing the smartphone with the system via
Bluetooth®.
–
Using the smartphone.
–
Connecting to Mirror Screen
(Apple®CarPlay® or Android Auto).
–
Changing the system settings and
configuration.
The message Energy economy mode is displayed when the system is about to go
into standby.
For more information on
Energy economy
mode
, refer to the “Practical information”
section.
The AM radio selection mode is not available on electric and rechargeable
hybrid vehicles.
Warning
Navigation is a driving aid. It cannot
replace the driver. All guidance instructions
should be carefully checked by the user.
By using the navigation, you accept the
following terms and conditions:
https://www.tomtom.com/en_gb/legal/
eula-automotive/?388448
First steps
The system starts when the ignition is switched on.
With the ignition off, a press turns the system on.
With the engine running, a press mutes the
sound.
A long press launches standby mode: the sound
cuts off, the screens go off and the clock is
displayed on the central screen.
Rotation: volume control.
Information
This system gives access to the following
elements:
–
Audio equipment and telephone controls with
display of associated information.
–
Connected services and display of associated
information.
–
Navigation system controls and display
of associated information (depending on
equipment).
–
V
oice recognition (depending on equipment).
–
T
ime and exterior temperature.
–
Heating/air conditioning system controls and
reminders of settings.
–
Settings for driving aid functions, comfort
and safety functions, extended head-up display
(depending on equipment and version), audio
equipment and digital instrument panel.
–
Settings for functions specific to rechargeable
hybrid vehicles.
–
Display of visual manoeuvring aid functions.
–
Interactive handbook.
–
V
ideo tutorials (e.g. screen management,
driving aids, voice recognition).
Upper bar
Certain information is displayed permanently in
the upper bar of the touch screen:
–
Exterior temperature from vehicle sensors
(associated with a blue symbol in case of risk
of ice).
–
T
emperature setting reminder for driver and
passenger side air conditionning.