Reactivate CITROEN C5 2022 User Guide
[x] Cancel search | Manufacturer: CITROEN, Model Year: 2022, Model line: C5, Model: CITROEN C5 2022Pages: 228, PDF Size: 6.78 MB
Page 76 of 228

74
Safety
Deactivation/reactivation is confirmed by
the lighting/switching off of this indicator
lamp on the instrument panel and the display of
a message.
The ASR system is reactivated automatically
every time the ignition is switched on or at
speeds over 31 mph (50
km/h).
Reactivation is manual below 31 mph (50 km/h).
Malfunction
In the event of a malfunction, this warning
lamp lights up on the instrument panel,
accompanied by the display of a message and
an audible signal.
Have it checked by a CITROËN dealer or a
qualified workshop.
ASR/DSC
These systems enhance safety during
normal driving, but should not encourage
the driver to take extra risks or drive at high
speed.
It is in conditions of reduced grip (rain, snow,
ice) that the risk of loss of grip increases. It
is therefore important for your safety to keep
these systems activated in all conditions, and
particularly in difficult conditions.
Correct operation of these systems depends
on compliance with the manufacturer's
recommendations relating to the wheels
(tyres and rims), braking and electronic
components, as well as the assembly and
repair procedures provided by CITROËN
dealers.
In order to ensure that these systems remain
effective in wintry conditions, the use of snow
or all-season tyres is recommended. All four
wheels must be fitted with tyres approved for
your vehicle.
All tyre specifications are listed on the
tyre/paint label. For more information
on Identification markings , refer to the
corresponding section.
Trailer stability assist (TSA)
When towing, this system reduces the risk of the
vehicle or trailer snaking.
Operation
The system is activated automatically when the
ignition is switched on.
The electronic stability control system (ESC)
must not have any faults.
The vehicle speed must be between 37 and 99
mph (60 and 160
km/h).
If the system detects that the trailer is
snaking, it applies the brakes to stabilise
the trailer and reduces engine power, if
necessary, to slow the vehicle (indicated by the
flashing of this warning lamp on the instrument
panel and the brake lamps coming on).
For information on weights and towed loads,
refer to the Engine technical data and towed
loads section or your vehicle’s registration
certificate.
To ensure safe driving with a Towing device,
refer to the corresponding section.
Malfunction
If a fault occurs, this warning lamp lights
up on the instrument panel, accompanied
by a message and an audible signal.
To continue towing a trailer, reduce speed and
drive carefully!
Have it checked by a CITROËN dealer or a
qualified workshop.
The trailer stability control system provides an extra safety feature under
normal driving conditions, when following the
recommendations for use of trailers and
current legislation in force in your country. It
must not encourage the driver to take extra
risks, such as using a trailer in unsuitable
conditions of operation (e.g.
excessive load,
exceeded nose weight, worn or under-inflated
tyres, faulty braking system) or driving at
excessive speed.
In certain cases, the system may not detect
trailer snaking, particularly with a light trailer.
When driving on slippery or poor surfaces, the
system may not be able to prevent sudden
trailer snaking.
Page 84 of 228

82
Safety
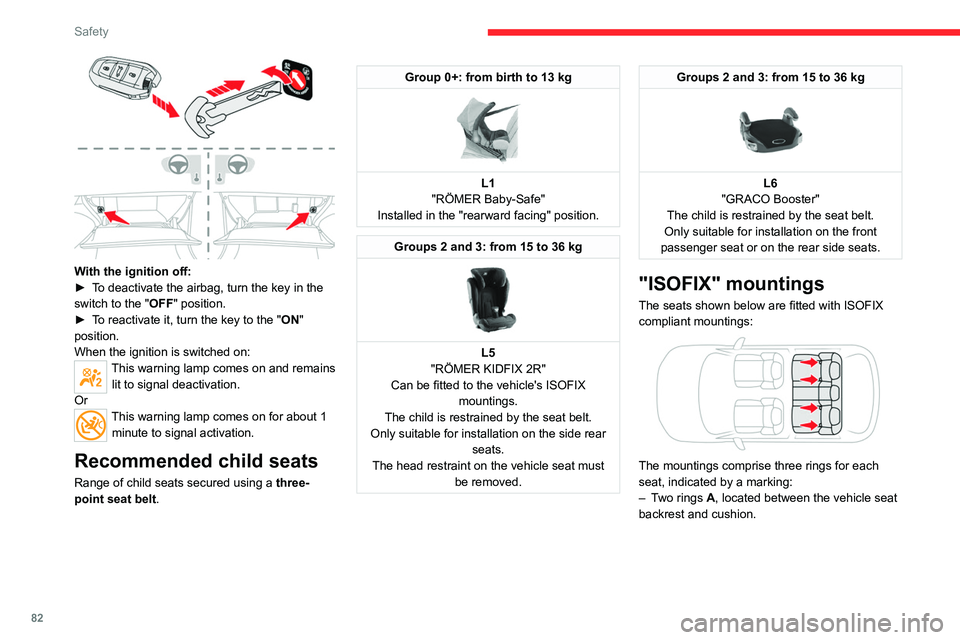
With the ignition off:
► T o deactivate the airbag, turn the key in the
switch to the "OFF " position.
►
T
o reactivate it, turn the key to the "ON"
position.
When the ignition is switched on:
This warning lamp comes on and remains lit to signal deactivation.
Or
This warning lamp comes on for about 1 minute to signal activation.
Recommended child seats
Range of child seats secured using a three-
point seat belt .
Group 0+: from birth to 13 kg
L1
"RÖMER Baby-Safe"
Installed in the "rearward facing" position.
Groups 2 and 3: from 15 to 36 kg
L5
"RÖMER KIDFIX 2R"
Can be fitted to the vehicle's ISOFIX mountings.
The child is restrained by the seat belt.
Only suitable for installation on the side rear seats.
The head restraint on the vehicle seat must be removed.
Groups 2 and 3: from 15 to 36 kg
L6
"GRACO Booster"
The child is restrained by the seat belt.
Only suitable for installation on the front
passenger seat or on the rear side seats.
"ISOFIX" mountings
The seats shown below are fitted with ISOFIX
compliant mountings:
The mountings comprise three rings for each
seat, indicated by a marking:
–
T
wo rings A, located between the vehicle seat
backrest and cushion.
Page 95 of 228

93
Driving
6Mode P is automatically selected when
the ignition is switched off. The wheels
are blocked.
For more information on Free-wheeling, refer
to the corresponding section.
While mode N is selected, opening the
driver’s door triggers an audible signal
and selection of mode P.
The audible signal stops when the driver's
door is closed.
Deactivating automatic
operation
In some situations, for example when it is
extremely cold or when towing (e.g. caravan,
breakdown), it may be necessary to deactivate
automatic operation of the system.
►
Start the engine.
►
Use the control to apply the parking brake, if
it is released.
►
T
ake your foot fully off the brake pedal.
►
Keep the control pushed in the release
direction for 10 to a maximum of
15 seconds.
►
Release the control.
►
Depress and hold the brake pedal.
►
Pull the control in the application direction for
2
seconds.
This indicator lamp on the instrument panel comes on to confirm deactivation of
the automatic functions. ►
Release the control and the brake pedal.
From this point onwards, only the manual
functions, using the control, allow the parking
brake to be applied and released.
►
Follow this procedure again to reactivate
automatic operation (confirmed by the indicator
lamp on the instrument panel going out).
Emergency braking
If depressing the brake pedal fails to provide
effective braking or in exceptional circumstances
(e.g.
driver unwell, assisted driving), the vehicle
can be braked by sustained pulling on the
electric parking brake control. Braking continues
for as long as the control is kept pulled, and
ceases when the control is released.
The ABS and DSC systems stabilise the vehicle
during emergency braking.
If emergency braking malfunctions, the message
"Parking brake fault" will be displayed on the
instrument panel.
If the ABS and DSC systems
malfunction, indicated by the
lighting of one or both warning lamps on the
instrument panel, the vehicle’s stability is no
longer ensured.
►
In this case, ensure the vehicle's stability by
successive and repeated "pull-release" actions
on the electric parking brake control until the
vehicle comes to a complete stop.
Automatic gearbox
With petrol engine
Automatic 8-speed gearbox with push selector. It also offers a manual mode with gear changes
via control paddles located
behind the steering
wheel.
With rechargeable hybrid
engine
Automatic 8-speed gearbox with push selector and regenerative braking function.
With the exception of the manual mode and
regenerative braking function, its operation is
identical to that of other EAT8 gearboxes.
Push selector
Page 112 of 228

11 0
Driving
Steering-mounted controls
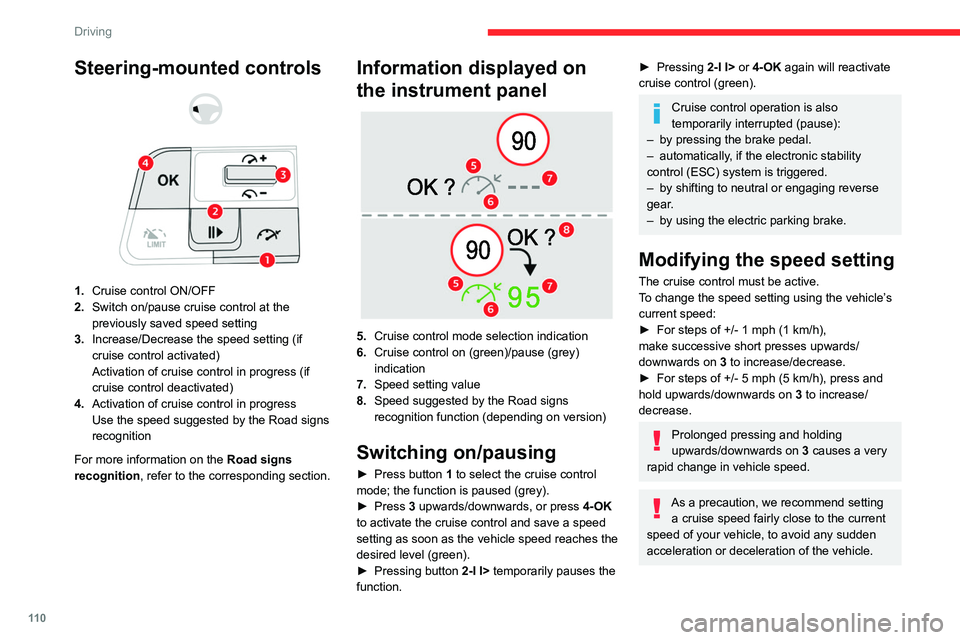
1. Cruise control ON/OFF
2. Switch on/pause cruise control at the
previously saved speed setting
3. Increase/Decrease the speed setting (if
cruise control activated)
Activation of cruise control in progress (if
cruise control deactivated)
4. Activation of cruise control in progress
Use the speed suggested by the Road signs
recognition
For more information on the Road signs
recognition , refer to the corresponding section.
Information displayed on
the instrument panel
5.Cruise control mode selection indication
6. Cruise control on (green)/pause (grey)
indication
7. Speed setting value
8. Speed suggested by the Road signs
recognition function (depending on version)
Switching on/pausing
► Press button 1 to select the cruise control
mode; the function is paused (grey).
►
Press
3 upwards/downwards, or press 4-OK
to activate the cruise control and save a speed
setting as soon as the vehicle speed reaches the
desired level (green).
►
Pressing button 2-I I>
temporarily pauses the
function.
► Pressing 2-I I> or 4-OK again will reactivate
cruise control (green).
Cruise control operation is also
temporarily interrupted (pause):
–
by pressing the brake pedal.
–
automatically
, if the electronic stability
control (ESC) system is triggered.
–
by shifting to neutral or engaging reverse
gear
.
–
by using the electric parking brake.
Modifying the speed setting
The cruise control must be active.
To change the speed setting using the vehicle’s
current speed:
►
For steps of +/- 1 mph (1 km/h),
make successive short presses upwards/
downwards
on 3 to increase/decrease.
►
For steps of +/- 5 mph (5
km/h), press and
hold upwards/downwards on 3 to increase/
decrease.
Prolonged pressing and holding
upwards/downwards on 3 causes a very
rapid change in vehicle speed.
As a precaution, we recommend setting a cruise speed fairly close to the current
speed of your vehicle, to avoid any sudden
acceleration or deceleration of the vehicle.
Page 115 of 228

11 3
Driving
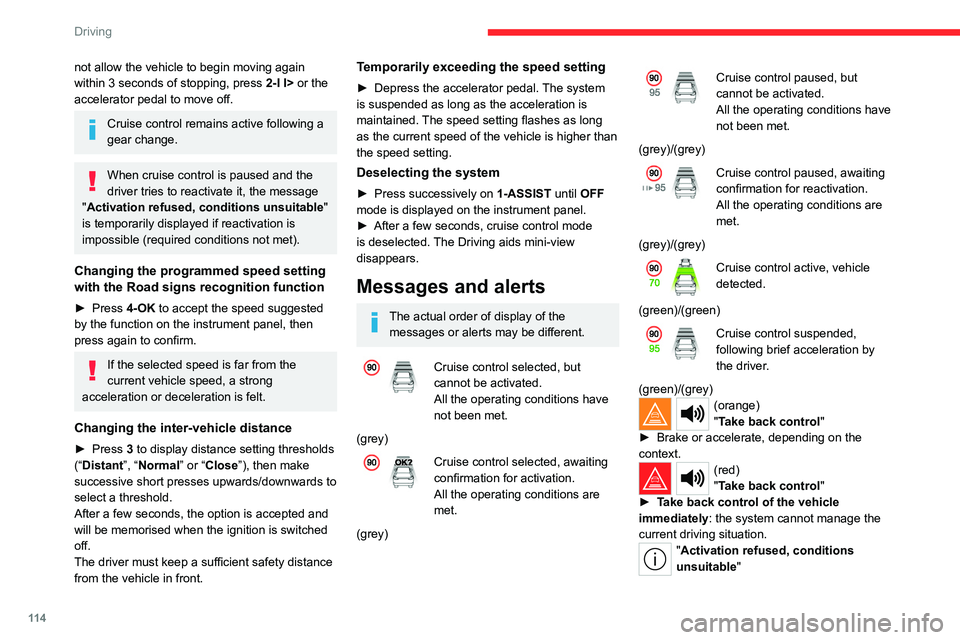
6Information displayed on
the instrument panel
5.Cruise control activated (green)/paused
(grey)
6. Speed setting value
7. Speed suggested by the Road signs
recognition
8. Vehicle held
stationary
9. Inter-vehicle distance setting
10. Position of the vehicle detected by the
system
Use
Selecting the system
► With the engine running, press successively
on 1-ASSIST until cruise control mode is
displayed on the instrument panel. ►
After a few seconds, cruise control mode is
selected.
The Driving aids mini-view is displayed
(grey) and cruise control is ready to be activated.
Switching on cruise control
The vehicle speed must be between 0 and
112 mph (0 and 180 km/h).
System activation is also subject to the following
conditions:
–
driver's door closed.
–
driver's seat belt fastened.
–
mode D selected on the automatic gearbox.
–
parking brake released.
–
if the vehicle is stationary
, brake pedal
depressed.
The message “OK?" is displayed if all the
activation conditions are met.
►
Press
on 4-OK: the current speed becomes
the speed setting (minimum 19 mph (30
km/h))
and cruise control is immediately activated
(green display).
Modifying the speed setting
To change the speed setting using the vehicle’s
current speed:
►
For steps of +/- 1 mph (1 km/h), make
successive short presses upwards/downwards
on
3 to increase/decrease.
►
For steps of +/- 5 mph (5
km/h), press and
hold upwards/downwards on 3 to increase/
decrease.
Prolonged pressing and holding
upwards/downwards on 3 causes a rapid
change in vehicle speed.
When the function is activated, it is possible
to change the speed setting using the speed
suggested by the Road signs recognition
function displayed on the instrument panel:
–
When passing the sign:
►
Press
4-OK to save the suggested speed.
This value is then immediately shown as the new
speed setting on the instrument panel.
–
After passing the sign:
►
Press
4-OK. The message “OK?" is
displayed to confirm the request to save.
►
Press
4-OK again to save the suggested
speed. The new speed setting value is displayed
on the instrument panel.
Pausing/resumption of cruise control
► Press 2-I I> or depress the brake pedal.
The symbol "I I>” is displayed if all the activation
conditions are met.
Cruise control may also have been paused:
–
automatically
, if the electronic stability control
(ESC) system is triggered.
–
by shifting to neutral or engaging reverse gear
.
–
by using the electric parking brake.
–
by unfastening the seat belt.
–
by opening the driver's door
.
►
Press
2-I I> or 4-OK to reactivate cruise
control.
Following braking that has brought the vehicle
to a complete stop, if the traffic conditions do
Page 116 of 228

11 4
Driving
not allow the vehicle to begin moving again
within 3 seconds of stopping, press 2-I I> or the
accelerator pedal to move off.
Cruise control remains active following a
gear change.
When cruise control is paused and the
driver tries to reactivate it, the message
"Activation refused, conditions unsuitable "
is temporarily displayed if reactivation is
impossible (required conditions not met).
Changing the programmed speed setting
with the Road signs recognition function
► Press 4-OK to accept the speed suggested
by the function on the instrument panel, then
press again to confirm.
If the selected speed is far from the
current vehicle speed, a strong
acceleration or deceleration is felt.
Changing the inter-vehicle distance
► Press 3 to display distance setting thresholds
(“Distant”, “Normal” or “Close”), then make
successive short presses upwards/downwards to
select a threshold.
After a few seconds, the option is accepted and
will be memorised when the ignition is switched
off.
The driver must keep a sufficient safety distance
from the vehicle in front.
Temporarily exceeding the speed setting
► Depress the accelerator pedal. The system
is suspended as long as the acceleration is
maintained. The speed setting flashes as long
as the current speed of the vehicle is higher than
the speed setting.
Deselecting the system
► Press successively on 1-ASSIST until OFF
mode is displayed on the instrument panel.
►
After a few seconds, cruise control mode
is deselected.
The Driving aids mini-view
disappears.
Messages and alerts
The actual order of display of the messages or alerts may be different.
Cruise control selected, but
cannot be activated.
All the operating conditions have
not been met.
(grey)
Cruise control selected, awaiting
confirmation for activation.
All the operating conditions are
met.
(grey)
Cruise control paused, but
cannot be activated.
All the operating conditions have
not been met.
(grey)/(grey)
Cruise control paused, awaiting
confirmation for reactivation.
All the operating conditions are
met.
(grey)/(grey)
Cruise control active, vehicle
detected.
(green)/(green)
Cruise control suspended,
following brief acceleration by
the driver.
(green)/(grey)
(orange)
"Take back control"
►
Brake or accelerate, depending on the
context.
(red)
"Take back control"
►
T
ake back control of the vehicle
immediately: the system cannot manage the
current driving situation.
"Activation refused, conditions
unsuitable "
Page 117 of 228

11 5
Driving
6The system refuses to activate cruise control, as
the necessary conditions are not fulfilled.
Stop & Go function
The system has brought the
vehicle to a complete stop.
(green)/(green)
Within 3 seconds of stopping, the vehicle
gradually and automatically begins moving
again.
Beyond 3 seconds of stopping, the driver must
accelerate or press 2-I I> to move off.
If the driver takes no action after the
vehicle has been stopped, the electric
parking brake is applied automatically after
about 5 minutes.
While the vehicle is immobilised, the
following recommendations apply:
–
The driver should not leave the vehicle.
–
Do not open the boot.
–
Do not drop off or pick up passengers.
–
Do not engage reverse gear
.
When restarting the vehicle, beware of
cyclists, pedestrians or animals who are
not taken into account by the system.
The driver must monitor their surroundings.
Operating limits
Cruise control operates by day and night, in dry
weather or moderate rainfall.
Certain situations cannot be managed by the
system and require driver intervention.
Cases not taken into account by the system:
–
Pedestrians, cyclists, animals.
–
Stationary vehicles (e.g.
traffic jams,
breakdown).
– Vehicles crossing your lane.
– V ehicles driving in the opposite direction.
Situations where the driver must suspend the
system:
– Vehicles in a tight bend.
– When approaching a roundabout.
– When following a narrow vehicle.
Reactivate the system when conditions allow .
Situations in which the driver is prompted to
immediately resume control:
–
Excessively sharp deceleration by the vehicle
in front of you.
– When a vehicle cuts in sharply between your
vehicle and the one in front.
Some vehicles on the road may be
poorly perceived or interpreted by the
camera and/or the radar (e.g.
truck), which
can lead to an incorrect evaluation of
distances and result in inappropriate
acceleration or braking of the vehicle.
Pay particular attention:
– When motorcycles are present and
when there are vehicles staggered across the
traffic lane.
Page 119 of 228

11 7
Driving
6This position is not necessarily the centre of the
lane.
You can feel the steering wheel moving.
At any time, the driver can change the position of
the vehicle by intervening on the steering wheel
and maintaining the position until the system has
taken it into account. If the chosen position is too
off-centre, an automatic re-centering manoeuvre
can occur. The system adjusts to the newly
defined position.
Pausing/Suspending the
system
The driver must act promptly if they believe that the traffic conditions or the
state of the road surface require their
intervention, by moving the steering wheel to
temporarily suspend system operation. Any
intervention on the brake pedal that causes
the Adaptive cruise control to pause will also
cause the system to pause.
If the system detects that the driver is not
holding the wheel firmly enough, it
triggers a series of gradual alerts and then
deactivates itself if there is no response from
the driver.
If the function is suspended due to the
prolonged release of the force holding
the steering wheel, the system must be
reactivated by pressing the ASSIST button
again.
Automatic pause
Pausing the system is accompanied by a specific
audible signal. –
T
riggering of the ESC.
–
Insufficient lane detection. In this case, the
Active lane departure warning system function
can take over
, and the system will reactivate
itself once the operating conditions are met
again.
Suspension by the driver
– Travelling outside the lane limits.
– T oo tight a grip on the steering wheel or
dynamic action on the steering wheel.
–
Action on the brake pedal (resulting in a pause
until cruise control is reactivated) or accelerator
pedal (suspension for as long as the pedal is
depressed).
–
Pausing of
Adaptive cruise control.
–
Deactivation of the
ASR.
Driving situations and related alerts
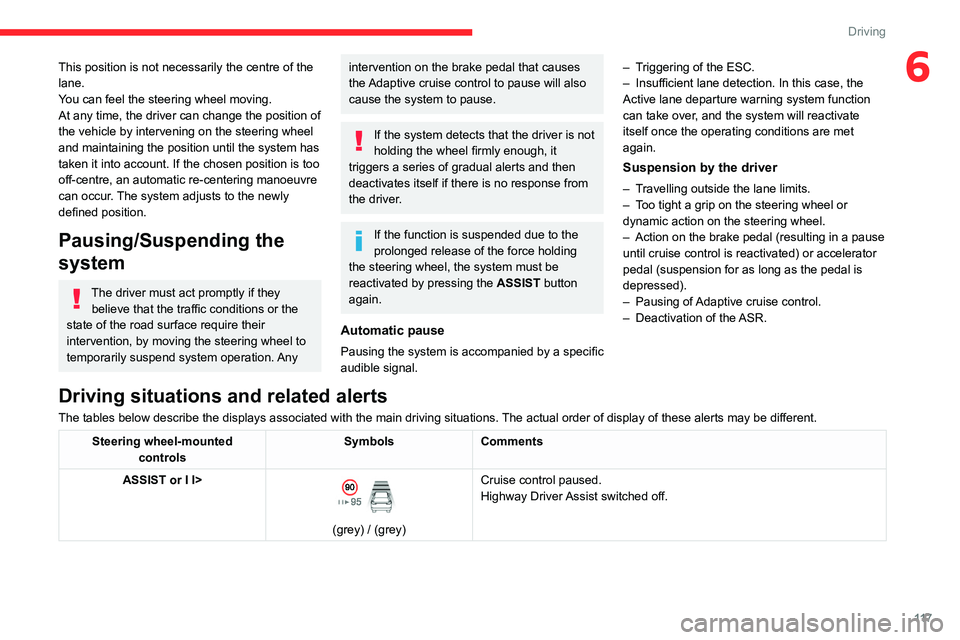
The tables below describe the displays associated with the main driving situations. The actual order of display of these alerts may be different.
Steering wheel-mounted
controls Symbols
Comments
ASSIST or I I>
(grey) / (grey) Cruise control paused.
Highway Driver Assist switched off.
Page 158 of 228

156
Practical information
Observe the legislation in force in your
country relating to the use of snow
chains and maximum authorised speeds.
Use only chains designed to be fitted to the type
of wheel fitted to the vehicle:
Original tyre size Maximum link size 215/65 R17 9 mm
205/55 R19 9 mm
For more information, contact a CITROËN dealer
or a qualified workshop.
Installation tips
► To fit the snow chains during a journey, stop
the vehicle on a flat surface at the side of the
road.
►
Apply the parking brake and position any
wheel chocks under the wheels to prevent
movement of the vehicle.
►
Fit the snow chains following the instructions
provided by the manufacturer
.
►
Move off gently and drive for a few moments,
without exceeding 31
mph (50 km/h).
►
Stop the vehicle and check that the snow
chains are correctly tightened.
It is strongly recommended that you
practise fitting the snow chains on a level
and dry surface before setting off.
Avoid driving with snow chains on roads that have been cleared of snow to avoid
damaging the vehicle's tyres and the road
surface. If the vehicle is fitted with alloy
wheels, check that no part of the chain or its
fixings is in contact with the wheel rim.
Energy economy mode
This system manages the duration of use of
certain functions, in order to conserve a sufficient
level of charge in the battery with the ignition off.
After switching off the engine, you can still
use functions such as the audio and telematic
system, the wipers and the dipped beam
headlamps or courtesy lamps, for a combined
duration of approximately 40 minutes.
Selecting the mode
A confirmation message is displayed when
energy economy mode is entered, and the active
functions are placed on standby.
If a telephone call is in progress at the
time, it will be maintained for around 10
minutes via the audio system’s hands-free
system.
Exiting the mode
These functions are automatically reactivated the
next time the vehicle is used.
To restore the use of these functions
immediately, start the engine and let it run:
– For less than 10 minutes, to use the
equipment for approximately 5 minutes.
–
For more than 10 minutes, to use the
equipment for approximately 30 minutes.
Let the engine run for the specified duration to
ensure that the battery charge is sufficient.
T
o recharge the battery, avoid repeatedly or
continuously restarting the engine.
A flat battery prevents the engine from starting.
For more information on the 12
V battery,
refer to the corresponding section.
Load reduction mode
This system manages the use of certain
functions according to the level of charge
remaining in the battery.
When the vehicle is being driven, the load
reduction function temporarily deactivates certain
functions, such as the air conditioning and the
heated rear screen.
The deactivated functions are reactivated
automatically as soon as conditions permit.
Bonnet
Stop & Start
Before doing anything under the bonnet,
you must switch off the ignition to avoid any