trailer CITROEN C5 AIRCROSS DAG 2022 Handbook (in English)
[x] Cancel search | Manufacturer: CITROEN, Model Year: 2022, Model line: C5 AIRCROSS DAG, Model: CITROEN C5 AIRCROSS DAG 2022Pages: 276, PDF Size: 7.92 MB
Page 140 of 276

138
Driving
Operating limits
The system goes into standby automatically in
the following cases:
– ESC deactivated or operation triggered.
– Speed below 43 mph (70 km/h) or greater
than 112 mph (180 km/h),
– Electrical connection of a trailer.
– Use of a"space-saver" spare wheel detected
(as detection is not immediate, deactivation of
the system is recommended).
– Dynamic driving style detected, pressure on
the brake or accelerator pedal.
– Driving where there are no lane markings.
– Activation of the direction indicators.
Driving situations and related alerts
The table below describes the alerts and messages displayed in different driving situations.
These alerts are not displayed sequentially.
Function status Indicator lamp Display and/or associated
messageComments
OFF
(grey)
Function deactivated.
ON
(grey) System active, conditions not met:
–
speed below 44 mph (70
km/h),
–
no lane marking recognised,
–
ASR/DSC systems deactivated or operation of ESC
system triggered,
–
"sport" driving.
ON
(grey)
Automatic deactivation/standby of the function (for
example, due to detection of a trailer or use of the "space-
saver" spare wheel provided with the vehicle).
ON
(green) Lane marking detected.
Speed above 44 mph (70
km/h).
ON
(orange)/(green)
The system corrects the trajectory on the side where the
risk of unintentional crossing is detected (orange line).
Page 141 of 276

139
Driving
6Function statusIndicator lamp Display and/or associated
messageComments
ON
(orange)/(green)
"Take control of the vehicle." –
If, while correcting the trajectory
, the system detects
that the driver has not held the steering wheel for a few
seconds, it stops correcting and returns control to the
driver.
– If, while correcting the trajectory , the system determines
that the correction will not be enough and that a solid line
will be crossed (orange line): the driver is warned that they
must provide additional trajectory adjustment.
The duration of audible warnings will increase if multiple
corrections are performed in quick succession. The
warning will become continuous, persisting until the driver
responds.
This message may also be displayed if you have your
hands on the steering wheel.
Operating limits
The system goes into standby automatically in
the following cases:
–
ESC deactivated or operation triggered.
–
Speed below 43 mph (70
km/h) or greater
than 112 mph (180
km/h),
–
Electrical connection of a trailer
.
–
Use of a"space-saver" spare wheel detected
(as detection is not immediate, deactivation of
the system is recommended).
–
Dynamic driving style detected, pressure on
the brake or accelerator pedal.
–
Driving where there are no lane markings.
–
Activation of the direction indicators.
– Crossing the inside line on a bend.
– Driving in a tight corner .
–
Inactivity by the driver detected during
correction.
The following situations may interfere with the operation of the system or
prevent it from working:
–
Insufficient contrast between the road
surface and the side of the road (e.g. shade).
–
Lane markings worn, hidden (snow
, mud)
or multiple (roadworks, etc.),
–
Running close to the vehicle in front (the
lane markings may not be detected).
–
Roads that are narrow
, winding.
Risk of undesirable operation
We recommend deactivating the system in the
following driving situations:
–
Driving on damaged, unstable or very slippery
(ice) road surfaces,
–
Poor weather conditions.
–
Driving on a speed circuit.
–
Driving on a rolling road.
Page 142 of 276

140
Driving
Operating limits
No alert is triggered in the following conditions:
Deactivation / Activation
► Press this button to deactivate/reactivate the
system at any time.
Deactivation is signalled by the lighting of
the indicator lamp in the button and this
warning lamp in the instrument panel.
The system is automatically reactivated every
time the ignition is switched on.
Malfunction
In the event of a malfunction, these
warning lamps light up on the
instrument panel, accompanied by the display of
a message and an audible signal.
Have it checked by a CITROËN dealer or a
qualified workshop.
Blind Spot Monitoring
Refer to the General recommendations on the
use of driving and manoeuvring aids .
This system includes sensors, placed on the
sides of the bumpers, and warns the driver of
the potentially dangerous presence of another
vehicle (car, truck, motorcycle) in the blind spot
areas of their vehicle (areas hidden
from the
driver's field of vision).
The warning is given by a fixed warning lamp
that appears in the door mirror on the side in
question:
–
immediately
, when being overtaken;
–
after a delay of about one second, when
overtaking a vehicle slowly
.
Activation/Deactivation
It is set via theDriving/Vehicle touch
screen menu.
When starting the vehicle, the warning lamp
comes on in each mirror to indicate that the
system is activated.
The status of the system is memorised when the
ignition is switched off.
The system is automatically deactivated when towing with a towing device
approved by CITROËN.
Operating conditions
– All vehicles are moving in the same direction
and in adjacent lanes.
–
The speed of your vehicle must be between 7
and 87 mph (12 and 140
km/h).
–
When overtaking a vehicle, the speed
difference is less than 6
mph (10 km/h).
–
When overtaken by a vehicle, the speed
difference is less than 16
mph (25 km/h).
–
T
raffic is flowing normally.
–
Overtaking a vehicle over a certain period of
time and the vehicle being overtaken remains in
the blind spot.
–
Y
ou are driving on a straight or slightly curved
road.
–
Y
our vehicle is not pulling a trailer, a caravan,
etc.
Page 144 of 276

142
Driving
The rear parking sensors system will be deactivated automatically if a trailer or
bicycle carrier is connected to a towing device
installed in accordance with the
manufacturer's recommendations.
In this case, the outline of a trailer is displayed
at the rear of the image of the vehicle.
The parking sensors are deactivated while the
Park Assist function is measuring a space.
For more information on the Park Assist, refer
to the corresponding section.
When the vehicle is started, the visual
and audible aids will be available after
the touch screen has started up.
Operating limits
If the boot is heavily loaded, the vehicle may tilt,
affecting distance measurements.
Malfunction
In the event of a malfunction when
shifting to reverse, one of these
warning lamps comes on on the instrument
panel, accompanied by the display of a message
and an audible signal (short beep).
If the malfunction occurs while the parking
sensors are being used, it causes the function to
deactivate.
Contact a CITROËN dealer or a qualified
workshop to have the system checked.
Using sensors located in the bumper, this
system signals the proximity of obstacles
(e.g.
pedestrian, vehicle, tree, barrier) present in
their field of detection.
Rear parking sensors
The system is switched on by engaging reverse
gear, which is confirmed by an audible signal.
The system is switched off when disengaging
reverse gear.
Audible assistance
The system signals the presence of obstacles
within the sensors’ detection zone.
The proximity information is given by an
intermittent audible signal, the frequency of
which increases as the vehicle approaches the
obstacle.
When the distance between the vehicle and
the obstacle becomes less than about thirty
centimetres, the audible signal becomes
continuous.
The sound emitted by the speaker (right or
left) indicates the side on which the obstacle is
located.
Adjusting the audible signalDepending on version, with
CITROËN Connect Radio or
CITROËN Connect Nav, pressing this button
opens the window for adjusting the volume of
the audible signal.
Visual assistance
This supplements the audible signal, without
taking account of the vehicle's trajectory, by
displaying bars on the screen whose location
represents the distance between the obstacle
and the vehicle (white: more distant, orange:
close, red: very close).
This supplements the audible signal by
displaying bars on the screen whose location
represents the distance between the obstacle
and the vehicle (white: more distant, orange:
close, red: very close).
When the obstacle is very close, the "Danger"
symbol is displayed on the screen.
Front parking sensors
Supplementing the rear parking sensors, the
front parking sensors are triggered when an
obstacle is detected in front and the speed of the
vehicle is still below 6 mph (10
km/h).
Front parking sensor operation is suspended if
the vehicle stops for more than three seconds in
forward gear, if an obstacle is no longer detected
or the vehicle speed exceeds 6
mph (10 km/h).
The sound emitted by the speaker (front or rear) locates the obstacle relative to
the vehicle, in front or behind it.
Deactivation/Activation
It is set via the Driving/Vehicle touch
screen menu.
The system status is memorised when the
ignition is switched off.
Page 145 of 276
143
Driving
6The rear parking sensors system will be deactivated automatically if a trailer or
bicycle carrier is connected to a towing device
installed in accordance with the
manufacturer's recommendations.
In this case, the outline of a trailer is displayed
at the rear of the image of the vehicle.
The parking sensors are deactivated while the
Park Assist function is measuring a space.
For more information on the Park Assist, refer
to the corresponding section.
When the vehicle is started, the visual
and audible aids will be available after
the touch screen has started up.
Operating limits
If the boot is heavily loaded, the vehicle may tilt,
affecting distance measurements.
Malfunction
In the event of a malfunction when
shifting to reverse, one of these
warning lamps comes on on the instrument
panel, accompanied by the display of a message
and an audible signal (short beep).
If the malfunction occurs while the parking
sensors are being used, it causes the function to
deactivate.
Contact a CITROËN dealer or a qualified
workshop to have the system checked.
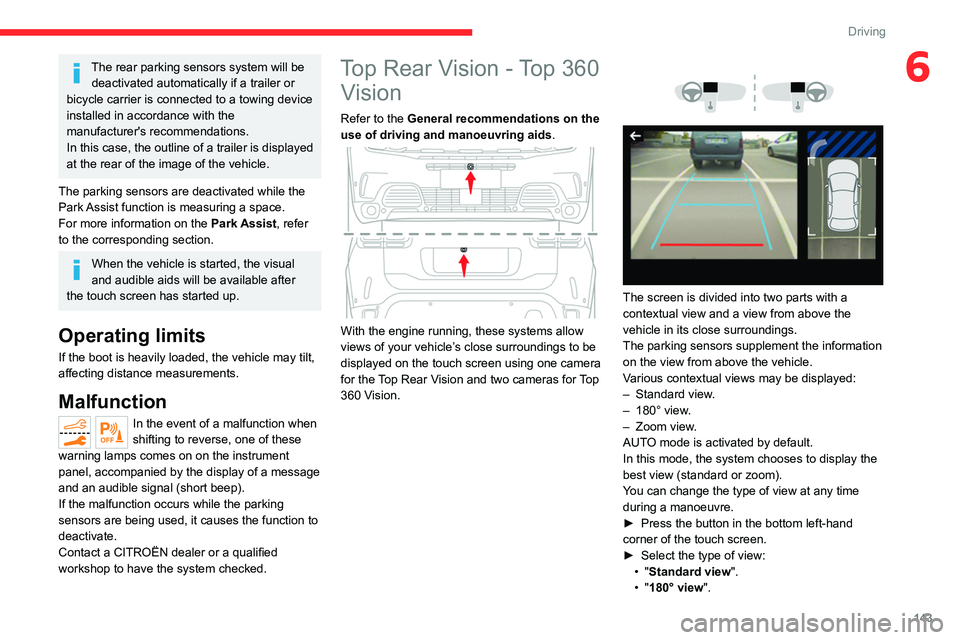
Top Rear Vision - Top 360 Vision
Refer to the General recommendations on the
use of driving and manoeuvring aids .
With the engine running, these systems allow
views of your vehicle’s close surroundings to be
displayed on the touch screen using one camera
for the
T
op Rear Vision and two cameras for Top
360 Vision.
The screen is divided into two parts with a
contextual view and a view from above the
vehicle in its close surroundings.
The parking sensors supplement the information
on the view from above the vehicle.
Various contextual views may be displayed:
–
Standard view
.
–
180° view
.
–
Zoom view
.
AUTO mode is activated by default.
In this mode, the system chooses to display the
best view (standard or zoom).
You can change the type of view at any time
during a manoeuvre.
►
Press the button in the bottom left-hand
corner of the touch screen.
►
Select the type of view:
•
"Standard view".
•
"180° view".
Page 148 of 276

146
Driving
Zoom view
The camera records the vehicle's surroundings
during the manoeuvre in order to create a
view from above the front of the vehicle in its
near surroundings, allowing the vehicle to be
manoeuvred around obstacles nearby.
This view is available with AUTO mode or in the
view selection menu.
Obstacles may appear further away than
they actually are.
It is important to check the sides of the
vehicle during the manoeuvre, using the
mirrors.
The parking sensors also supplement the
information on the vehicle's surroundings.
– by pressing the white arrow in the upper-left
corner of the touch screen.
If a trailer or a bicycle carrier is fitted to
the towball, the area behind the vehicle
on the view from above goes dark.
The surroundings are reconstructed by the
front camera only.
The rear vision views are similar to those for the
Top Rear Vision.
For more information on the Top Rear Vision,
refer to the corresponding section.
Front and rear vision
With the engine running and the speed
below 12 mph (20 km/h), the system is
activated via the Driving
/ Vehicle touch screen
menu:
►
Select "
Panoramic visual aid".
AUTO mode is displayed by default, with front
vision, if the gearbox is in neutral or with a gear engaged, or with rear vision, if reverse is
engaged.
The system is deactivated:
–
Automatically above about 19 mph (30
km/h)
(the image disappears temporarily from 12 mph
(20 km/h)).
–
By pressing the white arrow in the upper-left
corner of the touch screen.
AUTO mode
This mode is activated by default.
Using sensors in the front bumper, the automatic
view changes from the front view (standard) to
the view from above (zoom) as an obstacle is
approached during a manoeuvre.
Standard view
The area in front of your vehicle is displayed on
the screen.
The orange lines 1 represent the width of your
vehicle, with the mirrors unfolded; their direction
changes according to the position of the steering
wheel.
The red line 2 represents a distance of 30 cm
from the front bumper; the two orange lines 3
and 4 represent 1 m and 2 m, respectively.
This view is available with AUTO mode or in the
view selection menu.
Page 152 of 276

150
Driving
Deactivation
The system is deactivated via the Driving /
V ehicle touch screen menu.
The system is automatically deactivated:
–
when the ignition is switched off.
–
if the engine stalls.
–
if the driver's seat belt is not fastened.
–
on opening the driver's door
.
–
if no manoeuvre is performed within 5 minutes
of selecting the type of manoeuvre.
–
after a prolonged stop of the vehicle during a
manoeuvre.
–
if the wheel anti-slip regulation (ASR) is
triggered.
–
if the speed of the vehicle exceeds the
authorised limit.
–
when the driver interrupts the rotation of the
steering wheel.
–
after 4 manoeuvring cycles.
–
if one of the front wheels encounters an
obstacle.
The indicator lamp in the instrument panel goes
off and a message is displayed, accompanied by
an audible signal.
The driver should then take back control of the
vehicle's steering.
If the system is deactivated during a
manoeuvre, the driver should reactivate
it to repeat the measurement.
Deactivation
The system is automatically deactivated:
– when towing a trailer , connected electrically;
–
if the driver's door is opened;
–
if the speed of the vehicle is above 43 mph
(70 km/h).
T
o switch the system off for a prolonged period,
contact a CITROËN dealer or a qualified
workshop.
Malfunctions
When the function is not activated, this
indicator lamp (on a vehicle with a type 2
instrument panel) will flash briefly and/or an
audible signal will be emitted to indicate a
system malfunction.
If the malfunction occurs while the system is in
use, the warning lamp goes off.
In the event of a malfunction, have the system
checked by a CITROËN dealer or a qualified
workshop.
In the event of a power steering
malfunction, this warning lamp is
displayed on the instrument panel, accompanied
by a warning message.
You must stop as soon as it is safe to do so.
Contact a CITROËN dealer or a qualified
workshop.
Page 164 of 276

162
Practical information
Towing device with quickly detachable towball
Presentation
This genuine towing device can be fitted and
removed with no need for tools.
1. Carrier
2. Protective plug
3. Connection socket
4. Safety eye
5. Detachable towball
6. Locking/unlocking wheel
7. Security key lock
8. Label to note the key references
Disconnection
Before disconnecting the nozzle from the
charging connector:
►
If the vehicle is locked, unlock it.
►
If the vehicle is unlocked, lock it and then
unlock it .
If selective unlocking of the doors is
activated, press the unlocking button on
the remote control twice to disconnect the
nozzle.
The red indicator lamp in the flap goes out to
confirm that the nozzle is unlocked.
►
Within
30 seconds, remove the charging
nozzle.
Domestic charging (mode 2)
The end of charging is confirmed when the
green CHARGE indicator lamp on the control
unit comes on fixed and the green light guides in
the flap come on fixed.
►
After disconnection, replace the protective
cover over the nozzle and close the charging
flap.
►
Disconnect the control unit's charging cable
from the domestic socket.
Accelerated charging (mode 3)
The end of charging is confirmed by the
accelerated charging unit (Wallbox) and when
the green light guides in the flap come on fixed.
►
After disconnection, replace the nozzle on to
the charging unit and close the charging flap.
Towing device
Load distribution
► Distribute the load in the trailer so that the
heaviest items are as close as possible to the
axle, and the nose weight approaches the
maximum permitted without exceeding it.
Air density decreases with altitude, thus reducing
engine performance.
The maximum towable load
must be reduced by 10% per 1,000
metres of
altitude.
Use genuine towing devices and their
wiring harnesses approved by CITROËN.
We recommend having them fitted by a
CITROËN dealer or a qualified workshop.
If not fitted by a CITROËN dealer, they must
still be fitted in accordance with the vehicle
manufacturer's instructions.
Important: with a motorised tailgate and its
"Hands-Free Tailgate Access" function, if a
towing device is fitted outside the CITROËN
dealer network, it is essential to visit a
CITROËN dealer or a qualified workshop
to recalibrate the detection system. Risk
of malfunction of the "Hands-Free Tailgate
Access" function.
Certain driving or manoeuvring aid functions
are automatically deactivated while an
approved towing system is in use.
Comply with the maximum authorised
towable weight, as indicated on your
vehicle's registration certificate, on the
manufacturer's label and in the Technical
data section of this guide.
Complying with the maximum authorised
nose weight (towball weight) also includes
the use of accessories (bicycle carriers,
tow boxes, etc.).
Observe the legislation in force in the
country where you are driving.
Vehicle equipped with motorised
tailgate with "Hands-Free Tailgate
Access" function
To avoid unintentionally opening the tailgate
while operating the towing device:
–
Deactivate this function in advance in your
vehicle's configuration menu.
–
Or remove the electronic key from the
recognition zone, with the tailgate closed.
Page 165 of 276

163
Practical information
7Towing device with quickly detachable towball
Presentation
This genuine towing device can be fitted and
removed with no need for tools.
1. Carrier
2. Protective plug
3. Connection socket
4. Safety eye
5. Detachable towball
6. Locking/unlocking wheel
7. Security key lock
8. Label to note the key references
A. Locked position (the green marks are
opposite each other); the wheel is in contact
with the towball (no gap).
B. Unlocked position (red mark opposite the green mark); the wheel is no longer
in contact with the towball (gap of around
5
mm).
Trailers with LED lamps are not compatible with the wiring harness of this
device.
To ensure complete safety while driving with a Towing device , refer to the
corresponding section.
Before each use
Verify that the towball is correctly fitted,
checking the follow points:
–
The green mark on the wheel is in line with
the green mark on the towball.
– The wheel is in contact with the towball
(position A
).
–
The security key lock is closed and the
key removed; the wheel can no longer be
operated.
–
The towball must not be able to move in
its carrier; test by attempting to shake it with
your hand.
If the towball is not locked, the trailer can
become detached - risk of an accident!
During use
Never release the locking system with a
trailer or load carrier on the towball.
Never exceed the maximum authorised
weight for the vehicle - the Gross Train
Weight or GTW.
Always comply with the maximum authorised
load on the towing device: if it is exceeded,
this device may become detached from the
vehicle - risk of an accident!
Before driving, check the headlamp height
adjustment and check that the lamps on the
trailer operate correctly.
For more information on Headlamp height
adjustment, refer to the corresponding
section.
After use
When travelling without a trailer or
load carrier, remove the towball and fit the
protective plug into the carrier, to provide
Page 166 of 276

164
Practical information
clear visibility of the number plate and/or its
lighting.
Fitting the towball
► Below the rear bumper, remove the protective
plug 2 from the carrier 1.
►
Insert the end of the towball
5 into the carrier
1 and push it upwards; it will lock into position
automatically.
► The wheel 6 rotates a quarter turn anti-
clockwise; take care to keep your hands clear!
► Check that the mechanism has correctly
locked into place (position A
).
►
Close the lock 7
using the key.
►
Remove the key
. The key cannot be removed
while the lock is open.
►
Clip the cap onto the lock.
► Remove the protective cover from the
towball. ►
Attach the trailer to the towball.
►
Attach the cable on the trailer to the safety
eye
4 on the carrier.
►
Lower the connection socket
3
to put it in
position.
►
Insert the trailer plug and rotate it by a
quarter turn to connect it to the connection
socket
3 on the carrier.
Removing the towball
► Grasp the trailer plug, perform a quarter turn
and pull to disconnect it from the connection
socket
3 on the carrier.
►
Raise the connection socket 3
to the right
again to stow it away.
►
Detach the cable on the trailer from the safety
eye
4 on the carrier.
►
Detach the trailer from the towball.
►
Refit the protective cover to the towball.
►
Remove the cap from the lock and press it
onto the head of the key
.