sat nav Citroen C5 RHD 2011.5 (RD/TD) / 2.G User Guide
[x] Cancel search | Manufacturer: CITROEN, Model Year: 2011.5, Model line: C5 RHD, Model: Citroen C5 RHD 2011.5 (RD/TD) / 2.GPages: 340, PDF Size: 39.33 MB
Page 260 of 340
258
08
1
4
5
2ABC3DEF5JKL4GHI6MNO8TUV7PQRS9WXYZ0*#
1RADIO MEDIANAV ESC TRAFFIC
SETUPADDR
BOOK
2ABC3DEF5JKL4GHI6MNO8TUV7PQRS9WXYZ0*#
1RADIO MEDIANAV ESC TRAFFIC
SETUPADDR
BOOK
32ABC3DEF5JKL4GHI6MNO8TUV7PQRS9WXYZ0*#
1RADIO MEDIANAV ESC TRAFFIC
SETUPADDR
BOOK
22ABC3DEF5JKL4GHI6MNO8TUV7PQRS9WXYZ0*#
1RADIO MEDIANAV ESC TRAFFIC
SETUPADDR
BOOK
2ABC3DEF5JKL4GHI6MNO8TUV7PQRS9WXYZ0*#
1RADIO MEDIANAV ESC TRAFFIC
SETUPADDR
BOOK
2ABC3DEF5JKL4GHI6MNO8TUV7PQRS9WXYZ0*#
1RADIO MEDIANAV ESC TRAFFIC
SETUPADDR
BOOK
*
The services available via the telephone depend on the network, the
SIM card and the compatibility of the Bluetooth equipment used. Refer to
your telephone's manual and your operator to check which services you
have access to. A list of mobile telephones which offer the best range of
services is available from dealers.
USING THE TELEPHONE
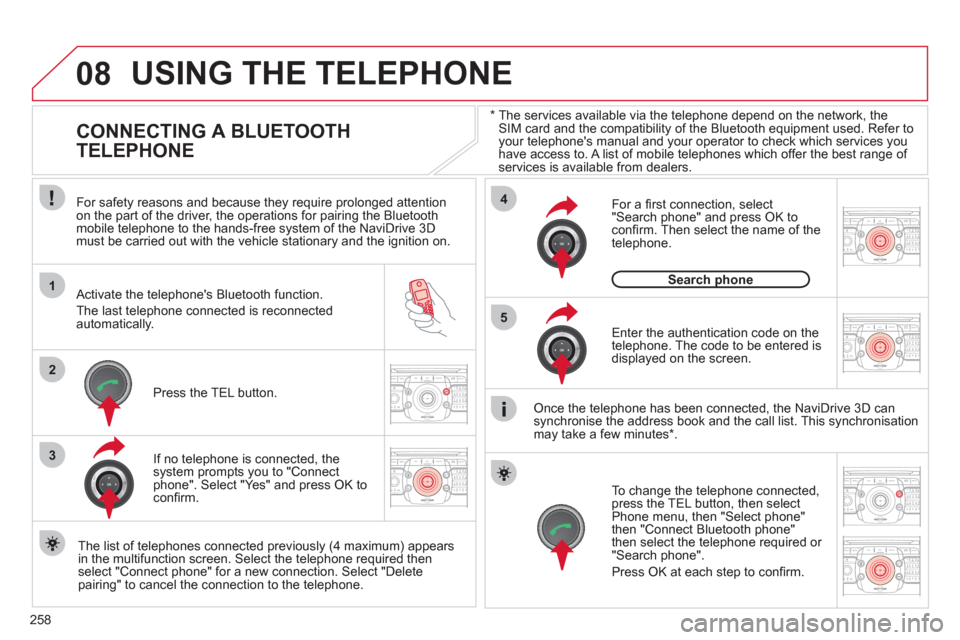
CONNECTING A BLUETOOTH
TELEPHONE
For safety reasons and because they require prolonged attention
on the part of the driver, the operations for pairing the Bluetooth
mobile telephone to the hands-free system of the NaviDrive 3D
must be carried out with the vehicle stationary and the ignition on.
Activate the telephone's Bluetooth function.
The last telephone connected is reconnected
automatically.
If no telephone is connected, the
system prompts you to "Connect
phone". Select "Yes" and press OK to
confi rm.
Enter the authentication code on the
telephone. The code to be entered is
displayed on the screen.
To change the telephone connected,
press the TEL button, then select
Phone menu, then "Select phone"
then "Connect Bluetooth phone"
then select the telephone required or
"Search phone".
Press OK at each step to confi rm.
Once the telephone has been connected, the NaviDrive 3D can
synchronise the address book and the call list. This synchronisation
may take a few minutes * .
The list of telephones connected previously (4 maximum) appears
in the multifunction screen. Select the telephone required then
select "Connect phone" for a new connection. Select "Delete
pairing" to cancel the connection to the telephone.
Press the TEL button.
For a fi rst connection, select
"Search phone" and press OK to
confi rm. Then select the name of the
telephone.
Search phone
Page 261 of 340

259
08
14
5
2ABC3DEF5JKL4GHI6MNO8TUV7PQRS9WXYZ0*#
1NAV ESC TRAFFICADDR
BOOK2ABC3DEF5JKL4GHI6MNO8TUV7PQRS9WXYZ0*#
1SETUP2ABC3DEF5JKL4GHI6MNO8TUV7PQRS9WXYZ0*#
1
3
2ABC3DEF5JKL4GHI6MNO8TUV7PQRS9WXYZ0*#
1RADIO MEDIANAV ESC TRAFFIC
SETUPADDR
BOOK
2
Extract the holder by
pressing the eject
button.
Install the SIM card in the holder
and then insert it in the slot.
To remove the SIM card, repeat step 1.
For safety reasons and because they require prolonged attention
on the part of the driver, the SIM card installation operations must
be carried out when stationary.
Enter the PIN code on the keypad
then select OK and confi rm.
The system asks "Do you want
to switch to the internal phone?",
select "Yes" if you wish to use your
SIM card for your personal calls.
Otherwise, only the emergency call
and the services will use the SIM
card.
Remember PIN
When entering your PIN code, tick the "Remember PIN" tab to
allow use of the telephone without having to enter this code when it
is used subsequently.
USING THE INTERNAL TELEPHONE WITH
A SIM CARD
USING THE TELEPHONE
Once the SIM card has been installed, the system can synchronise
the address book and the call list.
This synchronisation may take a few minutes.
If you have declined to use the internal telephone for personal calls, you
can still connect a Bluetooth telephone to receive your calls on the vehicle's
audio system.
Page 263 of 340

261
09
1
4
1
2ABC3DEF5JKL4GHI6MNO8TUV7PQRS9WXYZ0*#
1RADIO MEDIANAV ESC TRAFFIC
SETUPADDR
BOOK
3
2ABC3DEF5JKL4GHI6MNO8TUV7PQRS9WXYZ0*#
1RADIO MEDIANAV ESC TRAFFIC
SETUPADDR
BOOK
2ABC3DEF5JKL4GHI6MNO8TUV7PQRS9WXYZ0*#
1NAV ESC TRAFFICADDR
BOOKSETUPSETUP
2ABC3DEF5JKL4GHI6MNO8TUV7PQRS9WXYZ0*#
1RADIO MEDIANAV ESC TRAFFIC
SETUPADDR
BOOK22
2ABC3DEF5JKL4GHI6MNO8TUV7PQRS9WXYZ0*#
1RADIO MEDIANAV ESC TRAFFIC
SETUPADDR
BOOK
2ABC3DEF5JKL4GHI6MNO8TUV7PQRS9WXYZ0*#
1RADIO MEDIANAV ESC TRAFFIC
SETUPADDR
BOOK
CONFIGURATION
SETTING THE DATE AND TIME
Make the adjustments using the ring
and move on to the next using the
4-direction navigator.
Press OK to confi rm.
Select the "Date format" function and
press OK to confi rm.
Select the format required using the
ring and press OK to confi rm.
Select the "Set date & time" function
and press OK to confi rm.
Pressing the SETUP button for more than 2 seconds permits
access to:
This setting operation must be carried out if the battery has been
disconnected.
Press the SETUP button.
Select the "Time format" function and
press OK to confi rm.
Select the format required using the
ring and press OK to confi rm.
Set date & time
Select the "Date & Time" function
and press OK to confi rm.
Description of the unit
GPS coverage
Demo mode
Date & Time
Principle of GPS synchronisation (GMT):
1. Confi rm the "Synchronise with GPS" selection, the time is then set to
GMT universal time, the date is also updated.
2. Using the 4-direction navigator, move the cursor to the time fi elds and
press OK.
3. You can then use the ring to set the time to the time zone of your choice.
Note that when changing between summer/winter time, the time zone
must be changed again manually.
Page 271 of 340
269
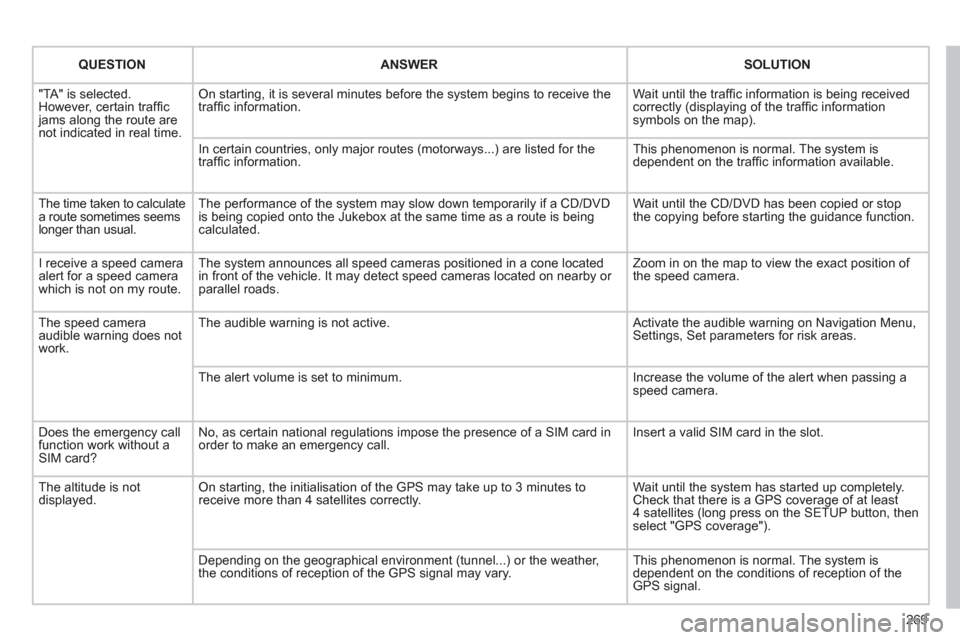
QUESTION
ANSWER
SOLUTION
"TA" is selected.
However, certain traffi c
jams along the route are
not indicated in real time. On starting, it is several minutes before the system begins to receive the
traffi c information. Wait until the traffi c information is being received
correctly (displaying of the traffi c information
symbols on the map).
In certain countries, only major routes (motorways...) are listed for the
traffi c information. This phenomenon is normal. The system is
dependent on the traffi c information available.
The time taken to calculate
a route sometimes seems
longer than usual. The performance of the system may slow down temporarily if a CD/DVD
is being copied onto the Jukebox at the same time as a route is being
calculated. Wait until the CD/DVD has been copied or stop
the copying before starting the guidance function.
I receive a speed camera
alert for a speed camera
which is not on my route. The system announces all speed cameras positioned in a cone located
in front of the vehicle. It may detect speed cameras located on nearby or
parallel roads. Zoom in on the map to view the exact position of
the speed camera.
The speed camera
audible warning does not
work. The audible warning is not active. Activate the audible warning on Navigation Menu,
Settings, Set parameters for risk areas.
The alert volume is set to minimum. Increase the volume of the alert when passing a
speed camera.
Does the emergency call
function work without a
SIM card? No, as certain national regulations impose the presence of a SIM card in
order to make an emergency call. Insert a valid SIM card in the slot.
The altitude is not
displayed. On starting, the initialisation of the GPS may take up to 3 minutes to
receive more than 4 satellites correctly. Wait until the system has started up completely.
Check that there is a GPS coverage of at least
4 satellites (long press on the SETUP button, then
select "GPS coverage").
Depending on the geographical environment (tunnel...) or the weather,
the conditions of reception of the GPS signal may vary. This phenomenon is normal. The system is
dependent on the conditions of reception of the
GPS signal.
Page 275 of 340
273
The MyWay is protected in such a way that it will only
operate in your vehicle. If it is to be installed in another
vehicle, contact a CITROËN dealer for confi guration of
the system.
Certain functions described in this handbook will
become available during the year.
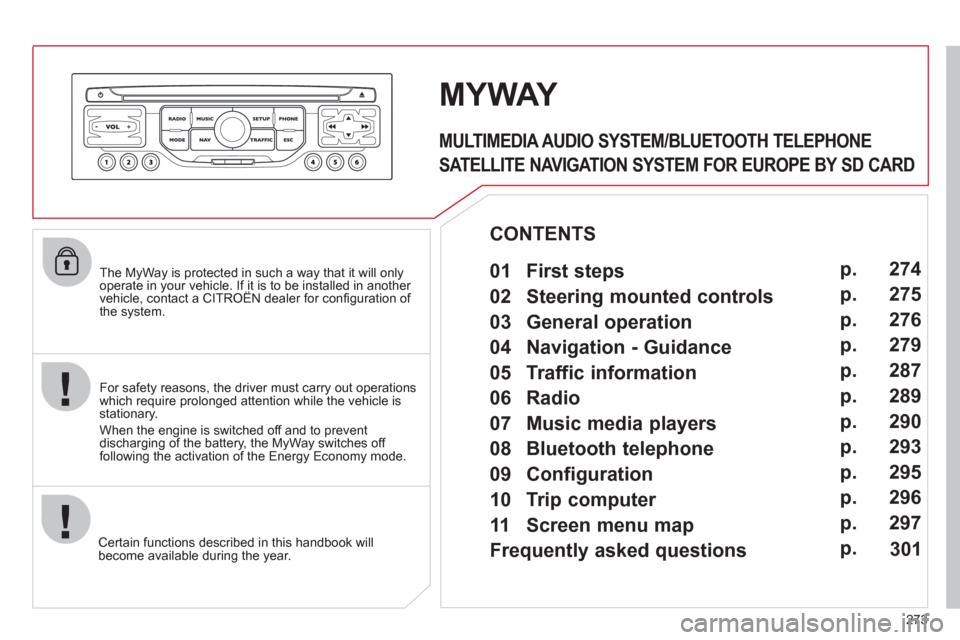
MYWAY
For safety reasons, the driver must carry out operations
which require prolonged attention while the vehicle is
stationary.
When the engine is switched off and to prevent
discharging of the battery, the MyWay switches off
following the activation of the Energy Economy mode.
MULTIMEDIA AUDIO SYSTEM/BLUETOOTH TELEPHONE
SATELLITE NAVIGATION SYSTEM FOR EUROPE BY SD CARD
01 First steps
CONTENTS
02 Steering mounted controls
03 General operation
04 Navigation - Guidance
05 Traffic information
06 Radio
07 Music media players
08 Bluetooth telephone
09 Configuration
10 Trip computer p.
p.
p.
p.
p.
p.
p.
p.
p.
p.
11 Screen menu map
Frequently asked questions p.
p. 274
275
276
279
287
289
290
293
295
296
297
301
Page 276 of 340
01
1
5
10 234 6
1311
9
14 157812 16
274
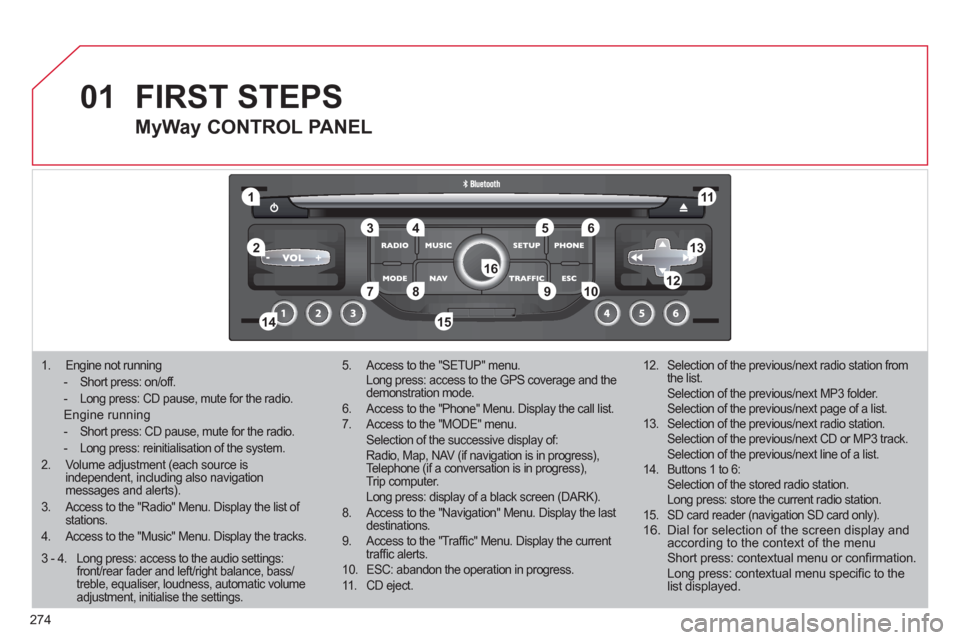
1. Engine not running
- Short press: on/off.
- Long press: CD pause, mute for the radio.
Engine running
- Short press: CD pause, mute for the radio.
- Long press: reinitialisation of the system.
2.
Volume adjustment (each source is
independent, including also navigation
messages and alerts).
3. Access to the "Radio" Menu. Display the list of
stations.
4. Access to the "Music" Menu. Display the tracks.
5. Access to the "SETUP" menu.
Long press: access to the GPS coverage and the
demonstration mode.
6. Access to the "Phone" Menu. Display the call list.
7. Access to the "MODE" menu.
Selection of the successive display of:
Radio, Map, NAV (if navigation is in progress),
Telephone (if a conversation is in progress),
Trip computer.
Long press: display of a black screen (DARK).
8. Access to the "Navigation" Menu. Display the last
destinations.
9. Access to the "Traffi c" Menu. Display the current
traffi c alerts.
10. ESC: abandon the operation in progress.
11 . CD eject.
12. Selection of the previous/next radio station from
the list.
Selection of the previous/next MP3 folder.
Selection of the previous/next page of a list.
13. Selection of the previous/next radio station.
Selection of the previous/next CD or MP3 track.
Selection of the previous/next line of a list.
14. Buttons 1 to 6:
Selection of the stored radio station.
Long press: store the current radio station.
15. SD card reader (navigation SD card only).
16. Dial for selection of the screen display and
according to the context of the menu
Short press: contextual menu or confi rmation.
Long press: contextual menu specifi c to the
list displayed.
FIRST STEPS
MyWay CONTROL PANEL
3 - 4. Long press: access to the audio settings:
front/rear fader and left/right balance, bass/
treble, equaliser, loudness, automatic volume
adjustment, initialise the settings.
Page 278 of 340
03
276
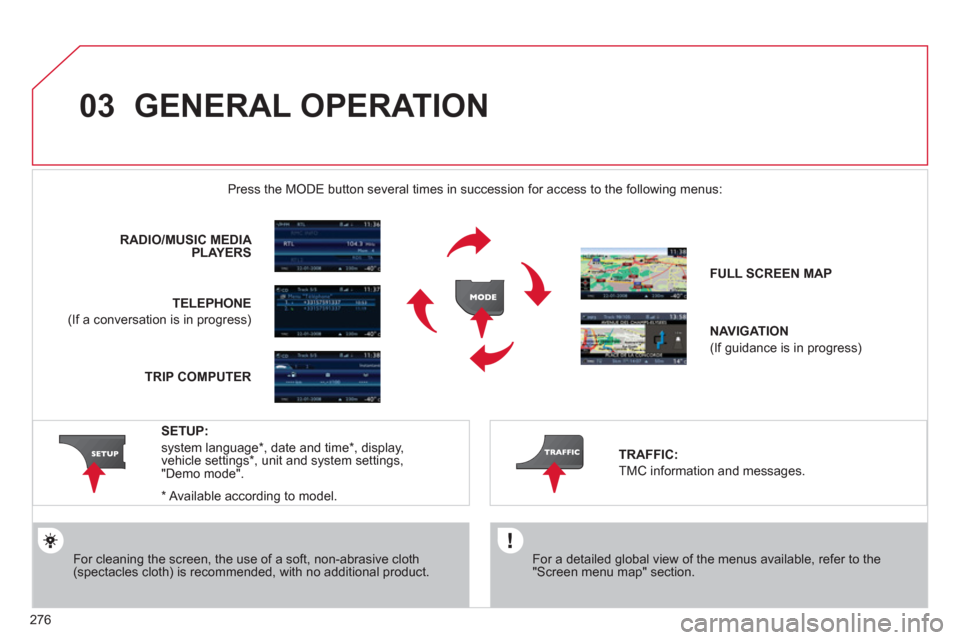
GENERAL OPERATION
For a detailed global view of the menus available, refer to the
"Screen menu map" section.
Press the MODE button several times in succession for access to the following menus:
For cleaning the screen, the use of a soft, non-abrasive cloth
(spectacles cloth) is recommended, with no additional product.
RADIO /
MUSIC MEDIA
PLAYERS
TELEPHONE
(If a conversation is in progress)
FULL SCREEN MAP
NAVIGATION
(If guidance is in progress)
SETUP:
system language * , date and time * , display,
vehicle settings * , unit and system settings,
"Demo mode".
TRAFFIC:
TMC information and messages.
*
Available according to model.
TRIP COMPUTER
Page 279 of 340
03
277
GENERAL OPERATION
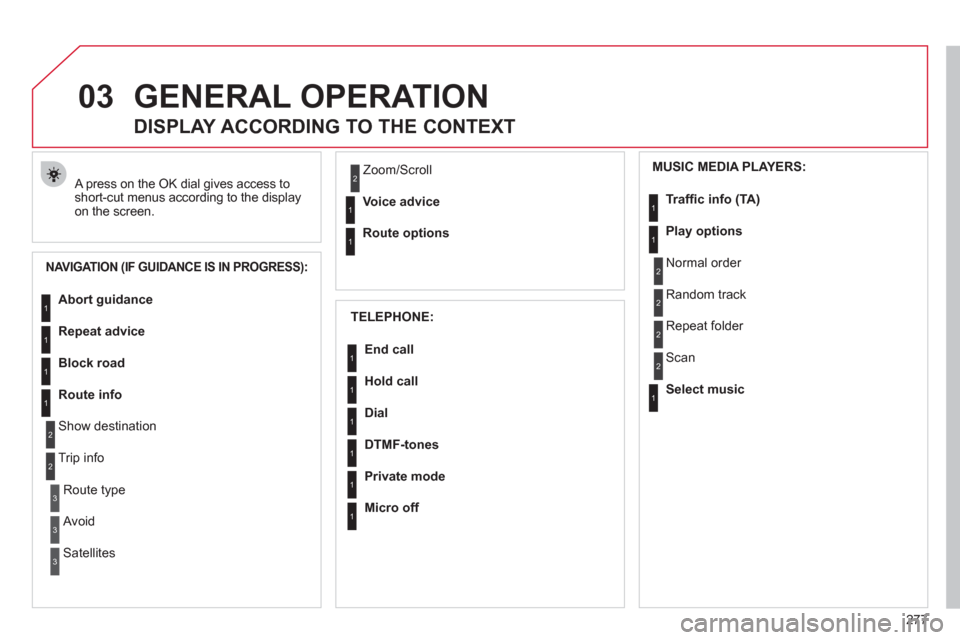
A press on the OK dial gives access to
short-cut menus according to the display
on the screen.
DISPLAY ACCORDING TO THE CONTEXT
MUSIC MEDIA PLAYERS:
NAVIGATION (IF GUIDANCE IS IN PROGRESS):
TELEPHONE: Abort guidance
Repeat advice
Block road
Route info
Show destination
T rip info
Route type
Avoid
Satellites Zoom/Scroll
Voice advice
Route options
End call
Hold call
Dial
DTMF-tones
Private mode
Micro off Tr a ffi c info (TA)
Play options
Normal order
Random track
Repeat folder
Select music
Scan
1
2
3
3
2
1
1
1
3
1
1
1
1
1
1
1
1
1
1
2
2
2
2
1
2
Page 305 of 340

303
QUESTION
ANSWER
SOLUTION
TA is selected. However,
certain traffi c jams
along the route are not
indicated in real time. On starting, it is several minutes before the system begins to receive
the traffi c information. Wait until the traffi c information is being received
correctly (displaying of the traffi c information
symbols on the map).
In certain countries, only major routes (motorways...) are listed for
the traffi c information. This phenomenon is normal. The system is
dependent on the traffi c information available.
I receive a speed camera
alert for a camera which
is not on my route. The system announces all speed cameras located in a conical zone
forward of the vehicle. It may detect speed cameras on nearby or parallel
roads. Zoom the map to view the exact position of the
speed camera.
The audible speed
camera alert is not
working. Audible alerts are not active. Activate audible alerts in Navigation Menu,
Settings, Set parameters for risk areas.
The alert volume level is set to minimum. Increase the speed camera alert volume.
The altitude is not
displayed. On starting, the initialisation of the GPS may take up to 3 minutes to
receive more than 3 satellites correctly. Wait until the system has started up completely.
Check that there is a GPS coverage of at least
3 satellites (long press on the SETUP button,
then select GPS coverage).
Depending on the geographical environment (tunnel...) or the weather,
the conditions of reception of the GPS signal may vary. This phenomenon is normal. The system is
dependent on the conditions of reception of
the GPS signal.
The route is not
calculated successfully. The exclusion criteria may confl ict with the current location
(exclusion of toll roads on a motorway with tolls). Check the exclusion criteria.