ECO mode Citroen C5 RHD 2012 (RD/TD) / 2.G User Guide
[x] Cancel search | Manufacturer: CITROEN, Model Year: 2012, Model line: C5 RHD, Model: Citroen C5 RHD 2012 (RD/TD) / 2.GPages: 340, PDF Size: 39.41 MB
Page 52 of 340

III
50
COMFORT
Air conditioning
We recommend use of the automatic
regulation of the air conditioning.
It permits automatic and optimised
control of all of the following functions:
air fl ow, temperature in the passenger
compartment and air distribution, by
means of various sensors (ambient
temperature, sunshine). This elimi-
nates any need for you to change
your settings other than the tempera-
ture value displayed.
�)
Take care not to cover the sun-
shine sensor A
.
If you select the automatic mode
(by pressing the "AUTO" control)
and leave all of the vents open, opti-
mum comfort will be maintained and
humidity and condensation will be
removed regardless of the exterior
climatic conditions.
The temperature in the passenger
compartment can only be lower than
the ambient temperature if the air
conditioning is on.
HEATING, VENTILATION
AND AIR CONDITIONING
RECOMMENDATIONS In order to be effective, the air
conditioning must be used with the
windows closed. If the vehicle has
been parked in the sun for a long
period and the interior tempera-
ture is very high, fi rst ventilate the
passenger compartment with the
windows open for a few minutes,
then close the windows.
To keep the air conditioning system
in good working order it is essential
that it is operated at least once a
month.
The air conditioning uses engine
power during its operation. As a
result, the fuel consumption of the
vehicle increases.
In certain cases of particularly ardu-
ous use (e.g. towing the maximum
load on a steep gradient in high
temperatures), switching off the air
conditioning saves engine power
and improves the towing capacity.
Air inlet
Check that the exterior grille for the
air inlet, at the bottom of the wind-
screen, is clean and free of dead
leaves, snow, etc.
When washing the vehicle using a
high pressure nozzle, avoid spraying
at the air inlet.
Air circulation
Maximum comfort is obtained by
means of a good distribution of air in
the passenger compartment, both in
the front and in the rear.
To obtain a uniform distribution of
air, take care not to block the ex-
terior air intake grille located at the
base of the windscreen, the vents,
the air outlets under the front seats
and the air extractor located behind
the fl aps in the boot.
The front and rear vents are fi tted
with thumbwheels to adjust the air
fl ow and direction. We recommend
that you leave all of the vents open.
Dust filter/Odour filter
(active carbon)
There is a fi lter for excluding odours
and dust.
This fi lter must be changed in line
with the vehicle’s servicing schedule
(see the vehicle’s servicing booklet).
Page 65 of 340

III
63
COMFORT
FRONT SEATS
ELECTRIC ADJUSTMENTS
To adjust the electric seats, switch on the ignition or start the engine if the
vehicle has gone into economy mode.
Seat adjustments are also possible for a short period after opening one of the
front doors or switching off the ignition.
2.
Adjustment of the backrest angle
Move the control forwards or
backwards to adjust the backrest
angle.
3.
Adjustment of the angle of the
top of the backrest
Move the control forwards or
backwards to adjust the angle of
the top of the backrest.
1.
Adjustment of the seat height
and angle, and longitudinal
adjustment
�)
Raise or lower the front of the
control to adjust the seat cushion
angle.
�)
Raise or lower the rear of the
control to raise or lower the seat.
�)
Simultaneously raise or lower
the front and rear of the control
in order to raise or lower the
entire seat.
4.
Adjustment of lumbar support
This function allows you to inde-
pendently adjust the height and
level of lumbar support.
Move the control:
�)
Forwards or backwards to increase
or reduce the lumbar support.
�)
Upwards or downwards to raise or
lower the lumbar support zone.
Head restraint height and
angle adjustments on electric
seats
�)
To adjust the angle of the head
restraint, push back or pull for-
ward section C
of the head re-
straint until you reach the desired
position.
�)
To raise it, pull upwards.
�)
To lower it, press on the control D
to unlock it, and simultaneously
on the head restraint itself.
�)
To remove it, press on the
control D
to unlock it, then pull it
upwards.
Page 79 of 340

IV
77
ACCESS
ELECTRIC WINDOWS
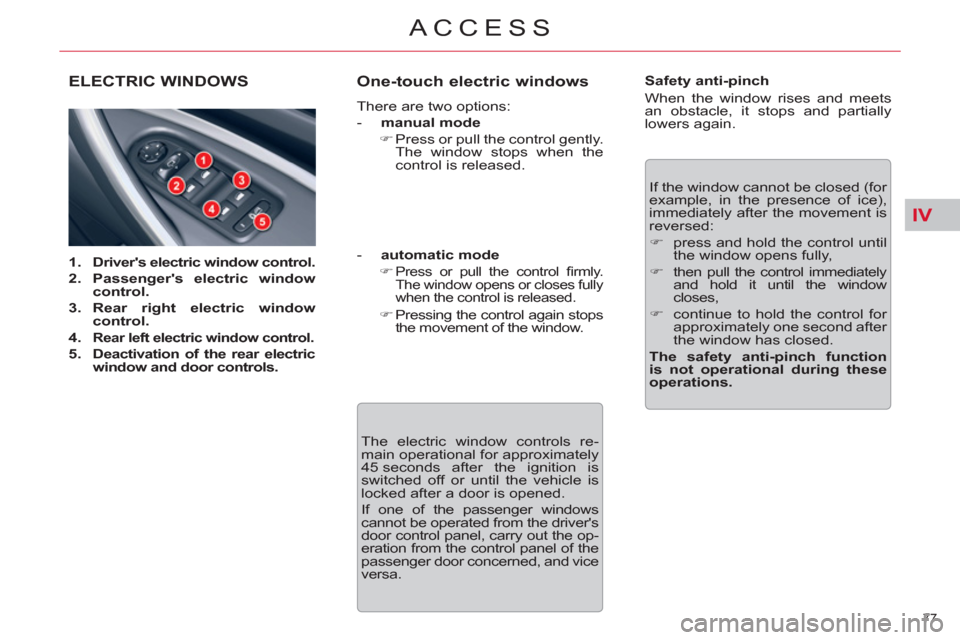
1.
Driver's electric window control.
2.
Passenger's electric window
control.
3.
Rear right electric window
control.
4.
Rear left electric window control.
5.
Deactivation of the rear electric
window and door controls.
One-touch electric windows
There are two options:
- manual mode
�)
Press or pull the control gently.
The window stops when the
control is released.
- automatic mode
�)
Press or pull the control fi rmly.
The window opens or closes fully
when the control is released.
�)
Pressing the control again stops
the movement of the window.
The electric window controls re-
main operational for approximately
45 seconds after the ignition is
switched off or until the vehicle is
locked after a door is opened.
If one of the passenger windows
cannot be operated from the driver's
door control panel, carry out the op-
eration from the control panel of the
passenger door concerned, and vice
versa.
Safety anti-pinch
When the window rises and meets
an obstacle, it stops and partially
lowers again.
If the window cannot be closed (for
example, in the presence of ice),
immediately after the movement is
reversed:
�)
press and hold the control until
the window opens fully,
�)
then pull the control immediately
and hold it until the window
closes,
�)
continue to hold the control for
approximately one second after
the window has closed.
The safety anti-pinch function
is not operational during these
operations.
Page 99 of 340

V
97
VISIBILITY
In lighting on mode, different light-
ing times are available:
- with the ignition off, approxi-
mately ten minutes,
- in energy economy mode, ap-
proximately thirty seconds,
-
with the engine running, unlimited.
Map reading lamps
�)
With the ignition on, press the
corresponding switch.
Panoramic sunroof rear
reading lamps (Tourer)
With the key in position or with the
ignition on:
�)
Press the corresponding switch.
The reading lamp concerned comes
on for ten minutes.
The rear reading lamps come on:
- when the key is removed from
the ignition,
- when the vehicle is unlocked.
They switch off gradually:
- when the vehicle is locked,
- when the ignition is switched on.
Page 137 of 340

IX
135
DRIVING
SITUATION
CONSEQUENCES
4
Display of messages " Parking brake faulty
"
and " Anti roll-back
fault
" and of the following
warning lamps:
and/or
fl ashing
- The automatic functions are deactivated.
- The hill start assist is not available.
To apply the electric parking brake:
�)
Immobilise the vehicle and switch off the ignition
�)
Pull the control lever for at least 5 seconds or until maximum
application.
�)
Switch on the ignition and check that the electric parking brake
warning lamps are on.
- Application may take longer than in normal operation.
- If warning lamp (!) fl ashes or if the warning lamps do not come
on when the ignition is switched on, this method does not work.
Have it checked by a CITROËN dealer or a qualifi ed workshop.
To release the electric parking brake:
�)
Switch on the ignition.
�)
Push the control lever and hold it for approximately 3 seconds.
5
Display of message " Parking brake control
faulty – automatic mode activated
" and the
following warning lamps:
and/or fl ashing
- Only the functions for automatic application on switching off the
engine and automatic release on acceleration are available.
- Manual application/release of the electric parking brake and dynamic
emergency braking are unavailable.
6
Display of message " Parking brake faulty
"
and of the following warning lamp:
fl ashing
- Application of the parking brake is not guaranteed.
- The parking brake is temporarily unavailable.
It this situation arises:
�)
Wait approximately 3 minutes.
�)
After 3 minutes, if the warning lamp is still fl ashing, try to
reinitialise the parking brake, either by pushing and releasing
the control A
while pressing the brake pedal or by means of a
long pull on control lever A
.
7
Battery fault
- Illumination of the battery warning lamp makes it essential to stop the
vehicle as soon as traffi c allows. Stop and immobilise your vehicle.
- Apply the electric parking brake before switching off the engine.
Page 140 of 340

IX
!
138
DRIVING
GEAR EFFICIENCY
INDICATOR *
System which reduces fuel con-
sumption by advising the driver to
change up on vehicles fi tted with a
manual gearbox.
Operation
The system intervenes only when
driving economically.
Depending on the driving situation
and your vehicle's equipment, the
system may advise you to skip one
or more gears. You can follow this
instruction without engaging the in-
termediate gears.
The gear engagement recommen-
dations must not be considered
compulsory. In fact, the confi gu-
ration of the road, the amount of
traffi c and safety remain determin-
ing factors when choosing the best
gear. Therefore, the driver remains
responsible for deciding whether or
not to follow the advice given by the
system.
This function cannot be deactivated.
* According to engine.
Example:
- You are in third gear.
- You press the accelerator pedal
moderately.
- The system may suggest that
you engage a higher gear, if ap-
propriate.
The information appears in the in-
strument panel screen in the form of
an arrow accompanied by the sug-
gested gear.
In the case of driving which
makes particular demands on
the performance of the engine
(fi rm pressure on the accelerator
pedal, for example, when overtak-
ing...), the system will not recom-
mend a gear change.
The system never suggests:
- engaging fi rst gear,
- engaging reverse gear,
- engaging a lower gear.
Page 145 of 340

IX!
143
DRIVING
STOP & START
The Stop & Start system puts the en-
gine temporarily into standby - STOP
mode - during stops in the traffi c
(red lights, traffi c jams, or other...).
The engine restarts automatically -
START mode - as soon as you want
to move off. The restart takes place
instantly, quickly and silently.
Perfect for urban use, the Stop &
Start system reduces fuel consump-
tion and exhaust emissions as well
as the noise level when stationary.
Operation
- with the electronic
gearbox
system
, at speeds below 4 mph
(6 km/h), press the brake pedal or
put the gear lever in position N
.
Going into engine STOP mode
The "ECO"
warning lamp comes
on in the instrument panel and
the engine goes into standby:
If your vehicle is fi tted
with the system, a time
counter calculates the
sum of the periods in
STOP mode during a journey. It rests
itself to zero every time the ignition
is switched on with the key.
For your comfort, during parking
maoeuvres, STOP mode is not
available for a few seconds after
coming out of reverse gear.
STOP mode does not affect the func-
tionality of the vehicle, such as for ex-
ample, braking, power steering...
Never refuel with the engine in
STOP mode; you must switch
off the ignition with the key.
Special cases: STOP mode not
available
In this case, the "ECO"
warning lamp fl ashes for a
few seconds then goes off.
This operation is perfectly normal.
STOP mode is not invoked when:
- the driver's door is open,
- the driver's seat belt is not fas-
tened,
- the vehicle has not exceeded
6 mph (10 km/h) since the last
engine start using the key,
- the electric parking brake is ap-
plied or being applied,
- the engine is needed to maintain
a comfortable temperature in the
passenger compartment,
- demisting is active,
- some special conditions (battery
charge, engine temperature,
braking assistance, ambient
temperature...) where the engine
is needed to assure control of a
system.
Page 146 of 340

IX
144
DRIVING
●
gear lever in position A
or M
, re-
lease the brake pedal,
●
or gear lever in position N
and the
brake pedal released, move the
gear lever to position A
or M
,
●
or engage reverse gear.
Going into engine START mode
The "ECO"
warning lamp goes
off and the engine starts with the
electronic
gearbox
system
:
Special cases: START invoked
automatically
In this case the "ECO"
warning lamp fl ashes for a
few seconds, then goes off.
This operation is perfectly normal.
START mode is invoked automati-
cally when:
- the driver's door is open,
- the driver's seat belt is not fas-
tened,
- the speed of the vehicle exceeds
7 mph (11 km/h) with the elec-
tronic gearbox system,
- the electric parking brake is being
applied,
- some special conditions (battery
charge, engine temperature,
braking assistance, ambient tem-
perature...) where the engine is
needed for control of a system. At any time, press the "ECO OFF"
switch to deactivate the system.
This is confi rmed by the switch warn-
ing lamp coming on accompanied by
a message in the screen.
Deactivation
If the system has been deactivated
in STOP mode, the engine restarts
immediately.
The system is reactivated auto-
matically at every new start using
the key.
Reactivation
Press the "ECO OFF"
switch again.
The system is active again; this is
confi rmed by the switch warning
lamp going off and a message in the
screen.
Page 147 of 340

IX
!
!
145
DRIVING
In the event of a fault with the sys-
tem, the "ECO OFF"
switch warning
lamp fl ashes then comes on con-
tinuously.
Have it checked by a CITROËN
dealer or a qualifi ed workshop.
In the event of a fault in STOP mode,
the vehicle may stall. It is then neces-
sary to switch off the ignition and start
the engine again using the key.
Operating fault
The Stop & Start system
makes use of advanced tech-
nology. For any work on the sys-
tem go to a qualifi ed workshop with
the skills and equipment required,
which a CITROËN dealer is able to
provide.
Before doing anything under
the bonnet, deactivate the
Stop & Start system to avoid
any risk of injury resulting from au-
tomatic operation of START mode.
Maintenance
This system requires a battery with
a special specifi cation and techno-
logy (reference numbers available
from CITROËN dealers).
Fitting a battery not listed by
CITROËN introduces the risk of
malfunction of the system.
Page 153 of 340

IX
151
DRIVING
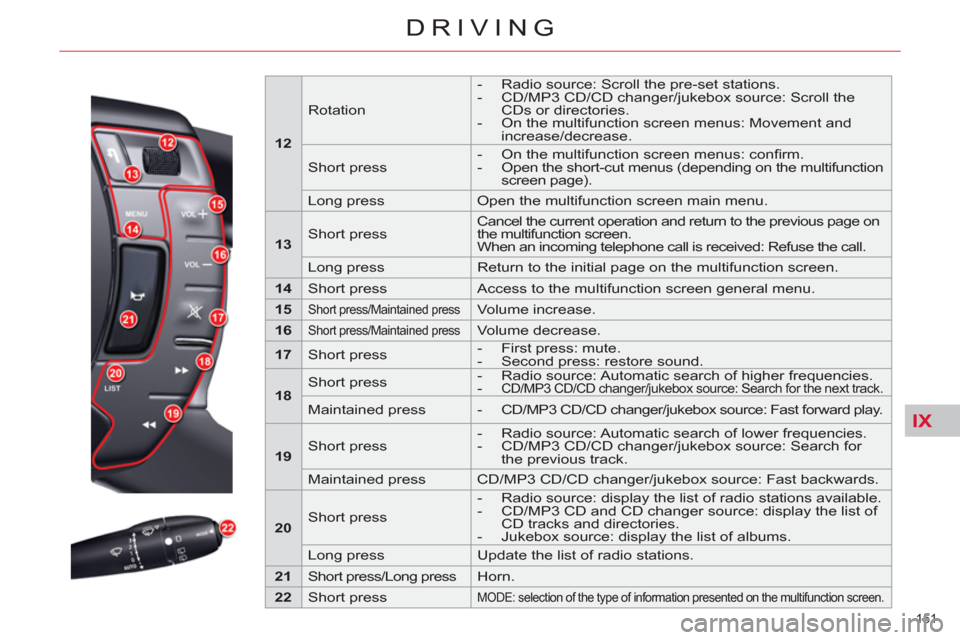
12
Rotation
- Radio source: Scroll the pre-set stations.
- CD/MP3 CD/CD changer/jukebox source: Scroll the
CDs or directories.
- On the multifunction screen menus: Movement and
increase/decrease.
Short press
- On the multifunction screen menus: confi rm.
- Open the short-cut menus (depending on the multifunction
screen page).
Long press Open the multifunction screen main menu.
13
Short press Cancel the current operation and return to the previous page on
the multifunction screen.
When an incoming telephone call is received: Refuse the call.
Long press Return to the initial page on the multifunction screen.
14
Short press Access to the multifunction screen general menu.
15
Short press/Maintained press
Volume increase.
16
Short press/Maintained press
Volume decrease.
17
Short press
- First press: mute.
- Second press: restore sound.
18
Short press
- Radio source: Automatic search of higher frequencies.
-
CD/MP3 CD/CD changer/jukebox source: Search for the next track.
Maintained press
- CD/MP3 CD/CD changer/jukebox source: Fast forward play.
19
Short press
- Radio source: Automatic search of lower frequencies.
- CD/MP3 CD/CD changer/jukebox source: Search for
the previous track.
Maintained press CD/MP3 CD/CD changer/jukebox source: Fast backwards.
20
Short press
- Radio source: display the list of radio stations available.
- CD/MP3 CD and CD changer source: display the list of
CD tracks and directories.
- Jukebox source: display the list of albums.
Long press Update the list of radio stations.
21
Short press/Long press Horn.
22
Short press
MODE: selection of the type of information presented on the multifunction screen.