key Citroen C5 RHD 2014.5 (RD/TD) / 2.G Owner's Guide
[x] Cancel search | Manufacturer: CITROEN, Model Year: 2014.5, Model line: C5 RHD, Model: Citroen C5 RHD 2014.5 (RD/TD) / 2.GPages: 344, PDF Size: 12.9 MB
Page 185 of 344
183
Fuel tank
Capacity of the tank: approximately 71 litres*.
Low fuel level
When the minimum level
in the tank is reached, this
warning lamp comes on in the
instrument panel, accompanied
by an audible warning and a message in the
multifunction screen. When it first comes on,
there remains around 5 litres of fuel in the tank.
You must refuel to avoid running out of fuel.
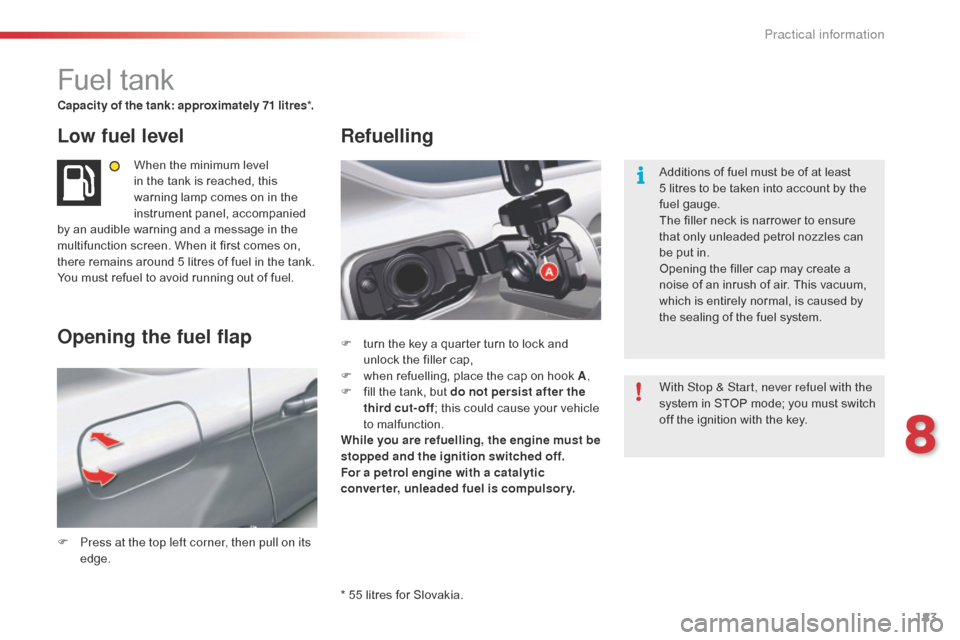
F
P
ress at the top left corner, then pull on its
edge. F
t
urn the key a quarter turn to lock and
unlock the filler cap,
F
w
hen refuelling, place the cap on hook A,
F
f
ill the tank, but do not persist after the
third cut-off ; this could cause your vehicle
to malfunction.
While you are refuelling, the engine must be
stopped and the ignition switched off.
For a petrol engine with a catalytic
converter, unleaded fuel is compulsory.
Opening the fuel flap Refuelling
* 55 litres for Slovakia. Additions of fuel must be of at least
5 litres to be taken into account by the
fuel gauge.
The filler neck is narrower to ensure
that only unleaded petrol nozzles can
be put in.
Opening the filler cap may create a
noise of an inrush of air. This vacuum,
which is entirely normal, is caused by
the sealing of the fuel system.
With Stop & Start, never refuel with the
system in STOP mode; you must switch
off the ignition with the key.
8
Practical information
Page 219 of 344
217
Following reconnection of
the battery
Following reconnection of the battery,
switch on the ignition and wait 1 minute
before starting to permit initialisation
of the electronic systems. However, if
slight malfunctions remain following this
operation, contact a CITROËN dealer
or a qualified workshop.
Referring to the corresponding section,
you must yourself reinitialise:
-
t
he remote control key,
-
t
he glass panoramic roof blind,
-
t
he GPS satellite navigation
system.
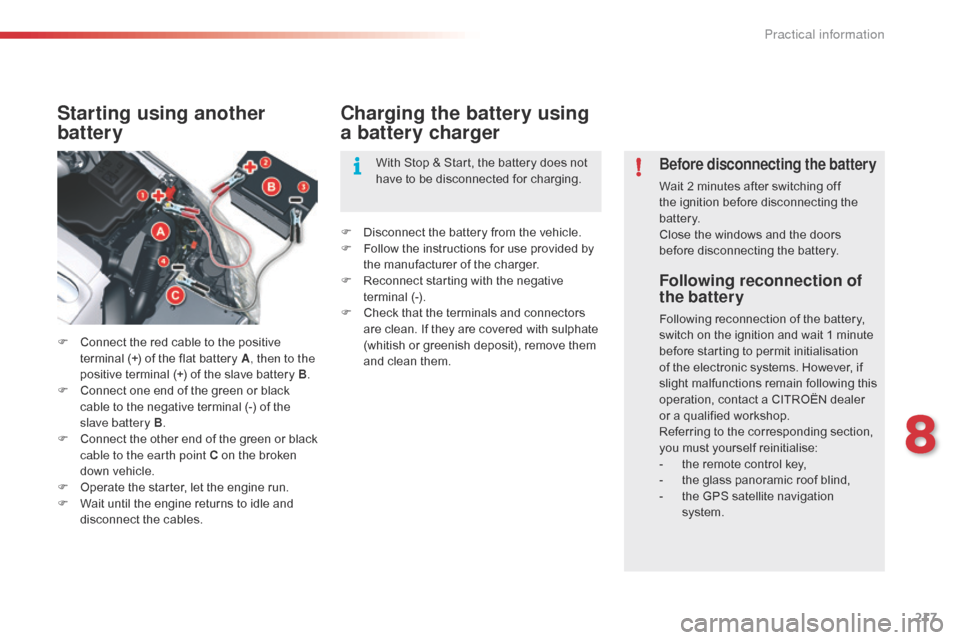
Starting using another
battery
F Connect the red cable to the positive terminal (+) of the flat battery A , then to the
positive terminal (+) of the slave battery B.
F
C
onnect one end of the green or black
cable to the negative terminal (-) of the
slave battery B .
F
C
onnect the other end of the green or black
cable to the earth point C on the broken
down vehicle.
F
O
perate the starter, let the engine run.
F
W
ait until the engine returns to idle and
disconnect the cables.
Charging the battery using
a battery charger
F Disconnect the battery from the vehicle.
F F ollow the instructions for use provided by
the manufacturer of the charger.
F
R
econnect starting with the negative
terminal (-).
F
C
heck that the terminals and connectors
are clean. If they are covered with sulphate
(whitish or greenish deposit), remove them
and clean them. With Stop & Start, the battery does not
have to be disconnected for charging.
Before disconnecting the battery
Wait 2 minutes after switching off
the ignition before disconnecting the
battery.
Close the windows and the doors
before disconnecting the battery.
8
Practical information
Page 288 of 344

06
286
USING THE TELEPHONE
Press PHONE twice.
Select "Dial" then confirm.Select "Directory of contacts" then
confirm.
Dial the telephone number using the
virtual keypad selecting each number
in turn.
Confirm "OK" to make the call. Press TEL or twice on PHONE.
Calling a new number
Calling a contact
Select the desired contact and confirm.
If access was via the PHONE button,
select "Call" and confirm.
Select the number and confirm to start
the call.
Making a callUse of the telephone is not recommended while driving. We
recommended that you park safely or make use of the steering
mounted controls.
Page 291 of 344

06
289
Options during a call*
During a call, press the MODE button
several times to select display of the
telephone screen, then press " OK" to
open the contextual menu.
Select "Private mode" and confirm to
take the call on the handset.
o
r select "Hands-free mode" and
confirm to take the call via the vehicle's
speakers.
Select "Put call on hold " and confirm to
put the current call on hold.
o
r select "Resume the call" and
confirm to resume the call on hold. Select "DTMF ring tones
" to use the
numerical keypad, so as to navigate
through the menu of an interactive vocal
server.
Select "Hang up" to end the call.
* Depending on the compatibility of the phone and your service plan. it is possible to hold a 3-way conference
call by making 2 calls in succession*.
Select "Conference mode call" in
the contextual menu accessible using
this
button.
Or make a short press on this button.
USING THE TELEPHONE
Page 295 of 344
07
293
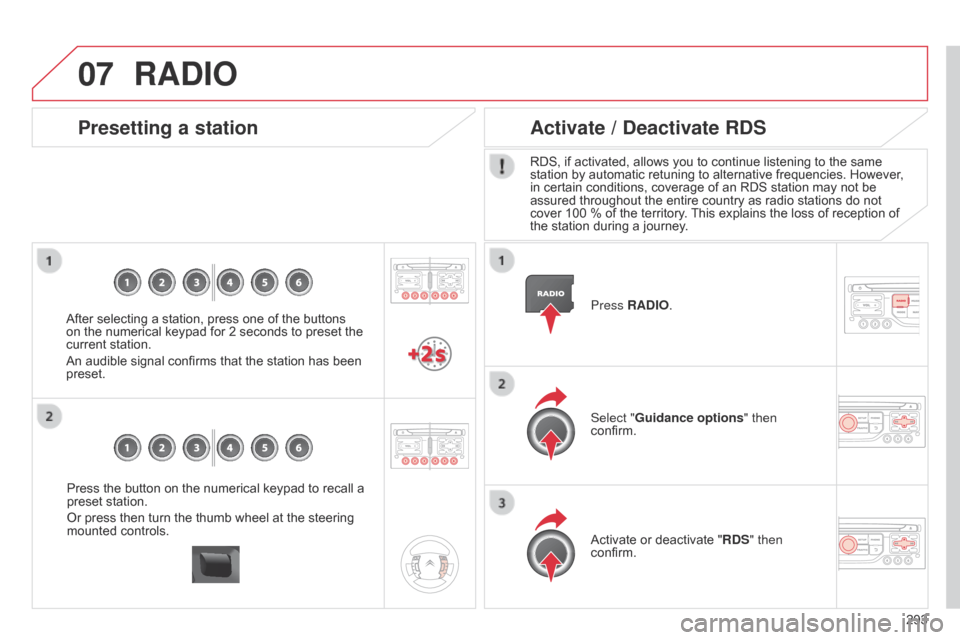
Press the button on the numerical keypad to recall a
preset station.
Or press then turn the thumb wheel at the steering
mounted controls.
Presetting a station
After selecting a station, press one of the buttons
on the numerical keypad for 2 seconds to preset the
current station.
An audible signal confirms that the station has been
preset.
Press RADIO.
Activate / Deactivate RDS
RDS, if activated, allows you to continue listening to the same
station by automatic retuning to alternative frequencies. However
,
in certain conditions, coverage of an RDS station may not be
assured throughout the entire country as radio stations do not
cover 100 % of the territory. This explains the loss of reception of
the station during a journey.
Select "Guidance options " then
confirm.
Activate or deactivate "RDS" then
confirm.
RADIO
Page 297 of 344
08
295
CD, MP3 CD / USB player
The audio equipment will only play audio files with ".wma, .aac, .flac,
.ogg and .mp3" file extensions and with a bit rate of between 32 Kbps
and 320 Kbps.
It also supports VBR (Variable Bit Rate) mode.
No other type of file (.mp4, .m3u...) can be played.
WMA files must be of the standard wma 9 type.
The sampling rates supported are greater than 32 KHz.
It is advisable to restrict file names to 20 characters, without using of
special characters (e.g.: " " ? ; ù) to avoid any playing and displaying
problems.
In order to be able to play a recorded CDR or CDRW, when recording
it is preferable to select the ISO 9660 level 1, 2 or Joliet standard.
If the disc is recorded in another format (udf, ...), it may not be played
correctly.
It is recommended that the same recording standard is always used
for an individual disc, with as low a speed as possible (4x maximum)
for optimum sound quality.
In the particular case of a multi-session CD, the Joliet standard is
recommended. Information and advice
The system supports USB mass storage or iPod
devices via the USB port (suitable cable not supplied).
If a partitioned USB memory key is connected to the
system, only the first partition is recognised.
Control of the peripheral device is with the audio
system controls.
The number of tracks is limited to 2000 maximum,
999
tracks per folder.
If the current consumption at the USB port exceeds
500 mA, the system goes into protection mode and
deactivates the port.
Other peripherals, not recognised on connection, must
be connected to the auxiliary socket using a Jack cable
(not supplied).
Use only USB memory sticks formatted FAT32 (File Allocation Table).
The system does not support the operation of an Apple
® player and a
USB memory stick connected at the same time.
It is recommended that official Apple
® USB cables are used to ensure
correct operation.
MUSIC MEDIA PLAYERS
Page 325 of 344
06
323
BLUETOOTH FUNCTIONS
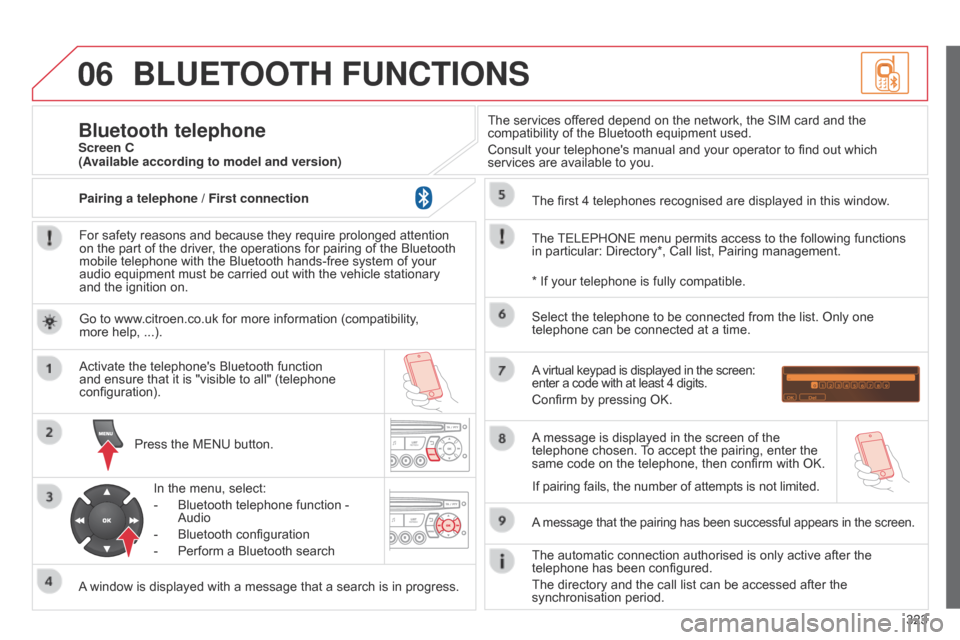
For safety reasons and because they require prolonged attention
on the part of the driver, the operations for pairing of the Bluetooth
mobile telephone with the Bluetooth hands-free system of your
audio equipment must be carried out with the vehicle stationary
and the ignition on.Press the MENU button.
A window is displayed with a message that a search is in progress. Activate the telephone's Bluetooth function
and ensure that it is "visible to all" (telephone
configuration).
In the menu, select:
-
Bluetooth telephone function -
Audio
-
Bluetooth configuration
-
Perform a Bluetooth search The services of
fered depend on the network, the SIM card and the
compatibility of the Bluetooth equipment used.
Consult your telephone's manual and your operator to find out which
services are available to you.
Bluetooth telephoneScreen C
The TELEPHONE menu permits access to the following functions
in particular: Directory*, Call list, Pairing management. The first 4 telephones recognised are displayed in this window.
A virtual keypad is displayed in the screen:
enter a code with at least 4 digits.
Confirm by pressing OK.
A message that the pairing has been successful appears in the screen.
Select the telephone to be connected from the list. Only one
telephone can be connected at a time.
A message is displayed in the screen of the
telephone chosen. To accept the pairing, enter the
same code on the telephone, then confirm with OK.
The automatic connection authorised is only active after the
telephone has been configured.
The directory and the call list can be accessed after the
synchronisation period.
(Available according to model and version)
* If your telephone is fully compatible.
If pairing fails, the number of attempts is not limited.
Go to www.citroen.co.uk for more information (compatibility,
more
help, ...).
Pairing a telephone / First connection
Page 326 of 344
06
324Receiving a call
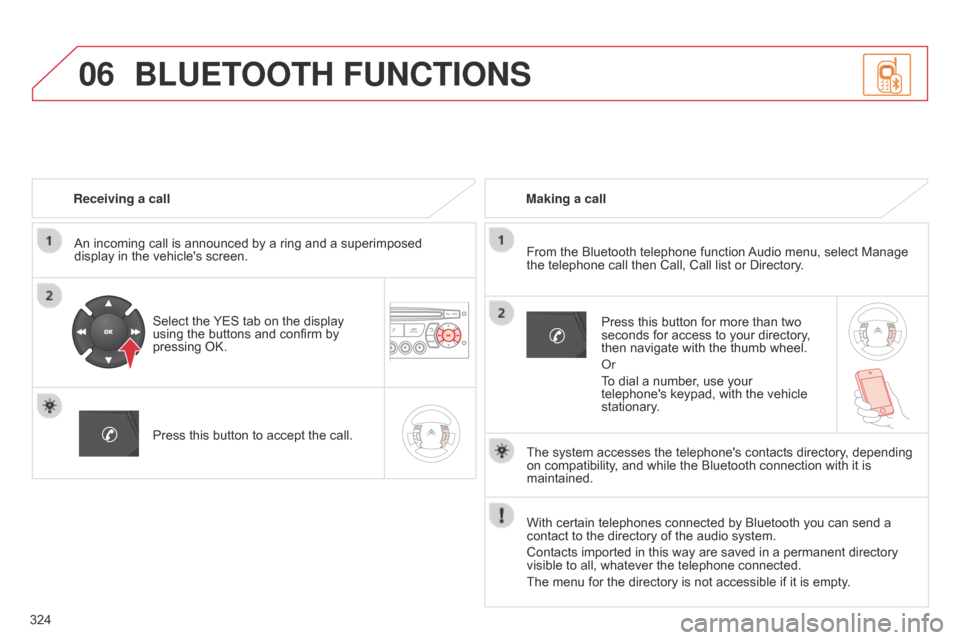
An incoming call is announced by a ring and a superimposed
display in the vehicle's screen.
Select the YES tab on the display
using the buttons and confirm by
pressing OK.
Press this button to accept the call. Making a call
From the Bluetooth telephone function Audio menu, select Manage
the telephone call then Call, Call list or Directory.
Press this button for more than two
seconds for access to your directory,
then navigate with the thumb wheel.
o
r
To dial a number, use your
telephone's keypad, with the vehicle
stationary.
BLUETOOTH FUNCTIONS
The system accesses the telephone's contacts directory, depending
on compatibility, and while the Bluetooth connection with it is
maintained.
With certain telephones connected by Bluetooth you can send a
contact to the directory of the audio system.
Contacts imported in this way are saved in a permanent directory
visible to all, whatever the telephone connected.
The menu for the directory is not accessible if it is empty.
Page 327 of 344
06
325
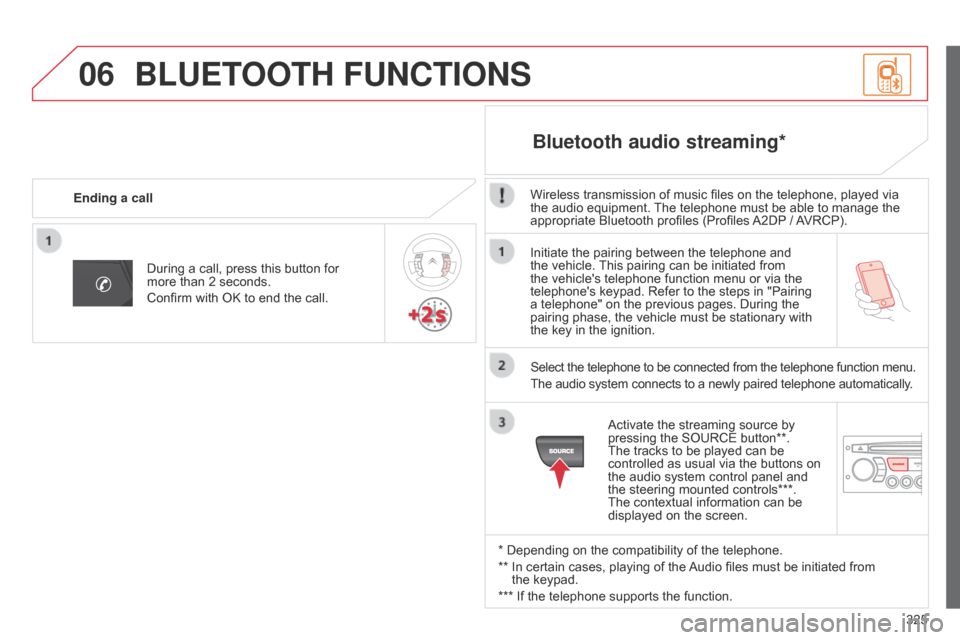
Initiate the pairing between the telephone and
the vehicle. This pairing can be initiated from
the vehicle's telephone function menu or via the
telephone's keypad. Refer to the steps in "Pairing
a telephone" on the previous pages. During the
pairing phase, the vehicle must be stationary with
the key in the ignition.
Select the telephone to be connected from the telephone function menu.
The audio system connects to a newly paired telephone automatically.
Bluetooth audio streaming*
Wireless transmission of music files on the telephone, played via
the audio equipment. The telephone must be able to manage the
appropriate Bluetooth profiles (Profiles A2DP / AVRCP).
* Depending on the compatibility of the telephone.
**
In certain cases, playing of the
Audio files must be initiated from
the keypad.
*** If the telephone supports the function. Activate the streaming source by
pressing the SOURCE button**.
The tracks to be played can be
controlled as usual via the buttons on
the audio system control panel and
the steering mounted controls***.
The contextual information can be
displayed on the screen.
During a call, press this button for
more than 2 seconds.
Confirm with OK to end the call.
Ending a call
BLUETOOTH FUNCTIONS
Page 336 of 344
334
Keeping children safe ..................16 2, 168 -182
Key in ignition warning ..................................99
K
ey with remote control
.................... 3
9 - 43, 97
Jack
........
.....................................................
192
JACK socket
................. 8
8, 298, 299, 320, 322
Identification plates
.....................................
25
6
Ignition
................
...........................................
97
Indicators, direction
.................................... 15
4
Inflating tyres
..............................
.......... 13, 256
Inputs for audio system
................
........ 88, 298, 299, 320, 322
Instrument panel lighting
..............................
25
In
strument panels
...............................
..........
15
Instrument panel screen
....................... 1
5, 120
Interior fittings
............................................... 86
I
nterior mood lighting
....................................
84
I
SOFIX mountings
....................................... 178
I
K
J
L
Labels, identification ...................................25 6
Lamps, warning and indicator ................26
-33
Lane Departure Warning System (LDWS)
....13
4Level, brake fluid
.........................................
2
37
Level, headlamp wash
................................
23
8
Level, power steering fluid
..........................
2
37
Levels and checks
..............................
.
2 3 2 - 2 41
Lighting
................
..........................................
84
Lighting bulbs (replacement)
..............
19
9 -209
Lighting control stalk
...................................
14
2
Lighting dimmer
..............................
..............
25
Lighting, guide-me home
....................
14
5, 146
Lighting, interior
............................................ 83
L
ighting on reminder
...................................
14
4
Loading
..............................
...........................
13
Load space cover
...............................
...........
93
Locating your vehicle
....................................
42
L
ocking from the inside
.................................
49
M
Main beam .............................. ............ 142, 199
Maintenance .............................. ...................13
Maintenance (advice)
.................................. 2
27
Map reading lamps
....................................... 83
M
arkings, identification
............................... 25
6
Massage function
...............................
..........60
Mat
.......
......................................................... 87
Menu, main
..............................
.............16, 316
Mirror, rear view
............................................ 64
M
irrors, door.................................................. 63
Misfuel prevention
...............................
........18 4
Mountings for ISOFIX seats
...............
.......................................... 178
MP3 CD
................
............................... 295, 319 Multifunction screen
......................................
34
M
usic media players
...................................
29
4
Navigation
...............................
....................
265
Number plate lamps
....................................
2
07
N
Oil change ...............................
....................235
Oil consumption .......................................... 23
5
oil
filter
...............
......................................... 239
oi
l level ..................................................23, 235
Oil temperature indicator
..............................24
O
pening the bonnet
.................................... 2
31
Opening the boot
..............................
............40
Opening the doors
...............................
... 39, 49
Opening the fuel filler flap
...........................18
3
Opening the panoramic sunroof blind
....5
5, 56
Opening the sunroof
..................................... 55
O
peration indicator lamps
......................26
-33
O
P
Paint colour code ........................................25 6
Paintwork, matt ........................................... 2
27
Panoramic glass sunroof
..............................56
alphabetical index