engine Citroen C5 RHD 2015 (RD/TD) / 2.G User Guide
[x] Cancel search | Manufacturer: CITROEN, Model Year: 2015, Model line: C5 RHD, Model: Citroen C5 RHD 2015 (RD/TD) / 2.GPages: 344, PDF Size: 12.96 MB
Page 34 of 344

32
Warning/indicator lampis on Cause Action / Observations
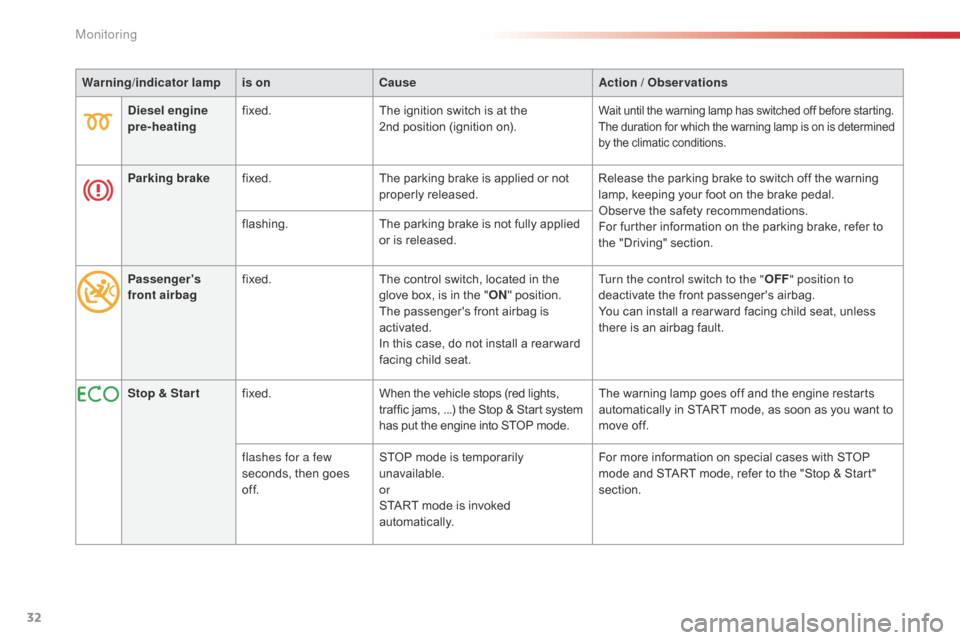
Diesel engine
pre-heating fixed.
The ignition switch is at the
2nd
position (ignition on).
Wait until the warning lamp has switched off before starting.
The duration for which the warning lamp is on is determined
by the climatic conditions.
Parking brakefixed. The parking brake is applied or not
properly released. Release the parking brake to switch off the warning
lamp, keeping your foot on the brake pedal.
Observe the safety recommendations.
For further information on the parking brake, refer to
the "Driving" section.
flashing.
The parking brake is not fully applied
or is released.
Passenger's
front airbag fixed.
The control switch, located in the
glove box, is in the "ON" position.
The passenger's front airbag is
activated.
In this case, do not install a rear ward
facing child seat. Turn the control switch to the "
OFF" position to
deactivate the front passenger's airbag.
You can install a rear ward facing child seat, unless
there is an airbag fault.
Stop & Star t fixed. When the vehicle stops (red lights,
traffic jams, ...) the Stop & Start system
has put the engine into STOP mode. The warning lamp goes off and the engine restarts
automatically in START mode, as soon as you want to
move off.
flashes for a few
seconds, then goes
of f. STOP mode is temporarily
unavailable.
or
START mode is invoked
automatically. For more information on special cases with STOP
mode and START mode, refer to the "Stop & Start"
section.
Monitoring
Page 42 of 344

40
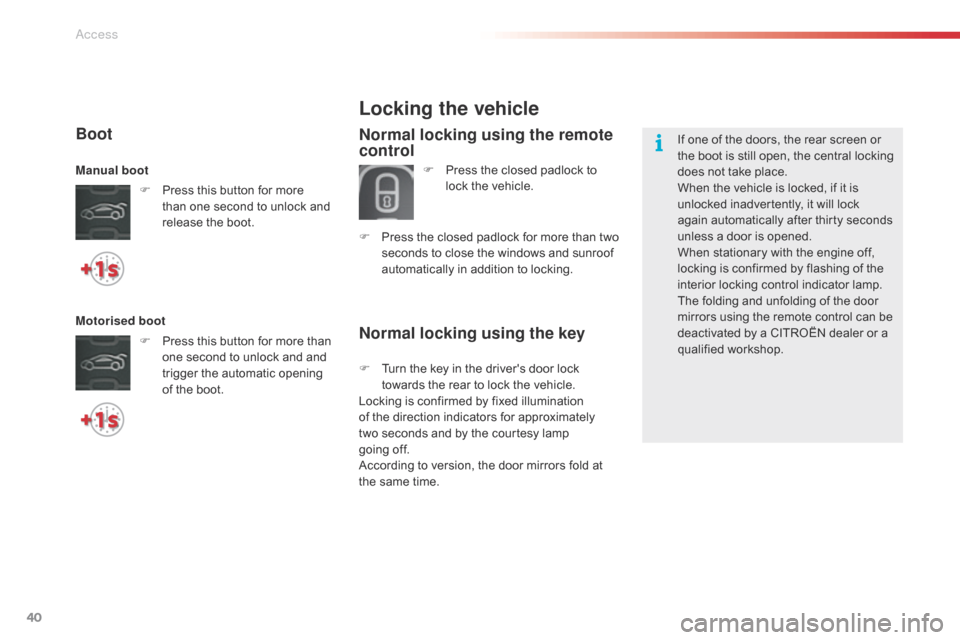
Normal locking using the key
Locking the vehicle
Normal locking using the remote
control
F Press the closed padlock to lock the vehicle.
F
P
ress the closed padlock for more than two
seconds to close the windows and sunroof
automatically in addition to locking. If one of the doors, the rear screen or
the boot is still open, the central locking
does not take place.
When the vehicle is locked, if it is
unlocked inadvertently, it will lock
again automatically after thirty seconds
unless a door is opened.
When stationary with the engine off,
locking is confirmed by flashing of the
interior locking control indicator lamp.
The folding and unfolding of the door
mirrors using the remote control can be
deactivated by a CITROËN dealer or a
qualified workshop.
F
T
urn the key in the driver's door lock
towards the rear to lock the vehicle.
Locking is confirmed by fixed illumination
of the direction indicators for approximately
two
seconds and by the courtesy lamp
going
off.
According to version, the door mirrors fold at
the same time.
Boot
F Press this button for more than one second to unlock and
release the boot.
Manual
boot
Motorised boot
F
P
ress this button for more than
one second to unlock and and
trigger the automatic opening
of the boot.
Access
Page 43 of 344

41
F Turn the key in the driver's door lock to the rear of the vehicle to lock it and
hold it in this position for more than two
seconds to close the windows and sunroof
automatically in addition to locking.
F
T
urn the key to the rear of the vehicle within
five seconds to deadlock it.
Deadlocking is confirmed by fixed lighting
of the direction indicators for approximately
two
seconds.
According to version, the exterior mirrors fold at
the same time.
Using the key
When stationary with the engine off,
locking is confirmed by flashing of the
indicator lamp on the interior locking
control.
If one of the doors or the boot is open
or has not been closed correctly, the
central locking will not work. Deadlocking renders the exterior and
interior door controls inoperative.
It also deactivates the manual central
control button.
Therefore, never leave anyone inside
the vehicle when it is deadlocked.
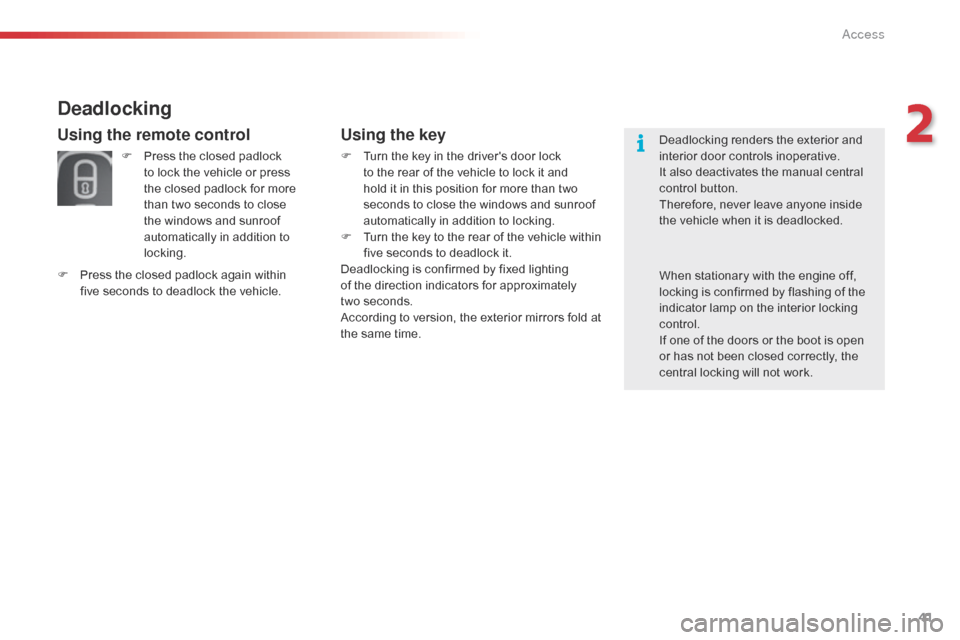
Deadlocking
F Press the closed padlock to lock the vehicle or press
the closed padlock for more
than two seconds to close
the windows and sunroof
automatically in addition to
locking.
F
P
ress the closed padlock again within
five
seconds to deadlock the vehicle.
Using the remote control
2
Access
Page 44 of 344

42
Operating problem
Following disconnection of the vehicle battery,
replacement of the remote control battery or in
the event of a remote control fault, you can no
longer unlock, lock or locate your vehicle.
F
F
irst of all, use the key in the lock to unlock
or lock your vehicle.
F
T
hen, reinitialise the remote control.
If the problem persists, contact a CITROËN
dealer or a qualified workshop as soon as
possible.
Reinitialisation
F Switch off the ignition.
F T urn the key to position 2 (Igntion on) .
(
Refer to the "Starting-switching off the
engine" section).
F
P
ress the closed padlock immediately for a
few seconds, until the operation requested
is triggered.
F
S
witch off the ignition and remove the key
from the ignition switch.
The remote control is fully operational again.
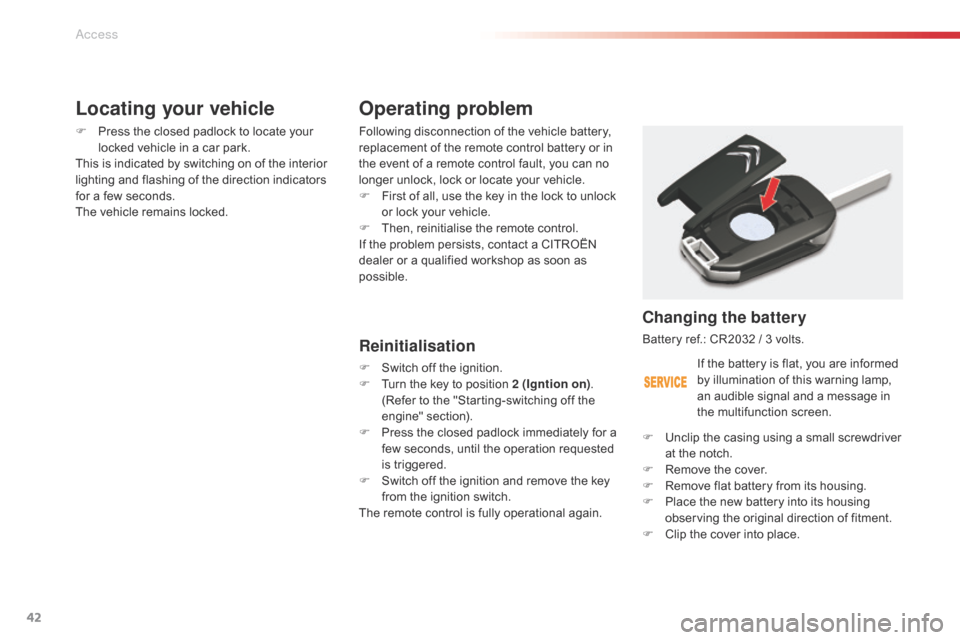
Changing the battery
Battery ref.: CR2032 / 3 volts.
F
U
nclip the casing using a small screwdriver
at the notch.
F
R
emove the cover.
F
R
emove flat battery from its housing.
F
P
lace the new battery into its housing
observing the original direction of fitment.
F
C
lip the cover into place.
Locating your vehicle
F Press the closed padlock to locate your locked vehicle in a car park.
This is indicated by switching on of the interior
lighting and flashing of the direction indicators
for a few seconds.
The vehicle remains locked.
If the battery is flat, you are informed
by illumination of this warning lamp,
an audible signal and a message in
the multifunction screen.
Access
Page 45 of 344

43
Lost keys
Go to a CITROËN dealer with the vehicle's registration document, your personal
identification documents and if possible the key code label.
The CITROËN dealer will be able to look up the key code and the transponder code
required to order a new key.
Remote control
The high frequency remote control is a sensitive system; do not operate it while it is in your
pocket as there is a possibility that it may unlock the vehicle, without you being aware of it.
Do not repeatedly press the buttons of your remote control out of range and out of sight of
your vehicle. You run the risk of stopping it from working and the remote control would have
to be reinitialised.
No remote control can operate when the key is in the ignition switch, even when the ignition
is switched off, except for reinitialisation.
Locking the vehicle
Driving with the doors locked may make access to the passenger compartment by the
emergency services more difficult in an emergency.
As a safety precaution, never leave children alone in the vehicle, except for a very short
period.
In all cases, it is essential to remove the key from the ignition switch when leaving the vehicle.
Anti-theft protection
Do not make any modifications to the electronic engine immobiliser system; this could
cause malfunctions.
When purchasing a second-hand vehicle
Have the pairing of all of the keys in your possession checked by a CITROËN dealer, to
ensure that only your keys can be used to open and start the vehicle.Do not throw the remote control
batteries away, they contain metals
which are harmful to the environment.
Take them to an approved collection
point.
2
Access
Page 51 of 344

49
doors
Opening
From inside
Manual centralised control
Locking
F Press button A to lock the vehicle.
The red indicator lamp on the button comes on.
It flashes when the doors are locked while
stationary with the engine off.
From outside
When the selective unlocking is
activated, the first press of the remote
control unlocking button permits
unlocking of the driver's door only. With the selective unlocking activated:
-
t he driver's door control unlocks the
driver's door only,
-
t
he other door controls unlock the
other doors and the boot.
The interior door controls do not
operate when the vehicle is deadlocked. If one of the doors is open, the central
locking from the inside does not take
place.
System which provides full manual locking or
unlocking of the doors and boot from the inside.
F
A
fter unlocking the vehicle completely
using the remote control or the key, pull the
door handle. F
P
ull the interior control lever of a front door;
this unlocks the vehicle completely.
2
access
Page 60 of 344

58
Front seats
Manual adjustments
1. Adjustments to the height and angle of the head restraint
T
o raise it, pull upwards.
T
o lower it, press on the release button A
and simultaneously on the head restraint
itself. The adjustment is correct when the
top edge of the head restraint is at the
same height as the top of the head. It is
also tilt adjustable.
T
o remove it, press the release button A ,
then pull it upwards. It may be necessary to
adjust the backrest angle.
2.
A
djustment of the backrest angle
O
perate the control and adjust the position
of the backrest to the front or to the rear.
3.
A
djustment of the seat height
R
aise or lower the control the number
of times required to obtain the desired
position.
4.
L
ongitudinal adjustment of seat
L
ift the control bar and adjust to the desired
position.
5.
A
djustment of lumbar support
T
urn the control and adjust to the desired
position.
6.
H
eated seat controls
T
he heated seats only operate when the
engine is running.
Seat consisting of a seat cushion, seat back and head restraint which can all be adjusted for optimum driving comfort.
For your safety, do not drive with the
head restraints removed; they must be
in place and correctly adjusted.Before moving the seat backwards,
ensure that there is nothing that might
prevent the full travel of the seat, so
as to avoid the risk of of jamming the
seat caused by the presence of objects
on the floor behind the seat or rear
passengers. If the seat jams, stop the
movement immediately.
Ease of use and comfort
Page 61 of 344

59
Electric adjustments
To adjust the electric seats, switch on the
ignition or start the engine if the vehicle has
gone into economy mode.
Seat adjustments are also possible for a short
period after opening one of the front doors or
switching off the ignition.
1.
A
djustment of the seat height and
angle, and longitudinal position
R
aise or lower the front of the control to
adjust the seat cushion angle.
R
aise or lower the rear of the control to
raise or lower the seat.
S
lide the control for wards or backwards to
move the seat for ward or back.
2.
A
djustment of the backrest angle
M
ove the control for wards or backwards to
adjust the backrest angle.
3.
A
djustment of the angle of the top of
the backrest
M
ove the control for wards or backwards to
adjust the angle of the top of the backrest. Before moving the seat backwards,
ensure that there is nothing that might
prevent the full travel of the seat, so
as to avoid the risk of of jamming the
seat caused by the presence of objects
on the floor behind the seat or rear
passengers. If the seat jams, stop the
movement immediately.
Move the control:
-
F
or wards or backwards to increase or
reduce the lumbar support.
-
U
pwards or downwards to raise or lower
the lumbar support zone.
4.
A
djustment of lumbar support
T
his function allows you to independently
adjust the height and level of lumbar
support.
3
Ease of use and comfort
Page 62 of 344

60
Head restraint height and
angle adjustments on
electric seats
F To adjust the angle of the head restraint, push back or pull for ward section C of the
head restraint until you reach the desired
position.
F
T
o raise it, pull upwards.
F
T
o lower it, press on the control D to unlock
it, and simultaneously on the head restraint
itself.
F
T
o remove it, press on the control D
to
unlock it, then pull it upwards.
Heated seats control
With the engine running, the front seats can
operate separately.
F
U
se the corresponding adjustment dial,
placed on the outer side of each front seat,
to switch on and select the level of heating
required:
0: Off.
1 : Low.
2 : Medium.
3 : High. This function provides the driver with a back
massage. It only operates when the engine is
running.
F
P
ress on button A.
The warning lamp comes on and the massage
function is activated for a period of 1 hour.
During this time, massage is per formed in
cycles of 6
minutes (4 minutes of massage
followed by 2 minutes break). In total, the
system will per form 10 cycles.
After 1 hour, the function is deactivated.
The
warning lamp goes out.
Massage function
Deactivation
You can deactivate the massage function at
any time by pressing on button A.
Ease of use and comfort
Page 63 of 344

61
Storing driving positions
System which stores the settings of the driver's
seat. Up to two positions can be stored using
the buttons on the side of the driver's seat.
When storing a driving position, the air
conditioning settings are also memorised.
Storing a position
Using buttons M / 1 / 2
F Switch on the ignition.
F A djust your seat.
F
P
ress button M , then press button 1 or 2
within four seconds.
A
n audible signal confirms that the settings
have been stored.
Storing a new position cancels the previous
position.
Welcome function
The welcome function assists entry and leaving
the vehicle.
After switching off the ignition and opening
the driver’s door, the seat moves back
automatically and then stays in this position,
ready for the next entry to the vehicle.
When switching on the ignition, the seat moves
for ward to the memorised driving position.
When moving the seat, take care that no
person or object hinders the automatic
movement of the seat.
This function is deactivated by default. You may
activate or deactivate this function using the
"Main Menu" on the instrument panel screen.
To do so, select " Vehicle parameters/Comfort /
Driver welcome".
To adjust the air conditioning, refer to
the "Air conditioning" section.For your safety, avoid storing a driving
position while driving.
Recalling a stored position
Ignition on or engine running
F briefly press button 1 or 2 to recall the
corresponding position.
A
n audible signal indicates the end of the
adjustment.
When the ignition is on, after a few consecutive
position recalls, the function will be deactivated
until the engine is started, to prevent
discharging of the battery.
3
Ease of use and comfort