fuse box Citroen C5 RHD 2015 (RD/TD) / 2.G Owner's Manual
[x] Cancel search | Manufacturer: CITROEN, Model Year: 2015, Model line: C5 RHD, Model: Citroen C5 RHD 2015 (RD/TD) / 2.GPages: 362, PDF Size: 32.4 MB
Page 9 of 362
7
Instruments and controls
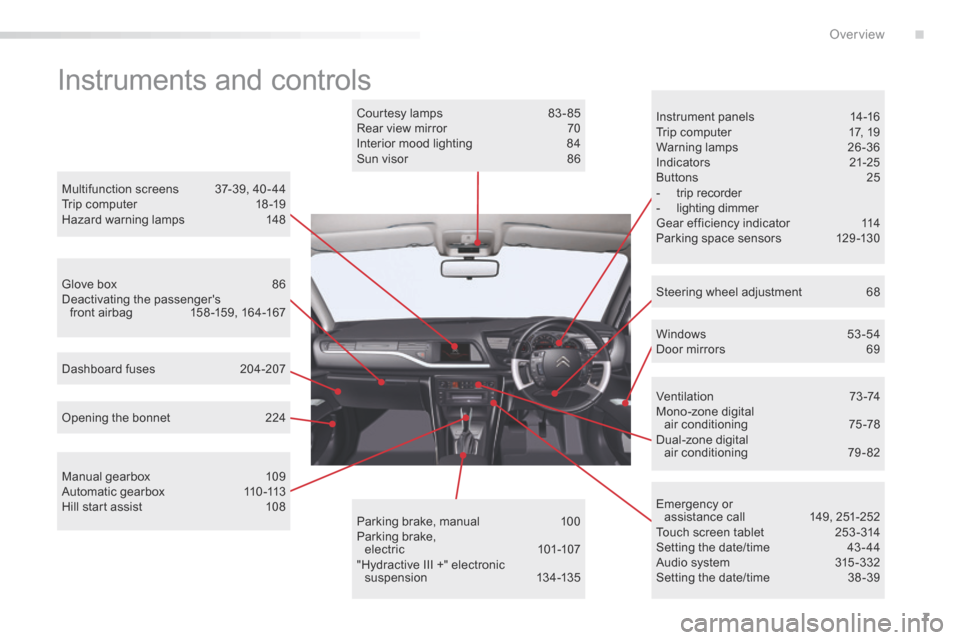
Instrument panels 14-16
Trip computer 17, 19
Warning lamps 26-36
Indicators 21-25
Buttons 25
- trip recorder
- lighting dimmer
Gear efficiency indicator 114
Parking space sensors 129 -130
Windows 53-54
Door mirrors 69
Opening the bonnet 224
Dashboard fuses
204-207
Manual gearbox 109
Automatic gearbox 110 -113
Hill start assist 108Courtesy lamps
83 - 85
Rear view mirror 70
Interior mood lighting 84
Sun visor 86
Parking brake, manual 100
Parking brake, electric 101-107
"Hydractive III +" electronic suspension 13 4 -13 5
Multifunction screens
37-39, 40 - 44
Trip computer 18 -19
Hazard warning lamps 148
Ventilation 73-74
Mono-zone digital air conditioning 75 -78
Dual-zone digital
air conditioning 79 - 82
Emergency or assistance call 149, 251-252
Touch screen tablet 253 -314
Setting the date/time 43 - 44
Audio system 315 -332
Setting the date/time 38 -39
Steering wheel adjustment
68
Glove box
86
Deactivating the passenger's
front airbag 158 -159, 164-167
.
over view
Page 75 of 362
73
Ventilation
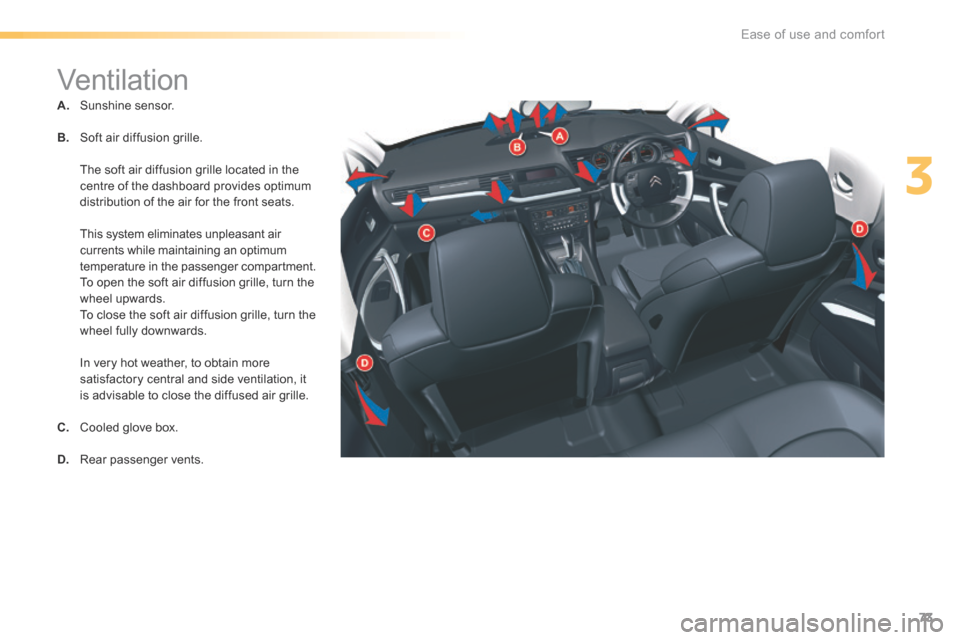
A. Sunshine sensor.
B. Soft air diffusion grille.
The soft air diffusion grille located in the
centre of the dashboard provides optimum
distribution of the air for the front seats.
This system eliminates unpleasant air
currents while maintaining an optimum
temperature in the passenger compartment.
To open the soft air diffusion grille, turn the
wheel upwards.
To close the soft air diffusion grille, turn the
wheel fully downwards.
In very hot weather, to obtain more
satisfactory central and side ventilation, it
is advisable to close the diffused air grille.
C. Cooled glove box.
D. Rear passenger vents.
3
Ease of use and comfort
Page 88 of 362
86
Sun visor
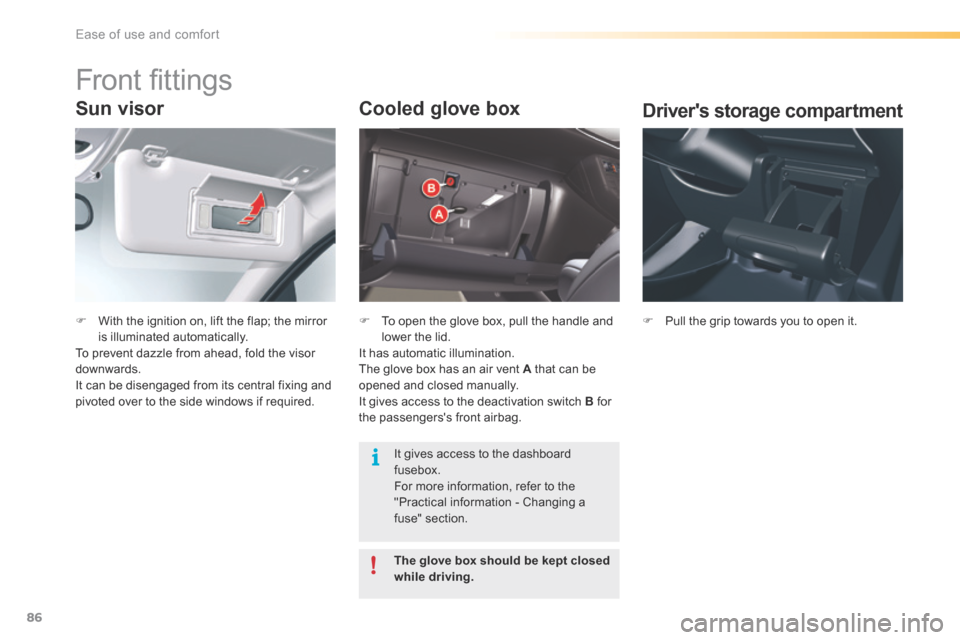
F With the ignition on, lift the flap; the mirror
is illuminated automatically.
To prevent dazzle from ahead, fold the visor
downwards.
It can be disengaged from its central fixing and
pivoted over to the side windows if required.
Cooled glove box
F To open the glove box, pull the handle and
lower the lid.
It has automatic illumination.
The glove box has an air vent A that can be
opened and closed manually.
It gives access to the deactivation switch B for
the passengers's front airbag.
The glove box should be kept closed
while driving.
Front fittings
F Pull the grip towards you to open it.
Driver's storage compartment
It gives access to the dashboard
fusebox.
For more information, refer to the
"Practical information - Changing a
fuse" section.
Ease of use and comfort
Page 206 of 362
204
Changing a fuse
The 2 fuseboxes are located below the dashboard and under the bonnet.
Before replacing a fuse, it is necessary to:
- determine the cause of the fault and have it
remedied,
- switch off all electric consumers,
- park the vehicle and switch off the ignition,
- identify the failed fuse using the allocation
tables and diagrams presented on the
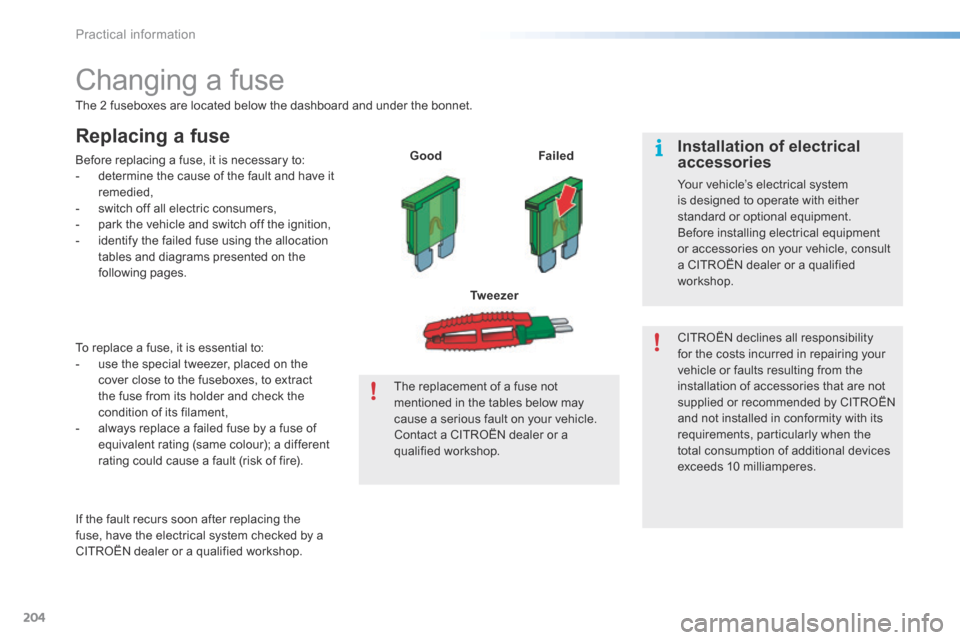
following pages. Good
Failed
Tw e e z e r
If the fault recurs soon after replacing the
fuse, have the electrical system checked by a
CITROËN dealer or a qualified workshop. To replace a fuse, it is essential to:
- use the special tweezer, placed on the
cover close to the fuseboxes, to extract
the fuse from its holder and check the
condition of its filament,
- always replace a failed fuse by a fuse of
equivalent rating (same colour); a different
rating could cause a fault (risk of fire). The replacement of a fuse not
mentioned in the tables below may
cause a serious fault on your vehicle.
Contact a CITROËN dealer or a
qualified workshop.CITROËN declines all responsibility
for the costs incurred in repairing your
vehicle or faults resulting from the
installation of accessories that are not
supplied or recommended by CITROËN
and not installed in conformity with its
requirements, particularly when the
total consumption of additional devices
exceeds 10 milliamperes.
Installation of electrical
accessories
Your vehicle’s electrical system
is designed to operate with either
standard or optional equipment.
Before installing electrical equipment
or accessories on your vehicle, consult
a CITROËN dealer or a qualified
workshop.
Replacing a fuse
Practical information
Page 207 of 362
205
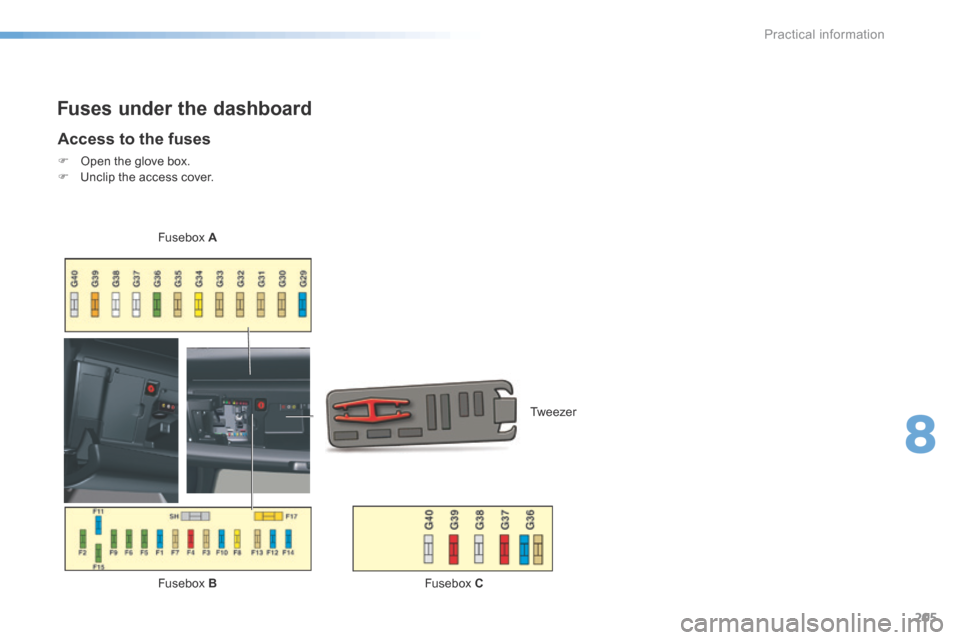
Fuses under the dashboard
Access to the fuses
F Open the glove box.
F Unclip the access cover.
Fusebox A
Fusebox B Fusebox C Tweezer
8
Practical information
Page 208 of 362

206
Fusebox B
Fuse N°Rating Function
G29 -Not used
G30 5 AHeated door mirrors
G31 5 ARain and sunshine sensor
G32 5 ASeat belt not fastened warning lamps
G33 5 AElectrochrome rear view mirror
G34 20 ASunroof (Saloon)
G35 5 APassenger door lighting - passenger door mirror adjustment
G36 30 AElectric tailgate (tourer)
G37 20 AHeated front seats
G38 30 ADriver’s electric seat
G39 30 APassenger’s electric seat - Hi-Fi amplifier
G40 3 ATrailer relay unit supply
Fuse N° Rating Function
G36 15 A6 speed automatic gearbox
G37 10 ADaytime running lamps - Diagnostic socket
G38 3 ADSC/ASR
G39 10 AHydraulic suspension
G40 3 ASToP switch
Fusebox A
Practical information
Page 209 of 362
207
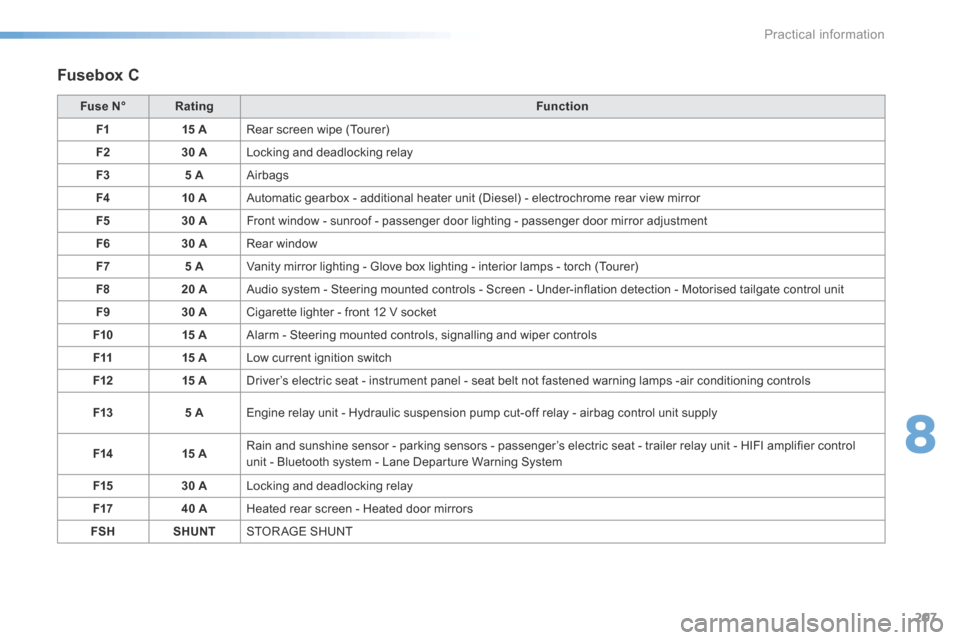
Fusebox C
Fuse N°Rating Function
F1 15 ARear screen wipe (Tourer)
F2 30 ALocking and deadlocking relay
F3 5 AAirbags
F4 10 AAutomatic gearbox - additional heater unit (Diesel) - electrochrome rear view mirror
F5 30 AFront window - sunroof - passenger door lighting - passenger door mirror adjustment
F6 30 ARear window
F7 5 AVanity mirror lighting - Glove box lighting - interior lamps - torch (Tourer)
F8 20 AAudio system - Steering mounted controls - Screen - Under-inflation detection - Motorised tailgate control unit
F9 30 ACigarette lighter - front 12 V socket
F10 15 AAlarm - Steering mounted controls, signalling and wiper controls
F11 15 ALow current ignition switch
F12 15 ADriver’s electric seat - instrument panel - seat belt not fastened warning lamps -air conditioning controls
F13 5 AEngine relay unit - Hydraulic suspension pump cut-off relay - airbag control unit supply
F14 15 ARain and sunshine sensor - parking sensors - passenger’s electric seat - trailer relay unit - HIFI amplifier control
unit - Bluetooth system - Lane Departure Warning System
F15 30 ALocking and deadlocking relay
F17 40 AHeated rear screen - Heated door mirrors
FSH SHUNTSTOR AGE SHUNT
8
Practical information
Page 210 of 362

208
Fuses under the bonnet
Access to the fuses
F Undo each screw by a quarter of a turn.
F Remove the cover.
F Replace the fuse. Fuse N°
Rating Function
F1 20 AEngine control unit
F2 15 AHorn
F3 10 AScreen wash pump
F4 10 AHeadlamp wash pump
F5 15 AStarter
F6 10 AAir flow sensor - Directional headlamps - Diagnostic socket
F7 10 AAutomatic gearbox selector lever lock - Power steering
F8 25 AStarter motor
F9 10 AClutch switch - Stop switch
F10 30 AActuator motors
F11 40 AAir conditioning blower
F12 30 AWipers
F13 40 ABSI supply (ignition on)
F14 30 A-
F15 10 ARight-hand main beam
F16 10 ALeft-hand main beam
F17 15 ARight-hand dipped beam
F18 15 ALeft-hand dipped beam
F19 15 AActuator motors
F20 10 AActuator motors
F21 5 AActuator motors
On completion, carefully refit the
cover to ensure correct sealing of
the fusebox.
Any work on the maxi-fuses (that
give additional protection), located
in the fuseboxes, must be left to
a CITROËN dealer or a qualified
workshop.
Table of fuses
Practical information
Page 212 of 362
210
12 V battery
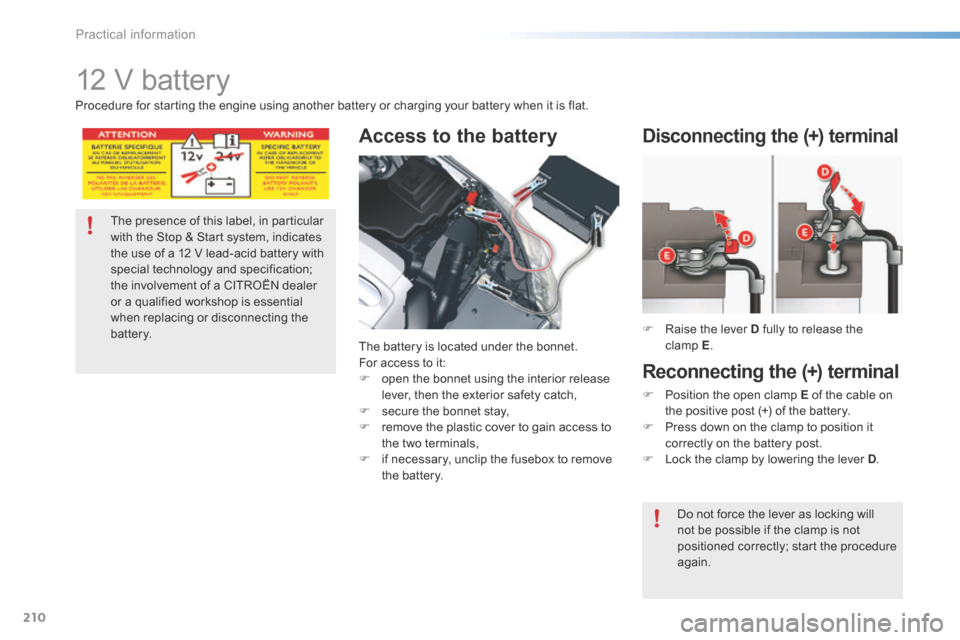
Access to the battery
The battery is located under the bonnet.
For access to it:
F open the bonnet using the interior release
lever, then the exterior safety catch,
F secure the bonnet stay,
F remove the plastic cover to gain access to
the two terminals,
F if necessary, unclip the fusebox to remove
the battery. F
Raise the lever D fully to release the
clamp E .
Disconnecting the (+) terminal
The presence of this label, in particular
with the Stop & Start system, indicates
the use of a 12 V lead-acid battery with
special technology and specification;
the involvement of a CITROËN dealer
or a qualified workshop is essential
when replacing or disconnecting the
battery.
Procedure for starting the engine using another battery or charging your battery when it is flat.
Reconnecting the (+) terminal
F
Position the open clamp E of the cable on
the positive post (+) of the battery.
F Press down on the clamp to position it
correctly on the battery post.
F Lock the clamp by lowering the lever D .
Do not force the lever as locking will
not be possible if the clamp is not
positioned correctly; start the procedure
again.
Practical information
Page 224 of 362
222
"Multimedia":
Wi-Fi on board, 230V socket, audio systems,
speakers, semi-integral navigation systems,
portable navigation systems, hands-free kit,
DVD player, USB Box, mapping update CD,
driving aid, Hi-Fi module...The fitting of electrical equipment or
accessories which are not recommended
by CITROËN may result in a failure of
your vehicle's electronic system and
excessive electrical consumption.
Contact a CITROËN dealer
for information on the range of
recommended equipment and
accessories.
Installation of radio
communication transmitters
Before installing any after-market radio
communication transmitter, you can
contact a CITROËN dealer for the
specification of transmitters which can
be fitted (frequency, maximum power,
aerial position, specific installation
requirements), in line with the Vehicle
Electromagnetic Compatibility
Directive (2004/104/EC). Depending on the legislation in force in
the country, certain safety equipment
may be compulsory: high visibility
safety vests, warning triangles,
breathalyzers, spare bulbs, spare fuses,
fire extinguisher, first aid kit, mud flaps
at the rear of the vehicle.
Practical information