start stop button CITROEN C5 X 2022 Owners Manual
[x] Cancel search | Manufacturer: CITROEN, Model Year: 2022, Model line: C5 X, Model: CITROEN C5 X 2022Pages: 228, PDF Size: 6.78 MB
Page 14 of 228

12
Instruments
Settings
Brightness adjustment is available after
activation of the function.
The system status and settings are memorised
when the ignition is switched off.
Activation/Deactivation
It can be activated/deactivated in the
Settings > Brightness touch screen
application.
►
With the ignition on, press the “ Head-Up
Display
” button to change the function status
(confirmed by the slider moving to the right/left:
function activated/deactivated).
Brightness adjustment
Brightness adjustment is configured in the
Settings > Brightness touch screen
application.
►
With the ignition on, press or move the slider
to the desired setting.
Adjusting the height
► With the ignition on and the control in the
central high position, move the control up/down
to adjust the desired height of the display
.
Warning and indicator
lamps
Displayed as symbols, the warning and indicator
lamps inform the driver of the occurrence of a
malfunction (warning lamps) or of the operating
status of a system (operation or deactivation
indicator lamps). Certain lamps light up in two
ways (fixed or flashing) and/or in several colours.
Associated warnings
The illumination of a lamp may be accompanied
by an audible signal and/or a message displayed
in a screen.
Relating the type of alert to the operating status
of the vehicle allows you to determine whether
the situation is normal or whether a fault has occurred: refer to the description of each lamp
for further information.
When the ignition is switched on
Certain red or orange warning lamps come on
for a few seconds when the ignition is switched
on. These warning lamps should go off as soon
as the engine is started.
For more information on a system or a function,
refer to the corresponding section.
Persistent warning lamp
If a red or orange warning lamp comes on, there
may be fault which needs further investigation.
If a lamp remains lit
The references (1), (2) and (3) in the warning
and indicator lamp description indicate whether
you should contact a qualified professional in
addition to the immediate recommended actions.
(1): You must stop the vehicle
.
Stop as soon as it is safe to do so and switch off
the ignition.
(2): Contact a CITROËN dealer or a qualified
workshop.
(3): Visit a CITROËN dealer or a qualified
workshop.
Page 22 of 228
20
Instruments
The range displayed depends on the use of the vehicle (type of driving and speed),
the outside temperature and the activated
comfort equipment.
Manual test
This function allows you to check certain
indicators and display the alerts log.
The test is launched in the Settings>Vehicle touch screen
application.
►
Then select
Safety>Check .
The following information is displayed on the
instrument panel:
–
T
yre pressures.
–
Engine oil level (depending on engine).
–
Next service due.
–
Current alerts.
This information is also displayed automatically every time the ignition is
switched on.
Total distance recorder
The total distance recorder measures the total
distance travelled by the vehicle since its initial
registration.
With the ignition on, the total distance is
displayed at all times. It remains displayed for
30
seconds after switching off the ignition. It is
displayed when the driver's door is opened, and
when the vehicle is locked or unlocked.
When travelling abroad, it may be
necessary to change the distance units
(km or miles): the road speed must be
displayed in the local country’s official unit
(km/h or mph).
The unit is changed via the application of
screen settings, with the vehicle stationary.
Rechargeable hybrid vehicles
The total distance recorder is only
accessible from the trip computer.
For more information on the Trip computer,
refer to the corresponding section.
Lighting dimmer
Used to manually adjust the brightness of the
instruments and controls to suit the exterior light
level.
It is configured in the Settings >
Brightness touch screen application.
►
In the “
Cockpit” section, press or move the
slider to the desired setting.
Trip computer
Displays information related to the current trip
(range, fuel consumption, average speed, etc.).
Data displayed on the
instrument panel
Display of the different tabs
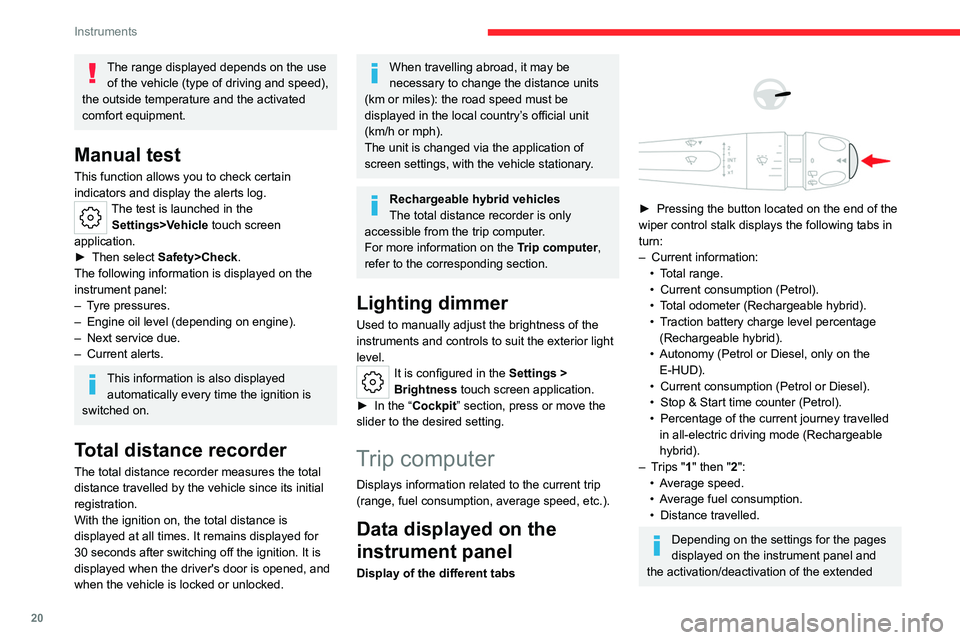
► Pressing the button located on the end of the
wiper control stalk displays the following tabs in
turn:
–
Current information:
•
T
otal range.
•
Current consumption (Petrol).
•
T
otal odometer (Rechargeable hybrid).
•
T
raction battery charge level percentage
(Rechargeable hybrid).
•
Autonomy (Petrol or Diesel, only on the E-HUD).
•
Current consumption (Petrol or Diesel).
•
Stop & Start time counter (Petrol).
•
Percentage of the current journey travelled
in all-electric driving mode (Rechargeable
hybrid).
–
T
rips "1" then "2":
•
A
verage speed.
•
A
verage fuel consumption.
•
Distance travelled.
Depending on the settings for the pages
displayed on the instrument panel and
the activation/deactivation of the extended
Page 23 of 228
21
Instruments
1head-up display, the trip computer appears in
one or the other, or both.
For more information on the Digital
instrument panel and the E-HUD, refer to
the corresponding sections.
Trip reset
► When the desired trip is displayed,
press the button on the end of the wiper
control stalk for more than 2
seconds.
Trips "1" and "2" are independent and are used
in the same way.
Definitions
Range
(miles or km)Distance that can still be travelled with the
fuel remaining in the tank (based on the
average fuel consumption over the last few miles
(kilometres) travelled).
This value may vary following a change in driving
style or terrain, leading to a significant change in
current fuel consumption.
When the range falls below 19 miles (30
km),
dashes are displayed.
After filling with at least 5 litres of fuel, the range
is recalculated and is displayed if it exceeds 62
miles (100
km).
If dashes instead of figures continue to be
displayed while driving, contact a CITROËN
dealer or a qualified workshop.
Current consumption
(mpg or l/100 km or km/l)Calculated during the last few seconds.
This function is only displayed at speeds above
19 mph (30
km/h).
Average consumption
(mpg or l/100 km or km/l)Calculated since the last trip computer
reset.
Average speed
(mph or km/h)Calculated since the last trip computer
reset.
Distance travelled
(miles or km)Calculated since the last trip computer
reset.
Stop & Start time counter
(minutes/seconds or hours/minutes)
If your vehicle is fitted with Stop & Start, a time
counter calculates the time spent in STOP mode
during a journey.
The time counter is reset each time the ignition is
switched on.
Touch screen
This system gives access to the following elements:
–
T
ime and exterior temperature.
–
Heating/air conditioning system controls and
reminders of settings.
–
Settings for driving aid functions, comfort and
safety functions, audio equipment and digital
instrument panel.
–
Settings of functions specific to rechargeable
hybrid vehicles.
–
Display of visual manoeuvring aid functions.
–
Interactive handbook.
–
V
ideo tutorials (e.g. screen management,
driving aids, voice recognition).
–
Audio equipment and telephone controls with
display of
associated information.
–
Connected services and display of associated
information.
–
Navigation system controls and display
of associated information (depending on
equipment).
–
V
oice recognition (depending on equipment).
For safety reasons, always stop the
vehicle before performing operations
that require sustained attention.
Some functions are not accessible while
driving.
Recommendations
It is a capacitive touch screen.
Page 28 of 228
26
Access
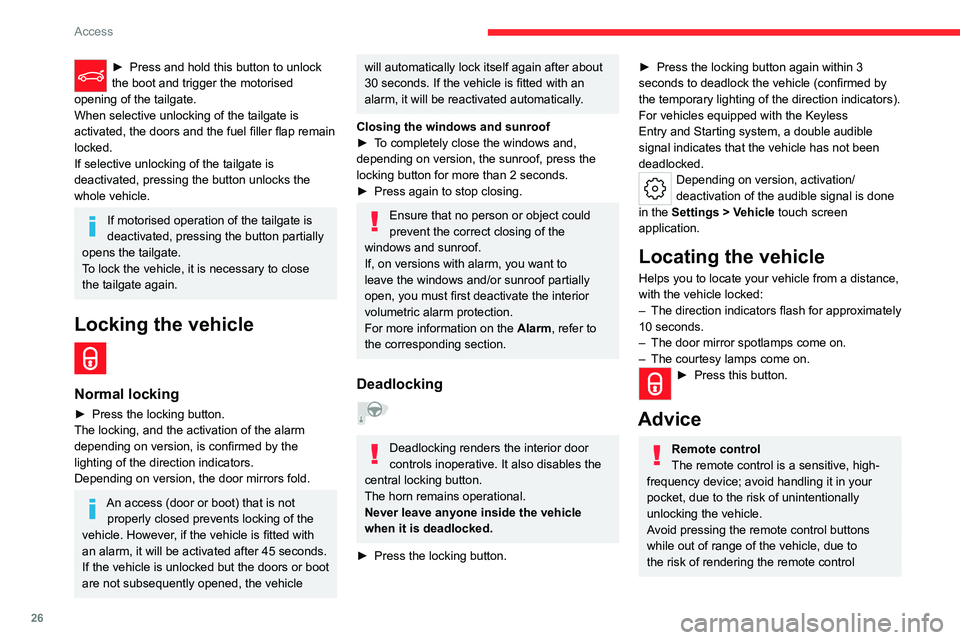
► Press and hold this button to unlock
the boot and trigger the motorised
opening of the tailgate.
When selective unlocking of the tailgate is
activated, the doors and the fuel filler flap remain
locked.
If selective unlocking of the tailgate is
deactivated, pressing the button unlocks the
whole vehicle.
If motorised operation of the tailgate is
deactivated, pressing the button partially
opens the tailgate.
To lock the vehicle, it is necessary to close
the tailgate again.
Locking the vehicle
Normal locking
► Press the locking button.
The locking, and the activation of the alarm
depending on version, is confirmed by the
lighting of the direction indicators.
Depending on version, the door mirrors fold.
An access (door or boot) that is not properly closed prevents locking of the
vehicle. However, if the vehicle is fitted with
an alarm, it will be activated after 45
seconds.
If the vehicle is unlocked but the doors or boot
are not subsequently opened,
the vehicle
will automatically lock itself again after about
30 seconds. If the vehicle is fitted with an
alarm, it will be reactivated automatically.
Closing the windows and sunroof
►
T
o completely close the windows and,
depending on version, the sunroof, press the
locking button for more than 2 seconds.
►
Press again to stop closing.
Ensure that no person or object could
prevent the correct closing of the
windows and sunroof.
If, on versions with alarm, you want to
leave the windows and/or sunroof partially
open, you must first deactivate the interior
volumetric alarm protection.
For more information on the Alarm, refer to
the corresponding section.
Deadlocking
Deadlocking renders the interior door
controls inoperative. It also disables the
central locking button.
The horn remains operational.
Never leave anyone inside the vehicle
when it is deadlocked.
►
Press the locking button.
► Press the locking button again within 3
seconds to deadlock the vehicle (confirmed by
the temporary lighting of the direction indicators).
For vehicles equipped with the Keyless
Entry and Starting system, a double audible
signal indicates that the vehicle has not been
deadlocked.
Depending on version, activation/
deactivation of the audible signal is done
in the Settings > Vehicle touch screen
application.
Locating the vehicle
Helps you to locate your vehicle from a distance,
with the vehicle locked:
–
The direction indicators flash for approximately
10 seconds.
–
The door mirror spotlamps come on.
–
The courtesy lamps come on.
► Press this button.
Advice
Remote control
The remote control is a sensitive, high-
frequency device; avoid handling it in your
pocket, due to the risk of unintentionally
unlocking the vehicle.
Avoid pressing the remote control buttons
while out of range of the vehicle, due to
the risk of rendering the remote control
Page 33 of 228
31
Access
2Battery type: CR2032/3 volts.
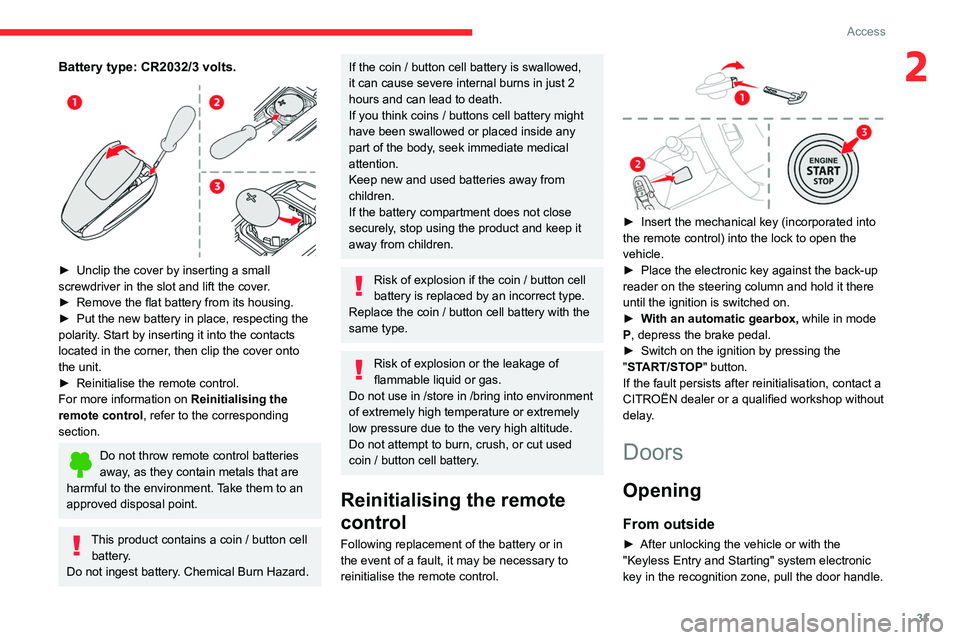
► Unclip the cover by inserting a small
screwdriver in the slot and lift the cover .
►
Remove the flat battery from its housing.
►
Put the new battery in place, respecting the
polarity
. Start by inserting it into the contacts
located in the corner, then clip the cover onto
the unit.
►
Reinitialise the remote control.
For more information on Reinitialising the
remote control
, refer to the corresponding
section.
Do not throw remote control batteries
away, as they contain metals that are
harmful to the environment. Take them to an
approved disposal point.
This product contains a coin / button cell battery.
Do not ingest battery. Chemical Burn Hazard.
If the coin / button cell battery is swallowed,
it can cause severe internal burns in just 2
hours and can lead to death.
If you think coins / buttons cell battery might
have been swallowed or placed inside any
part of the body, seek immediate medical
attention.
Keep new and used batteries away from
children.
If the battery compartment does not close
securely, stop using the product and keep it
away from children.
Risk of explosion if the coin / button cell
battery is replaced by an incorrect type.
Replace the coin / button cell battery with the
same type.
Risk of explosion or the leakage of
flammable liquid or gas.
Do not use in /store in /bring into environment
of extremely high temperature or extremely
low pressure due to the very high altitude.
Do not attempt to burn, crush, or cut used
coin / button cell battery.
Reinitialising the remote
control
Following replacement of the battery or in
the event of a fault, it may be necessary to
reinitialise the remote control.
► Insert the mechanical key (incorporated into
the remote control) into the lock to open the
vehicle.
►
Place the electronic key against the back-up
reader on the steering column and hold it there
until the ignition is switched on.
►
W
ith an automatic gearbox, while in mode
P, depress the brake pedal.
►
Switch on the ignition by pressing the
"
START/STOP" button.
If the fault persists after reinitialisation, contact a
CITROËN dealer or a qualified workshop without
delay.
Doors
Opening
From outside
► After unlocking the vehicle or with the
"Keyless Entry and Starting" system electronic
key in the recognition zone, pull the door handle.
Page 39 of 228

37
Access
2Locking the vehicle
with exterior perimeter
monitoring only
Deactivate the interior volumetric monitoring to
avoid the unwanted triggering of the alarm, in
certain cases such as:
–
Slightly open window
.
–
W
ashing the vehicle.
–
Changing a wheel.
–
T
owing the vehicle.
–
T
ransport on a ship or ferry.
Deactivating the interior volumetric
and anti-tilt monitoring
► Switch off the ignition and within 10 seconds
press the alarm button until its red indicator lamp
is on fixed.
►
Get out of the vehicle.
►
Immediately lock the vehicle using the remote
control or the Keyless Entry and Starting system.
Only the exterior perimeter monitoring is
activated; the button's red indicator lamp flashes
once every second.
To take effect, this deactivation must be carried out after each time the ignition is
switched off.
Reactivating the interior volumetric
and anti-tilt monitoring
► Deactivate the exterior perimeter monitoring
by unlocking the vehicle using the remote control
or the Keyless Entry and Starting system.
The indicator lamp in the button goes off.
►
Reactivate all monitoring by locking the
vehicle using the remote control or the Keyless
Entry and Starting system.
The red indicator lamp in the button once again
flashes every second.
Triggering of the alarm
This is indicated by sounding of the siren
and flashing of the direction indicators for 30
seconds.
Depending on the country of sale, certain
monitoring functions remain active until the alarm
has been triggered eleven times consecutively.
When the vehicle is unlocked using the remote
control or the Keyless Entry and Starting system,
rapid flashing of the red indicator lamp in the
button informs you that the alarm was triggered
during your absence. When the ignition is
switched on, this flashing stops.
Failure of the remote control
To deactivate the monitoring functions:
► Unlock the vehicle using the key in the front
left-hand door lock.
►
Open the door; the alarm is triggered. ►
Switch on the ignition; this stops the alarm.
The indicator lamp in the button goes off.
Locking the vehicle without
activating the alarm
► Lock the vehicle using the key (built-in the
remote control) in the front left-hand door lock.
Automatic activation
(Depending on version)
The system is activated automatically 2 minutes
after the last door or the boot is closed.
►
T
o avoid triggering the alarm on entering the
vehicle, first press the unlocking button on the
remote control or unlock the vehicle using the
“Keyless Entry and Starting” system.
Malfunction
When the ignition is switched on, the fixed
lighting of the red indicator lamp in the button
indicates a system malfunction.
Have it checked by a CITROËN dealer or a
qualified workshop.
Page 40 of 228

38
Access
Electric windows
1.Left-hand front
2. Right-hand front
3. Left-hand rear
4. Right-hand rear
5. Deactivation of the electric window controls
located at the rear seats
Manual operation
► To open/close the window, press/pull the
switch without passing the point of resistance;
the window stops as soon as the switch is
released.
Automatic operation
► To open/close the window, press/pull the
switch past its point of resistance: the window
opens/closes completely when the switch is
released.
Operating the switch again stops the movement
of the window.
Window controls remain operational for
approximately 45 seconds after switching
off the ignition.
After that time, the controls are disabled. To
reactivate them, switch on the ignition.
Anti-pinch
If the window meets an obstacle while rising, it
stops and immediately partially lowers again.
Deactivating the rear
controls for the rear electric
windows
For your children's safety, press control 5 to
deactivate the controls for the rear electric
windows, irrespective of their positions.
The red indicator lamp in the button comes on.
The lamp will remain lit until the controls are
reactivated.
The rear electric windows can still be controlled
using the driver's controls.
Reinitialising the electric
windows
After reconnecting the battery, or in the event
of abnormal window movement, the anti-pinch
function must be reinitialised.
The anti-pinch function is disabled during the
following sequence of operations.
For each window:
►
Raise the window until it is fully closed.
►
Release then pull the control for at least one
second.
If an electric window meets an obstacle
during operation, the movement of the
window must be reversed. To do this, press
the relevant switch.
When the driver operates the passengers’
electric window switches, it is important to
ensure that nothing can prevent the window
from closing properly.
It is important to ensure that passengers use
the electric windows correctly.
Pay particular attention to children when
operating windows.
Be aware of passengers and/or other persons
present when closing windows using the key
or the "Keyless Entry and Starting" system.
Page 41 of 228

39
Access
2Do not put your head or arms through the
open windows while the vehicle is moving -
risk of serious injury!
Sunroof
The sunroof consists of a movable glass panel
that slides over the roof and a blind that can
be opened independently. Opening the sunroof
automatically opens the blind.
►
T
o operate the panoramic sunroof, use the
button in the roof console.
The sunroof can be operated when the ignition
is turned on (if the battery is charged enough),
with the engine running, in STOP mode of Stop
& Start, and up to 45 seconds after turning off
the ignition.
Precautions
Do not put your head or arms through the
sunroof while the vehicle is moving - risk
of serious injury!
Do not operate the sunroof if transverse
roof bars are fitted - risk of serious
damage!
Do not place heavy loads on the movable
glass panel of the sunroof.
If the sunroof is wet, following a shower
or washing the vehicle, wait until it is
completely dry before opening.
Do not operate the sunroof if it is covered by
snow or ice - risk of damage!
Use only plastic scrapers to remove snow or
ice from the sunroof.
Regularly check the condition of the
sunroof seals (e.g. presence of dust,
dead leaves).
If using a car wash, check first that the roof is
correctly closed and keep the high-pressure
jet at least 30 centimetres from the seals.
Never leave the vehicle with the sunroof
open.
Operation
When opening the sunroof fully, the movable
glass moves to a partially open position, then
slides over the roof. Any intermediate position is
possible.
Before operating the sunroof control
button, ensure that no object or person
might prevent the movement.
Pay particular attention to children when
operating the sunroof.
If something is trapped when operating the
sunroof, reverse the movement of the sunroof
by pressing the appropriate control button.
The driver must ensure that passengers use
the sunroof correctly.
Any manual intervention on the position of
the sunroof may disturb the anti-pinch device.
Perform a reinitialisation.
Anti-pinch system
If the sunroof encounters an obstacle when
closing, the movement is automatically reversed.
Opening/closing the sunroof
► To open the sunroof, use the part of the
button located towards the rear.
►
T
o close the sunroof, use the part of the
button located towards the front.
Operating the button
► Pressing the button beyond its point of
resistance opens or closes the sunroof fully .
►
Pressing the button again stops the
movement in progress.
►
By keeping the button pressed (without going
beyond the point of resistance), the movement of
the glass stops when this button is released.
Page 52 of 228
50
Ease of use and comfort
according to the recommendations in the
Manufacturer’s service schedule.
Stop & Start
The heating and air conditioning systems
only operate when the engine is running.
Temporarily deactivate the Stop & Start
system to maintain a comfortable temperature
in the passenger compartment.
For more information on the Stop & Start,
refer to the corresponding section.
Ventilation with the ignition on
When the ignition is switched on, you can use
the ventilation system to adjust the air flow
settings and the air distribution in the passenger
compartment, for a period which depends on the
battery charge.
This function does not operate the air
conditioning.
Dual-zone automatic air
conditioning
This system automatically controls the activation
of the air conditioning system, regulating the
temperature, air flow and air distribution inside
the passenger compartment.
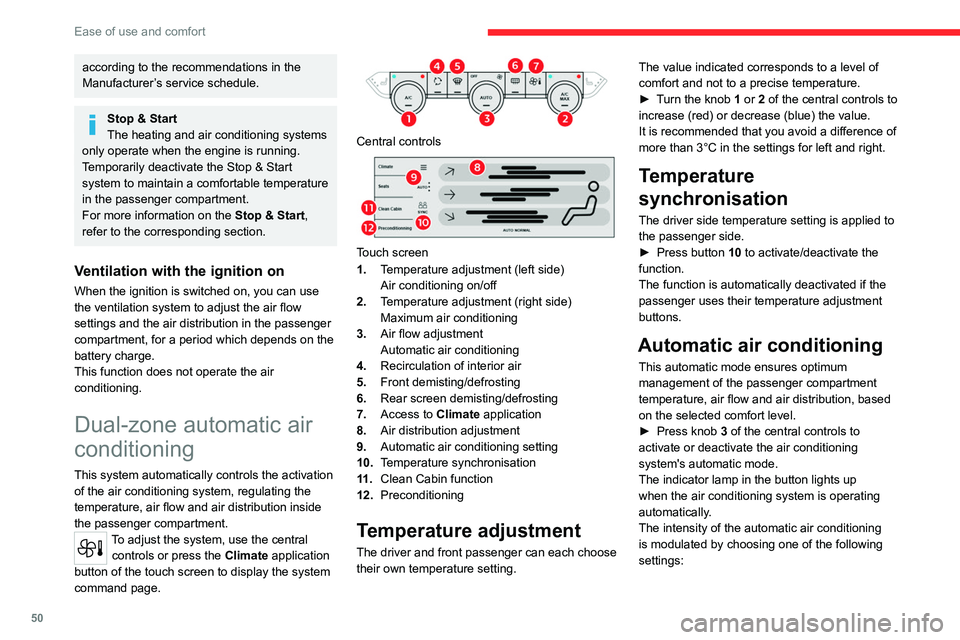
To adjust the system, use the central controls or press the Climate application
button of the touch screen to display the system
command page.
Central controls
Touch screen
1. Temperature adjustment (left side)
Air conditioning on/off
2. Temperature adjustment (right side)
Maximum air conditioning
3. Air flow adjustment
Automatic air conditioning
4. Recirculation of interior air
5. Front demisting/defrosting
6. Rear screen demisting/defrosting
7. Access to Climate application
8. Air distribution adjustment
9. Automatic air conditioning setting
10. Temperature synchronisation
11 . Clean Cabin function
12. Preconditioning
Temperature adjustment
The driver and front passenger can each choose
their own temperature setting. The value indicated corresponds to a level of
comfort and not to a precise temperature.
►
T
urn the knob 1 or 2 of the central controls to
increase (red) or decrease (blue) the value.
It is recommended that you avoid a difference of
more than 3°C in the settings for left and right.
Temperature
synchronisation
The driver side temperature setting is applied to
the passenger side.
►
Press button
10 to activate/deactivate the
function.
The function is automatically deactivated if the
passenger uses their temperature adjustment
buttons.
Automatic air conditioning
This automatic mode ensures optimum
management of the passenger compartment
temperature, air flow and air distribution, based
on the selected comfort level.
►
Press knob
3 of the central controls to
activate or deactivate the air conditioning
system's automatic mode.
The indicator lamp in the button lights up
when the air conditioning system is operating
automatically.
The intensity of the automatic air conditioning
is modulated by choosing one of the following
settings:
Page 54 of 228

52
Ease of use and comfort
If the air quality appears to be reduced, consult
a CITROËN dealer or a qualified workshop to
change the passenger compartment filter.
Air conditioning on / off
The air conditioning is designed to operate
effectively in all seasons, with the windows
closed.
It lowers the temperature in summer.
It increase the effectiveness of the demisting, in
winter, above 3°C.
►
Press knob
1 to switch the air conditioning
on/off.
When the system is activated, the indicator lamp
of the button comes on.
Air conditioning does not operate when the air flow is deactivated.
To obtain cool air more quickly, enable interior
air recirculation for a a brief period. Then
return to the intake of exterior air.
Switching off air conditioning may result in
some discomfort (humidity, misting).
Maximum air conditioning
This function automatically adjusts the
temperature setting to the lowest possible, the
air distribution towards the central and side air
vents, the air flow to maximum and activates
interior air recirculation.
► Press knob 2 to activate/deactivate the
function (the indicator lamp will come on/switch
off).
Once the function is deactivated, the system
returns to the previous settings.
Interior air recirculation
The intake of exterior air prevents the formation
of mist on the windscreen and side windows.
Recirculating the interior air isolates the
passenger compartment from outside odours
and fumes and allows the desired passenger
compartment temperature to be achieved more
rapidly.
► Press this button to activate/deactivate
the function (confirmed by the
illumination/extinction of the indicator lamp).
This function is activated automatically when reverse gear is engaged.
Front demisting
- defrosting
This mode allows the windscreen and side windows to be demisted or defrosted as quickly
as possible.
► Press this button to activate/deactivate
the mode (confirmed by the illumination/
extinction of the indicator lamp).
It automatically manages the air conditioning
(depending on version), air flow and air intake,
and provides optimum distribution towards the
windscreen and side windows.
It is possible to manually change the air flow
without deactivating the mode.
With Stop & Start, when demisting has
been activated, STOP mode is not
available.
In wintry conditions, before moving off,
remove all snow or ice on the windscreen
near the camera.
Otherwise, the operation of the equipment
using the camera may be affected.
Rear screen demisting/
defrosting
This demisting/defrosting only works with the engine running.
It also demists/defrosts the doors mirrors.
► Press this button to activate/deactivate
the function (confirmed by the
illumination/extinction of the indicator lamp).
The function can be activated whatever the outside temperature may be.
The period of operation depends on the outside
temperature.