remote control CITROEN C5 X 2023 User Guide
[x] Cancel search | Manufacturer: CITROEN, Model Year: 2023, Model line: C5 X, Model: CITROEN C5 X 2023Pages: 228, PDF Size: 6.78 MB
Page 42 of 228
40
Access
► When the sunroof is closed: pressing once
without passing the point of resistance moves it
to the partially open position.
►
When the sunroof is partially open: pressing
once on the front part of the button, without
going beyond the point of resistance, closes it
completely
.
The sunroof and windows can be closed by holding down the remote control
locking button.
Opening/closing the blind
► To open the blind, pull its handle backwards
until the desired position is reached.
►
T
o close the blind, push its handle forwards
until the desired position is reached.
Reinitialisation
Reinitialisation is required after reconnecting the
battery, or if the sunroof malfunctions or moves
in a jerky manner.
►
Check that nothing is affecting the movement
of the sunroof and that the seals are clean.
► With the ignition on, press and hold
the front part of the button to close the
sunroof.
The sunroof closes step by step. When fully
closed, it performs a slight opening/closing
movement.
►
Release the button 1 second after the end of
the movement.
Page 58 of 228

56
Ease of use and comfort
► With the charging area clear, place a device
in its centre.
When the portable device is detected, the
charger’s indicator lamp lights up green. It
remains lit for the whole time that the battery is
being charged.
The system is not designed to charge multiple devices simultaneously.
Do not leave metal objects (e.g. coins,
keys, vehicle remote control) in the
charging area while a device is being charged
- risk of overheating or interrupting the
charging!
When using applications for a long time
in combination with wireless charging,
some smartphones may switch to thermal
safety and cause some functions to stop.
Checking operation
The state of the indicator lamp allows the
operation of the charger to be monitored.
State of the
indicator lamp Meaning
Off Engine switched off.
No compatible devices
detected.
Charging complete.
Fixed green Compatible portable device detected.
Charging.
Flashing orange Foreign object detected in the charging zone.
Portable device not well
centred in the charging
zone.
Fixed orange Malfunction of the portable device's battery
meter.
Device battery
temperature too high.
Charger malfunction.
If the indicator lamp is fixed orange:
– remove the device, then place it back in the
centre of the charging zone.
or
–
remove the device and try again in a quarter
of an hour
.
If the problem persists, have the system checked
by a CITROËN dealer or a qualified workshop.
Front armrest
It includes a storage space.
Opening
► Press the lever beneath the cover.
The cover opens in two parts.
Closing
► Fold back the two parts of the cover .
Page 59 of 228

57
Ease of use and comfort
3Mats
Fitting
When fitting it on the driver's side, only use
the mountings present on the carpet (a "click"
indicates proper locking).
The other mats are simply laid over the carpet.
Removing/refitting
► To remove it on the driver's side, move the
seat backwards and unclip the fasteners.
►
T
o refit it, position the mat and secure it by
pressing down.
►
Check that the mat is secured correctly
.
To avoid any risk of jamming the pedals:– Only use mats which are suited to the
fixings already present in the vehicle; these
fixings must be used.
–
Never fit one mat on top of another
.
The use of mats not approved by CITROËN
may interfere with access to the pedals and
hinder the operation of the cruise control/
speed limiter.
The approved mats have two fasteners
located underneath the seat.
Courtesy lamps
1. Front courtesy and reading lamps
2.Rear reading lamps
Front courtesy lamp
It comes on gradually:
–
when the vehicle is unlocked.
–
when the ignition is switched off.
–
when a door is opened.
–
when the remote control locking button is
activated, in order to locate the vehicle.
It switches off:
– when the vehicle is locked.
–
when the ignition is switched on.
–
30 seconds after the last door is closed.
The front and rear reading lamps come on and
go off at the same time as the courtesy lamp.
Reading lamps
► With the ignition on, operate the
corresponding switch.
Take care not to place anything in contact with the courtesy lamps.
Interior ambient lighting
The interior ambient lighting casts soft lighting,
both day and night.
Interior ambient lighting is associated with
display lighting depending on the driving mode
selected.
You can activate/deactivate this function and adjust the brightness in the
Settings
> Brightness touch screen application.
Page 66 of 228

64
Lighting and visibility
– On the outside, sidelamps, dipped beam
headlamps and door mirror spotlamps.
–
Inside, courtesy lamps and footwell lighting.
Door mirror spotlamps
These spotlamps facilitate access to the vehicle
by lighting the ground near the front doors.
The spotlamps come on automatically:
–
when the vehicle is unlocked.
–
when a door is opened.
–
when a request to locate the vehicle is
received from the remote control.
They also come on with the welcome lighting
and guide-me-home lighting functions.
They go off automatically after 30 seconds.
Automatic lighting systems - General
recommendations
The automatic lighting systems use a detection
camera, located at the top of the windscreen.
Operating limits
The system may be disrupted or not work
correctly:
–
When visibility conditions are poor
(e.g.
snowfall, heavy rain).
–
If the windscreen is dirty
, misted-up or
masked (e.g.
sticker) in front of the camera.
–
If the vehicle is facing highly reflective signs
or safety barrier reflectors.
The system is not able to detect:
– Road users that do not have their own
lighting, such as pedestrians.
–
V
ehicles with hidden lighting (e.g. travelling
behind a safety barrier on the motorway).
–
V
ehicles at the top or bottom of a steep
slope, on winding roads, on crossroads.
Maintenance
Clean the windscreen regularly,
particularly the area in front of the camera.
The internal surface of the windscreen can
also become misted around the camera.
In humid and cold weather, demist the
windscreen regularly.
Do not allow snow to accumulate on the
bonnet or roof of the vehicle as this could
obstruct the camera.
Automatic headlamp dipping
For more information, refer to the
General recommendations for
automatic lighting systems.
When the lighting control ring is in the " AUTO”
position and the function is activated on the
touch screen, this system automatically switches
between dipped and main beam headlamps
depending on light and traffic conditions, using a
camera located at the top of the windscreen.
This system is a driving aid. The driver remains responsible for
the vehicle's lighting, its correct use in the
prevailing light, visibility and traffic conditions,
and for compliance with driving and vehicle
regulations.
The system becomes operational when the vehicle exceeds 16 mph (25 km/h).
When the speed falls below 9 mph (15 km/h),
the function is no longer operational.
Page 93 of 228

91
Driving
6fails to detect the key in the recognition zone, or
if the battery in the electronic key is flat.
► Place and hold the remote control against the
back-up reader .
►
Select mode
P on the automatic gearbox,
then depress the brake pedal.
►
Press the "
START/STOP" button.
The engine starts.
Back-up switch-off
If the electronic key is not detected or is no
longer in the recognition zone, a message appears in the instrument panel when closing a
door or trying to switch off the engine.
►
T
o confirm the instruction to switch off the
engine, press the " START/STOP" button for
approximately 5 seconds.
In the event of a fault with the electronic key,
contact a CITROËN dealer or a qualified
workshop.
Emergency switch-off
In case of emergency only, the engine can be
switched off without conditions (even when
driving).
►
Press the "
START/STOP" button for about
5
seconds.
Electric parking brake
In automatic mode, this system applies the
parking brake when the engine is switched off
and releases it when the vehicle moves off.
At any time, with the engine running:
► T o apply the parking brake, briefly pull the
control.
► To release it, briefly push the control while
pressing the brake pedal.
Automatic mode is activated by default.
This automatic operation can be deactivated in
certain situations.
Indicator lamp
This indicator lamp comes on both on the instrument panel and on the control to
confirm that the parking brake has been applied,
accompanied by display of the message
"Parking brake applied".
The indicator lamp goes out to confirm the
release of the parking brake, accompanied by
the display of the message " Parking brake
released ".
The indicator lamp flashes in response to a
manual request to apply or release the brake.
In the event of a battery failure, the
electric parking brake will not operate.
As a safety measure, if the parking brake is
not applied, immobilise the vehicle by placing
the supplied chock against one of the wheels.
Contact a CITROËN dealer or a qualified
workshop.
Page 148 of 228
146
Practical information
Green: electrical connection established;
charging can begin.
CHARGE
Flashing green: charging in progress or
temperature pre-conditioning activated.
Fixed green: charging complete.
FAULT
Red: fault; charging not permitted or must
be stopped immediately. Check that everything
is connected correctly and that the electrical
system is not faulty.
If the indicator lamp does not go off, contact a
CITROËN dealer or a qualified workshop.
Upon plugging the charging cable into a
domestic socket, all of the indicator lamps come
on briefly.
If no indicator lamps come on, check the
domestic socket's circuit-breaker:
–
If the circuit-breaker has tripped, contact a
professional to check that the electrical system
is compatible and/or carry out any necessary
repairs.
–
If the circuit-breaker has not tripped, stop
using the charging cable and contact a
CITROËN dealer or a qualified workshop.
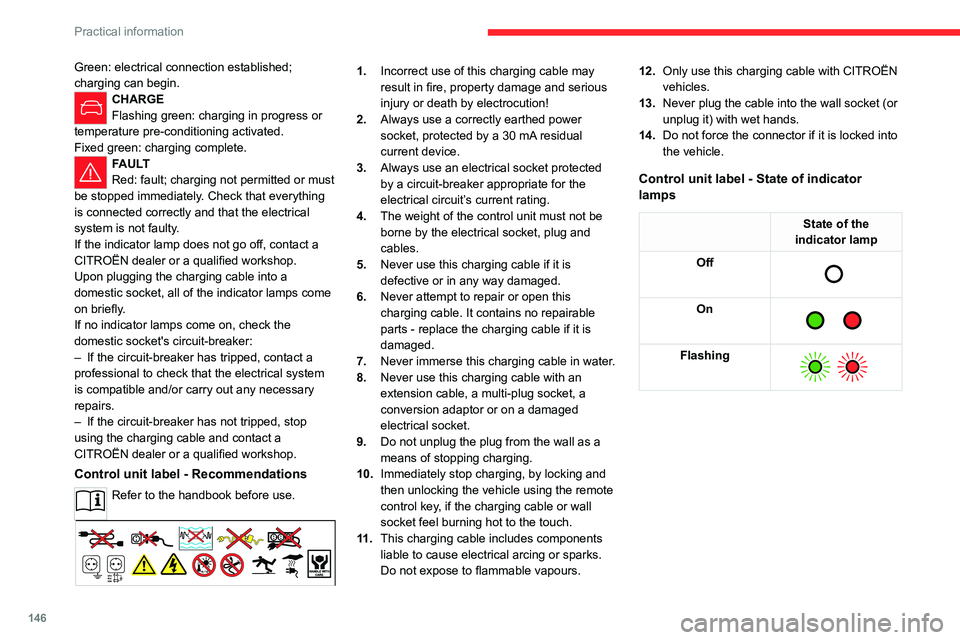
Control unit label - Recommendations
Refer to the handbook before use.
1. Incorrect use of this charging cable may
result in fire, property damage and serious
injury or death by electrocution!
2. Always use a correctly earthed power
socket, protected by a 30
mA residual
current device.
3. Always use an electrical socket protected
by a circuit-breaker appropriate for the
electrical circuit’s current rating.
4. The weight of the control unit must not be
borne by the electrical socket, plug and
cables.
5. Never use this charging cable if it is
defective or in any way damaged.
6. Never attempt to repair or open this
charging cable. It contains no repairable
parts - replace the charging cable if it is
damaged.
7. Never immerse this charging cable in water.
8. Never use this charging cable with an
extension cable, a multi-plug socket, a
conversion adaptor or on a damaged
electrical socket.
9. Do not unplug the plug from the wall as a
means of stopping charging.
10. Immediately stop charging, by locking and
then unlocking the vehicle using the remote
control key, if the charging cable or wall
socket feel burning hot to the touch.
11 . This charging cable includes components
liable to cause electrical arcing or sparks.
Do not expose to flammable vapours. 12.
Only use this charging cable with CITROËN
vehicles.
13. Never plug the cable into the wall socket (or
unplug it) with wet hands.
14. Do not force the connector if it is locked into
the vehicle.
Control unit label - State of indicator
lamps
State of the
indicator lamp
Off
On
Flashing
Page 150 of 228
148
Practical information
The control unit can be reset by simultaneously disconnecting the chargi\
ng connector and the wall socket.
Then, reconnect the wall socket first. For more information, refer to the handbook.
Charging the traction
battery (Rechargeable
hybrid)
For a full charge, follow the charging procedure
without interrupting it, until it stops automatically.
Charging may be performed either immediately
(by default) or deferred.
Deferred charging is set via the touch
screen or the MyCitroën App application.
When the vehicle is connected, the following
information is displayed on the instrument panel:
–
T
raction battery charge status (%).
–
Remaining range (miles or km).
–
Estimated charging time (calculation may take
a few seconds).
–
Charging speed (miles or km gained per hour).
After the instrument panel has been put into
standby mode, this information can be displayed
again by unlocking the vehicle or opening a door
.
It is also possible to monitor the charging
progress using the MyCitroën App
application.
For more information on Remote functions,
refer to the corresponding section.
Lounge mode
When the vehicle is connected, it is
possible to switch on the ignition and use
certain functions such as the audio and
telematics system and the air conditioning
system for several hours.
Low load / Driving
Driving when the charge level of the
traction battery is too low can lead to the
vehicle breaking down and can lead to
accidents or serious injuries. ALWAYS make
sure the traction battery has a sufficient
charge level.
Low load / Parking
If the outside temperature is negative,
it is recommended not to park your vehicle
outside for several hours at a low load (less
than 20%).
Vehicle in storage for more than 1
month
In the event of a long period of non-use of
the vehicle (beyond 4 weeks) without the
possibility of charging when restarting, the
self-discharge may make it impossible to
restart if the traction battery charge level
is a low or very low, especially at negative
ambient temperatures. ALWAYS make sure
that the traction battery has a charge between
20% and 40% if you do not plan to use your
vehicle for several weeks.
Do not connect the charging cable.
Always park the vehicle in a place with
temperatures between -10°C and 30°C
(parking in a place with extreme temperatures
can damage the traction battery).
Refer to the Accessory battery
(Rechargeable hybrid) section for the
battery disconnection procedure.
Precautions
Rechargeable hybrid vehicles have
been developed in accordance with the
recommendations for maximum electromagnetic
field limits established by the ICNIRP
(International Commission on Non-Ionizing
Radiation Protection - 1998 Guidelines).
Wearers of pacemakers or equivalent
devices should consult a doctor to
enquire about any applicable precautionary
measures, or contact the manufacturer of their
implanted electronic medical device to check that
it is guaranteed to operate in an environment
compliant with the ICNIRP guidelines.
Page 152 of 228
150
Practical information
► Follow the accelerated charging unit
(W allbox) user instructions.
►
Remove the protective cover from the
charging nozzle.
►
Insert the nozzle into the vehicle's charging
connector
.
The start of charging is confirmed by the flashing
of the green light guides in the flap.
If this is not the case, charging has not
started; restart the procedure ensuring that all
connections are properly established.
The red indicator lamp in the flap comes on to
indicate that the nozzle is locked.
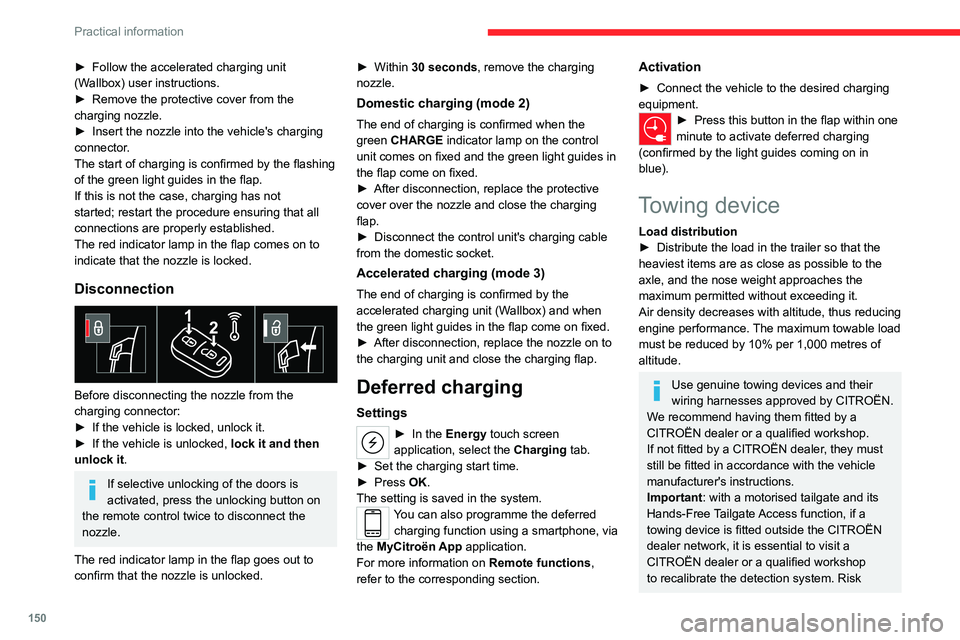
Disconnection
Before disconnecting the nozzle from the
charging connector:
►
If the vehicle is locked, unlock it.
►
If the vehicle is unlocked, lock it and then
unlock it .
If selective unlocking of the doors is
activated, press the unlocking button on
the remote control twice to disconnect the
nozzle.
The red indicator lamp in the flap goes out to
confirm that the nozzle is unlocked. ►
Within
30 seconds, remove the charging
nozzle.
Domestic charging (mode 2)
The end of charging is confirmed when the
green CHARGE indicator lamp on the control
unit comes on fixed and the green light guides in
the flap come on fixed.
►
After disconnection, replace the protective
cover over the nozzle and close the charging
flap.
►
Disconnect the control unit's charging cable
from the domestic socket.
Accelerated charging (mode 3)
The end of charging is confirmed by the
accelerated charging unit (Wallbox) and when
the green light guides in the flap come on fixed.
►
After disconnection, replace the nozzle on to
the charging unit and close the charging flap.
Deferred charging
Settings
► In the Energy touch screen
application, select the Charging tab.
►
Set the charging start time.
►
Press
OK.
The setting is saved in the system.
You can also programme the deferred charging function using a smartphone, via
the MyCitroën App application.
For more information on Remote functions,
refer to the corresponding section.
Activation
► Connect the vehicle to the desired charging
equipment.
► Press this button in the flap within one
minute to activate deferred charging
(confirmed by the light guides coming on in
blue).
Towing device
Load distribution
► Distribute the load in the trailer so that the
heaviest items are as close as possible to the
axle, and the nose weight approaches the
maximum permitted without exceeding it.
Air density decreases with altitude, thus reducing
engine performance.
The maximum towable load
must be reduced by 10% per 1,000
metres of
altitude.
Use genuine towing devices and their
wiring harnesses approved by CITROËN.
We recommend having them fitted by a
CITROËN dealer or a qualified workshop.
If not fitted by a CITROËN dealer, they must
still be fitted in accordance with the vehicle
manufacturer's instructions.
Important: with a motorised tailgate and its
Hands-Free Tailgate Access function, if a
towing device is fitted outside the CITROËN
dealer network, it is essential to visit a
CITROËN dealer or a qualified workshop
to recalibrate the detection system. Risk
Page 160 of 228
158
Practical information
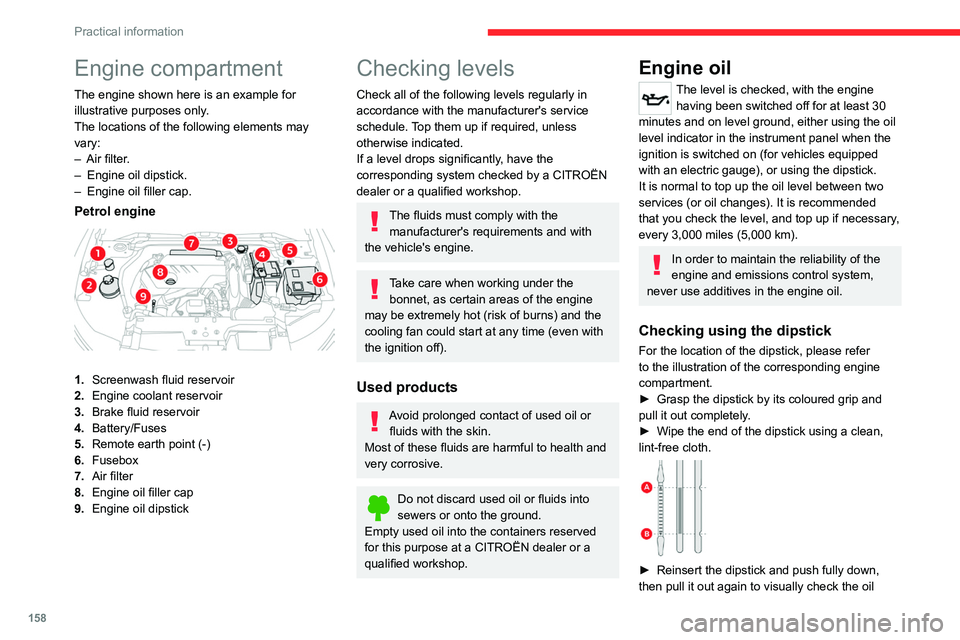
Engine compartment
The engine shown here is an example for
illustrative purposes only.
The locations of the following elements may
vary:
–
Air filter
.
–
Engine oil dipstick.
–
Engine oil filler cap.
Petrol engine
1. Screenwash fluid reservoir
2. Engine coolant reservoir
3. Brake fluid reservoir
4. Battery/Fuses
5. Remote earth point (-)
6. Fusebox
7. Air filter
8. Engine oil filler cap
9. Engine oil dipstick
Checking levels
Check all of the following levels regularly in
accordance with the manufacturer's service
schedule. Top them up if required, unless
otherwise indicated.
If a level drops significantly, have the
corresponding system checked by a CITROËN
dealer or a qualified workshop.
The fluids must comply with the
manufacturer's requirements and with
the vehicle's engine.
Take care when working under the bonnet, as certain areas of the engine
may be extremely hot (risk of burns) and the
cooling fan could start at any time (even with
the ignition off).
Used products
Avoid prolonged contact of used oil or fluids with the skin.
Most of these fluids are harmful to health and
very corrosive.
Do not discard used oil or fluids into
sewers or onto the ground.
Empty used oil into the containers reserved
for this purpose at a CITROËN dealer or a
qualified workshop.
Engine oil
The level is checked, with the engine having been switched off for at least 30
minutes and on level ground, either using the oil
level indicator in the instrument panel when the
ignition is switched on (for vehicles equipped
with an electric gauge), or using the dipstick.
It is normal to top up the oil level between two
services (or oil changes). It is recommended
that you check the level, and top up if necessary,
every 3,000 miles (5,000 km).
In order to maintain the reliability of the
engine and emissions control system,
never use additives in the engine oil.
Checking using the dipstick
For the location of the dipstick, please refer
to the illustration of the corresponding engine
compartment.
►
Grasp the dipstick by its coloured grip and
pull it out completely
.
►
Wipe the end of the dipstick using a clean,
lint-free cloth.
► Reinsert the dipstick and push fully down,
then pull it out again to visually check the oil
Page 175 of 228

173
In the event of a breakdown
81. Reversing lamps
2. Foglamps
Fuses
Changing a fuse
All work must be carried out only by a
CITROËN dealer or a qualified workshop
The replacement of a fuse by a third party
could cause a serious malfunction of the
vehicle.
Installing electrical accessories
The vehicle's electrical system is
designed to operate with standard or optional
equipment.
Before fitting other electrical equipment
or accessories to your vehicle, contact a
CITROËN dealer or a qualified workshop.
CITROËN accepts no responsibility for
the cost incurred in repairing the vehicle
or for rectifying malfunctions resulting from
the installation of accessories not supplied or
not recommended by CITROËN and not
installed in accordance with its
recommendations, in particular when the
combined power consumption of all of the
additional equipment connected exceeds 10
milliamperes.
12 V battery / Accessory
batteries
Lead-acid starter batteries
These batteries contain harmful
substances (sulphuric acid and lead).
They must be disposed of in accordance
with regulations and must never under any
circumstances be discarded with household
waste.
Take used batteries to a special collection
point.
Protect your eyes and face before
handling the battery.
All operations on the battery must be carried
out in a well ventilated area and away from
naked flames and sources of sparks, to avoid
any risk of explosion or fire.
Wash your hands afterwards.
Electronic control units
Never connect the negative jump lead to
the metal part of the electronic control units.
Risk of destroying the electronic control units!
Connect to the remote earth point provided
for this purpose.
Never try to charge a frozen battery - risk
of explosion!
If the battery has frozen, have it checked by a
CITROËN dealer or by a qualified workshop
who will verify that the internal components
have not been damaged and that the case
has not cracked, which would mean a risk of
toxic and corrosive acid leaking.
Automatic gearbox
Never try to start the engine by pushing
the vehicle.
Symbols
No sparks or naked flames, no smoking.
Always protect your eyes. Explosive gases can cause blindness and injury.
Keep the vehicle's battery out of the reach
of children.
The vehicle's battery contains sulphuric acid which can make you go blind or
cause severe burns.
For more information, refer to the
handbook.
Explosive gases can be present close to
the battery.
With petrol engine
Procedure for starting the engine using another
battery or for charging a discharged battery.