tow CITROEN C5 X 2023 Owners Manual
[x] Cancel search | Manufacturer: CITROEN, Model Year: 2023, Model line: C5 X, Model: CITROEN C5 X 2023Pages: 228, PDF Size: 6.78 MB
Page 5 of 228
3
Contents
Highway Driver Assist 2.0 111
Adaptive cruise control 11 2
Lane positioning assist 11 6
Speed adjustment during cornering 11 9
Semi-automatic lane changing 120
Active Safety Brake with Collision Risk Alert and
Intelligent emergency braking assistance
124
Distraction detection 128
Active lane departure warning system 129
Long-distance blind spot monitoring 131
Parking sensors 132
Top Rear Vision 134
Top 360 Vision 135
Rear traffic alert 137
7Practical informationCompatibility of fuels 140
Refuelling 140
Rechargeable hybrid system 141
Charging the traction battery (Rechargeable
hybrid engine)
148
Towing device 150
Towing device with quickly detachable towball 151
Roof bars 154
Very cold climate screen 155
Snow chains 155
Energy economy mode 156
Bonnet 156
Engine compartment 158
Checking levels 158
Checks 159
Free-wheeling 161
Advice on care and maintenance 162
8In the event of a breakdownWarning triangle 165
Tool kit 165
Temporary puncture repair kit 166
Spare wheel 169
Changing a bulb 171
Fuses 173
12
V battery
/ Accessory batteries 173
Towing the vehicle 178
9Technical dataEngine technical data and towed loads 181
Petrol engines 182
Rechargeable hybrid engine 183
Dimensions 184
Identification markings 184
10 MYCITROËN DRIVE PLUS - MYCITROËN PLAY PLUS
First steps 185
Customisation 188
Steering mounted controls 189
Applications 190
Voice commands 190
Navigation 191
Connectivity 192
Mirror Screen 194
Media 195
Phone 197
Settings 198
Help 199
11Event data recorders
■
Alphabetical index
■
Appendix
Page 32 of 228

30
Access
The CITROËN dealer will be able to retrieve the
key code and the transponder code, enabling a
new key to be ordered.
Complete unlocking/locking
of the vehicle with the key
Use this procedure in the following situations:
– Remote control battery discharged.
–
Remote control malfunction.
–
V
ehicle battery discharged.
–
V
ehicle in an area subject to strong
electromagnetic interference.
In the first case, change the remote control
battery.
In the second case, reinitialise
the remote
control.
Refer to the corresponding sections.
► Insert the key in the notch of the lock cover
and remove the lock cover .
►
Insert the key in the door lock.
►
T
urn the key towards the front or the rear to
unlock and lock the vehicle.
If the vehicle is fitted with an alarm, it will
not be activated when locking with the
key.
If the alarm is activated, the siren sounds
when the door is opened; switch on the
ignition to stop it.
Central locking not
functioning
Use these procedures in the following cases:
– Central locking malfunction.
–
Battery disconnected or discharged.
In the event of a malfunction of the
central locking system, the battery must
be disconnected to ensure that the vehicle is
locked fully.
Front left-hand door
► Insert the key in the lock and turn it to lock
the door .
Other doors
Unlocking
► Pull the interior door opening control.
Locking
► Open the doors.
► For the rear doors, check that the child lock
is not on.
Refer to the corresponding section.
►
Gently insert the key into the latch located in
the door lock, then turn the latch an eighth of a
turn towards the outside of the door
.
►
Close the doors and check from the outside
that the vehicle is locked.
Changing the battery
A message is displayed on the instrument panel
when the battery needs changing.
Page 35 of 228
33
Access
2To avoid the risk of injury through pinching or trapping, before and during
operation of the motorised tailgate:
–
ensure that there is no-one close to the
rear of the vehicle.
–
monitor the activity of the rear passengers,
particularly any children.
Bicycle carrier/Towing device
The motorised tailgate is not designed to support
a bicycle carrier.
When installing a bicycle carrier on the towing
device with connection of the cable to the trailer
socket, the motorised operation of the tailgate
will be automatically deactivated.
If using a towing device or bicycle carrier
not recommended by CITROËN, it is
essential to deactivate the motorised
operation of the tailgate.
Motorised operation
The motorised operation of the tailgate is configured in the Settings
> Vehicle
touch screen application.
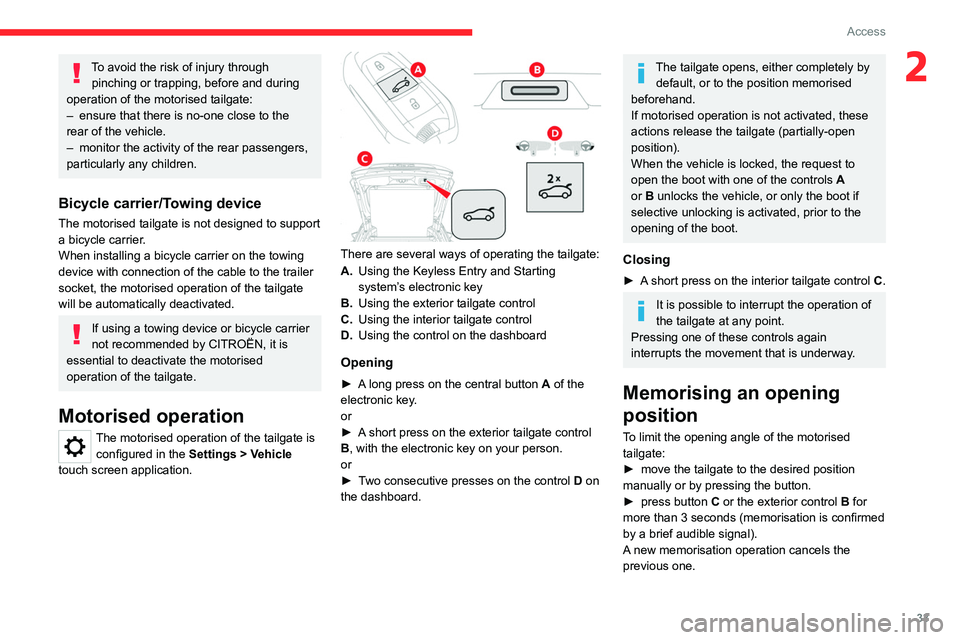
There are several ways of operating the tailgate:
A. Using the Keyless Entry and Starting
system’s electronic key
B. Using the exterior tailgate control
C. Using the interior tailgate control
D. Using the control on the dashboard
Opening
► A long press on the central button A of the
electronic key.
or
►
A
short press on the exterior tailgate control
B, with the electronic key on your person.
or
►
T
wo consecutive presses on the control D on
the dashboard.
The tailgate opens, either completely by default, or to the position memorised
beforehand.
If motorised operation is not activated, these
actions release the tailgate (partially-open
position).
When the vehicle is locked, the request to
open the boot with one of the controls A
or B unlocks the vehicle, or only the boot if
selective unlocking is activated, prior to the
opening of the boot.
Closing
► A short press on the interior tailgate control C.
It is possible to interrupt the operation of
the tailgate at any point.
Pressing one of these controls again
interrupts the movement that is underway.
Memorising an opening
position
To limit the opening angle of the motorised
tailgate:
►
move the tailgate to the desired position
manually or by pressing the button.
►
press button
C or the exterior control B for
more than 3 seconds (memorisation is confirmed
by a brief audible signal).
A new memorisation operation cancels the
previous one.
Page 37 of 228
35
Access
2
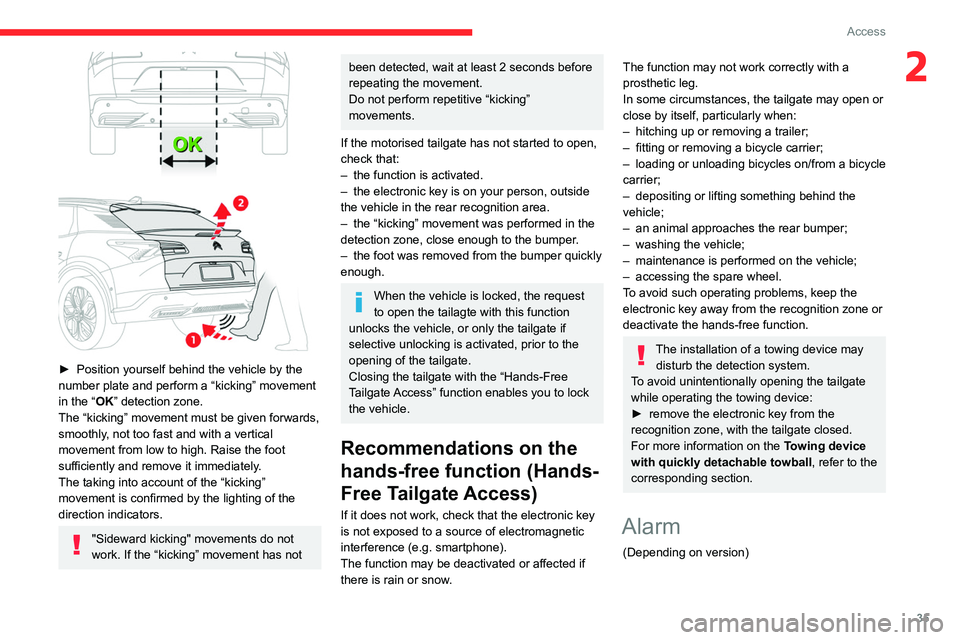
► Position yourself behind the vehicle by the
number plate and perform a “kicking” movement
in the “
OK” detection zone.
The “kicking” movement must be given forwards,
smoothly, not too fast and with a vertical
movement from low to high. Raise the foot
sufficiently and remove it immediately.
The taking into account of the “kicking”
movement is confirmed by the lighting of the
direction indicators.
"Sideward kicking" movements do not
work. If the “kicking” movement has not
been detected, wait at least 2 seconds before
repeating the movement.
Do not perform repetitive “kicking”
movements.
If the motorised tailgate has not started to open,
check that:
–
the function is activated.
–
the electronic key is on your person, outside
the vehicle in the rear recognition area.
–
the “kicking” movement was performed in the
detection zone, close enough to the bumper
.
–
the foot was removed from the bumper quickly
enough.
When the vehicle is locked, the request
to open the tailagte with this function
unlocks the vehicle, or only the tailgate if
selective unlocking is activated, prior to the
opening of the tailgate.
Closing the tailgate with the “Hands-Free
Tailgate Access” function enables you to lock
the vehicle.
Recommendations on the
hands-free function (Hands-
Free Tailgate Access)
If it does not work, check that the electronic key
is not exposed to a source of electromagnetic
interference (e.g. smartphone).
The function may be deactivated or affected if
there is rain or snow.
The function may not work correctly with a
prosthetic leg.
In some circumstances, the tailgate may open or
close by itself, particularly when:
–
hitching up or removing a trailer;
–
fitting or removing a bicycle carrier;
–
loading
or unloading bicycles on/from a bicycle
carrier;
–
depositing or lifting something behind the
vehicle;
–
an animal approaches the rear bumper;
–
washing the vehicle;
–
maintenance is performed on the vehicle;
–
accessing the spare wheel.
T
o avoid such operating problems, keep the
electronic key away from the recognition zone or
deactivate the hands-free function.
The installation of a towing device may disturb the detection system.
To avoid unintentionally opening the tailgate
while operating the towing device:
►
remove the electronic key from the
recognition zone, with the tailgate closed.
For more information on the T
owing device
with quickly detachable towball , refer to the
corresponding section.
Alarm
(Depending on version)
Page 41 of 228
39
Access
2Do not put your head or arms through the
open windows while the vehicle is moving -
risk of serious injury!
Sunroof
The sunroof consists of a movable glass panel
that slides over the roof and a blind that can
be opened independently. Opening the sunroof
automatically opens the blind.
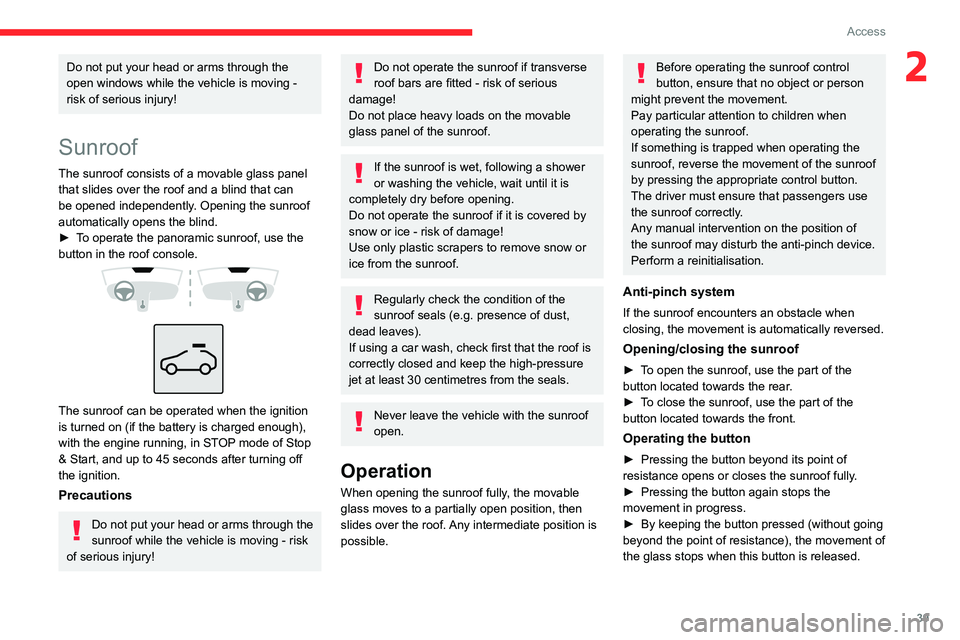
►
T
o operate the panoramic sunroof, use the
button in the roof console.
The sunroof can be operated when the ignition
is turned on (if the battery is charged enough),
with the engine running, in STOP mode of Stop
& Start, and up to 45 seconds after turning off
the ignition.
Precautions
Do not put your head or arms through the
sunroof while the vehicle is moving - risk
of serious injury!
Do not operate the sunroof if transverse
roof bars are fitted - risk of serious
damage!
Do not place heavy loads on the movable
glass panel of the sunroof.
If the sunroof is wet, following a shower
or washing the vehicle, wait until it is
completely dry before opening.
Do not operate the sunroof if it is covered by
snow or ice - risk of damage!
Use only plastic scrapers to remove snow or
ice from the sunroof.
Regularly check the condition of the
sunroof seals (e.g. presence of dust,
dead leaves).
If using a car wash, check first that the roof is
correctly closed and keep the high-pressure
jet at least 30 centimetres from the seals.
Never leave the vehicle with the sunroof
open.
Operation
When opening the sunroof fully, the movable
glass moves to a partially open position, then
slides over the roof. Any intermediate position is
possible.
Before operating the sunroof control
button, ensure that no object or person
might prevent the movement.
Pay particular attention to children when
operating the sunroof.
If something is trapped when operating the
sunroof, reverse the movement of the sunroof
by pressing the appropriate control button.
The driver must ensure that passengers use
the sunroof correctly.
Any manual intervention on the position of
the sunroof may disturb the anti-pinch device.
Perform a reinitialisation.
Anti-pinch system
If the sunroof encounters an obstacle when
closing, the movement is automatically reversed.
Opening/closing the sunroof
► To open the sunroof, use the part of the
button located towards the rear.
►
T
o close the sunroof, use the part of the
button located towards the front.
Operating the button
► Pressing the button beyond its point of
resistance opens or closes the sunroof fully .
►
Pressing the button again stops the
movement in progress.
►
By keeping the button pressed (without going
beyond the point of resistance), the movement of
the glass stops when this button is released.
Page 44 of 228

42
Ease of use and comfort
When driving
Maintain a good driving position and hold the
steering wheel with both hands at the 'quarter to
three' position, so that you can easily and quickly
reach the controls behind and near the steering
wheel.
Never adjust the seats or steering wheel
when driving.
Always keep your feet on the floor.
Front seats
Before moving the seat backwards,
ensure that there is no person or object
that might prevent the full travel of the seat.
There is a risk of trapping or pinching
passengers if present in the rear seats or of
jamming the seat if large objects are placed
on the floor behind the seat.
Front head restraints
Adjusting the height
Upwards:
► Pull the head restraint up to the desired
position; you can feel the head restraint clicking
into position.
Downwards:
►
Depending on equipment, press lug A
or
button B and then, while still pressing, lower the
head restraint.
The head restraint is correctly adjusted when its upper edge is level with the top
of the head.
Adjusting the angle
(Depending on equipment)
Forwards:
►
move the lower part of the head restraint
forwards.
Rearwards:
► press and hold button B and push the lower
part of the head restraint rearwards.
Removing a head restraint
► Pull the head restraint fully up.
► Depending on equipment, press lug(s) A
or C
to release the head restraint and raise it fully.
►
Stow the head restraint securely
.
Refitting a head restraint
► Insert the head restraint rods into the guides
in the corresponding seat backrest.
►
Push the head restraint fully down.
►
If the vehicle is so equipped, press lug(s) A
or C to release the head restraint and push it
down.
►
Adjust the height of the head restraint.
Never drive with the head restraints
removed; they should be in place and
adjusted for the occupant of the seat.
Manual adjustments
Longitudinal
Page 49 of 228

47
Ease of use and comfort
3Interior rear view mirror
Equipped with an anti-dazzle system, which
darkens the mirror glass and reduces the
nuisance to the driver caused by the sun,
headlamps of other vehicles, etc.
Manual model
Day/night position
► Pull the lever to change to the anti-dazzle
"night” position.
►
Push the lever to change to the normal "day"
position.
Adjustment
►
Set the mirror to the normal “day” position.
Automatic "electrochrome" model
The electrochrome system uses a sensor that
detects the level of exterior brightness and that
coming from the rear of the vehicle, in order to
automatically and gradually switch between day
and night usage.
To ensure optimum visibility while manoeuvring, the mirror automatically
brightens when reverse gear is engaged.
The system is deactivated if the load in the
boot exceeds the height of the load space
cover or if the load space cover has items
placed on it.
Rear bench seat
Bench seat with fixed cushions and split folding
backrests (2/3-1/3) to adapt the boot load space.
Rear head restraints
They have two positions:
– A high position , for when the seat is in use:
►
Pull the head restraint fully up.
–
A low position , for stowing, when the seat is
not in use: ►
Press the lug
A to release the head
restraint and push it down.
The rear head restraints can be removed.
Removing a head restraint
► Release the backrest using control 1 .
► T ilt the backrest slightly forwards.
►
Pull the head restraint fully up.
►
Press the lug
A to release the head restraint
and remove it completely.
Refitting a head restraint
► Insert the head restraint rods into the guides
in the corresponding backrest.
►
Push the head restraint fully down.
►
Press the lug
A to release the head restraint
and push it down.
Never drive with passengers seated at
the rear when the head restraints are
removed; the head restraints should be in
place and in the high position.
The head restraint for the centre seat
and those for the outer seats are not
interchangeable.
Folding the backrests
Manoeuvring the backrests should only
be done when the vehicle is stationary.
Page 50 of 228

48
Ease of use and comfort
First steps:
► Lower the head restraints.
►
If necessary
, move the front seats forward.
►
Check
that no person or object might interfere
with the folding of the backrests (e.g.
clothing,
luggage).
►
Check that the seat belts are free, not
engaged in the buckles. Release them so that
the backrest can be moved.
Folding from the passenger compartment
► Press the backrest release grip 1 .
► Guide the backrest 2 down to the horizontal
position.
When the backrest is released, the red
indicator in the release grip is visible.
Folding from the boot (depending on
version)
► Pull the backrest release lever 3 towards you.
The backrest 2 folds fully onto the cushion.
Repositioning the backrests
First check that the outer seat belts are
lying vertically flat alongside the backrest
latching rings.
► Put the backrest 2 in the upright position and
push it firmly to latch it home.
►
Check that the red indicator is no longer
visible in the release grip 1
.
►
Ensure that the outer seat belts were not
trapped during the operation.
Please note: an incorrectly latched
backrest compromises the safety of
passengers in the event of sudden braking or
an accident.
The contents of the boot may be thrown
forwards - risk of serious injury!
Courtesy buttons
These buttons are used to move the passenger
seat forward from the rear bench seat or to
adjust the angle of the backrest.
► Press the front or rear of the button 1 to move
the passenger seat forwards or backwards until
the desired position.
Page 51 of 228
49
Ease of use and comfort
3► Press the button 2 and tilt the backrest
forwards or backwards to obtain the desired
angle.
Heating and Ventilation
Air intake
The air circulating in the passenger compartment
is filtered and originates either from the
exterior, via the grille located at the base of the
windscreen, or from the inside in air recirculation
mode.
Controls
The controls are accessible through the Climate touch screen application and are
also grouped on the centre console panel.
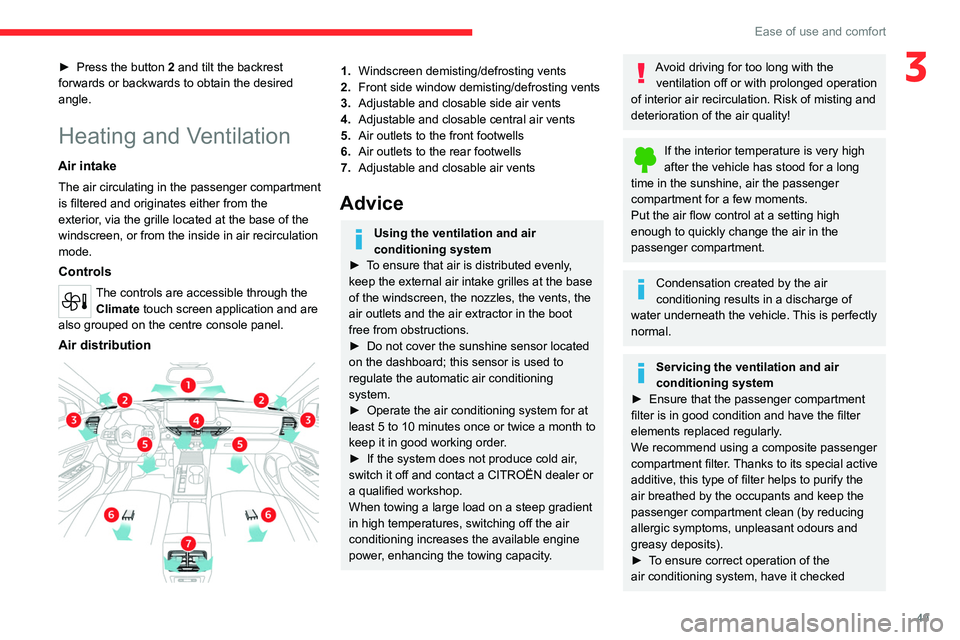
Air distribution
1. Windscreen demisting/defrosting vents
2. Front side window demisting/defrosting vents
3. Adjustable and closable side air vents
4. Adjustable and closable central air vents
5. Air outlets to the front footwells
6. Air outlets to the rear footwells
7. Adjustable and closable air vents
Advice
Using the ventilation and air
conditioning system
►
T
o ensure that air is distributed evenly,
keep the external air intake grilles at the base
of the windscreen, the nozzles, the vents, the
air outlets and the air extractor in the boot
free from obstructions.
►
Do not cover the sunshine sensor located
on the dashboard; this sensor is used to
regulate the automatic air conditioning
system.
►
Operate the air conditioning system for at
least 5 to 10 minutes once or twice a month to
keep it in good working order
.
►
If the system does not produce cold air
,
switch it off and contact a CITROËN dealer or
a qualified workshop.
When towing a large load on a steep gradient
in high temperatures, switching off the air
conditioning increases the available engine
power, enhancing the towing capacity.
Avoid driving for too long with the ventilation off or with prolonged operation
of interior air recirculation. Risk of misting and
deterioration of the air quality!
If the interior temperature is very high
after the vehicle has stood for a long
time in the sunshine, air the passenger
compartment for a few moments.
Put the air flow control at a setting high
enough to quickly change the air in the
passenger compartment.
Condensation created by the air
conditioning results in a discharge of
water underneath the vehicle. This is perfectly
normal.
Servicing the ventilation and air
conditioning system
►
Ensure that the passenger compartment
filter is in good condition and have the filter
elements replaced regularly
.
We recommend using a composite passenger
compartment filter. Thanks to its special active
additive, this type of filter helps to purify the
air breathed by the occupants and keep the
passenger compartment clean (by reducing
allergic symptoms, unpleasant odours and
greasy deposits).
►
T
o ensure correct operation of the
air conditioning system, have it checked
Page 54 of 228

52
Ease of use and comfort
If the air quality appears to be reduced, consult
a CITROËN dealer or a qualified workshop to
change the passenger compartment filter.
Air conditioning on / off
The air conditioning is designed to operate
effectively in all seasons, with the windows
closed.
It lowers the temperature in summer.
It increase the effectiveness of the demisting, in
winter, above 3°C.
►
Press knob
1 to switch the air conditioning
on/off.
When the system is activated, the indicator lamp
of the button comes on.
Air conditioning does not operate when the air flow is deactivated.
To obtain cool air more quickly, enable interior
air recirculation for a a brief period. Then
return to the intake of exterior air.
Switching off air conditioning may result in
some discomfort (humidity, misting).
Maximum air conditioning
This function automatically adjusts the
temperature setting to the lowest possible, the
air distribution towards the central and side air
vents, the air flow to maximum and activates
interior air recirculation.
► Press knob 2 to activate/deactivate the
function (the indicator lamp will come on/switch
off).
Once the function is deactivated, the system
returns to the previous settings.
Interior air recirculation
The intake of exterior air prevents the formation
of mist on the windscreen and side windows.
Recirculating the interior air isolates the
passenger compartment from outside odours
and fumes and allows the desired passenger
compartment temperature to be achieved more
rapidly.
► Press this button to activate/deactivate
the function (confirmed by the
illumination/extinction of the indicator lamp).
This function is activated automatically when reverse gear is engaged.
Front demisting
- defrosting
This mode allows the windscreen and side windows to be demisted or defrosted as quickly
as possible.
► Press this button to activate/deactivate
the mode (confirmed by the illumination/
extinction of the indicator lamp).
It automatically manages the air conditioning
(depending on version), air flow and air intake,
and provides optimum distribution towards the
windscreen and side windows.
It is possible to manually change the air flow
without deactivating the mode.
With Stop & Start, when demisting has
been activated, STOP mode is not
available.
In wintry conditions, before moving off,
remove all snow or ice on the windscreen
near the camera.
Otherwise, the operation of the equipment
using the camera may be affected.
Rear screen demisting/
defrosting
This demisting/defrosting only works with the engine running.
It also demists/defrosts the doors mirrors.
► Press this button to activate/deactivate
the function (confirmed by the
illumination/extinction of the indicator lamp).
The function can be activated whatever the outside temperature may be.
The period of operation depends on the outside
temperature.