CITROEN C6 DAG 2012 Handbook (in English)
Manufacturer: CITROEN, Model Year: 2012, Model line: C6 DAG, Model: CITROEN C6 DAG 2012Pages: 216, PDF Size: 10.27 MB
Page 51 of 216

49
II
TRIP COMPUTER
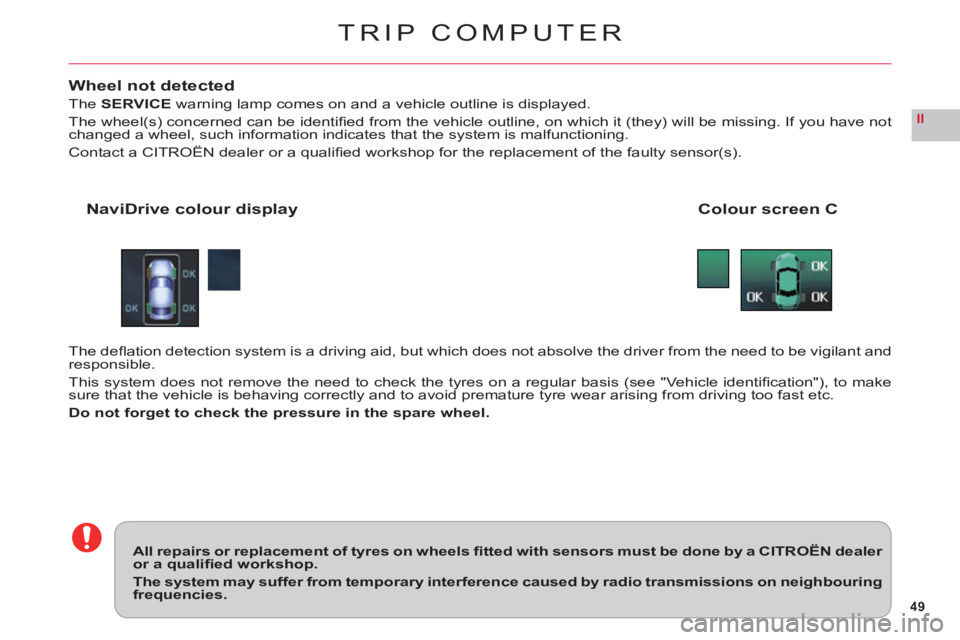
Wheel not detected
TheSERVICEwarning lamp comes on and a vehicle outline is displayed.
The wheel(s) concerned can be identifi ed from the vehicle outline, on which it (they) will be missing. If you have notchanged a wheel, such information indicates that the system is malfunctioning.
Contact a CITROËN dealer or a qualifi ed workshop for the replacement of the faulty sensor(s).
Colour screen CNaviDrive colour display
The defl ation detection system is a driving aid, but which does not absolve the driver from the need to be vigilant andresponsible.
This system does not remove the need to check the tyres on a regular basis (see "Vehicle identifi cation"), to makesure that the vehicle is behaving correctly and to avoid premature tyre wear arising from driving too fast etc.
Do not forget to check the pressure in the spare wheel.
All repairs or replacement of tyres on wheels fi tted with sensors must be done by a CITROËN dealer or a qualifi ed workshop.
The system may suffer from temporary interference caused by radio transmissions on neighbouringfrequencies.
Page 52 of 216

50
II
SIGNALLING
DIRECTION INDICATORS
Left, downwards.
Right, upwards.
For a change of direction, move
the control stalk beyond the tightspot. Stops automatically with thereturn of the steering wheel.
Visible alert/headlamp fl ash
Pull the control towards you.
The headlam
p fl ash can be madeeven with the ignition switched off.
Horn
Press at the centre of the steeringwheel.
HAZARD WARNING LAMPS
This operates all the direction indi-cators simultaneously.
Only use them to indicate dan-ger, for an emergency stop or for
driving in abnormal conditions.
The hazard lamps can also be
used with the ignition switched off.
SOUND SIGNAL FOR HEAD-LAMPS LEFT ON
This operates when the driver's
door is opened, ignition off, to indi-cate that the vehicle lamps are stillon.
It stops when you close the door,
switch off the lamps or switch on
the ignition.
This signal does not operate i
f the
automatic lighting of headlamps
or the guide-me-home lighting areactive.
EMERGENCY OPERATION OFHAZARD WARNING LAMPS
A sudden deceleration of the vehi-cle causes the hazard lamps tocome on automatically.
The
y will cease to operate auto-matically, or manually if you press
the hazard lamps button on the
dashboard.
The direction indicators cannot operate if the hazard warninglamps are on.
Page 53 of 216

51
II
A
SIGNALLING
LIGHTING CONTROL STALK
All vehicle lamps off
Sidelam
ps on
Dipped beams/main beams on
Rotate the ring Aforwards.
Rotate the ring Aforwards.
AUTOMATIC LIGHTING OF
HEADLAMPS
Sidelamps and dipped beams come on automatically in poor
ambient light, or if the wipers are in continuous operation. They go out
as soon as the ambient light again
become suffi cient or when the wip-ers cease to operate.
Activation
/deactivation of this func-
tion is possible in the menu "Per-
sonalisation/Confi guration" in the "Main menu".
Note: Activation of this function is immediate while deactivation requires the ignition to be switched off.
In fo
g or snow, the light sensor may detect enough light. The lights will therefore not come on automatically.Take care not to cover the bright-
ness sensor, which is visible from
outside the windscreen, behind the interior rear view mirror.
GUIDE-ME-HOME LIGHTING
This function switches on your headlamps, to light your way whenyou wish to walk from a carpark,for example.
Thi
s function is activated:Manually by pulling the con-
trol Atowards you, with the
ignition switched off.Automatically, provided:
The automatic lighting of headlamps is activated.To activate the guide-me-
home lighting function, select
in the "Main menu", then
in "P
ersonalisation/Con-fi guration", the sub-menu for
lighting and signalling, thenactivate the function.
See "Multifunction displays".Note: It is possible to modify the dura-tion of the guide-me-home lighting (approx. 60, 30 or 15 seconds) in themenu "Personalisation/Confi guration".
•
•
-
-
Dipped beams/main beamsdipswitch
Pull the control stalk towards you
to change between dipped beamand main beam.
Page 54 of 216

52
II
C
SIGNALLING
Front foglamps on
Front fo
glamps and rear foglamps on
Rotate the ring Cforwards.
Switching off
First action rearwards, rear foglamps off.
Second action rearwards, front and rear foglamps off.Note:the foglamps should be used only in fog or in other conditions of poor
visibility.
FRONT AND REAR
FOGLAMPS (RING C)
Lighting
With dipped/main beams on:
Rotate the ring Cforwards.
DAYTIME-RUNNING LAMPS
These come on automatically when
the engine is running:If the function is activated in
the Main Menu. See "Multi-function displays".Provided the lighting controlstalk is on position0and all theheadlamps are off.
I
f the daytime-running lamps are
active, the sidelamps will also be
on (depending on country specifi -cation).
ï
ï
In foggy conditions, if the ambient light is not such that the headlamps come on automatically, it is up to the driver to switchon dipped beams, and/or foglamps, manually.
Page 55 of 216

53
II
FEATURES
With dipped beams or main beams, theDirectional headlampsfunction turns the headlamps in the direction theroad ahead is taking.
Your vision on bends is considerably enhanced.Note:An automatic correction of the beam height enables you not to dazzle other drivers.
XENON DUAL FUNCTION DIRECTIONAL
HEADLAMPS
Function activatedFunction deactivated
ACTIVATION/DEACTIVATION
Activated by default, this functioncan be activated/deactivated in
the "Main menu" on the multifunc-
tion screen. See "Multifunction dis-plays".
Theactivated/deactivated statusis retained when you switch off
the engine.Note:This function is not activewhen the vehicle is stationary,moving at very low speed, or inreverse gear.
Should there be a malfunction the "Dipped beams" warning lamp fl ashes. Have the system checkedby a CITROËN dealer or a qualifi ed workshop.pp
It is recommended to change both Xenon bulbs at the same time if there is a failure of one of them.
Page 56 of 216

54
II
WIPERS
CONTROL POSITIONS2: Rapid wipe.
1: Normal wipe.I:Intermittent wipe.
0: Off.
One press downwards:AUTO:Automatic wipe activated.
Single wipe.
•
•
Position I:The wipe speed adjusts automatically to the speed of the vehicle.
Positions 1 and 2: When the vehicle is stationary, the speed of the wipers
will reduce automatically.
For safet
y, the wiper system is deactivated when the ignition is
switched off.
When you switch the ignition on again, to reactivate the function:
Return to position 0, then go to the desiredposition.
Activation of the function is confi rmed by one sweep of the wipers.
Automatic wipe: To activate automatic wipe, place the control stalk on
position 0, then press it downwards. The wipe speed will adjust according to
the intensity of the rain.Note: One press downwards produces a single wipe, without deactivating automatic wipe.
Deactivation of automatic wipe:Go to position I, then return to position0.
Or stop the engine.
WARNING
Do not cover the rain detectorwhich is located behind the interior rear rview mirror and visible from outside the windscreen.
If washing the vehicle, with ignition on for example in an automatic car
wash, deactivate the wiper system.
•
•
For safety, the wiper system isdeactivated when the ignition isswitched off.
Page 57 of 216

55
II
WIPERS
CHANGING THE WIPER BLADES
If you have toreplace them, the wiper blades have to be parked in themaintenance position. For this, switch off theignition and then within one minute move the wiper control stalk. The wipers stand up in a vertical position.
After replacement, switch on the ignitionandmove the wiper control stalk so that the wipers resume their normalposition.Note:this action places the Piloted Defl ector in the maintenance position.
WINDSCREEN WASH
To operate the windscreen wash, pull the wiper stalk towards you.
The screen wash is accompanied by a timed wipe of the windscreen, the
headlamp wash also activates if the dipped beams are on.
The displa
y of a message indicates that there is only approx. one litre of
screen wash fl uid remaining.
In freezing conditions, always check that the wiper blades are free tooperate.
Remove any accumulation of snow at the base of the windscreen.
Page 58 of 216

56
II
A
WINDOWS
After a battery disconnection or if there has been a malfunction, you have to reinitialise the anti-
pinch function for each window:Lower the window fully usingthe control, then close. It willrise only a few centimetres.
Press repeatedly on the controluntil the window is fully closed.
Keep the control pressed for atleast a few seconds after the
window has fully closed.
WARNING
During this operation, the anti-
pinch protection does not work.
•
•
CHILD SAFETY
This deactivates the controls in therear of the vehicle, both for the rear
windows and for opening the rear doors from the inside.
For Pack Lounge seats, the seatslide adjustments, and those for
the front seats from the rear of thevehicle, are also deactivated.
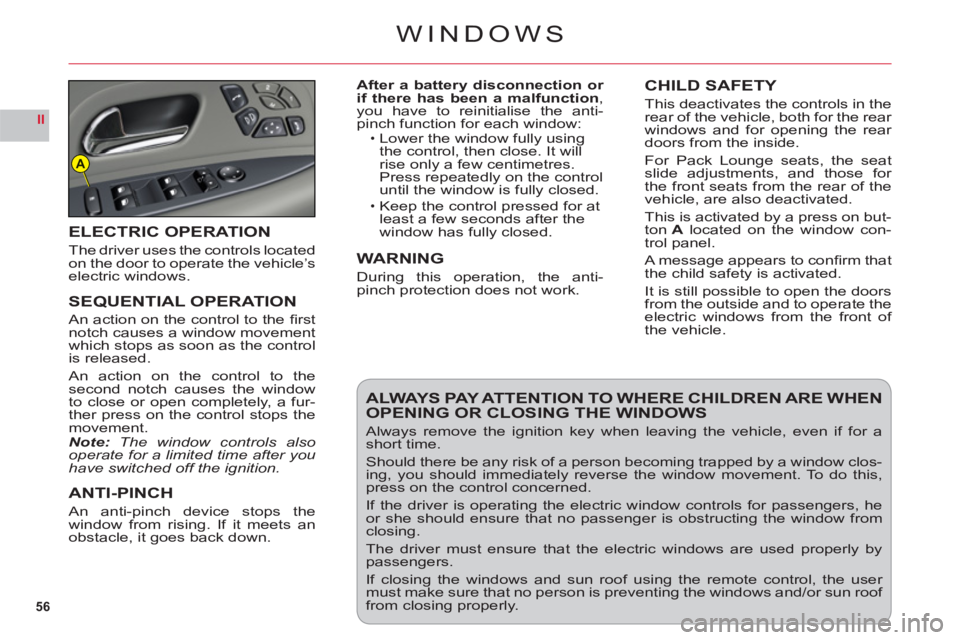
This is activated by a press on but-
tonA located on the window con-
trol panel.
A message appears to confi rm that
the child safety is activated.
It is still possible to open the doorsfrom the outside and to operate theelectric windows from the front of
the vehicle.
ELECTRIC OPERATION
The driver uses the controls locatedon the door to operate the vehicle’selectric windows.
SEQUENTIAL OPERATION
An action on the control to the fi rstnotch causes a window movement
which stops as soon as the control
is released.
An action on the control to thesecond notch causes the window
to close or open completely, a fur-
ther press on the control stops themovement.Note:The window controls alsooperate for a limited time after you have switched off the ignition.
ANTI-PINCH
An anti-pinch device stops the
window from rising. If it meets an
obstacle, it goes back down.
ALWAYS PAY ATTENTION TO WHERE CHILDREN ARE WHENOPENING OR CLOSING THE WINDOWS
Always remove the ignition key when leaving the vehicle, even if for ashort time.
Should there be any risk of a person becoming trapped by a window clos-ing, you should immediately reverse the window movement. To do this,press on the control concerned.
If the driver is operating the electric window controls for passengers, heor she should ensure that no passenger is obstructing the window fromclosing.
The driver must ensure that the electric windows are used properly bypassengers.
If closing the windows and sun roof using the remote control, the user must make sure that no person is preventing the windows and/or sun roof from closing properly.
Page 59 of 216

57
II
STEERING COLUMN ADJUSTMENT –
SEAT BELT HEIGHT ADJUSTMENT
MANUAL ADJUSTMENT
OF THE STEERING WHEEL
FOR HEIGHT AND REAC
H
While the vehicle is stationary,unlock the steering wheel by push-
ing the lever forward.
Adjust the height and the reach
of the steering wheel, then lock
the position by pulling the lever upwards.
ELECTRICAL ADJUSTMENT
OF THE STEERING WHEEL
FOR HEIGHT OR REAC
H
While the vehicle is stationary,
adjust the height or the reach of
the steering wheel by moving the control:forward or rearward to adjust
the reach
up or down to adjust the
height.
The steering wheel adjustment is
memorised with the driving posi-
tion (See "Memorisation").
•
•
SEAT BELT HEIGHT
ADJUSTMENT
Thecorrect positioningof the beltstrap is through the middle of the
shoulder. See "Seat belts".
To a d
just the seat belt for height,compress the control andslideitin the desired direction.
As a matter of safety, the adjustments in your driving position must be made only while the vehicle is stationary.
First adjust your seat to the most suitable position, then adjust the position of the steering wheel. See "Memorisation".
THE WELCOME FUNCTION
As the driver’s door is opened
and with the ignition switched off,
the steering wheel moves in order
to
facilitate entering or exiting the
vehicle.
Yo u can activate or deactivate thisfunction by going to the "Personali-sation-Confi guration" menu of themultifunction screen.
Page 60 of 216

58
II
1
3
2
FRONT SEATS
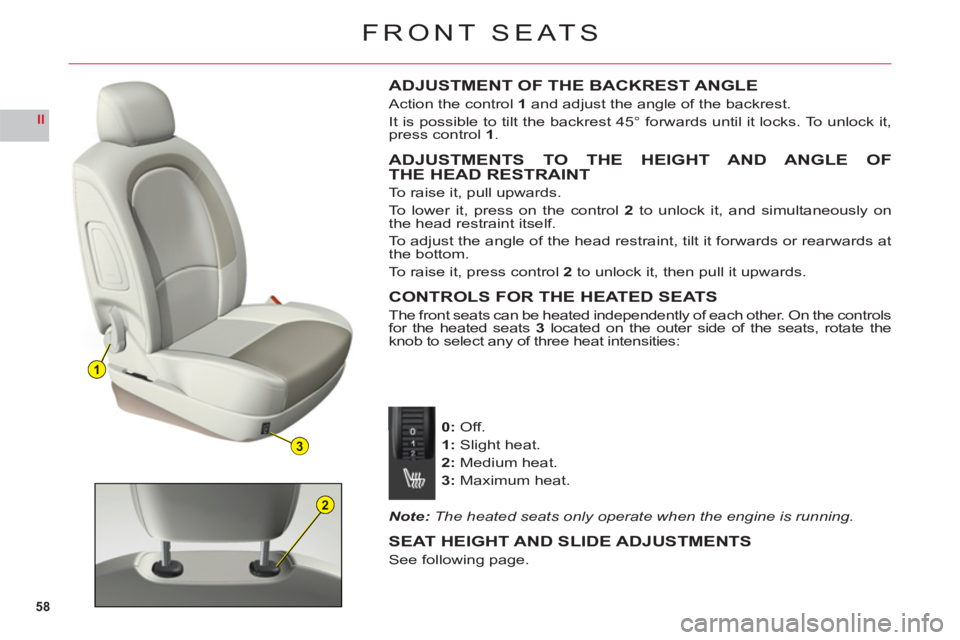
ADJUSTMENT OF THE BACKREST ANGLE
Action the control 1 and adjust the angle of the backrest.
It is possible to tilt the backrest 45° forwards until it locks. To unlock it,
press control1.
ADJUSTMENTS TO THE HEIGHT AND ANGLE OFTHE HEAD RESTRAINT
To raise it, pull upwards.
To lower it, press on the control 2 to unlock it, and simultaneously on
the head restraint itself.
To a d
just the angle of the head restraint, tilt it forwards or rearwards at
the bottom.
To raise it,
press control 2 to unlock it, then pull it upwards.
CONTROLS FOR THE HEATED SEATS
The front seats can be heated independently of each other. On the controlsfor the heated seats3located on the outer side of the seats, rotate the
knob to select any of three heat intensities:
0:Off.
1:Slight heat.
2:Medium heat.
3:Maximum heat.
Note: The heated seats only operate when the engine is running.
SEAT HEIGHT AND SLIDE ADJUSTMENTS
See following page.