steering Citroen CX 1985 1.G User Guide
[x] Cancel search | Manufacturer: CITROEN, Model Year: 1985, Model line: CX, Model: Citroen CX 1985 1.GPages: 394
Page 219 of 394
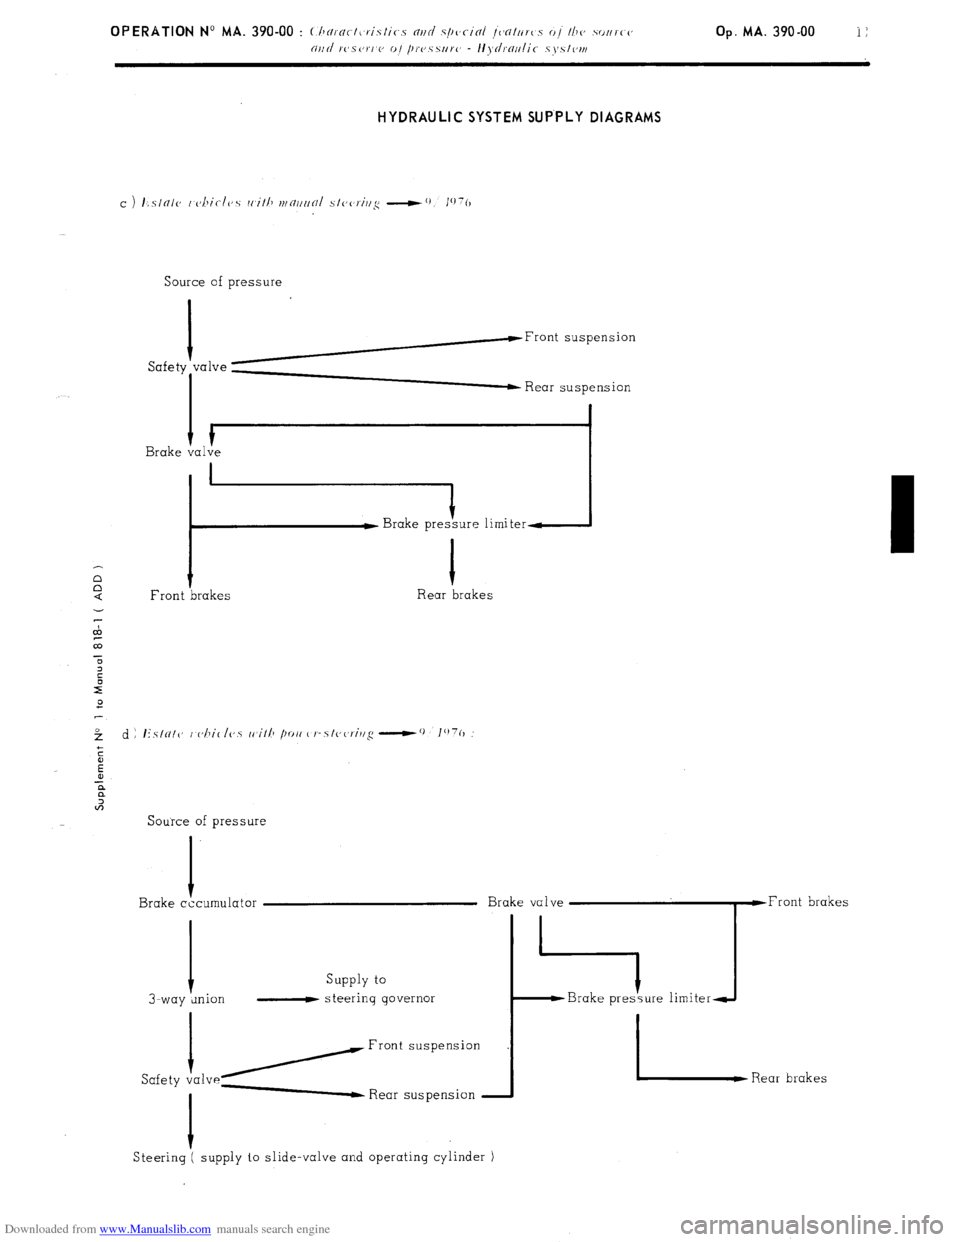
Downloaded from www.Manualslib.com manuals search engine HYDRAULIC SYSTEM SUP.PLY DIAGRAMS
Source of pressure
I
h-Front suspension
Safety “‘lve ; Rear suspension
I
I Brake valve
i :ure limiter-
1
Front brakes Rear brakes
Source of pressure
I
Brake cccumulator
Supply to
I-way wion - steering governor
/Front
Safety va1ve- Rear suspension
I
Steering ( supply to slide-valve and operating cylinder )
Page 220 of 394
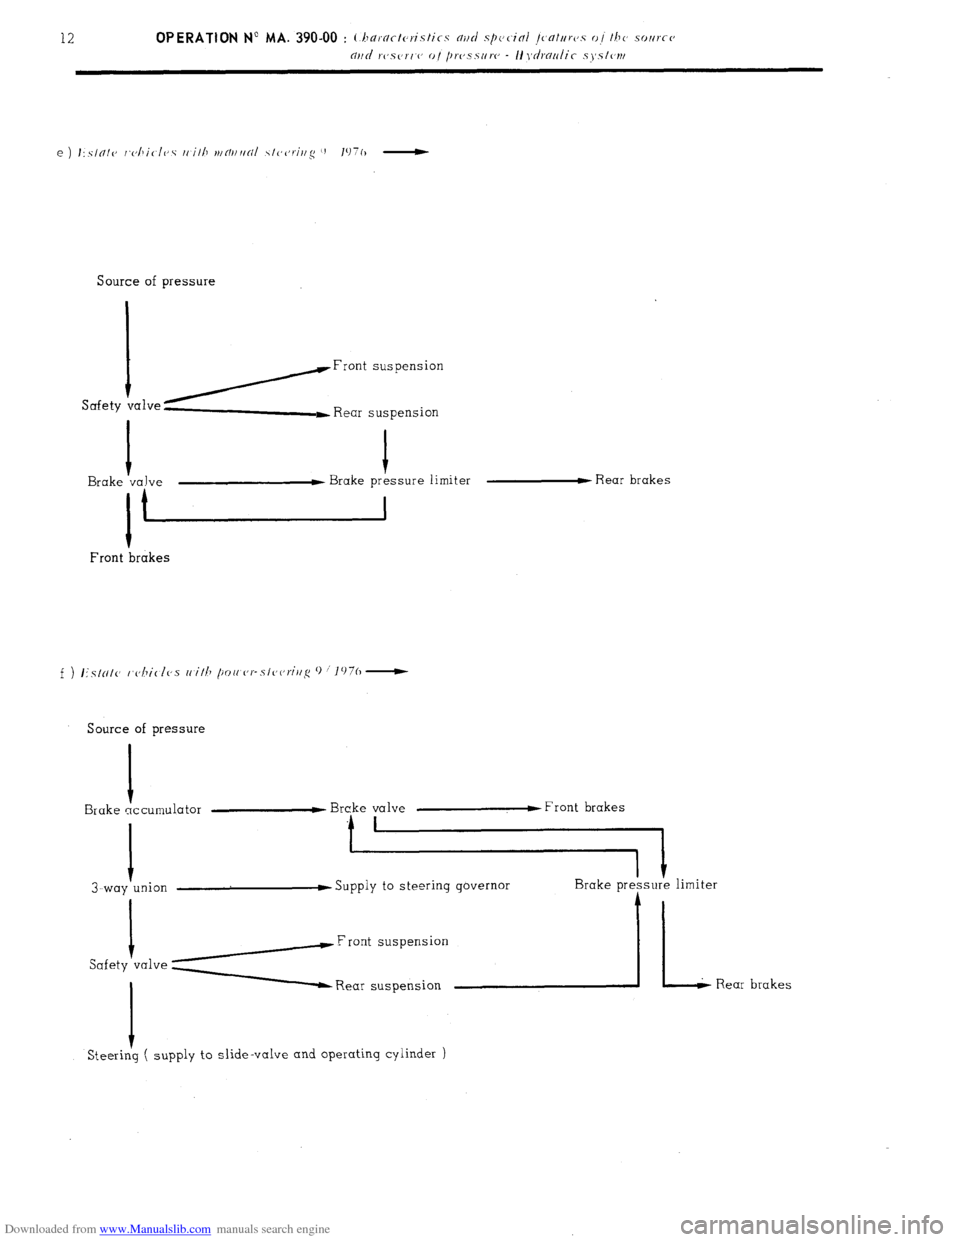
Downloaded from www.Manualslib.com manuals search engine Source of pressure
Safety ialveYFront suspension
t
L Rear suspension
I I
Brake valve w Brake pressure limiter w Rear brakes
I t
Front ‘brakes
Source of pressure
I
Brake accumulator
I
3-way union F Brake valve w Front brakes
Supply to steering governor
Safety I
va1ve y Rear suspension
I
Steering ( supply to slide-valve and operating cylinder )
Page 237 of 394
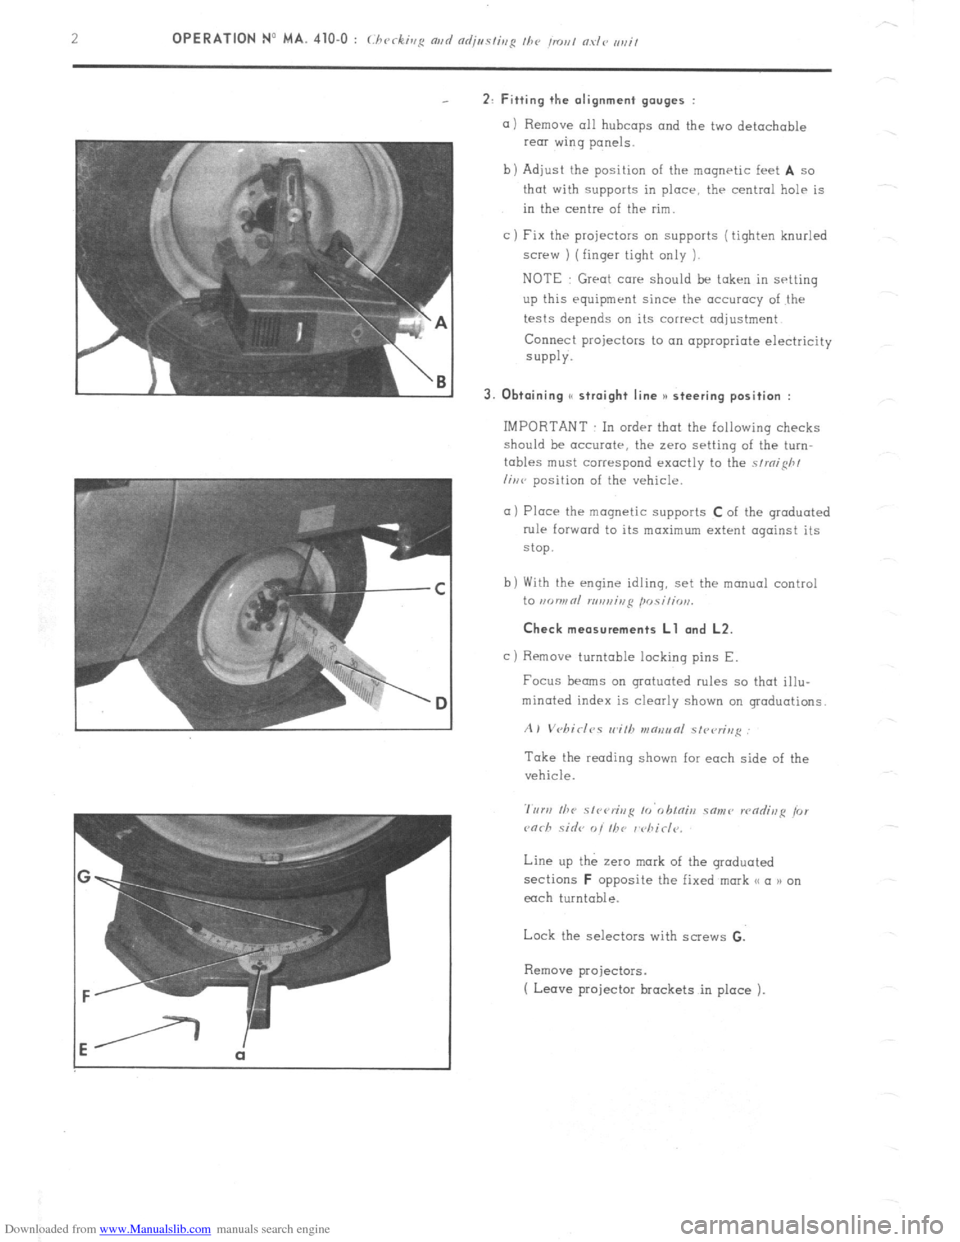
Downloaded from www.Manualslib.com manuals search engine 2: Fitting the alignment gauges :
a) Remove all hubcaps and the two detachable
rear wing panels.
b) Adjust the position of the magnetic feet
A so
that with supports in place, thr central help is
in the centre of the rim.
c ) Fix the projectors on supports ( tighten knurled
screw ) (finger tight only 1.
NOTE Great care should be taken in setting
up this equipment since the accuracy of the
tests depends on its correct adjustment
Connect projectors to on appropriate electricity
SUPPlY.
3. Obtaining S( straight line )I steering position :
IMPORTANT In order that the following checks
should be accurate, the zero setting of the turn-
tables must correspond exactly to the strnifih/
liwv position of the vehicle.
a) Place the magnetic supports C of the graduated
rule forward to its maximum extent against its
stop.
b) With the engine idling, set the manual control
to ,KJWRl n,n,,ir,ji posili, ,,,.
Check measurements Ll and L2.
c)
Removr turntable locking pins E.
Focus beams on grotuoted rules so that illu-
minated index is clearly shown on graduations.
A) Vebirlc,s wilh v~aeunl slvvrin,~
Take the reading shown for each side of the
vehicle.
Line up the zero mark of the graduated
sections
F opposite the fixed mark << a n on
each turntable.
Lock the selectors with screws G.
Remove projectors.
( Leave projector brackets in place ).
Page 238 of 394
Downloaded from www.Manualslib.com manuals search engine Op. MA. 410.0 3
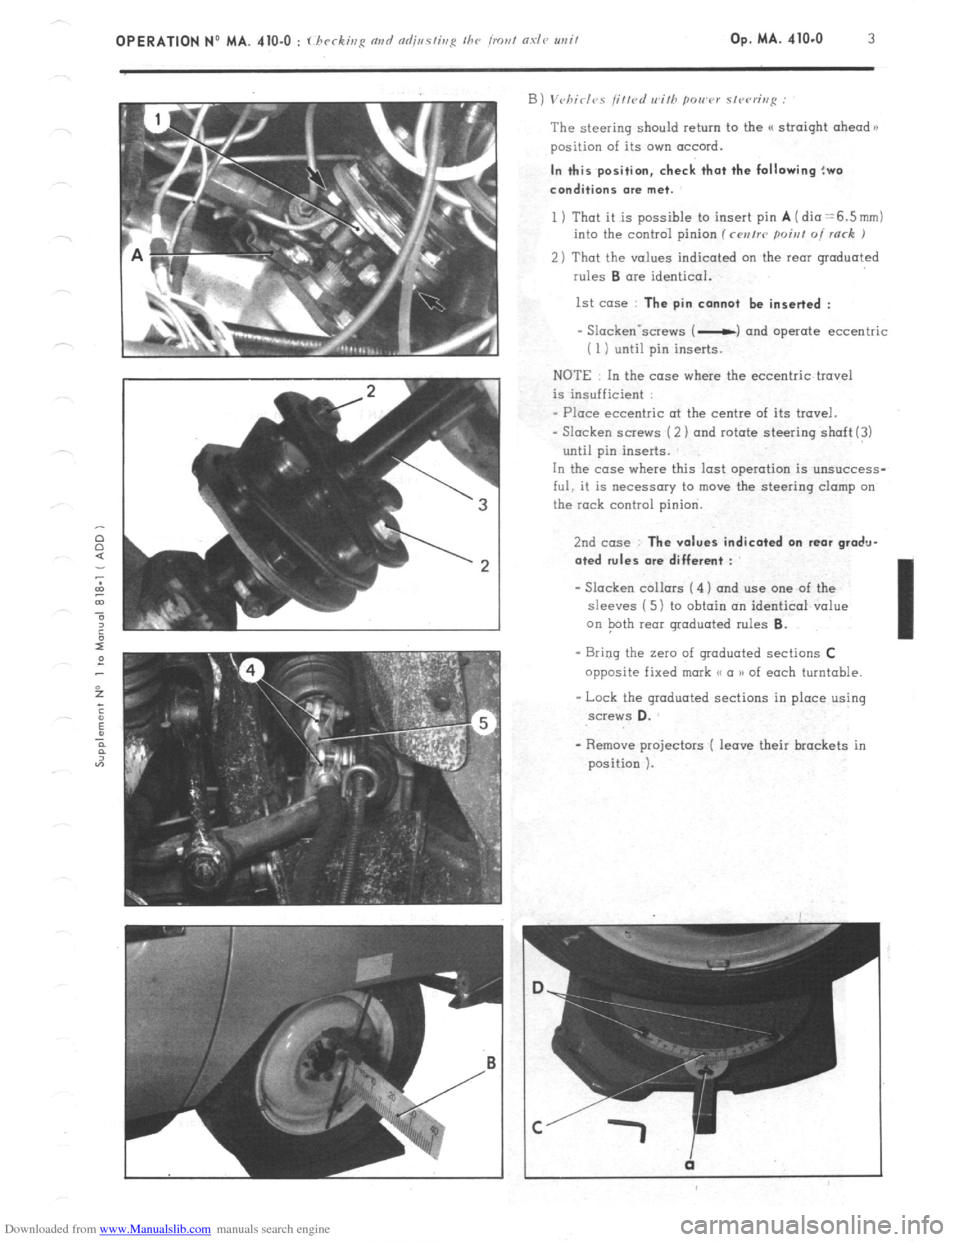
The steering should return to the (( straight ahead n
position of its own accord. In this position, check that the following !wo
conditions me met.
1 ) That it is possible to insert pin A (dia =6.5mm)
into the control pinion (rwrrr poiat oi rack J
2) That the values indicated on the rear graduated
rules B ore identical.
1st case : The pin cannot be inserted :
- Slackenvscrews ( -c) and operate eccentric
i 1 i until pin inserts.
NOTE In the case where the eccentric travel
is insufficient :
- Place eccentric ot the centre of its travel.
- Slacken screws (2 ) and rotate steering shaft(!)
until pin inserts.
In the case where this last operation is unsuccess-
ful, it is necessary to move the steering clamp on
the rock control pinion.
2nd case : The values indicated on rear gradu-
ated rules ore different :
- Slacken collars ( 4) and use one of the
sleeves ( 5 1 to obtain an identical value
on Path rear graduated rules 6.
- Bring the Z~IO of graduated sections C
opposite fixed mark <( a )I of each turntable.
- Lock the graduated sections in place using screws D.
Page 241 of 394
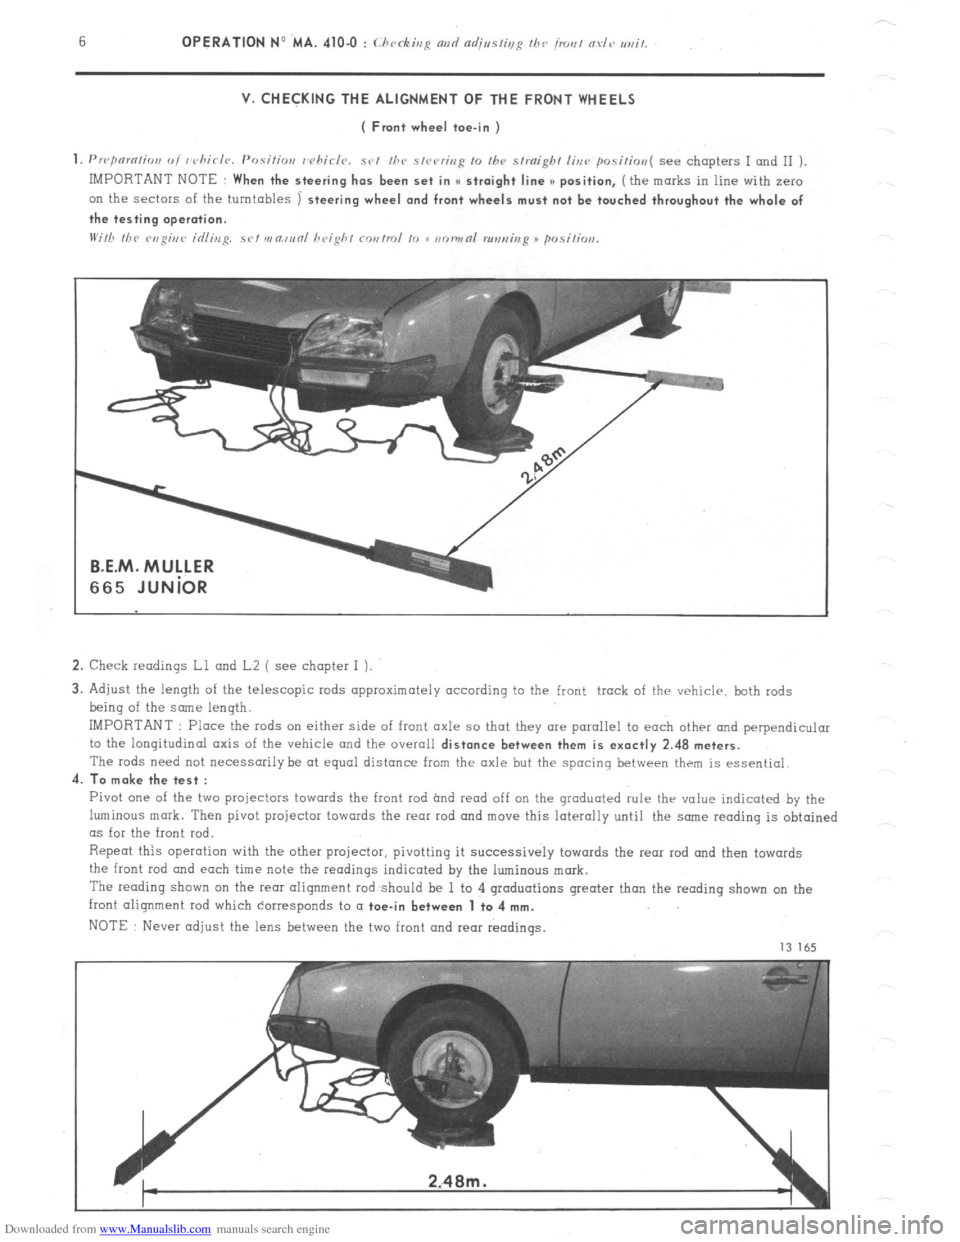
Downloaded from www.Manualslib.com manuals search engine V. CHECKING THE ALIGNMENT OF THE FRONT WHEELS
( Front wheel toe-in )
1. Prrpnmtion oi whirlr~. Positior,
whirls. set /he s,rering 10 Ihv straight line positim~( see chapters I and II )
IMPORTANT NOTE
When the steering has been set in I( straight line >) position, (the marks in line with zero
on the sectors of the turntables
1 steering wheel and front wheels must not be touched throughout the whole of
the testing operation.
2. Check readings Ll and L2 ( see chapter I ).
3. Adjust the length of the telescopic rods approximately according to the front track of the vehicle, both rods
being of the some length.
IMPORTANT : Place the rods on either side of front axle so that they are parallel to each other and perpendicular
to the longitudinal axis of the vehicle and the overall
distance between them is exactly 2.48 meters.
The rods need not necessarily be at equal distance from the axle but the spacing between them is essential.
4.
To make the test :
Pivot one of the two projectors towards the front rod hnd read off on the graduated rule thr value indicated by the
luminous mark. Then pivot projector towards the rear rod and move this laterally until the snne reading is obtained
as for the front rod.
Repeat this operation with the other projector, pivotting it successively towards the rear rod and then towards
the front
rod and each time note the readings indicated by the luminous mark.
The reading shown on the rem alignment rod should be 1 to 4 graduations greater than the reading shown on the
front alignment rod which corresponds to a
toe-in between 1 to 4 mm.
NOTE Never adjust the lens between the two front and rear readings.
13 165
Page 243 of 394
Downloaded from www.Manualslib.com manuals search engine a OPERATION N’ MA. 410-O : (./~rrkiq N,,I/
VI. CHECKING AND ADJUSTING THE STEERING GEOMETRY
The crossmember supporting the steering has slots at its fixing point on the front subframe.
Any vertical movement of this crossmember alters the steering geometry.
WARNING
This operation is only to
be carried out in certain ccxses such as
-accidental impact, with repercussions on the steering system.
-work on the vehicle entoiling removal of steering crossmember.
- vehicle with poor
road stability ( p oar stright-line stability) 01 with excessive tyre weor.
CHECKING
1, Prepare the vehicle. as for checking front wheel
alignment ( Srr ~ho/,lvr
V I.
NOTE
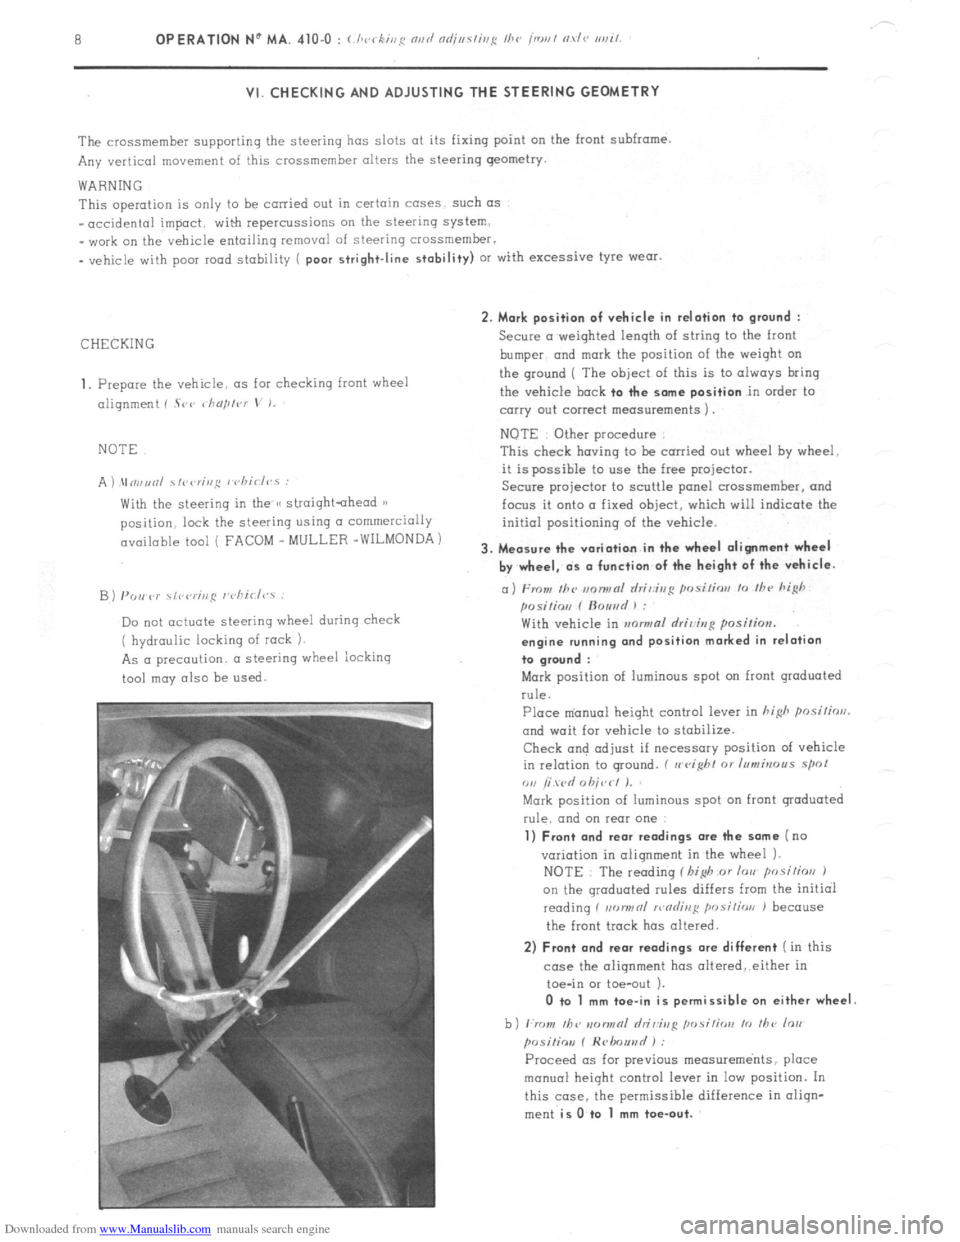
A ) \In,,unl ~fi~<,r;,,~ I chiclvs :
With the steering in the /< straightahead 1)
position. lock the steering using CI commercially
available tool ( FACOM _ MULLER -WILMONDA)
B) PO,, P)’ \,r,rr;ng r’cliirl<,.s :
Do not actuate steering wheel during check
( hydraulic locking of rock 1.
As a precaution. a steering wheel iocking
tool may also be
used. 2. Mark position of vehicle in relation to
ground :
Secure a weighted length of string to the front
bumper. and
mark the position of the weiqht on
the ground ( The
object of this is to always bring
the vehicle
bock to the some position in order to
carry out correct measurements 1.
NOTE Other procedure
This check having to be carried out wheel hy wheel.
it is possible to use the free projector.
Secure projector to scuttle panel crossmemher, and
focus it onto a fixed object, which will indicate the
initial positioning of the vehicle.
3. Measure the variation in the wheel alignment wheel
by wheel, ds o function of the height of the vehicle.
a) From Ihc m~nwnl rlri,:ir,g posi/ior, lo /hc hi@
posilio,, f ftouad 1 :
With vehicle in mwmal rlriving position.
engine running ond position marked in relation
to groond :
Mark position of luminous spot on front graduated
rule.
Place m’anual height control lever in hi&
posilirrrl.
and wait for vehicle to stabilize.
Check and adjust if necessary position of vehicle
in relation to ground. ( II
eight 01 Inmbrous spol
ou /i wd 0 hit,< I J.
Mark position of luminous spot on front graduated
rule. and on rear one
1) Front and rear readings ore the some (no
variation in alignment in the wheel 1.
NOTE : The reading f I,i$ or lorr posilios J
on the qroduated rules differs from the initial
reading f non,,nl >r,nrlinl:
position J because
the front track has altered.
2) Front and rear readings ore different ( in this
case the alignment has oltered,.either in
toe-in or toe-out ).
0 to 1 mm toe-in is permissible on either wheel
b) ,:rr ,,I, /bv IIDIINRI hi&g ,,osi,;orr lo ,I,<, lo,,
posiliov f Hrlmuad ) :
Proceed OS for previous measurements, place
manual height control lever in low position. In
this case. the permissible difference in oliqn-
ment
is O.to 1 mm toe-out.
Page 244 of 394
Downloaded from www.Manualslib.com manuals search engine OPERATION No MA. 4104 : (./ , k’ 1
ADJUSTMENT
NOTE The steering crossmember will have to be
moved (IS a function of the readings obtained during
checkinq
01) Towards the top to
obtain
_ toe-out ir, Ihe hish positim
- toe-in irr the 10~ psitios
b) Towards the bottom
to obtain
.
toe-in in Ihr hi& posilins
- toe-out iu fhc IOU posilios
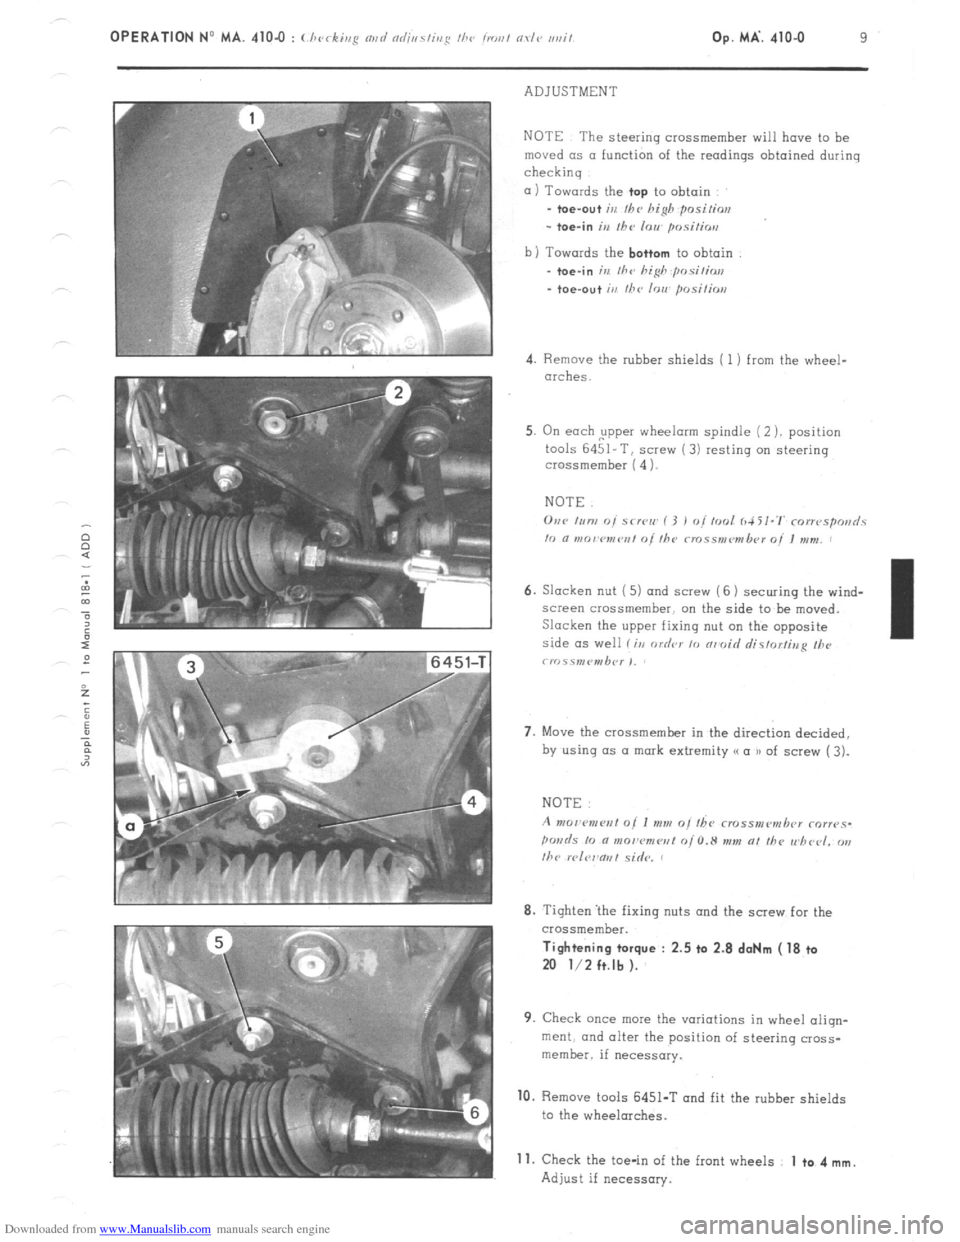
4. Remove the rubber shields ( 1 ) from the wheel-
arches.
5. On each ,upper wheelorm spindle (2 ). position
tools 6451-T, screw (3) resting on steering
crossmember ( 4 1.
NOTE.
6. Slacken nut ( 5) and screw (6 1 securing the wind-
screen crossmember. on the side to be moved.
Slacken the upper fixing nut on the opposite
side as well li,r order 10 nrmoid rlistorfina II><,
crr~.ss,nP”,b<~r ,,
7. Move the crossmember in the direct& decided,
by using (1s a mark extremity (( a u of screw ( 3).
8. Tighten ‘the fixing nuts and the screw for the
crossmember. Tightening torque : 2.5 ta 2.8 doNm ( 18 ta
20 l/2 ft.lb ).
9. Check once mew the variations in wheel aliqn-
merit. and alter the position of steering cross-
member. if necessary. 10.
Remove tools 6451-T and fit the rubber shields
to the wheelarches.
Adjust if necessary. 11.
Check the toe-in of the front wheels 1 to 4 mm.
Page 245 of 394
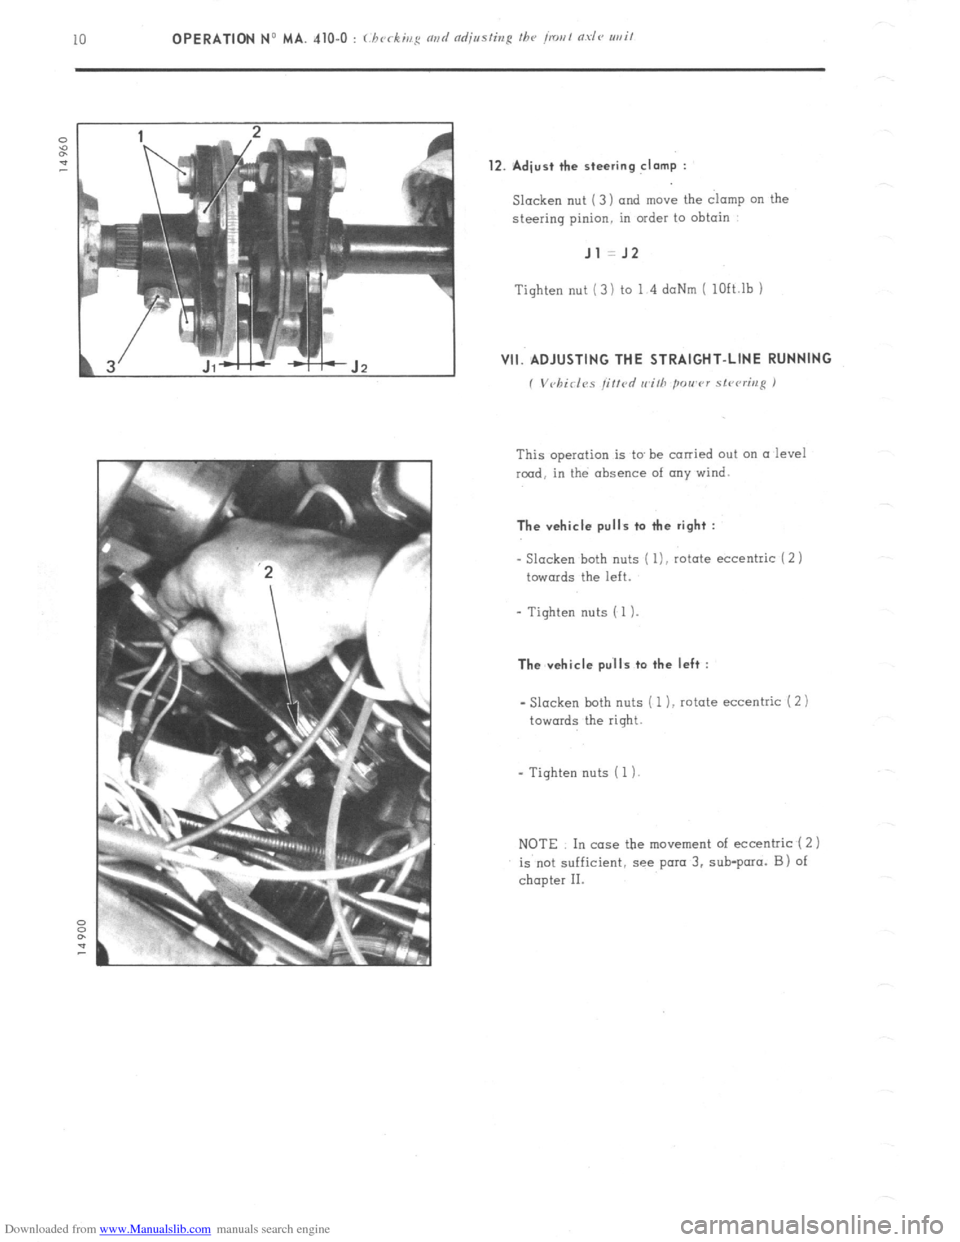
Downloaded from www.Manualslib.com manuals search engine 12. Adiust the steering clamp :
Slacken nut ( 3 ) and move the clamp on the
steering pinion. in order to obtain Jl =J2
Tighten nut (3) to 1 4 daNm ( lOft.lb 1 VII. ADJUSTING THE STRAIGHT-LINE RUNNING
( Vvhirlvs jirtd rr~ilh power stcvri1r.q )
This operation is to be
carried out on a level
rmd, in the absence of any wind. The vehicle pulls ta the right :
- Slacken
both nuts ( l), rotate eccentric ( 2 )
towards the left.
- Tighten nuts ( 1). The vehicle pu’lls to the left :
- Slacken both nuts ( 1 ), rotate eccentric i 2) towards
the right.
- Tighten nuts ( 1)
NOTE In case the movement of eccentric ( 2 1
is not sufficient, see para 3. sub-para. B) of
chapter II.
Page 260 of 394

Downloaded from www.Manualslib.com manuals search engine STEERING
OPERATION No MA. 440-00 : (Ihnrnctrristics nlld spcrt’nl ic;atrrrcds oi the sfvc~tir~g Op. MA. 440-00 1
Page 261 of 394
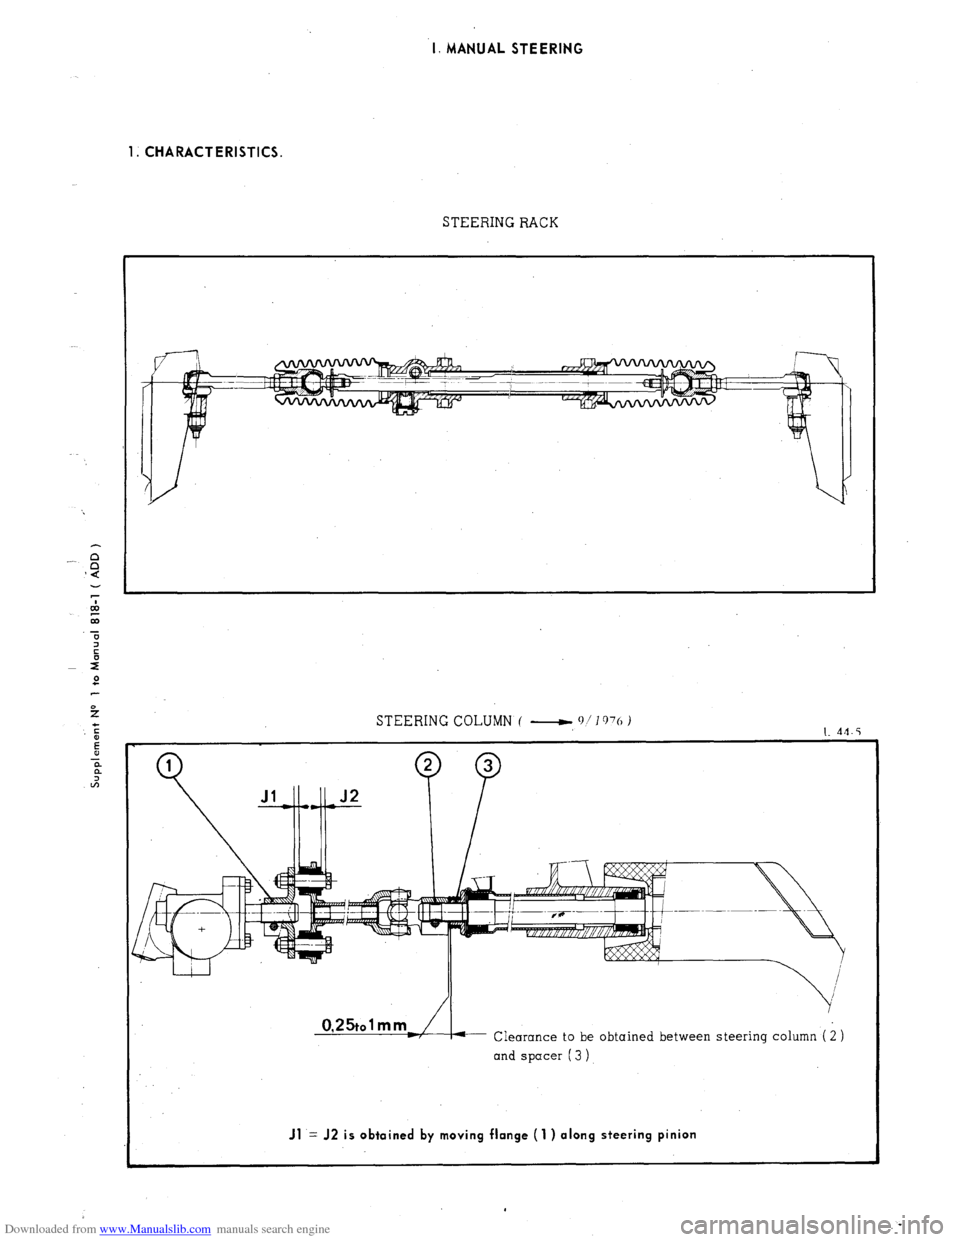
Downloaded from www.Manualslib.com manuals search engine I. MANUAL STEERING
1. CHARACTERISTICS.
STEERING RACK
STEERING COLUMN ( -,
q/1976 )
I. 44.5
Clearance to be obtained between steering column ( i )
and spacer (3 )
Jl = J2 is obtained by moving flange (1 ) along steering pinion