fuel CITROEN DISPATCH SPACETOURER 2018 Handbook (in English)
[x] Cancel search | Manufacturer: CITROEN, Model Year: 2018, Model line: DISPATCH SPACETOURER, Model: CITROEN DISPATCH SPACETOURER 2018Pages: 400, PDF Size: 16.99 MB
Page 66 of 400

64
Close the door manually for safety reasons.
Then reinitialise the door.
Reinitialising electric doors
If electrical operations no longer work,
the doors must be closed manually then
reinitialised:
F
F
ully close the door(s) manually.
F
F
ully open the door(s) manually.
F
C
lose the door(s) electrically.
On completion of this procedure, electric
operation of the doors is restored.
However, if a problem persists following this
procedure, contact a CITROËN dealer or a
qualified workshop.
Fuel filler flap
If your vehicle is equipped with one, do not
open the sliding left side door when the
fuel filler flap is open, other wise there is a
risk that the fuel filler flap and the sliding
door will be damaged and the person
filling up will be injured.
If the fuel filler flap is open and you open
the left side door, a mechanism prevents it
being opened.
The door can be opened half way
h o w eve r.
With a mechanical door, close the fuel
filler flap again to regain use of the door.
With an electrical door, in order to be able
to use it correctly, close the fuel filler flap
then press an opening button.
On a steep slope
It is possible to open and close doors
electrically on slopes of up to a 20% gradient.
However, if your vehicle is on a slope, with the
front of the vehicle facing up, open the door
with care. The door may open more quickly due
to the incline.
On a steep slope, guide the side door manually
to help it to close.
Access
Page 84 of 400

82
Additional adjustments
Adjusting the height of the
head restraint
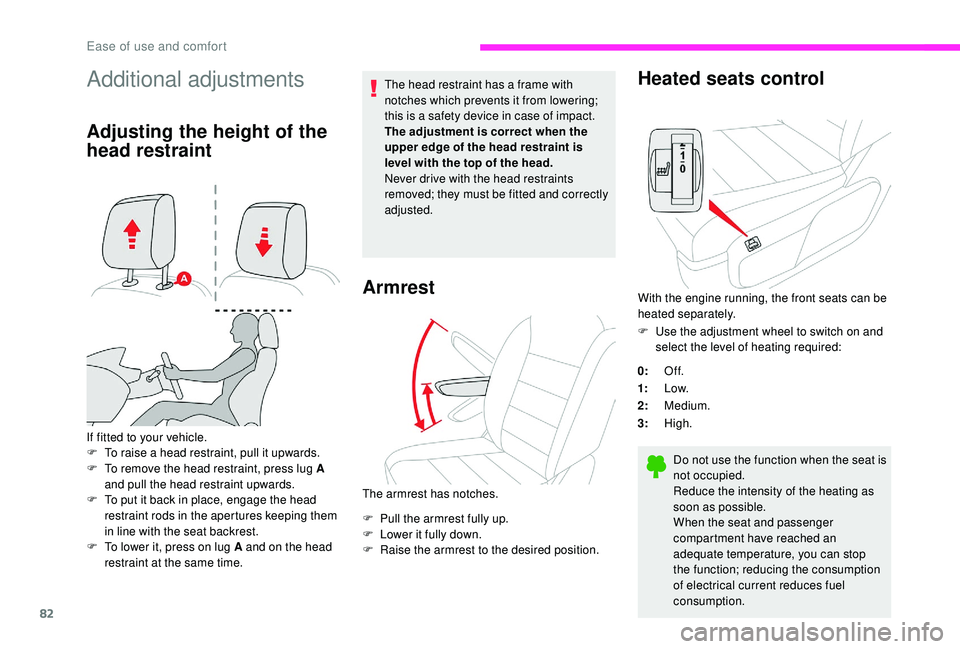
If fitted to your vehicle.
F T o raise a head restraint, pull it upwards.
F
T
o remove the head restraint, press lug A
and pull the head restraint upwards.
F
T
o put it back in place, engage the head
restraint rods in the apertures keeping them
in line with the seat backrest.
F
T
o lower it, press on lug A and on the head
restraint at the same time. The head restraint has a frame with
notches which prevents it from lowering;
this is a safety device in case of impact.
The adjustment is correct when the
upper edge of the head restraint is
level with the top of the head.
Never drive with the head restraints
removed; they must be fitted and correctly
adjusted.
Armrest
The armrest has notches.
F
P
ull the armrest fully up.
F
L
ower it fully down.
F
R
aise the armrest to the desired position.
Heated seats control
With the engine running, the front seats can be
heated separately.
F
U
se the adjustment wheel to switch on and
select the level of heating required:
0: Of f.
1: Low.
2: Medium.
3: High.
Do not use the function when the seat is
not occupied.
Reduce the intensity of the heating as
soon as possible.
When the seat and passenger
compartment have reached an
adequate temperature, you can stop
the function; reducing the consumption
of electrical current reduces fuel
consumption.
Ease of use and comfort
Page 86 of 400

84
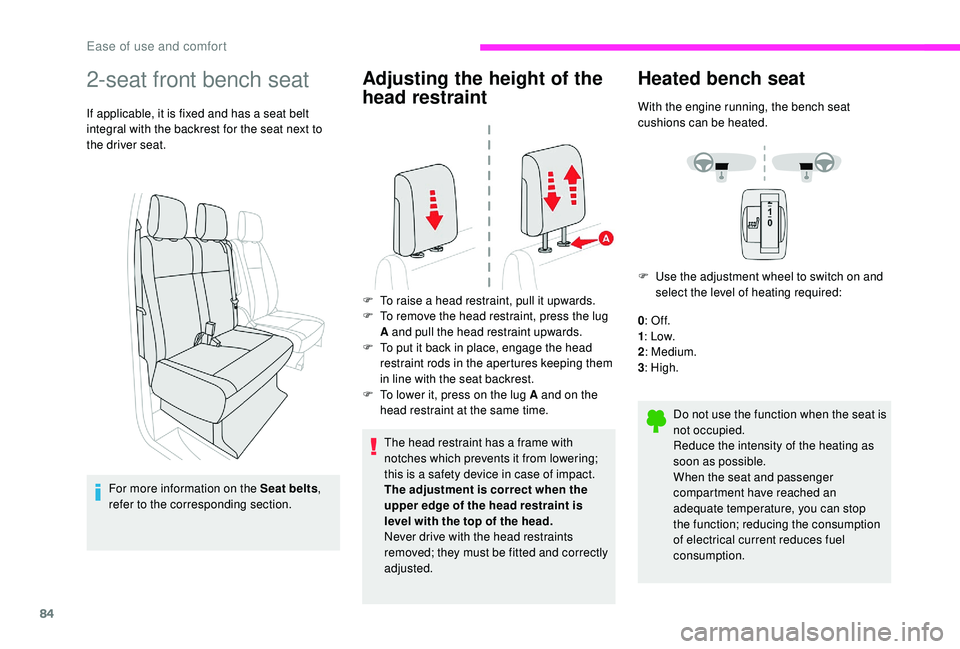
2-seat front bench seat
If applicable, it is fixed and has a seat belt
integral with the backrest for the seat next to
the driver seat.For more information on the Seat belts ,
refer to the corresponding section.
Adjusting the height of the
head restraint
The head restraint has a frame with
notches which prevents it from lowering;
this is a safety device in case of impact.
The adjustment is correct when the
upper edge of the head restraint is
level with the top of the head.
Never drive with the head restraints
removed; they must be fitted and correctly
adjusted.
Heated bench seat
With the engine running, the bench seat
cushions can be heated.
F
U
se the adjustment wheel to switch on and
select the level of heating required:
0 : Of f.
1 : Low.
2 : Medium.
3 : High.
Do not use the function when the seat is
not occupied.
Reduce the intensity of the heating as
soon as possible.
When the seat and passenger
compartment have reached an
adequate temperature, you can stop
the function; reducing the consumption
of electrical current reduces fuel
consumption.
F
T
o raise a head restraint, pull it upwards.
F
T
o remove the head restraint, press the lug
A and pull the head restraint upwards.
F
T
o put it back in place, engage the head
restraint rods in the apertures keeping them
in line with the seat backrest.
F
T
o lower it, press on the lug A and on the
head restraint at the same time.
Ease of use and comfort
Page 123 of 400

121
Switch off the demisting/defrosting of
the rear screen and door mirrors as
soon as appropriate, as lower current
consumption results in reduced fuel
consumption.
Door mirror demisting and defrosting only
operates with the engine running.Rear screen demist –
defrost
Switching on
F Press this button to demist / defrost the rear screen and the
door mirrors (if your vehicle is
so equipped); its indicator lamp
comes on.
Switching off
Demisting/defrosting switches off automatically
to prevent excessive electrical consumption.
F
I
t is possible to stop the
demisting/defrosting operation
before it is switched off
automatically by pressing this
button again; its indicator lamp
goes out. Switch off the demisting/defrosting of
the rear screen and door mirrors as
soon as appropriate, as lower current
consumption results in reduced fuel
consumption.
Rear screen demisting/defrosting can only
be operated when the engine is running.
3
Ease of use and comfort
Page 127 of 400

125
Switching off
F Press and hold this button to stop the heating immediately.
The indicator lamp in the remote control comes
on in red for about 2
seconds to confirm that
the signal has been received by the vehicle.
The indicator lamp in the remote control
flashes for about 2
seconds if the vehicle
has not received the signal.
You should then move to a different
location and repeat the command.
Changing the battery
If the indicator lamp in the remote control
becomes orange, the state of charge of the
battery is low.
If the indicator lamp is not on, the battery is
discharged. F
U
se a coin to unscrew the cap and replace
the battery.
During heating
This indicator lamp flashes while the
heating is in operation.
This indicator lamp goes out at the end
of the heating cycle or when the heating
is stopped using the remote control.
The maximum heating period is about
45 minutes depending on the climatic
conditions.
The programmable heating system is
supplied by the vehicle's fuel tank.
Before use, ensure that there is enough
fuel in the tank.
If the tank is on reser ve, it is
recommended that the system is not used.
The ventilation is activated provided that
the battery is sufficiently charged.
The heating is activated provided that:
-
t
he battery is sufficiently charged,
-
t
he fuel level is adequate,
-
t
he engine has been started since the
previous heating cycle. Always switch off the programmable
heating when refuelling to avoid any risk of
fire or explosion.
To avoid the risks of poisoning or
asphyxia, the programmable heating must
not be used, even for short periods, in a
closed environment such as a garage or
workshop which is not equipped with an
exhaust gas extraction system.
Do not park the vehicle on a flammable
sur face (dry grass, dead leaves, paper,
etc.). Risk of fire!
Glazed sur faces such as the rear screen
or windscreen can become very hot in
places.
Take care not to place objects in contact
with these sur faces, nor touch them with
your hands or any other part of your body.
Do not throw the remote control
batteries away, they contain metals
which are harmful to the environment.
Take them to an approved collection
point.
3
Ease of use and comfort
Page 149 of 400

147
Seat belts
Front seat belts
Fastening
Unfastening
F Press the red button on the buckle.
F G uide the seat belt as it reels in.
The front seat belts are fitted with a
pretensioning and force limiting system.
This system improves safety in the front
seats in the event of a front or side impact.
Depending on the severity of the impact, the
pretensioning system instantly tightens the seat
belts against the body of the passengers. The pretensioning seat belts are active when
the ignition is on.
The force limiter reduces the pressure of the
seat belt on the chest of the passenger, so
improving their protection.
F
P
ull the strap then insert the tongue in the
buckle.
F
C
heck that the seat belt is fastened
correctly by pulling the strap.
Driving recommendations
Your vehicle is designed principally to
drive on tarmac roads but it allows you to
occasionally drive on other less passable
terrain.
However, it does not permit off-road
driving such as:
-
c
rossing and driving on terrain which
could damage the underbody or strip
away components (fuel pipe, fuel
cooler, etc.) due to obstacles or stones
in particular,
-
d
riving on terrain with steep gradients
and poor grip,
-
c
rossing a stream.
5
Safety
Page 180 of 400

178
Manoeuvre cautiously, at low
speed
The dimensions of your vehicle differ from
those of a light vehicle, in width, in height, as
well as in length, and some obstacles will be
more difficult to notice.
Manoeuvre slowly.
Before turning, check that there are no
obstacles at mid-height along the sides.
Before reversing, check that there are no
obstacles, particularly at high level behind the
vehicle.
Be aware of the external dimensions, if ladders
are fitted.
Load the vehicle correctly
If your vehicle is fitted with a drop-side back,
the height and width of the load must remain
within the overall dimensions of the vehicle.
Drive the vehicle in a prudent
and efficient way
Take corners gently.
Anticipate the need to brake as the stopping
distance is increased, particularly on wet or icy
roads.
Be aware of the effect of side winds on the
vehicle.
Effective eco-driving saves fuel; accelerate
progressively, anticipate the need to slow down
and adapt your speed to suit the situation.
Indicate changes of direction well in advance
so that you are seen by other road users.
Take care
The tyres must be inflated to at least the
pressures indicated on the label, even over-
inflated by 0.2 to 0.3 bar for long journeys.
With a load carried, the vehicle must remain
within the maximum authorised weight, the
Gross Vehicle Weight.
To avoid upsetting the balance of the vehicle,
the load should be centred and the heaviest
part placed on the floor in front of the rear
wheels.
It is inadvisable to place heavy loads on a roof
rack.
Loading also implies adherence to the
maximum load of the roof bar anchor points.
Adhere to the maximum permissible weight,
according to CITROËN dealer specifications.
Loads must be securely lashed down.
A load that is not properly secured inside the
vehicle may affect vehicle handling and create
a risk of accident.
In case of towing
Driving with a trailer places greater
demands on the towing vehicle and
requires extra care from the driver.
Distribution of loads
F Distribute the load in the trailer so that the
heaviest items are as close as possible to
the axle and the nose weight approaches
the maximum permitted without exceeding
it.
Air density decreases with altitude, thus
reducing engine performance. The maximum
towed load must be reduced by 10% for every
1,000
metres of altitude.
Please respect the maximum towable
weights.
F
T
ake into account the increased sensitivity
to wind.
Side wind
Driving
Page 191 of 400

189
Gear efficiency indicator
This system reduces fuel consumption by
recommending the most appropriate gear.
Depending on the driving situation and the
equipment of your vehicle, the system can
recommend you to skip one or several gears.
You can follow this instruction without engaging
the intermediate gears.On certain BlueHDi Diesel versions
with manual gearbox, the system
may suggest changing into neutral
(N is displayed in the instrument
panel) so that the engine can go into
standby (STOP mode with Stop &
Start), in certain driving conditions.
Gear engagement recommendations
are only optional.
In fact, the configuration of the road,
the traffic density and safety remain
determining factors when choosing the
best gear.
The gear efficiency indicator system does
not replace the need for vigilance on the
part of the driver. Example:
-
Y
ou are in third gear.
-
Y
ou press the accelerator pedal.
The information appears in the instrument
panel in the form of an arrow.
With a manual gearbox, the arrow may be
accompanied by the gear recommended. The system adapts its gear change
recommendation according to the driving
conditions (slope, load, etc.) and the
driver’s requirements (power, acceleration,
b r a k i n g , e t c .) .
The system never suggests:
-
e
ngaging first gear,
-
enga
ging reverse gear.
This function cannot be deactivated.
-
T
he system may suggest that you engage a
higher gear.
6
Driving
Page 196 of 400

194
A stiff point may be noticed when moving
to position P.
If the selector is not in position P , when the
driver's door is opened or approximately
45
seconds after the ignition is switched
off, an audible signal sounds and a
message appears.
F
R
eturn the selector to position P ; the
audible signal stops and the message
disappears.
On a steep slope with a loaded vehicle,
depress the brake pedal, select
position P , apply the parking brake then
release the brake pedal.
In all circumstances, ensure that the
selector is in position P before leaving
your vehicle.Malfunction
When the ignition is on, a message appears
in the instrument panel screen to indicate a
gearbox fault.
In this case, the gearbox switches to back-up
mode and is locked in 3rd gear. You may feel a
substantial jolt when changing from P to R and
from N to R. This will not cause any damage to
the gearbox.
Do not exceed around 60
mph (100 km/h), local
speed restrictions permitting.
Have it checked by a CITROËN dealer or a
qualified workshop.
There is a risk of damage to the gearbox:
-
i
f you depress the accelerator and
brake pedals at the same time (braking
or acceleration must be done only with
the right foot),
-
i
f you force the selector from position P
to another position when the battery is
flat. To reduce fuel consumption when
stationary for long periods with the
engine running (traffic jam, etc.),
position the selector to N and apply the
parking brake.
If your vehicle has an automatic gearbox,
never try to start the engine by pushing
the vehicle.
Driving
Page 200 of 400

198
Stopping the vehicle
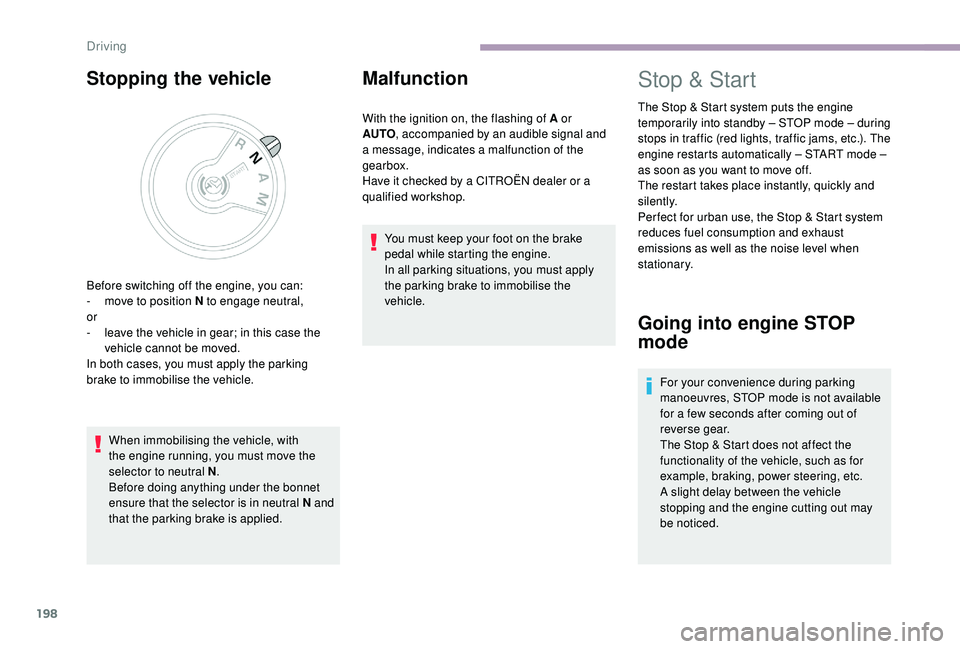
When immobilising the vehicle, with
the engine running, you must move the
selector to neutral N.
Before doing anything under the bonnet
ensure that the selector is in neutral N and
that the parking brake is applied.
Malfunction
With the ignition on, the flashing of A or
AUTO , accompanied by an audible signal and
a message, indicates a malfunction of the
gearbox.
Have it checked by a CITROËN dealer or a
qualified workshop.
You must keep your foot on the brake
pedal while starting the engine.
In all parking situations, you must apply
the parking brake to immobilise the
vehicle.
Before switching off the engine, you can:
-
m
ove to position N to engage neutral,
or
-
l
eave the vehicle in gear; in this case the
vehicle cannot be moved.
In both cases, you must apply the parking
brake to immobilise the vehicle.
Stop & Start
The Stop & Start system puts the engine
temporarily into standby – STOP mode – during
stops in traffic (red lights, traffic jams, etc.). The
engine restarts automatically – START mode –
as soon as you want to move off.
The restart takes place instantly, quickly and
silently.
Per fect for urban use, the Stop & Start system
reduces fuel consumption and exhaust
emissions as well as the noise level when
stationary.
Going into engine STOP
mode
For your convenience during parking
manoeuvres, STOP mode is not available
for a few seconds after coming out of
reverse gear.
The Stop & Start does not affect the
functionality of the vehicle, such as for
example, braking, power steering, etc.
A slight delay between the vehicle
stopping and the engine cutting out may
be noticed.
Driving