ESP CITROEN DISPATCH SPACETOURER 2018 Handbook (in English)
[x] Cancel search | Manufacturer: CITROEN, Model Year: 2018, Model line: DISPATCH SPACETOURER, Model: CITROEN DISPATCH SPACETOURER 2018Pages: 400, PDF Size: 16.99 MB
Page 71 of 400

69
If the left-hand door is not fully closed
(the right-hand door is not detected):
-
v
ehicle stationary and the engine
running, this warning lamp comes
on, accompanied by an alert
message for a few seconds,
-
v
ehicle moving (speed above
6
mph (10 km/h)), this warning
lamp comes on, accompanied
by an audible signal and an alert
message for a few seconds.
Opening to approximately 180°
If fitted to your vehicle, a check strap system
that allows the doors to be opened from about
90° to about 180°.
F
P
ull the yellow control when the door is
open.
The check strap will engage again
automatically on closing. When parking with rear
doors opened at 90°, they
conceal the rear lamps.
To signal your position to
other road users driving
in the same direction who
may not have noticed that
your vehicle has stopped,
use a warning triangle or
other device required by the
legislation in your country.
From inside
Opening
Vehicle locked and child lock off (disabled).
F
T
wist this handle down to fully unlock the
vehicle and open the right-hand door.
Vehicle unlocked and child lock disabled.
F
T
wist this handle down to open the right-
hand door.
If the child lock is on (enabled), the handle
is inoperative.
For more information on the Child lock ,
refer to the corresponding section.
Closing
F First close the right-hand door, then the left-hand door.
2
Access
Page 72 of 400

70
Tailgate
Opening
For more information on the Key, Remote
control or K eyless Entr y and Star ting ,
and in particular unlocking the vehicle,
refer to the corresponding section.
F
A
fter unlocking the vehicle with the key,
the remote control or the
K
eyless Entry
and Starting, pull the handle, then raise the
tailgate.
Closing
If the tailgate is not fully closed:
-
v
ehicle stationary and the engine running,
this warning lamp comes on, accompanied
by an alert message for a few seconds,
-
v
ehicle moving (speed above 6 mph
(10
km/h)), this warning lamp comes on,
accompanied by an audible signal and an
alert message for a few seconds.
For more information on the Key, Remote
control or
K
eyless Entr y and Star ting ,
and in particular locking the vehicle, refer
to the corresponding section.
Back-up control
It allows the mechanical unlocking of the
tailgate in the event of a battery or central
locking system malfunction.
Unlocking
F If fitted to your vehicle and if necessary, fold the rear seats to gain access to the lock
from inside.
Locking after closing
If the fault persists after closing again, the
tailgate will remain locked.
F
L
ower the tailgate using the interior grab
handle then push it home to fully close it.
F
I
nsert a small screwdriver into hole A of the
lock to unlock the tailgate.
F
M
ove the latch to the left.
Access
Page 73 of 400

71
Tailgate rear screen
The opening rear screen allows you to access
the rear of the vehicle directly, without having to
open the tailgate.
Opening
For more information on the Key, Remote
control or K eyless Entr y and Star ting ,
and in particular unlocking the vehicle,
refer to the corresponding section.
Closing
Close the rear screen by pressing the centre of
the glass until it is fully closed.
If the tailgate rear screen is not fully
closed:
After unlocking the vehicle using the key,
remote control or
K
eyless Entry and Starting
(depending on equipment), press this control
and raise the rear screen to open it. -
v
ehicle stationary and the engine running,
this warning lamp comes on, accompanied
by an alert message for a few seconds,
-
v
ehicle moving (speed above 6 mph
(10
km/h)), this warning lamp comes on,
accompanied by an audible signal and an
alert message for a few seconds. For more information on the Key, Remote
control or
K
eyless Entr y and Star ting
,
and in particular locking the vehicle, refer
to the corresponding section.
The tailgate and tailgate screen cannot
both be open at the same time, to avoid
damaging them.
2
Access
Page 74 of 400

72
Alarm
This system protects and provides a deterrent
against theft and break-ins.Self-protection function
The system checks for the disconnection
of any of its components.
The alarm is triggered if the battery,
button or siren wiring is disconnected or
damaged.
For all work on the alarm system,
contact a CITROËN dealer or a qualified
workshop.
Exterior perimeter
The system checks whether the vehicle is
opened.
The alarm is triggered if anyone tries to open
one of the doors, the tailgate or the bonnet.
Volumetric
The system checks for any variation in the
volume of the passenger compartment.
The alarm is triggered if anyone breaks a
window, enters the passenger compartment or
moves inside the vehicle.If your vehicle is fitted with Programmable
Heating/Ventilation, volumetric monitoring
is not compatible with this system.
For more information on Programmable
Heating/Ventilation , refer to the
corresponding section.
Total protection
Activation
F Switch off the ignition and get out of the vehicle.
F
L
ock the vehicle using the
remote control.
or
F
L
ock the vehicle using the "
K
eyless Entry
and Starting" system. The monitoring system is active: the indicator
lamp flashes once per second and the direction
indicators come on for about 2
seconds.
Following a command to lock the vehicle
using the remote control or the "
K
eyless Entry
and Starting" system, the exterior perimeter
monitoring is activated after 5 seconds, the
interior volumetric monitoring after 45 seconds.
If an opening element (door, tailgate or side-
hinged doors, bonnet, etc.) is not closed fully
after locking with the "remote control", the
vehicle is not locked but monitoring will be
activated after 45
seconds.
Deactivation
F Press this unlocking button on
the remote control.
or
F
U
nlock the vehicle using the "
K
eyless Entry
and Starting" system.
The monitoring system is deactivated: the
indicator lamp for the button goes out and the
direction indicators flash for about 2
seconds.
Access
Page 78 of 400

76
Steering wheel adjustment
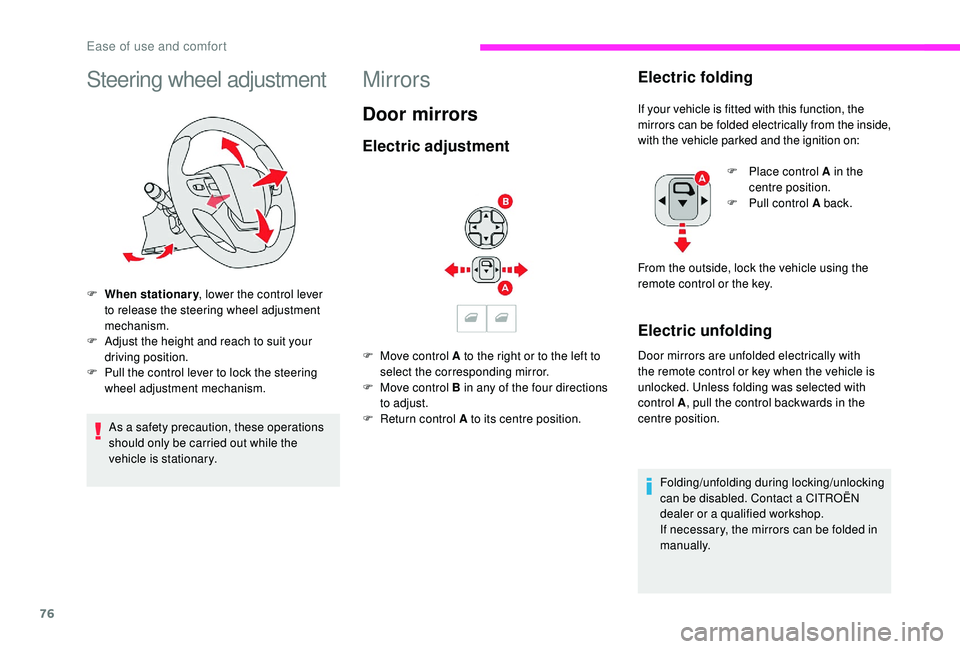
F When stationary, lower the control lever
to release the steering wheel adjustment
mechanism.
F
A
djust the height and reach to suit your
driving position.
F
P
ull the control lever to lock the steering
wheel adjustment mechanism.
As a safety precaution, these operations
should only be carried out while the
vehicle is stationary.
Mirrors
Door mirrors
Electric adjustment
F Move control A to the right or to the left to select the corresponding mirror.
F
M
ove control B in any of the four directions
to adjust.
F
R
eturn control A to its centre position.
Electric folding
If your vehicle is fitted with this function, the
mirrors can be folded electrically from the inside,
with the vehicle parked and the ignition on:
Electric unfolding
Door mirrors are unfolded electrically with
the remote control or key when the vehicle is
unlocked. Unless folding was selected with
control A , pull the control backwards in the
centre position.
Folding/unfolding during locking/unlocking
can be disabled. Contact a CITROËN
dealer or a qualified workshop.
If necessary, the mirrors can be folded in
manually. F
P
lace control A in the
centre position.
F
P
ull control A back.
From the outside, lock the vehicle using the
remote control or the key.
Ease of use and comfort
Page 80 of 400

78
Surveillance mirror
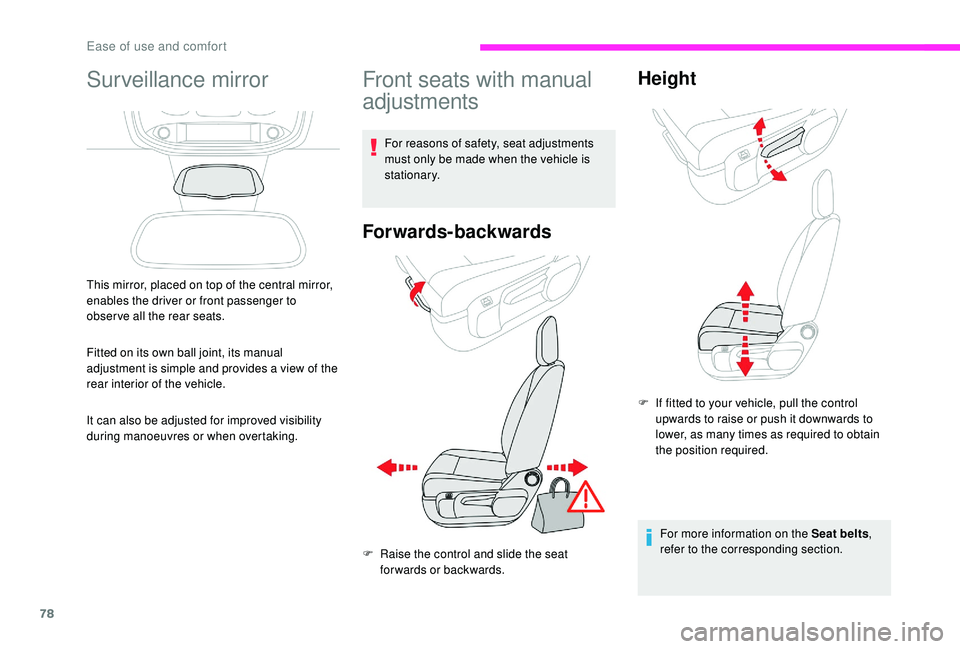
This mirror, placed on top of the central mirror,
enables the driver or front passenger to
observe all the rear seats.
Fitted on its own ball joint, its manual
adjustment is simple and provides a view of the
rear interior of the vehicle.
It can also be adjusted for improved visibility
during manoeuvres or when overtaking.
Front seats with manual
adjustments
For reasons of safety, seat adjustments
must only be made when the vehicle is
stationary.
Forwards-backwards
F Raise the control and slide the seat forwards or backwards.
Height
F If fitted to your vehicle, pull the control upwards to raise or push it downwards to
lower, as many times as required to obtain
the position required.
For more information on the Seat belts ,
refer to the corresponding section.
Ease of use and comfort
Page 83 of 400

81
Backrest angle
F Tilt the control for wards or backwards to adjust the angle of the seat backrest.
Cushion height
F Tilt the control upwards or downwards to obtain the desired height.
Before moving the seat backwards,
ensure that there is no object or person in
the way, preventing full travel of the seat.
There is a risk of trapping or pinching
passengers if present in the rear seats
or jamming the seat if large objects are
placed on the floor behind the seat. For more information on the Seat belts
,
refer to the corresponding section.
3
Ease of use and comfort
Page 86 of 400

84
2-seat front bench seat
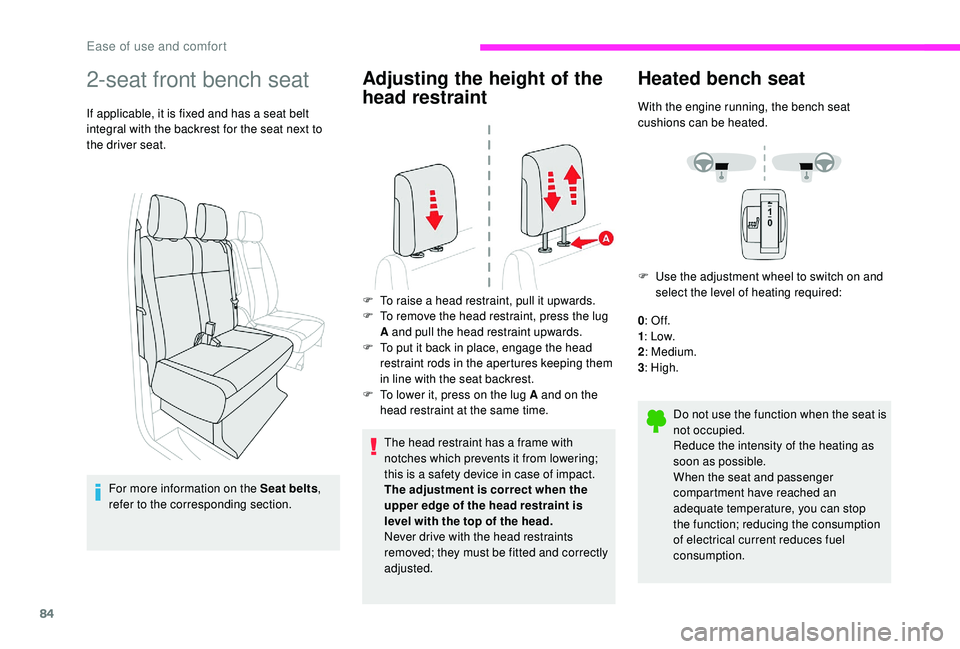
If applicable, it is fixed and has a seat belt
integral with the backrest for the seat next to
the driver seat.For more information on the Seat belts ,
refer to the corresponding section.
Adjusting the height of the
head restraint
The head restraint has a frame with
notches which prevents it from lowering;
this is a safety device in case of impact.
The adjustment is correct when the
upper edge of the head restraint is
level with the top of the head.
Never drive with the head restraints
removed; they must be fitted and correctly
adjusted.
Heated bench seat
With the engine running, the bench seat
cushions can be heated.
F
U
se the adjustment wheel to switch on and
select the level of heating required:
0 : Of f.
1 : Low.
2 : Medium.
3 : High.
Do not use the function when the seat is
not occupied.
Reduce the intensity of the heating as
soon as possible.
When the seat and passenger
compartment have reached an
adequate temperature, you can stop
the function; reducing the consumption
of electrical current reduces fuel
consumption.
F
T
o raise a head restraint, pull it upwards.
F
T
o remove the head restraint, press the lug
A and pull the head restraint upwards.
F
T
o put it back in place, engage the head
restraint rods in the apertures keeping them
in line with the seat backrest.
F
T
o lower it, press on the lug A and on the
head restraint at the same time.
Ease of use and comfort
Page 87 of 400

85
Prolonged use at the highest setting is
not recommended for those with sensitive
skin.
There is a risk of burns for people whose
perception of heat is impaired (illness,
taking medication, etc.).
There is a risk of overheating the system if
material with insulating properties is used,
such as cushions or seat covers.
Do not use the system:
-
i
f wearing damp clothing,
-
i
f child seats are fitted.
To avoid breaking the heating element in
the seat:
-
d
o not place heavy objects on the seat,
-
d
o not kneel or stand on the seat,
-
d
o not place sharp objects on the seat,
-
d
o not spill liquids onto the seat.
To avoid the risk of short-circuit:
-
d
o not use liquid products for cleaning
the seat,
-
n
ever use the heating function when
the seat is damp.Under-seat storage
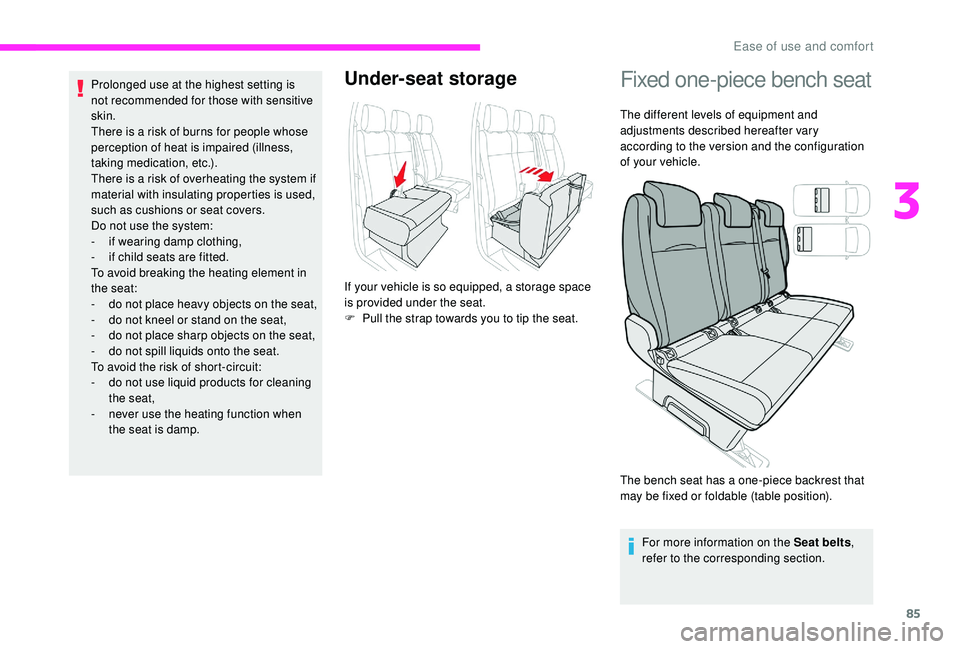
If your vehicle is so equipped, a storage space
is provided under the seat.
F
P
ull the strap towards you to tip the seat.
Fixed one-piece bench seat
The different levels of equipment and
adjustments described hereafter vary
according to the version and the configuration
of your vehicle.
The bench seat has a one-piece backrest that
may be fixed or foldable (table position).
For more information on the Seat belts ,
refer to the corresponding section.
3
Ease of use and comfort
Page 90 of 400

88
F If your vehicle has the facility, pull the control and raise the backrest (from the
rear, lower the handle).
Check that the seat has correctly engaged
in its anchorages on the floor when
returned to the seating position.
Ensure that no object, or the feet of a
passenger seated at the rear, could
obstruct the anchorage points or prevent
the correct latching of the assembly.
Fixed rear seat and bench
seat
The different levels of equipment and adjustments
described hereafter vary according to the version
and the configuration of your vehicle.
The seat has a backrest that may be fixed or
foldable (table position).
The bench seat has a one-piece backrest that
may be fixed or foldable (table position). For more information on the Seat belts
,
refer to the corresponding section.
Angled head restraints
F To raise a head restraint, pull it up until it engages in its notches.
F
T
o remove the head restraint, press lug A
and pull the head restraint upward.
F
T
o put it back in place, engage the head
restraint rods in the apertures keeping them
in line with the seat backrest.
F
T
o lower it, press on lug A and on the head
restraint at the same time.
Ease of use and comfort