navigation system CITROEN DISPATCH SPACETOURER 2018 Handbook (in English)
[x] Cancel search | Manufacturer: CITROEN, Model Year: 2018, Model line: DISPATCH SPACETOURER, Model: CITROEN DISPATCH SPACETOURER 2018Pages: 400, PDF Size: 16.99 MB
Page 13 of 400
11
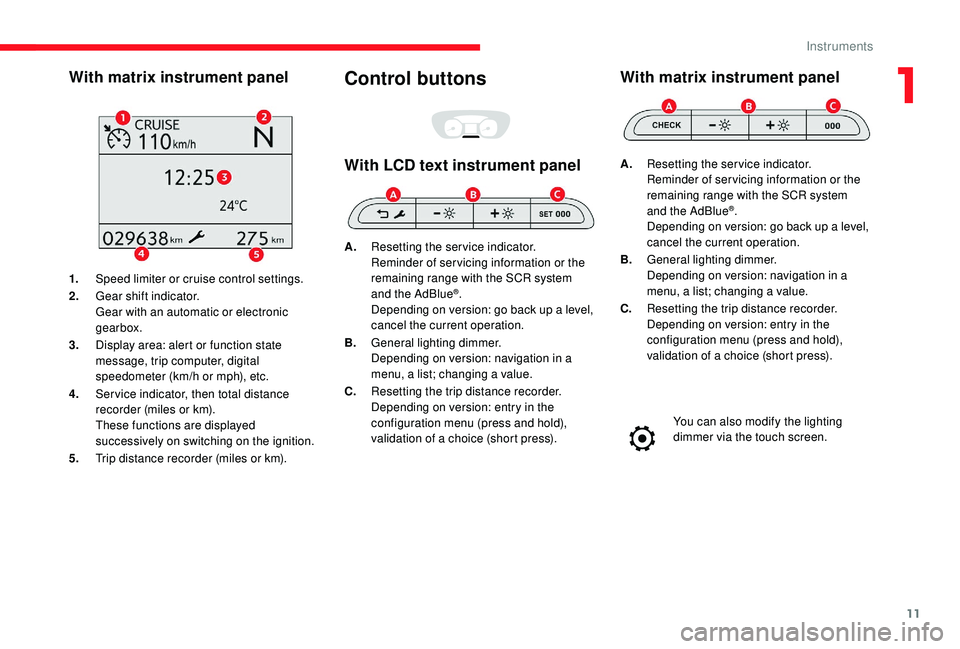
With matrix instrument panel
1.Speed limiter or cruise control settings.
2. Gear shift indicator.
Gear with an automatic or electronic
gearbox.
3. Display area: alert or function state
message, trip computer, digital
speedometer (km/h or mph), etc.
4. Ser vice indicator, then total distance
recorder (miles or km).
These functions are displayed
successively on switching on the ignition.
5. Trip distance recorder (miles or km).
Control buttons
With LCD text instrument panel
A.Resetting the service indicator.
Reminder of servicing information or the
remaining range with the SCR system
and the AdBlue
®.
Depending on version: go back up a level,
cancel the current operation.
B. General lighting dimmer.
Depending on version: navigation in a
menu, a list; changing a value.
C. Resetting the trip distance recorder.
Depending on version: entry in the
configuration menu (press and hold),
validation of a choice (short press).
With matrix instrument panel
A.Resetting the service indicator.
Reminder of servicing information or the
remaining range with the SCR system
and the AdBlue
®.
Depending on version: go back up a level,
cancel the current operation.
B. General lighting dimmer.
Depending on version: navigation in a
menu, a list; changing a value.
C. Resetting the trip distance recorder.
Depending on version: entry in the
configuration menu (press and hold),
validation of a choice (short press).
You can also modify the lighting
dimmer via the touch screen.
1
Instruments
Page 203 of 400

201
Operating fault
Depending on your vehicle's equipment:In the event of a fault with the
system, this warning lamp flashes in
the instrument panel.
The indicator lamp in this button
flashes and a message appears,
accompanied by an audible signal. Have it checked by a CITROËN dealer or a
qualified workshop.
If a fault occurs in STOP mode, the vehicle may
stall.
All of the instrument panel warning lamps come
on.
Depending on version, an alert message may
also be displayed, asking you to place the gear
lever in position N and put your foot on the
brake pedal.
With the vehicle stationary, you must switch off
the ignition and then start the engine again.
Head-up display
System which projects various information onto
a blade in the driver's field of vision so that they
do not have to take their eyes off the road.
Displays during operation
A.
The speed of your vehicle.
B. Cruise control/speed limiter information.
C. If your vehicle is so equipped, inter-
vehicle distance information, automatic
emergency braking alerts and navigation
instructions.
D. If your vehicle is so equipped, speed limit
information.
Driving on flooded roads
Before driving in a flooded area, it is
strongly recommended that you deactivate
the Stop & Start system.
For more information on Driving advice
,
particularly on flooded roads, refer to the
corresponding section.
Once the system has been activated, the
following information is grouped together in the
head-up display:
6
Driving
Page 204 of 400
202
For more information on Navigation, refer
to the Audio equipment and telematics
section.
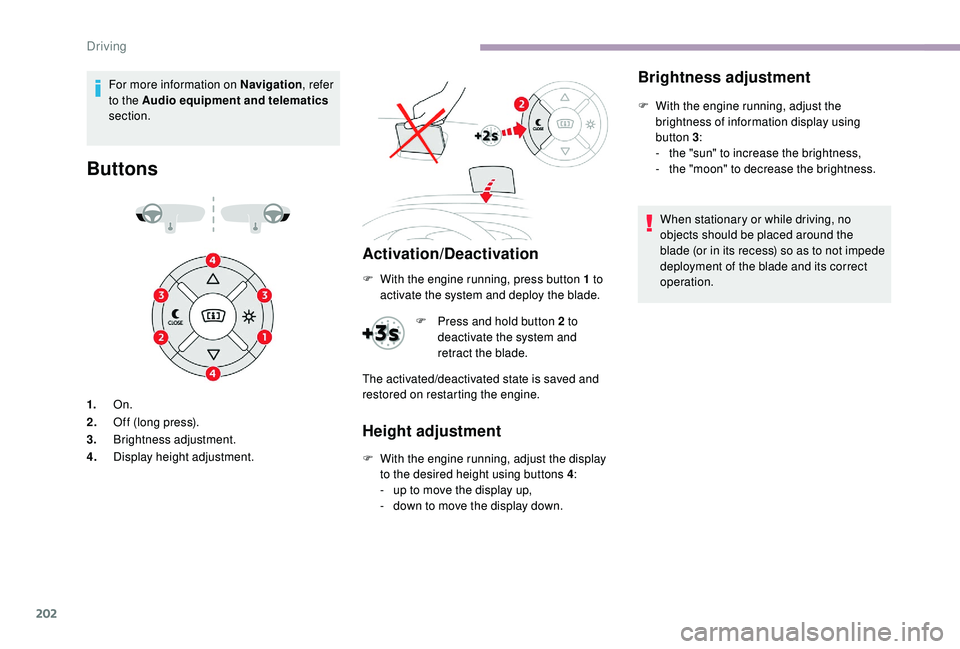
Buttons
Activation/Deactivation
1. On.
2. Off (long press).
3. Brightness adjustment.
4. Display height adjustment.
Height adjustment
F With the engine running, adjust the display
to the desired height using buttons 4 :
-
u
p to move the display up,
-
d
own to move the display down.
Brightness adjustment
F With the engine running, adjust the brightness of information display using
button 3 :
-
t
he "sun" to increase the brightness,
-
t
he "moon" to decrease the brightness.
When stationary or while driving, no
objects should be placed around the
blade (or in its recess) so as to not impede
deployment of the blade and its correct
operation.
F
W
ith the engine running, press button 1
to
activate the system and deploy the blade.
F
P
ress and hold button 2
to
deactivate the system and
retract the blade.
The activated/deactivated state is saved and
restored on restarting the engine.
Driving
Page 206 of 400

204
Recognition of
speed limit signs and
recommendation
This system allows the speed limit detected by
the camera to be displayed in the instrument
panel.
Specific speed limits, such as those for heavy
goods vehicles, are not displayed.
The display of the speed limit in the instrument
panel is updated as you pass a speed limit sign
intended for cars (light vehicles).The units for the speed limits (mph or
km/h) depend on the country you are
driving in.
It should be taken into account so that you
obser ve the speed limit.
For the system to operate correctly when
you change country, the units for speed in
the instrument panel must be those for the
country you are driving in. The automatic reading of road signs is a
driving assistance system and does not
always display speed limits correctly.
The speed limit signs present on the road
always take priority over the display by the
system.
The system cannot in any circumstances
replace the need for vigilance on the part
of the driver.
The driver must observe the driving
regulations and must adapt the speed of
the vehicle to suit the weather and traffic.
It is possible for the system to not display
the speed limit if it does not detect a
speed limit sign within a preset period.
The system is designed to detect signs
that conform to the Vienna Convention on
road signs.
To maintain correct operation of the
system: regularly clean the area in front of
the camera.
Principles
Depending on equipment, the
system takes account of speed limit
information from the navigation
system mapping.
Depending on equipment, using a camera at
the top of the windscreen, this system detects
and reads speed limit and end of speed limit
signs.
Depending on equipment, the system takes
account of the camera and information from the
navigation system mapping.
Driving
Page 207 of 400

205
For the speed limit information given
by the navigation system to be correct,
your mapping software must be regularly
updated.
Display on the instrument panel
Head-up display
1.Speed limit indication.
Speed display Activation/Deactivation
The system is activated or deactivated via the
vehicle configuration menu.
With audio system
In the "Personalisation-
configuration " menu,
activate/deactivate " Speed
recommendation ".
With the touch screen
In the "Driving/Vehicle " menu,
activate/deactivate " Displaying of
the recommended speed. ".
Operating limits
The legislation on speed limits is specific to
each country.
The system does not take account of reduced
speed limits in the following cases:
-
p
oor weather (rain, snow),
-
a
tmospheric pollution,
-
t
railer, caravan,
-
d
riving with snow chains fitted,
-
p
uncture repair using the temporary repair
kit,
-
y
oung drivers.
The system is active but is not detecting speed
limit information.
On detection of speed limit information, the
system displays the value.
The driver can, if desired, adjust the
speed of the vehicle according to the
information given by the system.
6
Driving
Page 283 of 400
281
FuseN° Rating
(A) Functions
F1 10Electric power steering, clutch switch.
F4 15Horn.
F5 20Front/rear screenwash pump.
F6 20Front/rear screenwash pump.
F7 10Rear 12
V accessory socket.
F8 20Single or double rear wipers.
F10/F11 30Internal/external locks, front and rear.
F13 10Front air conditioning controls, audio system controls, gear
lever, head-up display.
F14 5Alarm, emergency and assistance calls.
F17 5Instrument panel.
F19 3Steering mounted controls.
F21 3"
K
eyless Entry and Starting" or anti-theft system.
F22 3Rain and sunshine sensor, multifunction detection camera.
F23 5Seat belt unfastened or not fastened display screen.
F24 5Touch screen, reversing camera and parking sensors.
F25 5Airbags.
F29 20Audio system, touch screen, CD player, navigation.
F31 15Audio system (+ battery).
F32 15Front 12
V accessory socket.
F34 5Blind spot monitoring system, door mirror electric controls.
F35 5Heated washer jets, headlamp beam height control.
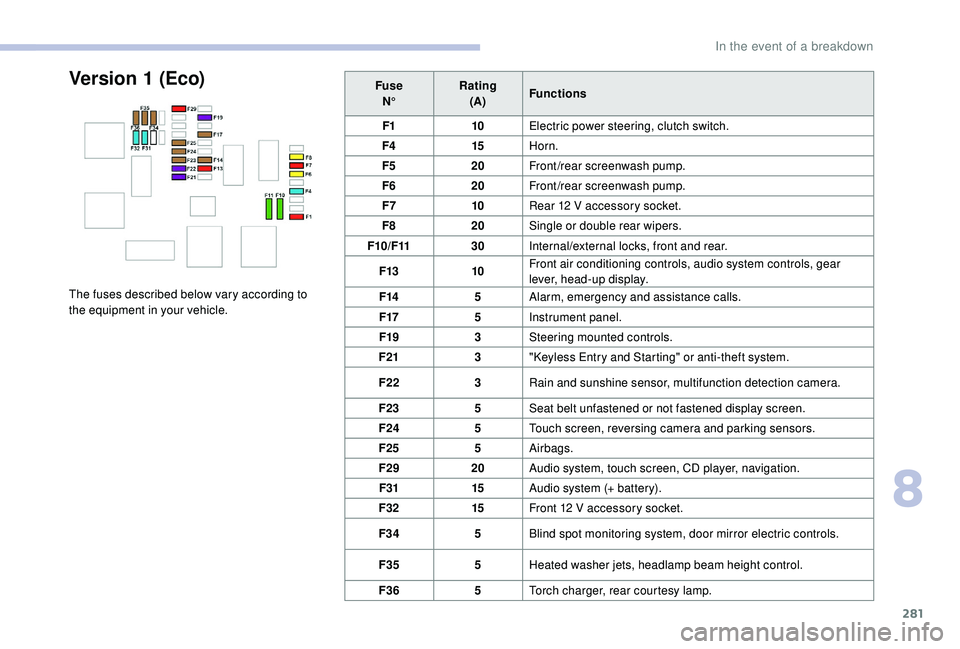
F36 5Torch charger, rear courtesy lamp.Version 1 (Eco)
The fuses described below vary according to
the equipment in your vehicle.
8
In the event of a breakdown
Page 284 of 400
282
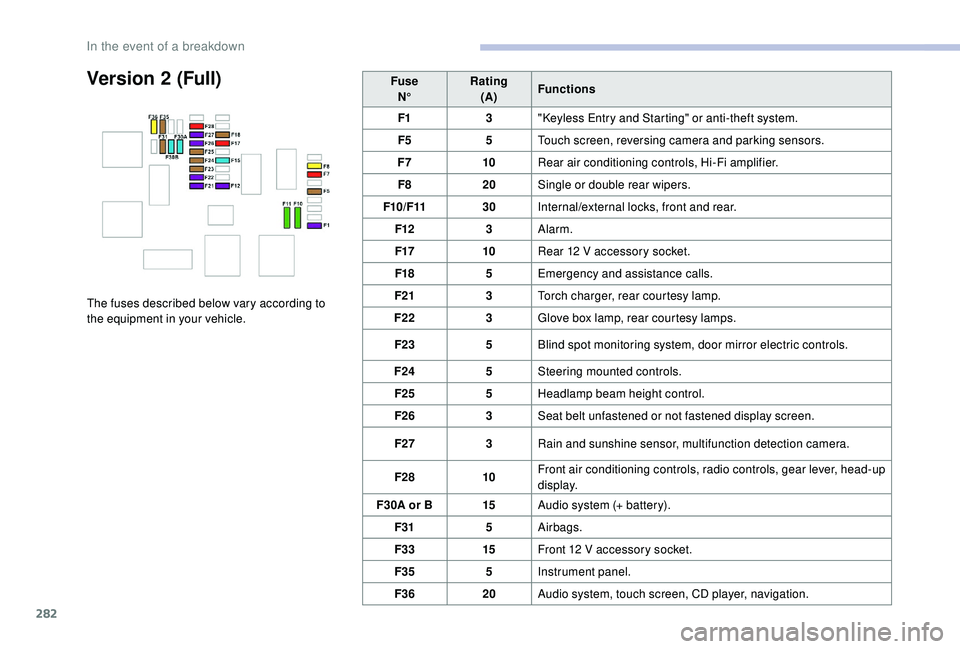
Version 2 (Full)
The fuses described below vary according to
the equipment in your vehicle.Fuse
N° Rating
(A) Functions
F1 3"
K
eyless Entry and Starting" or anti-theft system.
F5 5Touch screen, reversing camera and parking sensors.
F7 10Rear air conditioning controls, Hi-Fi amplifier.
F8 20Single or double rear wipers.
F10/F11 30Internal/external locks, front and rear.
F12 3Alarm.
F17 10Rear 12 V accessory socket.
F18 5Emergency and assistance calls.
F21 3Torch charger, rear courtesy lamp.
F22 3Glove box lamp, rear courtesy lamps.
F23 5Blind spot monitoring system, door mirror electric controls.
F24 5Steering mounted controls.
F25 5Headlamp beam height control.
F26 3Seat belt unfastened or not fastened display screen.
F27 3Rain and sunshine sensor, multifunction detection camera.
F28 10Front air conditioning controls, radio controls, gear lever, head-up
display.
F30A or B 15Audio system (+ battery).
F31 5Airbags.
F33 15Front 12
V accessory socket.
F35 5Instrument panel.
F36 20Audio system, touch screen, CD player, navigation.
In the event of a breakdown
Page 296 of 400
1
CITROËN Connect Nav
GPS satellite navigation –
Applications – Multimedia
audio system – Bluetooth
®
telephone
Contents
First steps
2
S
teering mounted controls
3
M
enus
4
V
oice commands
5
N
avigation
1
1
Connected navigation
1
5
Applications
1
8
Radio
2
3
DAB radio (Digital Audio Broadcasting)
2
5
Media
26
T
elephone
2
8
Configuration
3
3
Frequently asked questions
3
7The different functions and settings
described vary according to the version
and configuration of your vehicle.
As a safety measure and because it
requires sustained attention by the
driver, the pairing of a Bluetooth mobile
telephone with the Bluetooth hands-free
system of your audio system must be
done with the vehicle stationary
and the
ignition on.
The system is protected in such a way that
it will only operate in your vehicle.
The display of the Energy Economy
Mode message signals that a change to
standby is imminent.
The link below gives access to OSS
(Open Source Software) codes for the
system.
https://www.groupe-psa.com/fr/oss/
https://www.groupe-psa.com/en/oss/
.
CITROËN Connect Nav
Page 297 of 400
2
12:13
18,5 21,5
23 °CFirst steps
With the engine running, a press
mutes the sound.
With the ignition off, a press turns
the system on.
Adjustment of the volume.
Use the buttons either side of or below the
touch screen for access to the menus, then
press the virtual buttons in the touch screen.
Depending on the model, use the "Source" or
"Menu" buttons either side of the touch screen
for access to the menus, then press the virtual
buttons in the touch screen.
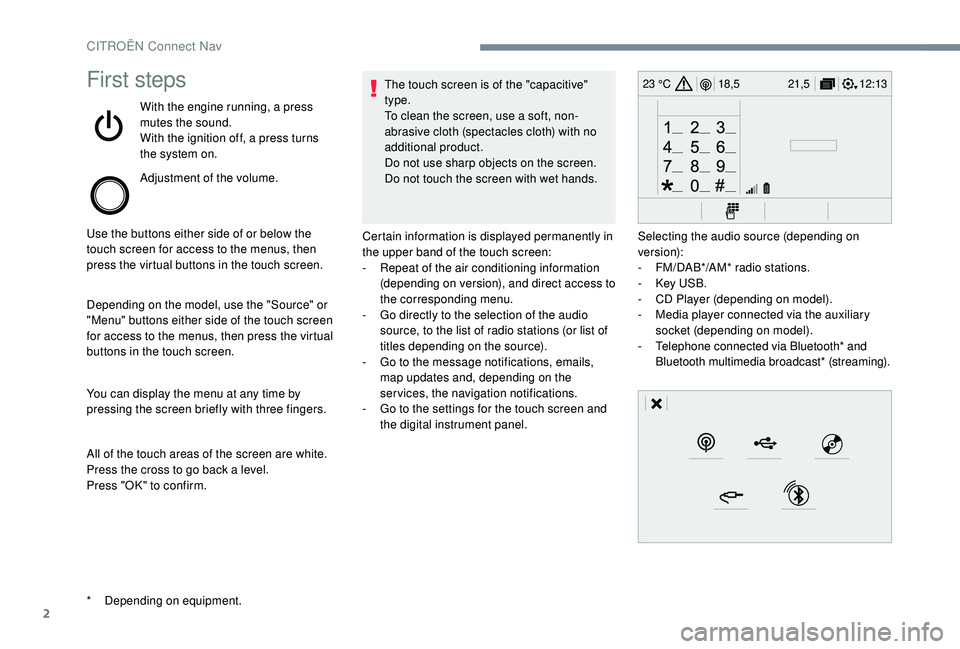
You can display the menu at any time by
pressing the screen briefly with three fingers.
All of the touch areas of the screen are white.
Press the cross to go back a level.
Press "OK" to confirm. The touch screen is of the "capacitive"
type.
To clean the screen, use a soft, non-
abrasive cloth (spectacles cloth) with no
additional product.
Do not use sharp objects on the screen.
Do not touch the screen with wet hands.
*
D
epending on equipment. Certain information is displayed permanently in
the upper band of the touch screen:
-
R
epeat of the air conditioning information
(depending on version), and direct access to
the corresponding menu.
-
G
o directly to the selection of the audio
source, to the list of radio stations (or list of
titles depending on the source).
-
G
o to the message notifications, emails,
map updates and, depending on the
services, the navigation notifications.
-
G
o to the settings for the touch screen and
the digital instrument panel. Selecting the audio source (depending on
version):
-
F
M/DAB*/AM* radio stations.
-
K
ey USB.
-
C
D Player (depending on model).
-
M
edia player connected via the auxiliary
socket (depending on model).
-
T
elephone connected via Bluetooth* and
Bluetooth multimedia broadcast* (streaming).
CITROËN Connect Nav
Page 298 of 400
3
In the "Settings" menu you can create
a profile for just one person or a group
of people with common points, with the
possibility of entering a multitude of
settings (radio presets, audio settings,
navigation history, contact favourites,
etc.); these settings are taken into account
automatically.
In very hot conditions, the volume may
be limited to protect the system. It may go
into standby (screen and sound off) for at
least 5
minutes.
The return to normal takes place when
the temperature in the passenger
compartment has dropped.Steering mounted controls
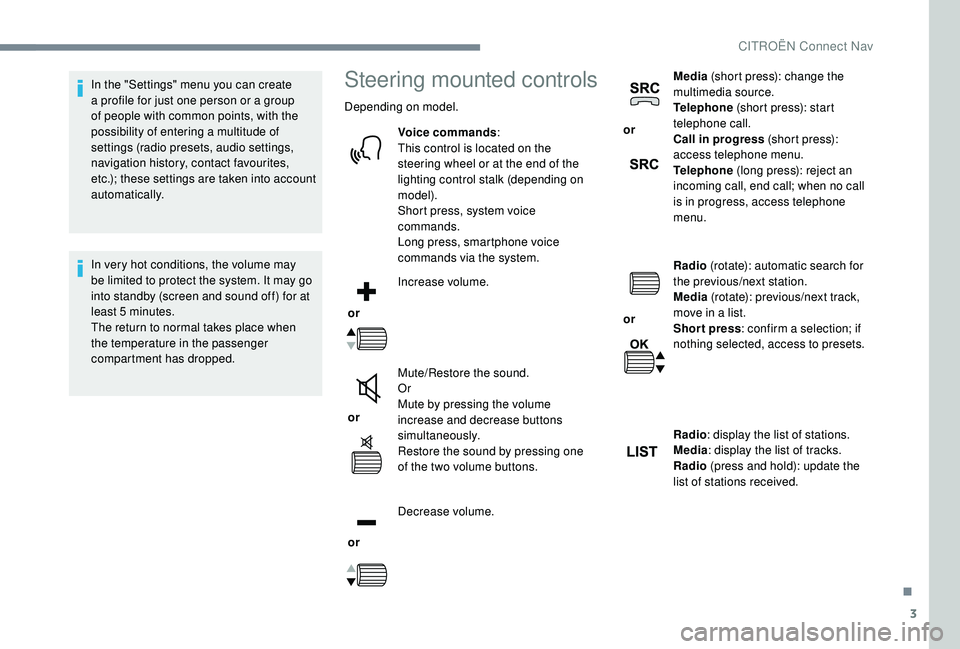
Depending on model.
Voice commands :
This control is located on the
steering wheel or at the end of the
lighting control stalk (depending on
model).
Short press, system voice
commands.
Long press, smartphone voice
commands via the system.
or Increase volume.
or Mute/Restore the sound.
Or
Mute by pressing the volume
increase and decrease buttons
simultaneously.
Restore the sound by pressing one
of the two volume buttons.
or Decrease volume. or
Media
(short press): change the
multimedia source.
Telephone (short press): start
telephone call.
Call in progress (short press):
access telephone menu.
Telephone (long press): reject an
incoming call, end call; when no call
is in progress, access telephone
menu.
or Radio
(rotate): automatic search for
the previous/next station.
Media (rotate): previous/next track,
move in a list.
Short press : confirm a selection; if
nothing selected, access to presets.
Radio : display the list of stations.
Media : display the list of tracks.
Radio (press and hold): update the
list of stations received.
.
CITROËN Connect Nav