boot CITROEN DISPATCH SPACETOURER 2020 Handbook (in English)
[x] Cancel search | Manufacturer: CITROEN, Model Year: 2020, Model line: DISPATCH SPACETOURER, Model: CITROEN DISPATCH SPACETOURER 2020Pages: 324, PDF Size: 10.89 MB
Page 10 of 324
8
Limit the causes of excess
consumption
Spread loads throughout the vehicle ; place
t he heaviest items in the boot, as close as
possible to the rear seats.
Limit the loads carried in the vehicle and
reduce wind resistance (roof bars, roof rack,
bicycle carrier, trailer, etc.). Preferably, use a
roof box.
Remove roof bars and roof racks after use.
At the end of winter, remove snow tyres and
refit the summer tyres.
Comply with servicing
instructions
Check the tyre pressures regularly, when cold,
referring to the label in the door aperture,
driver's side.
Carry out this check in particular:
-
b
efore a long journey,
-
a
t each change of season,
-
a
fter a long period out of use.
Do not forget the spare wheel and the tyres on
any trailer or caravan. Have your vehicle ser viced regularly (engine
oil, oil filter, air filter, cabin filter, etc.) and
obser ve the schedule of operations in the
manufacturer's service schedule.
When filling the tank, do not continue after the
3
rd cut-off of the nozzle to avoid over flow.
You will only see the fuel consumption
of your new vehicle settle down to a
consistent average after the first 1,900
miles
(3,000
kilometres).
With a BlueHDi Diesel engine, if the SCR
system is faulty, your vehicle becomes
polluting. Visit a CITROËN dealer or a
qualified workshop as soon as possible to
bring your vehicle’s nitrogen oxides emissions
back in line with the regulations.
Eco-driving
Page 14 of 324
12
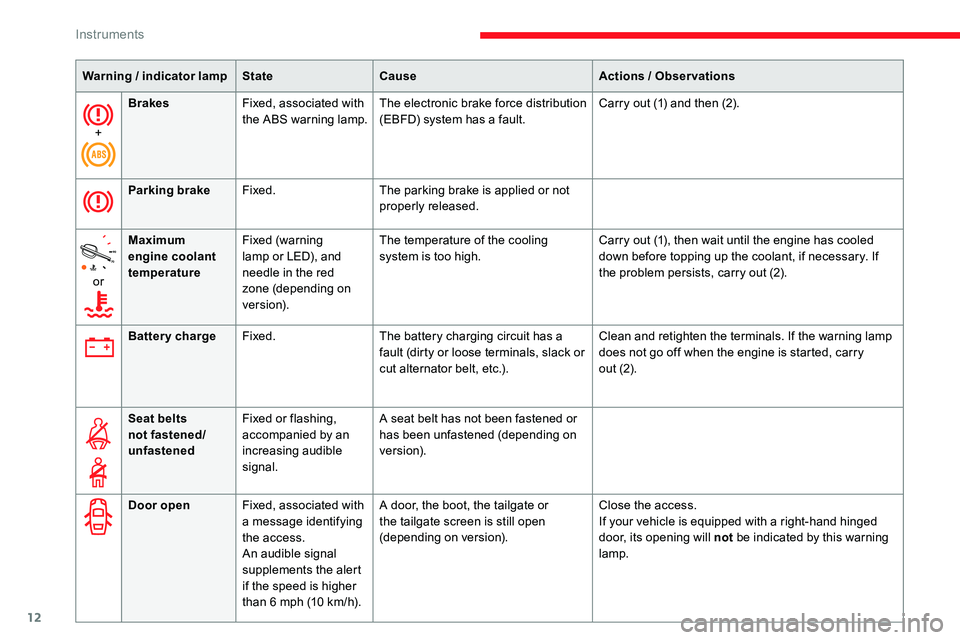
+Brakes
Fixed, associated with
the ABS warning lamp. The electronic brake force distribution
(EBFD) system has a fault. Carry out (1) and then (2).
Parking brake Fixed. The parking brake is applied or not
properly released.
or Maximum
engine coolant
temperature
Fixed (warning
lamp or LED), and
needle in the red
zone (depending on
ve r s i o n). The temperature of the cooling
system is too high.
Carry out (1), then wait until the engine has cooled
down before topping up the coolant, if necessary. If
the problem persists, carry out (2).
Warning
/ indicator lamp
State Cause Actions
/ Observations
Battery charge Fixed. The battery charging circuit has a
fault (dirty or loose terminals, slack or
cut alternator belt, etc.). Clean and retighten the terminals. If the warning lamp
does not go off when the engine is started, carry
out
(2).
Seat belts
not fastened/
unfastened Fixed or flashing,
accompanied by an
increasing audible
signal. A seat belt has not been fastened or
has been unfastened (depending on
ve r s i o n).
Door open Fixed, associated with
a message identifying
the access.
An audible signal
supplements the alert
if the speed is higher
than 6 mph (10
km/h).A door, the boot, the tailgate or
the tailgate screen is still open
(depending on version).
Close the access.
If your vehicle is equipped with a right-hand hinged
door, its opening will not
be indicated by this warning
lamp.
Instruments
Page 33 of 324
31
Electronic key with remote
control function and built-
i n key,
If one of the doors or the boot is still open
or if the electronic key for the Keyless
Entry and Starting system has been left
inside the vehicle, the central locking does
not take place.
However, if the vehicle has an alarm, it will
be activated after 45 seconds.
If the vehicle is unlocked and there is no
action at the doors or boot, the vehicle will
automatically lock itself again after about
30
seconds. If the vehicle has an alarm, it
will also be reactivated automatically.
The automatic folding and unfolding of
the door mirrors can be deactivated by a
CITROËN dealer or a qualified workshop. If a door is not properly closed
(except the right-hand door with side-
hinged rear doors):
-
v
ehicle stationary and engine
running, this warning lamp
comes on, accompanied by an
alert message for a few seconds,
-
v
ehicle moving (speed above
6 mph (10
km/h)), this warning
lamp comes on, accompanied
by an audible signal and an alert
message for a few seconds.
Remote control key
This allows the central locking or unlocking of
the vehicle using the door lock or remotely.
It also allows the vehicle to be located, the fuel The remote control buttons are not active
with the ignition switched on.
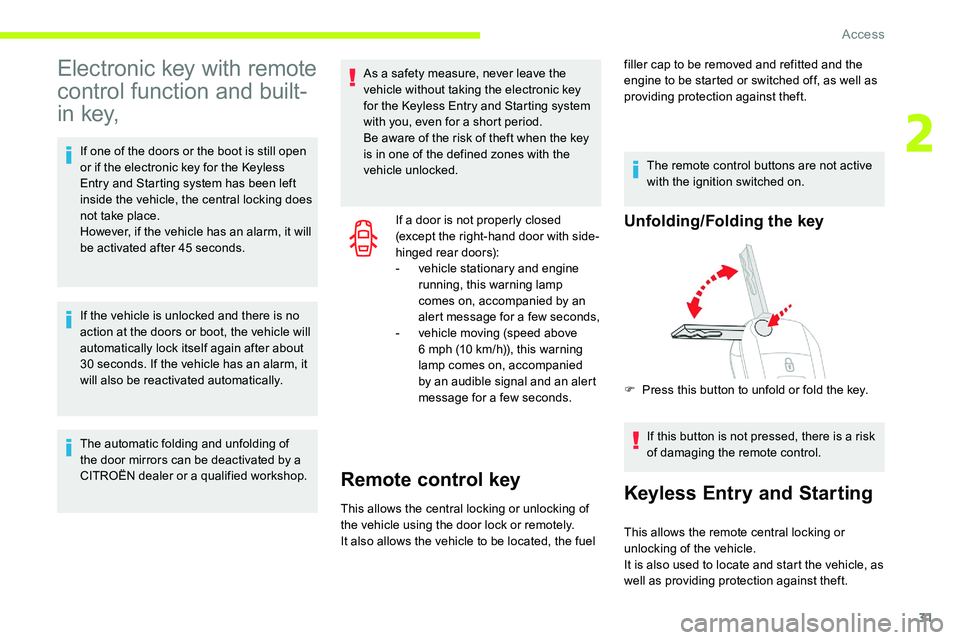
Unfolding/Folding the key
If this button is not pressed, there is a risk
of damaging the remote control.
Keyless Entry and Starting
F Press this button to unfold or fold the key.
This allows the remote central locking or
unlocking of the vehicle.
It is also used to locate and start the vehicle, as
well as providing protection against theft.
As a safety measure, never leave the
vehicle without taking the electronic key
for the Keyless Entry and Starting system
with you, even for a short period.
Be aware of the risk of theft when the key
is in one of the defined zones with the
vehicle unlocked.
filler cap to be removed and refitted and the
engine to be started or switched off, as well as
providing protection against theft.
2
Access
Page 41 of 324
39
F To deadlock it, turn the key towards the rear again within 5 seconds of locking
(confirmed by the temporary lighting of the
direction indicators).
If the vehicle is fitted with an alarm, this
function will not be activated when locking
with the key.
If the alarm is activated, the siren sounds
on opening the door
; switch on the
ignition to stop it.Central locking not
functioning
Use these procedures in the following cases:
- c entral locking fault,
-
b
attery disconnected or discharged.
In the event of a malfunction with the
central locking system, the battery must
be disconnected to lock the boot and thus
ensure that the vehicle is locked fully.
Driver's door
F Turn the key towards the rear of the vehicle to lock it, or towards the front to unlock it.
If unlocking using the key in the lock
takes place after locking using the
remote control or the Keyless Entr y
and Starting
, all of the accesses are
unlocked.
If unlocking using the key in the lock
takes place after locking using the
key , only the doors are unlocked (front
doors, sliding side doors(s)). The hinged
doors and the tailgate are not unlocked.
Switching on the ignition unlocks them.
Front passenger door and sliding
side door
Unlocking
F P ull the interior door opening handle.
Locking
F
O
pen the door.
F
F
or the side door, check that the child
lock is not on. Refer to the corresponding
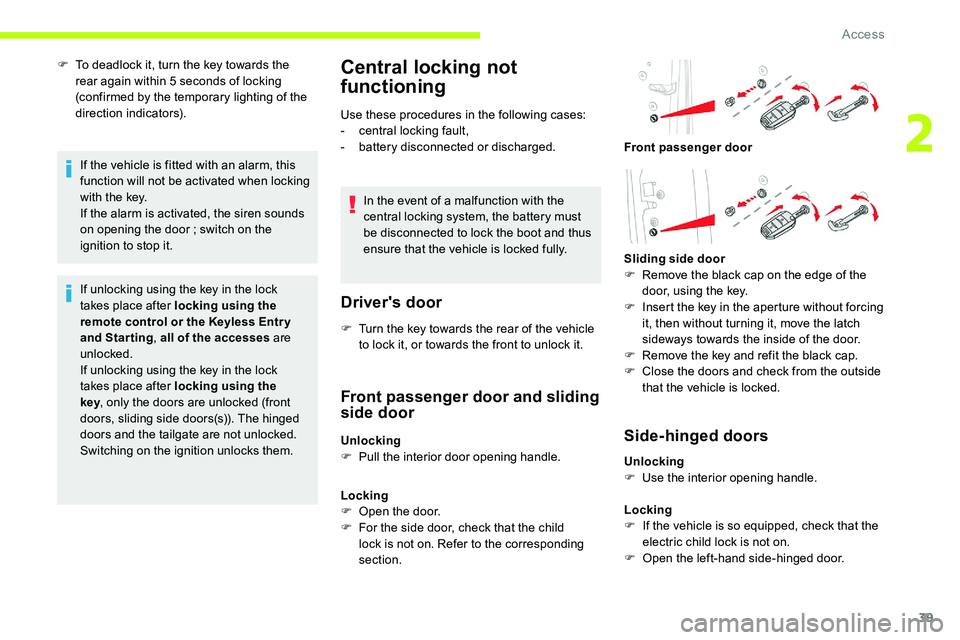
section. Front passenger door
Sliding side door
F
R
emove the black cap on the edge of the
door, using the key.
F
I
nsert the key in the aperture without forcing
it, then without turning it, move the latch
sideways towards the inside of the door.
F
R
emove the key and refit the black cap.
F
C
lose the doors and check from the outside
that the vehicle is locked.Side-hinged doors
Unlocking
F U se the interior opening handle.
Locking
F
I
f the vehicle is so equipped, check that the
electric child lock is not on.
F
O
pen the left-hand side-hinged door.
2
Access
Page 51 of 324
49
If the "Hands-free access self-locking "
option is selected in the vehicle menu and
after closing the door, make sure that the
vehicle is locked.
This is because locking will not take place:
-
i
f the ignition is on,
-
i
f one of the doors or the tailgate is
open,
-
i
f a "Keyless Entry and Starting"
remote control is inside the vehicle.
If a number of actions with your foot have
no effect, wait a few seconds before
starting again.
The system is automatically deactivated in
heavy rain or with accumulations of snow.
If it does not work, make sure that the
remote control is not exposed to a
source of electromagnetic interference
(smartphone, etc.).
Operation may be affected if using a
prosthetic leg.
This system may not work correctly if the
vehicle is fitted with a towing device. The side door may open or close
erratically if:
-
t
he vehicle is fitted with a towball,
-
a t
railer is being hitched or unhitched,
-
a b
icycle carrier is being attached or
detached,
-
b
icycles are being loaded or unloaded
on a bicycle carrier,
-
s
omething is being placed or lifted
behind the vehicle,
-
an
animal approaches the bumper,
-
t
he vehicle is being washed,
-
y
our vehicle is being serviced,
-
a w
heel is being changed.
To avoid unwanted operation, keep the
key away from the detection zone (also
from the boot’s interior sides) or deactivate
the function in the vehicle configuration
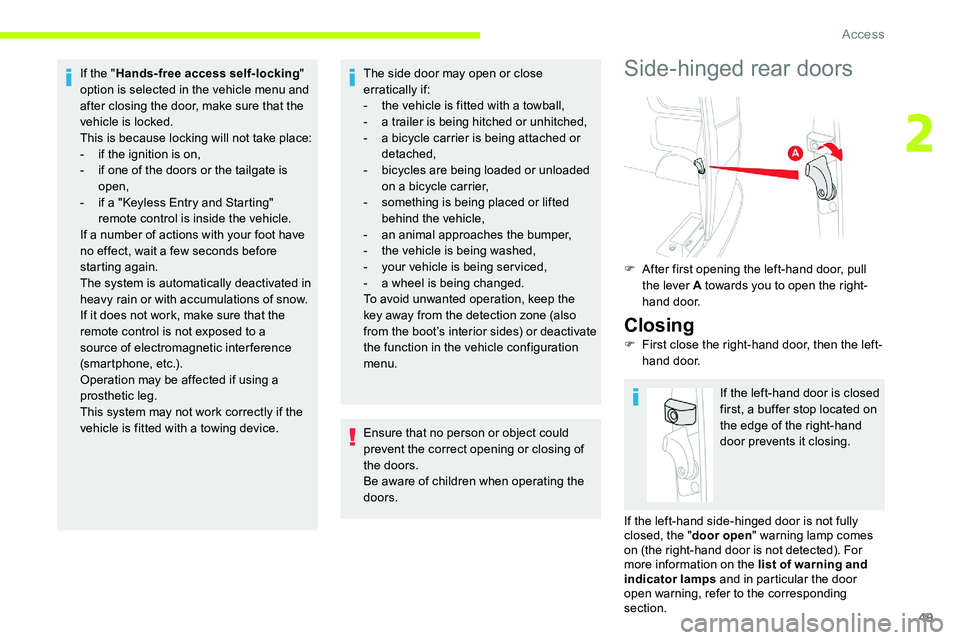
menu.Side-hinged rear doors
F After first opening the left-hand door, pull the lever A towards you to open the right-
hand door.
Closing
F First close the right-hand door, then the left-hand door.
If the left-hand door is closed
first, a buffer stop located on
the edge of the right-hand
door prevents it closing.
Ensure that no person or object could
prevent the correct opening or closing of
the doors.
Be aware of children when operating the
doors.
If the left-hand side-hinged door is not fully
closed, the "door open" warning lamp comes
on (the right-hand door is not detected). For
more information on the list of warning and
indicator lamps and in particular the door
open warning, refer to the corresponding
section.
2
Access
Page 53 of 324
51
Alarm
(Depending on version)
System which protects and provides a deterrent
against theft and break-ins.
Exterior perimeter monitoring
The system checks for opening of the vehicle.
The alarm is triggered if anyone tries, for
example, to open a door, the boot or the
bonnet.
Interior volumetric monitoring
The system only checks for the
variation in volume inside the cab .
The alarm is triggered if anyone
breaks a window or enters the
vehicle's cab but will not be
triggered if someone enters the
loading area . The system checks for any
variation in the volume in the
passenger compartment.
The alarm is triggered if anyone
breaks a window, enters the
passenger compartment or moves
inside the vehicle.
Self-protection function
The system checks for the putting out of
ser vice of its components.
The alarm is triggered if the battery, the central
control or the siren wiring is put out of ser vice
or damaged.
For all work on the alarm system,
contact a CITROËN dealer or a qualified
workshop.
If your vehicle is fitted with Additional
Heating
/ Ventilation, volumetric
monitoring is not compatible with this
system.
For more information on Additional
Heating
/ Ventilation, refer to the
corresponding section.
Locking the vehicle with full
alarm system
Activation
F Turn the ignition off and exit the vehicle. The exterior perimeter monitoring is activated
after 5 seconds and the interior volumetric
monitoring after 45 seconds.
If an opening (door, tailgate or hinged
doors, bonnet, etc.) is incorrectly closed,
the vehicle is not locked, but the exterior
perimeter monitoring will be activated
after 45 seconds, at the same time as the
interior volumetric monitoring.
Deactivation
F Lock or deadlock the vehicle using the remote control or the
"Keyless Entry and Starting"
system.
When the monitoring system is active, the
indicator lamp in the button flashes once per
second and the direction indicators come on for
about 2 seconds.
F
P
ress the remote control
unlocking button.
or
F
U
nlock the vehicle with the "Keyless Entry
and Starting" system.
The monitoring system is deactivated: the
indicator lamp in the button goes off and the
direction indicators flash for about 2 seconds.
2
Access
Page 54 of 324
52
Triggering of the alarm
This is indicated by sounding of the siren
and flashing of the direction indicators for 30
seconds.
The monitoring functions remain active until
the alarm has been triggered ten times in
succession.
When the vehicle is unlocked, rapid flashing of
the indicator lamp in the button indicates that
the alarm was triggered during your absence.
When the ignition is switched on, this flashing
stops immediately.
Locking the vehicle
with exterior perimeter
monitoring only
Deactivate the interior volumetric monitoring
to avoid unwanted triggering of the alarm in
certain cases such as:
-
l
eaving a pet in the vehicle,
-
l
eaving a window partially open,
-
w
ashing your vehicle,
-
c
hanging a wheel,
-
h
aving your vehicle towed,
-
t
ransport by ship.If the vehicle automatically locks itself
again (as happens if a door or the boot
is not opened within 30 seconds of
unlocking), the monitoring system is
automatically reactivated.
Deactivating the interior
volumetric monitoring
F Switch off the ignition and within 10
seconds
press the alarm button until the indicator
lamp is on fixed.
F
G
et out of the vehicle.
F
I
mmediately lock the vehicle using the
remote control or the "Keyless Entry and
Starting" system.
Only the exterior perimeter monitoring is
activated
; the red indicator lamp in the button
flashes every second.
To take effect, this deactivation must be
carried out after each time the ignition is
switched off.
Reactivating the interior
volumetric monitoring
F Deactivate the exterior perimeter monitoring by unlocking the vehicle using the remote
control or the "Keyless Entry and Starting"
system.
F
R
eactivate the alarm system normally.
Locking the vehicle without
activating the alarm
F Lock or deadlock the vehicle using the key (integral to the remote control) in the driver's
door lock.
Failure of the remote
control
To deactivate the monitoring functions:
F
u
nlock the vehicle using the key (integral to
the remote control) in the driver's door lock,
F
O
pen the door ; this sets off the alarm.
F
U
pon switching on the ignition the alarm
stops. The button indicator lamp goes off.
Operating fault
When the ignition is switched on, fixed
illumination of the indicator lamp in the button
indicates a fault with the system.
Have it checked by a CITROËN dealer or a
qualified workshop.
Automatic activation
(Depending on country of sale)
The system is activated automatically 2
minutes
after the last door or the boot is closed.
F
T
o avoid triggering the alarm on entering
the vehicle, first press the unlocking button
on the remote control or unlock the vehicle
using the “Keyless Entry and Starting”
system.
Access
Page 88 of 324
86
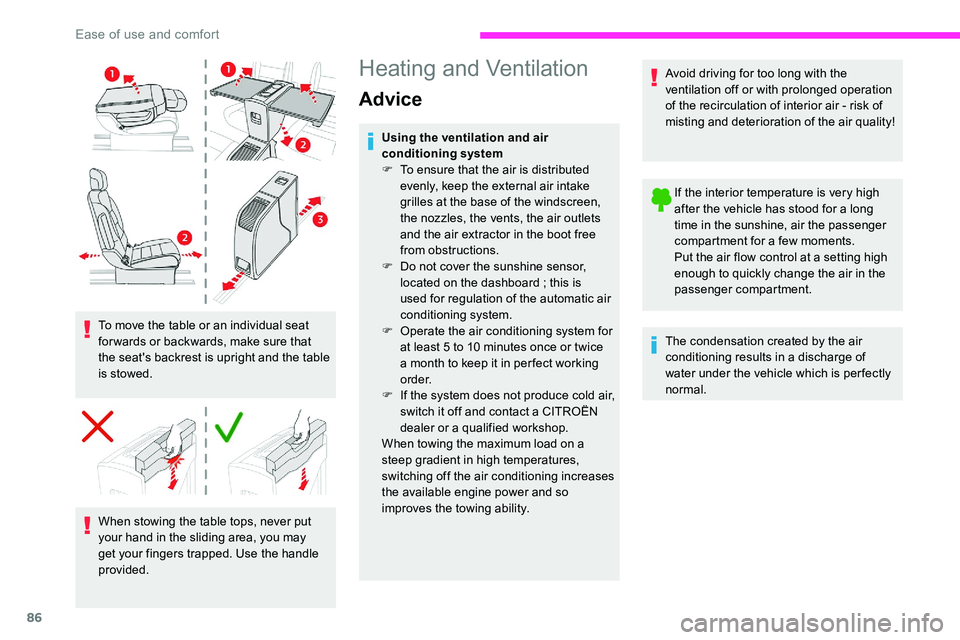
To move the table or an individual seat
for wards or backwards, make sure that
the seat's backrest is upright and the table
is stowed.When stowing the table tops, never put
your hand in the sliding area, you may
get your fingers trapped. Use the handle
provided.
Heating and Ventilation
Advice
Using the ventilation and air
conditioning system
F
T
o ensure that the air is distributed
evenly, keep the external air intake
grilles at the base of the windscreen,
the nozzles, the vents, the air outlets
and the air extractor in the boot free
from obstructions.
F
D
o not cover the sunshine sensor,
located on the dashboard
; this is
used for regulation of the automatic air
conditioning system.
F
O
perate the air conditioning system for
at least 5 to 10
minutes once or twice
a month to keep it in per fect working
o r d e r.
F
I
f the system does not produce cold air,
switch it off and contact a CITROËN
dealer or a qualified workshop.
When towing the maximum load on a
steep gradient in high temperatures,
switching off the air conditioning increases
the available engine power and so
improves the towing ability. Avoid driving for too long with the
ventilation off or with prolonged operation
of the recirculation of interior air - risk of
misting and deterioration of the air quality!
If the interior temperature is very high
after the vehicle has stood for a long
time in the sunshine, air the passenger
compartment for a few moments.
Put the air flow control at a setting high
enough to quickly change the air in the
passenger compartment.
The condensation created by the air
conditioning results in a discharge of
water under the vehicle which is per fectly
normal.
Ease of use and comfort
Page 181 of 324
179
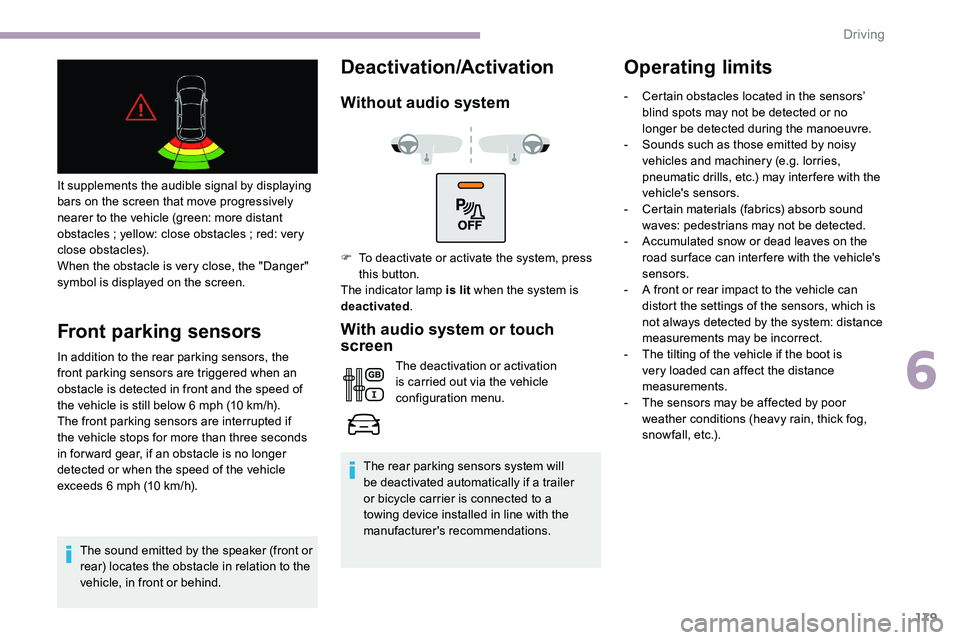
It supplements the audible signal by displaying
bars on the screen that move progressively
nearer to the vehicle (green: more distant
obstacles ; yellow: close obstacles ; red: very
close obstacles).
When the obstacle is very close, the "Danger"
symbol is displayed on the screen.
Front parking sensors
In addition to the rear parking sensors, the
front parking sensors are triggered when an
obstacle is detected in front and the speed of
the vehicle is still below 6 mph (10
km/h).
The front parking sensors are interrupted if
the vehicle stops for more than three seconds
in for ward gear, if an obstacle is no longer
detected or when the speed of the vehicle
exceeds 6
mph (10 km/h).
The sound emitted by the speaker (front or
rear) locates the obstacle in relation to the
vehicle, in front or behind.
Deactivation/Activation
Without audio system
With audio system or touch
screen
The deactivation or activation
is carried out via the vehicle
configuration menu.
The rear parking sensors system will
be deactivated automatically if a trailer
or bicycle carrier is connected to a
towing device installed in line with the
manufacturer's recommendations.
Operating limits
F To deactivate or activate the system, press this button.
The indicator lamp is lit when the system is
deactivated . -
C
ertain obstacles located in the sensors’
blind spots may not be detected or no
longer be detected during the manoeuvre.
-
S
ounds such as those emitted by noisy
vehicles and machinery (e.g. lorries,
pneumatic drills, etc.) may inter fere with the
vehicle's sensors.
-
C
ertain materials (fabrics) absorb sound
waves: pedestrians may not be detected.
-
A
ccumulated snow or dead leaves on the
road sur face can inter fere with the vehicle's
sensors.
-
A f
ront or rear impact to the vehicle can
distort the settings of the sensors, which is
not always detected by the system: distance
measurements may be incorrect.
-
T
he tilting of the vehicle if the boot is
very loaded can affect the distance
measurements.
-
T
he sensors may be affected by poor
weather conditions (heavy rain, thick fog,
snowfall, etc.).
6
Driving
Page 183 of 324

181
As soon as reverse gear is engaged with the
engine running, this system displays views of
your vehicle’s close surroundings on the touch
screen using a camera located at the rear of
the vehicle.
The screen is divided into two parts: on the left,
a contextual view ; on the right, a view from
above the vehicle in its close surroundings. Different contextual views can be displayed in
the left-hand part:
-
s
tandard view,
-
1
80° view,
-
z
oom view.
AUTO mode is activated by default.
In this mode, the system chooses the best view
to display (standard or zoom) according to the
information transmitted by the parking sensors.
You can change the type of view at any time
during a manoeuvre.
The state of the function is not saved when the
ignition is switched off.
Principle of operation
An image from above your vehicle in its close
surroundings is reconstructed (represented
between the blue brackets) in real time and as
the manoeuvre progresses.
This representation facilitates the alignment of
your vehicle when parking and allows obstacles
close to the vehicle to be seen.
This image is automatically deleted if the
vehicle remains stationary for too long.
The parking sensors supplement the
information on the view from above the vehicle.
The display disappears above
approximately 6 mph (10
km/h).
The system is automatically deactivated
about 7 seconds after coming out of
reverse or on opening a door or the boot.
Activation
Activation is automatic on engaging reverse at
a speed lower than 6 mph (10 km/h).
Using the rear camera, the vehicle's
surroundings are recorded during manoeuvres
at low speed.
6
Driving