mirror controls CITROEN DISPATCH SPACETOURER 2020 Handbook (in English)
[x] Cancel search | Manufacturer: CITROEN, Model Year: 2020, Model line: DISPATCH SPACETOURER, Model: CITROEN DISPATCH SPACETOURER 2020Pages: 324, PDF Size: 10.89 MB
Page 4 of 324
2
.
.
Instrument Panel 9
I ndicators 23
Distance recorders
2
7
Lighting dimmer
2
7
Trip computer
2
8
Setting the time and date
2
9
Electronic key with remote control
function and built-in key,
3
1
Unlocking/Complete or selective unlocking
3
3
Back-up procedures
3
8
Central locking
/ unlocking
4
1
Electric sliding side door(s)
4
3
General recommendations
for the sliding side doors
4
5
Hands-free sliding side door(s)
4
7
Side-hinged rear doors
4
9
Tailgate
5
0
Tailgate rear screen
5
0
Alarm
51
Electric windows
5
3Correct driving position
5
4
Front seats
5
4
2-seat front bench seat
5
6
Steering wheel adjustment
5
8
Mirrors 59
Moduwork
6
0
Precautions for the seats and bench seats
6
3
Fixed one-piece bench seat 6 4
Fixed rear seat and bench seat 6 6
Rear seat and bench seat on rails 6 8
Individual rear seat(s) on rails
7
1
Crew cab, fixed
7
3
Crew cab, folding
7
4
Interior fittings
7
5
Loading area fittings
7
9
Seating area fittings
8
1
Panoramic sunroof
8
2
Retractable sliding table
8
3
Heating and Ventilation
8
6
Heating
87
Manual air conditioning
8
7
Dual-zone automatic air conditioning
8
8
Recirculation of interior air
9
0
Front demisting - defrosting
9
0
Rear screen and/or door mirrors demisting -
defrosting
91
Rear heating - air conditioning
9
2
Additional Heating
/ Ventilation
9
2
Courtesy lamp(s)
9
5Lighting control stalk
9
7
Direction indicators
9
8
Daytime running lamps/Sidelamps
9
9
Automatic illumination of headlamps
9
9
Guide-me-home and welcome lighting
9
9
Cornering lighting
1
00
Automatic headlamp dipping
1
01
Manual headlamp beam
height adjustment 1 02
Interior ambient lighting 1 02
Wiper control stalk
1
03
Automatic wiping
1
04
Changing a wiper blade
1
06
General safety recommendations
1
07
Hazard warning lamps
1
08
Emergency or assistance call
1
08
Audible warning
1
09
Electronic stability control (ESC)
1
09
Advanced Grip Control
1
12
Seat belts
1
13
Airbags
117
Child seats
1
20
Deactivating the front passenger airbag
1
22
ISOFIX child seats
1
29
Manual child lock
1
36
Electric child lock
1
36
Child lock on rear windows
1
37
Over view
Instruments
Access Ease of use and comfort
Safety
Lighting and visibility
Instruments and controls 4
L abels 5
Eco-driving
Contents
Page 6 of 324
4
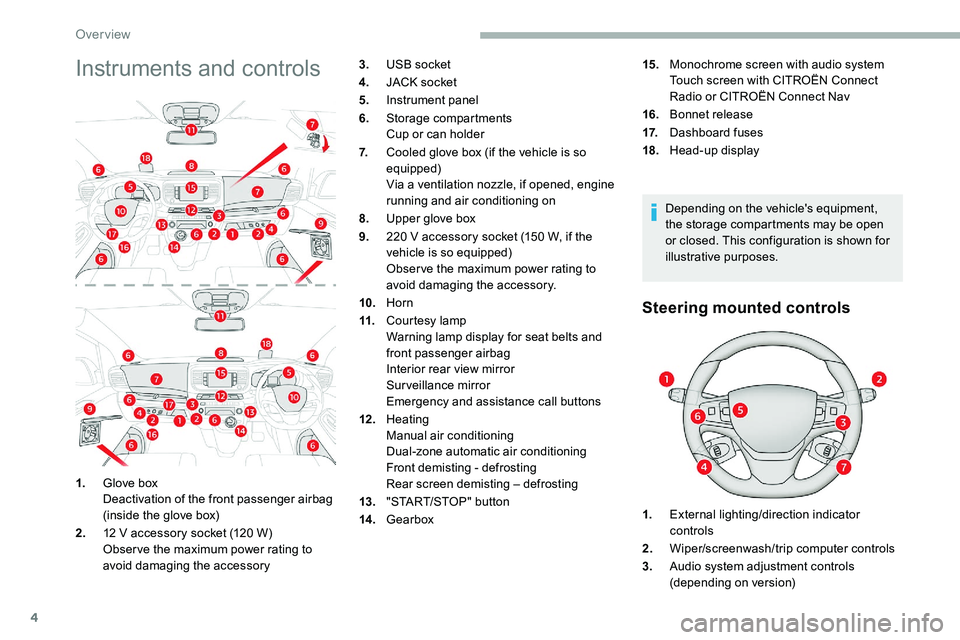
Instruments and controls
Depending on the vehicle's equipment,
the storage compartments may be open
or closed. This configuration is shown for
illustrative purposes.
Steering mounted controls
1.Glove box
Deactivation of the front passenger airbag
(inside the glove box)
2. 12
V accessory socket (120 W)
Obser ve the maximum power rating to
avoid damaging the accessory 3.
USB socket
4. JACK socket
5. Instrument panel
6. Storage compartments
Cup or can holder
7. Cooled glove box (if the vehicle is so
equipped)
Via a ventilation nozzle, if opened, engine
running and air conditioning on
8. Upper glove box
9. 220 V accessory socket (150 W, if the
vehicle is so equipped)
Obser ve the maximum power rating to
avoid damaging the accessory.
10. Horn
11. Courtesy lamp
Warning lamp display for seat belts and
front passenger airbag
Interior rear view mirror
Surveillance mirror
Emergency and assistance call buttons
12 . Heating
Manual air conditioning
Dual-zone automatic air conditioning
Front demisting - defrosting
Rear screen demisting – defrosting
13. "START/STOP" button
14 . Gearbox 15.
Monochrome screen with audio system
Touch screen with CITROËN Connect
Radio or CITROËN Connect Nav
16. Bonnet release
17. Dashboard fuses
18. Head-up display
1. External lighting/direction indicator
controls
2. Wiper/screenwash/trip computer controls
3. Audio system adjustment controls
(depending on version)
Over view
Page 39 of 324
37
With the Keyless Entry and
Starting on your person
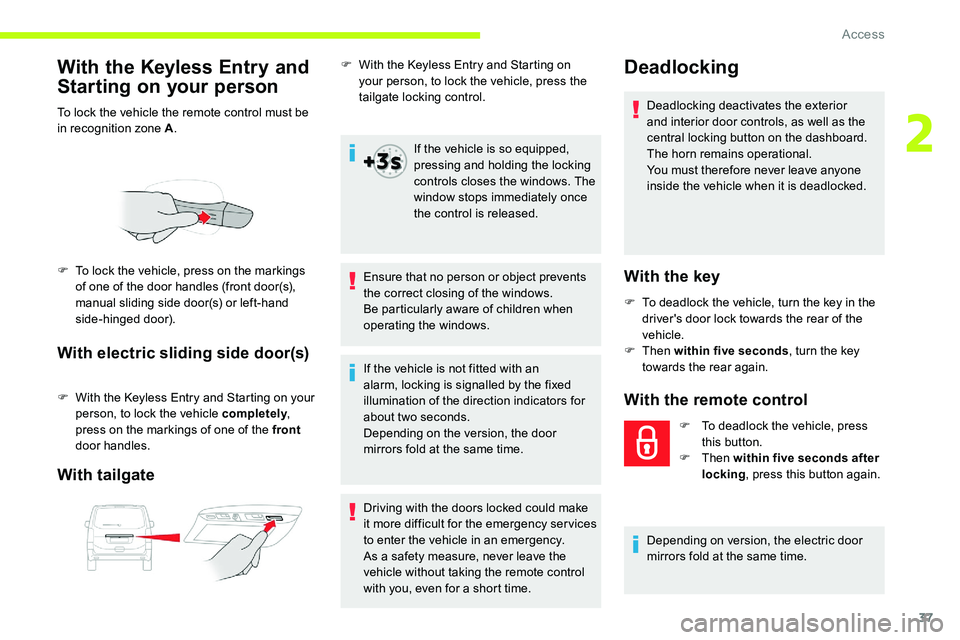
To lock the vehicle the remote control must be
in recognition zone A.
With electric sliding side door(s)
F With the Keyless Entry and Starting on your
person, to lock the vehicle completely ,
press on the markings of one of the front
door handles.
With tailgate
F With the Keyless Entry and Starting on your person, to lock the vehicle, press the
tailgate locking control.
If the vehicle is so equipped,
pressing and holding the locking
controls closes the windows. The
window stops immediately once
the control is released.
Ensure that no person or object prevents
the correct closing of the windows.
Be particularly aware of children when
operating the windows.Deadlocking
F To lock the vehicle, press on the markings of one of the door handles (front door(s),
manual sliding side door(s) or left-hand
side-hinged door). Deadlocking deactivates the exterior
and interior door controls, as well as the
central locking button on the dashboard.
The horn remains operational.
You must therefore never leave anyone
inside the vehicle when it is deadlocked.With the key
F To deadlock the vehicle, turn the key in the
driver's door lock towards the rear of the
vehicle.
F
Then within five seconds , turn the key
towards the rear again.
With the remote control
F To deadlock the vehicle, press this button.
F
Then within five seconds after
locking , press this button again.
If the vehicle is not fitted with an
alarm, locking is signalled by the fixed
illumination of the direction indicators for
about two seconds.
Depending on the version, the door
mirrors fold at the same time.
Driving with the doors locked could make
it more difficult for the emergency ser vices
to enter the vehicle in an emergency.
As a safety measure, never leave the
vehicle without taking the remote control
with you, even for a short time.
Depending on version, the electric door
mirrors fold at the same time.
2
Access
Page 44 of 324
42
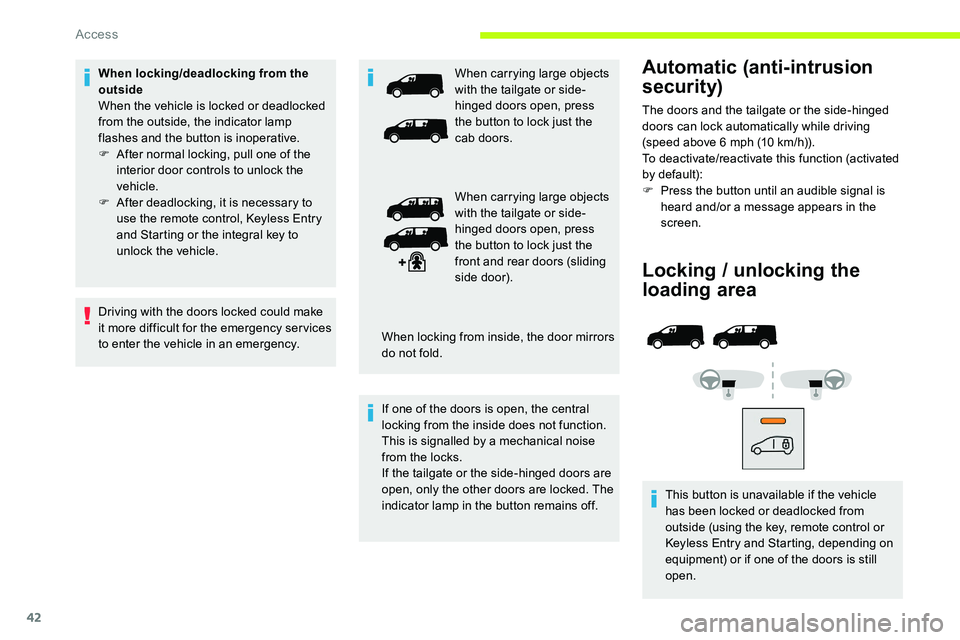
Locking / unlocking the
loading area
This button is unavailable if the vehicle
has been locked or deadlocked from
outside (using the key, remote control or
Keyless Entry and Starting, depending on
equipment) or if one of the doors is still
open.
Automatic (anti-intrusion
security)
The doors and the tailgate or the side-hinged
doors can lock automatically while driving
(speed above 6 mph (10 km/h)).
To deactivate/reactivate this function (activated
by default):
F
P
ress the button until an audible signal is
heard and/or a message appears in the
screen.
When locking/deadlocking from the
outside
When the vehicle is locked or deadlocked
from the outside, the indicator lamp
flashes and the button is inoperative.
F
A
fter normal locking, pull one of the
interior door controls to unlock the
vehicle.
F
A
fter deadlocking, it is necessary to
use the remote control, Keyless Entry
and Starting or the integral key to
unlock the vehicle.
Driving with the doors locked could make
it more difficult for the emergency ser vices
to enter the vehicle in an emergency. When carrying large objects
with the tailgate or side-
hinged doors open, press
the button to lock just the
cab doors.
When carrying large objects
with the tailgate or side-
hinged doors open, press
the button to lock just the
front and rear doors (sliding
side door).
If one of the doors is open, the central
locking from the inside does not function.
This is signalled by a mechanical noise
from the locks.
If the tailgate or the side-hinged doors are
open, only the other doors are locked. The
indicator lamp in the button remains off. When locking from inside, the door mirrors
do not fold.
Access
Page 56 of 324
54
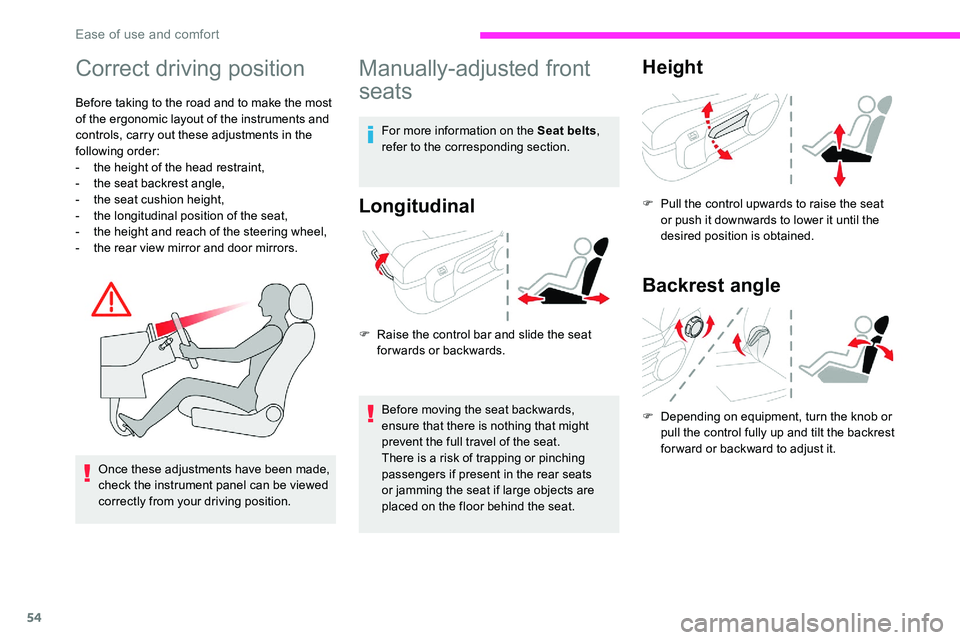
Correct driving position
Before taking to the road and to make the most
of the ergonomic layout of the instruments and
controls, carry out these adjustments in the
following order:
-
t
he height of the head restraint,
-
t
he seat backrest angle,
-
t
he seat cushion height,
-
t
he longitudinal position of the seat,
-
t
he height and reach of the steering wheel,
-
t
he rear view mirror and door mirrors.
Once these adjustments have been made,
check the instrument panel can be viewed
correctly from your driving position.
Manually-adjusted front
seats
For more information on the Seat belts ,
refer to the corresponding section.
Longitudinal
F Raise the control bar and slide the seat forwards or backwards.
Before moving the seat backwards,
ensure that there is nothing that might
prevent the full travel of the seat.
There is a risk of trapping or pinching
passengers if present in the rear seats
or jamming the seat if large objects are
placed on the floor behind the seat.
Height
F Pull the control upwards to raise the seat or push it downwards to lower it until the
desired position is obtained.
Backrest angle
F Depending on equipment, turn the knob or pull the control fully up and tilt the backrest
forward or backward to adjust it.
Ease of use and comfort
Page 105 of 324

103
Wiper control stalk
Programming
Your vehicle may also include some functions
that can be activated/deactivated:In wintry conditions, remove snow, ice or
frost present on the windscreen, around
the wiper arms and blades and the
windscreen seal, before operating the
wipers.
Do not operate the wipers on a dry
windscreen. Under extremely hot or cold
conditions, ensure that the wiper blades
are not stuck to the windscreen before
operating the wipers.
Manual controls
The wipers are controlled directly by the driver.
With manual wiping (intermittent)
With AUTO wiping
- automatic windscreen wipers,
- rear wiping on engaging reverse gear.
Front wipers
Raise or lower the control to the desired
position to change the wiping speed.
Fast wiping (heavy rain).
Normal wiping (moderate rain).
Intermittent wiping (proportional to
the speed of the vehicle).
Of f. Single wipe (press down or pull
the stalk briefly towards you, then
release).
or Automatic wiping (press down,
then release).
Single wipe (pull the stalk briefly
towards you).
Automatic windscreen
wiping
The windscreen wipers operate automatically
once rain is detected (sensor behind the
rear view mirror), adapting their speed to the
intensity of the rain, without any action on the
part of the driver.
4
Lighting and visibility
Page 253 of 324
1
CITROËN Connect Radio
Multimedia audio system -
Applications - Bluetooth®
telephone
Contents
First steps
1
S
teering mounted controls
2
M
enus
3
A
pplications
5
R
adio
5
D
AB radio (Digital Audio Broadcasting)
7
M
edia
8
T
elephone
1
0
Settings
1
4
Frequently asked questions
1
6
The various functions and settings
described differ according to the version
and configuration of the vehicle. For safety reasons and because they
require continued attention on the part of
the driver, the following operations must
be carried out with the vehicle stationary
and the ignition on:
-
Us
ing a smartphone.
-
P
airing a Bluetooth mobile phone to
the hands-free Bluetooth system of the
car radio.
-
Sm
artphone connection operations for
CarPlay
®, MirrorLinkTM or Android Auto
(certain applications interrupt their
display when the vehicle starts to move
again).
-
T
he configuration of profiles.
The system is protected in such a way that
it will only operate in the vehicle.
The display of the message Energy
Economy Mode signals that a change to
standby is imminent.
The link below gives access to the OSS
(Open Source Software) code for the
system.
https://www.groupe-psa.com/fr/oss/
https://www.groupe-psa.com/en/oss/
First steps
With the engine running, a press
mutes the sound.
With the ignition off, a press turns
the system on.
Increase or decrease the volume using
the wheel or the "plus" or "minus" buttons
(depending on the equipment).
Use the buttons on either side of or below the
touch screen for access to the menus, then
press the virtual buttons in the touch screen.
Depending on the model, use the "Source" or
"Menu" buttons on the left of the touch screen
for access to the menus, then press the virtual
buttons in the touch screen.
At all times it is possible to display the rolling
menus by pressing the screen briefly with three
fingers.
All of the touch areas of the screen are white.
For pages with multiple tabs at the bottom of
the screen, it is possible to switch between
pages either by tapping the tab for the desired
page, or by using a finger, sliding the pages to
the left or to the right.
Press in the grey zone to go back up a level or
to confirm.
.
CITROËN Connect Radio
Page 273 of 324
1
CITROËN Connect Nav
GPS navigation -
Applications - Multimedia
audio system - Bluetooth
®
telephone
Contents
First steps
1
S
teering mounted controls
2
M
enus
3
V
oice commands
4
N
avigation
1
2
Connected navigation
1
4
Applications
1
7
Radio
2
0
DAB radio (Digital Audio Broadcasting)
2
2
Media
2
2
Telephone
2
4
Settings
2
8
Frequently asked questions
3
0The various functions and settings
described differ according to the version
and configuration of the vehicle.
For safety reasons and because they
require continued attention on the part of
the driver, the following operations must
be carried out with the vehicle stationary
and the ignition switched off:
-
Us
ing a smartphone.
-
P
airing a Bluetooth mobile phone to
the hands-free Bluetooth system of the
audio system.
-
Sm
artphone connection operations for
CarPlay
®, MirrorLinkTM or Android Auto
(certain applications interrupt their
display when the vehicle starts to move
again).
-
W
atching a video (the video stops
when the vehicle starts to move again).
-
T
he configuration of profiles.
The system is protected in such a way that
it will only operate in the vehicle.
The display of the message Energy
Economy Mode signals that a change to
standby is imminent. The link below gives access to the OSS
(Open Source Software) code for the
system.
https://www.groupe-psa.com/fr/oss/
https://www.groupe-psa.com/en/oss/
First steps
With the engine running, a press
mutes the sound.
With the ignition off, a press turns
the system on.
Increase or decrease the volume using
the wheel or the "plus" or "minus" buttons
(depending on the equipment).
Use the menu buttons on either side of or
below the touch screen for access to the
menus, then press the virtual buttons in the
touch screen.
Depending on the model, use the "Source" or
"Menu" buttons to access the rolling menus,
then press the virtual buttons in the touch
screen.
Display the rolling menus at any time by
pressing the screen briefly with three fingers.
All of the touch areas of the screen are white.
Press the back arrow to go back a level.
Press "OK" to confirm.
.
CITROËN Connect Nav