run flat CITROEN DISPATCH SPACETOURER 2021 Handbook (in English)
[x] Cancel search | Manufacturer: CITROEN, Model Year: 2021, Model line: DISPATCH SPACETOURER, Model: CITROEN DISPATCH SPACETOURER 2021Pages: 324, PDF Size: 10.52 MB
Page 214 of 324

212
In the event of a breakdown
Model with halogen
headlamps
1.Sidelamps (W5W-5W)
2. Main beam headlamps (H1-55W)
3. Dipped beam headlamps (H7-55W)
4. Daytime running lamps (W21W LL-21W)
5. Direction indicators (PY21W-21W amber)
Model with Xenon
headlamps
1.Main beam headlamps (H1-55W)
2. Dipped beam headlamps (D8S-25W)
3. Direction indicators (PY21W-21W amber)
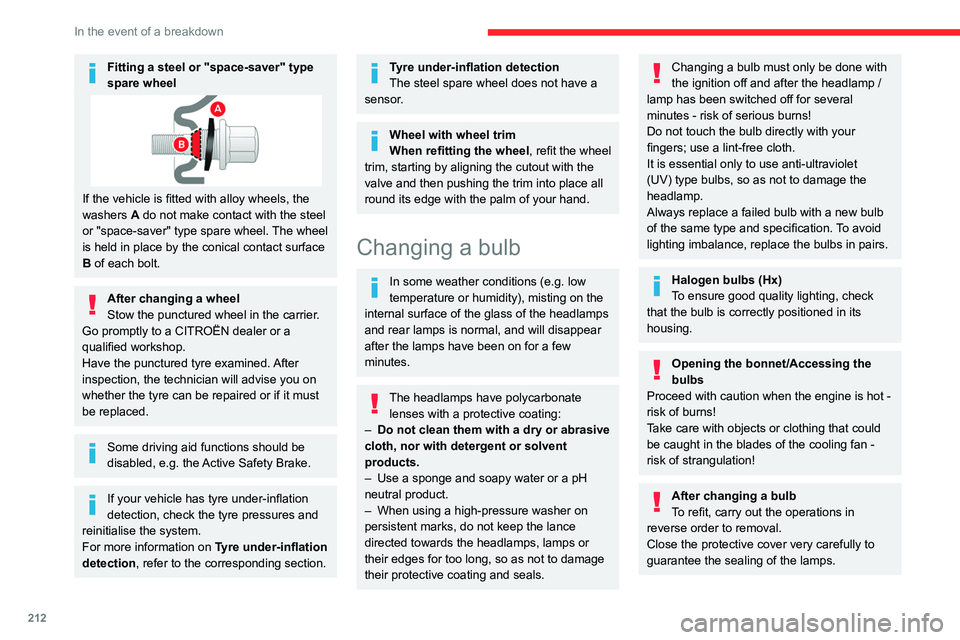
Fitting a steel or "space-saver" type
spare wheel
If the vehicle is fitted with alloy wheels, the
washers A do not make contact with the steel
or "space-saver" type spare wheel. The wheel
is held in place by the conical contact surface
B of each bolt.
After changing a wheel
Stow the punctured wheel in the carrier.
Go promptly to a CITROËN dealer or a
qualified workshop.
Have the punctured tyre examined. After
inspection, the technician will advise you on
whether the tyre can be repaired or if it must
be replaced.
Some driving aid functions should be
disabled, e.g. the Active Safety Brake.
If your vehicle has tyre under-inflation
detection, check the tyre pressures and
reinitialise the system.
For more information on Tyre under-inflation
detection, refer to the corresponding section.
Tyre under-inflation detection
The steel spare wheel does not have a
sensor.
Wheel with wheel trim
When refitting the wheel, refit the wheel
trim, starting by aligning the cutout with the
valve and then pushing the trim into place all
round its edge with the palm of your hand.
Changing a bulb
In some weather conditions (e.g. low
temperature or humidity), misting on the
internal surface of the glass of the headlamps
and rear lamps is normal, and will disappear
after the lamps have been on for a few
minutes.
The headlamps have polycarbonate lenses with a protective coating:
–
Do not clean them with a dry or abrasive
cloth, nor with detergent or solvent
products.
–
Use a sponge and soapy water or a pH
neutral product.
–
When using a high-pressure washer on
persistent marks, do not keep the lance
directed towards the headlamps, lamps or
their edges for too long, so as not to damage
their protective coating and seals.
Changing a bulb must only be done with
the ignition off and after the headlamp /
lamp has been switched off for several
minutes - risk of serious burns!
Do not touch the bulb directly with your
fingers; use a lint-free cloth.
It is essential only to use anti-ultraviolet
(UV) type bulbs, so as not to damage the
headlamp.
Always replace a failed bulb with a new bulb
of the same type and specification. To avoid
lighting imbalance, replace the bulbs in pairs.
Halogen bulbs (Hx)
To ensure good quality lighting, check
that the bulb is correctly positioned in its
housing.
Opening the bonnet/Accessing the
bulbs
Proceed with caution when the engine is hot -
risk of burns!
Take care with objects or clothing that could
be caught in the blades of the cooling fan -
risk of strangulation!
After changing a bulb
To refit, carry out the operations in
reverse order to removal.
Close the protective cover very carefully to
guarantee the sealing of the lamps.
Page 222 of 324

220
In the event of a breakdown
the booster (or to an earth point on the assisting
vehicle).
► Connect the other end of the green or black
cable to the earth point C.
► Start the engine on the assisting vehicle and
leave it running for a few minutes.
► Operate the starter on the broken down
vehicle and let the engine run.
If the engine does not start immediately, switch
off the ignition and wait a few moments before
trying again.
► Wait for it to return to idle.
► Disconnect the jump leads in reverse order.
► Refit the plastic cover to the (+) terminal, if
the vehicle has one.
► Allow the engine to run for at least
30 minutes, with the vehicle stationary, so that
the battery reaches an adequate state of charge.
Driving immediately without having
reached a sufficient level of charge may
affect some of the vehicle's functionalities.
To disconnect, proceed in reverse order.
Automatic gearbox
Never try to start the engine by pushing
the vehicle.
Electric motor
Flat accessory battery
It is no longer possible to start the motor
or recharge the traction battery.
Precautions before working on the
accessory battery
Select mode
P, switch off the ignition, check
that the instrument panel is off and that the
vehicle is not plugged in.
Jump-starting another vehicle
Do not use the accessory battery to
jump-start another vehicle or to charge
another vehicle's battery.
Always replace the battery with one of equivalent specification.
Access to the battery
The battery is located under the bonnet.
► Open the bonnet using the interior release
lever
, then the exterior safety catch.
►
Secure the bonnet stay
.
► Remove the plastic cover to access the (+)
terminal, if your vehicle has one.
The battery (-) terminal is not accessible.
A
remote earth point is provided at the front of
the vehicle.
For more information on the Bonnet and
the Engine , refer to the corresponding
sections.
Starting using another
battery
If the vehicle's battery is flat, the engine can be
started using a backup battery (either external or
from another vehicle) and jump leads or using a
battery booster.
Never start the engine by connecting a
battery charger.
Never use a 24
V or higher battery booster.
Check beforehand that the backup battery
has a nominal voltage of 12
V and a capacity
at least equal to that of the discharged
battery.
The two vehicles must not be in contact with
each other.
Switch off all electricity-consuming equipment
on both vehicles (audio system, wipers,
lighting, etc.).
Make sure that the jump leads are well away
from the engine’s moving parts (fan, belt,
etc.).
Do not disconnect the (+) terminal while the
engine is running.
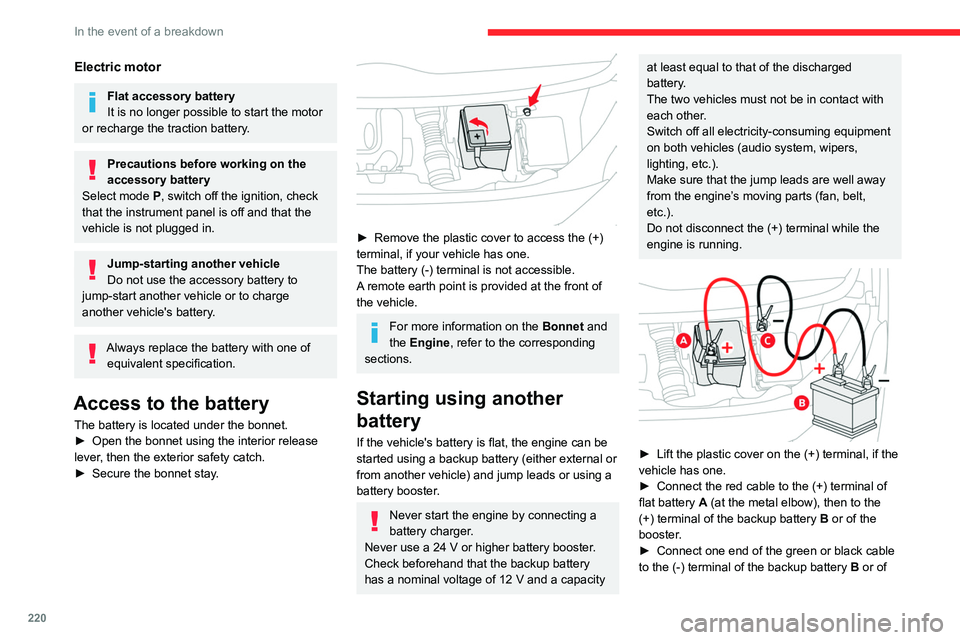
► Lift the plastic cover on the (+) terminal, if the
vehicle has one.
►
Connect the red cable to the (+) terminal of
flat battery
A (at the metal elbow), then to the
(+) terminal of the backup battery
B or of the
booster.
►
Connect one end of the green or black cable
to the (-) terminal of the backup battery
B or of
Page 225 of 324

223
In the event of a breakdown
8state of charge of the battery (up to about 8
hours).
Towing
Procedure for having your vehicle towed or
for towing another vehicle using a removable
mechanical device.
General recommendations
Observe the legislation in force in the
country where you are driving.
Ensure that the weight of the towing vehicle is
higher than that of the towed vehicle.
The driver must remain at the wheel of the
towed vehicle and must have a valid driving
licence.
When towing a vehicle with all four wheels on
the ground, always use an approved towing
arm; rope and straps are prohibited.
The towing vehicle must move off gently.
When the vehicle is towed with its engine
off, there is no longer braking and steering
assistance.
A professional towing service must be
called if:
–
Broken down on a motorway or main road.
–
Not possible to put
the gearbox into neutral,
unlock the steering, or release the parking
brake.
–
Not possible to tow a vehicle with an
automatic gearbox, with the engine running.
–
T
owing with only two wheels on the ground.
–
Four-wheel drive vehicle.
–
No approved towbar available.
Before towing the vehicle, it is essential
to put the vehicle in free-wheeling mode.
For more information on Free-wheeling, refer
to the corresponding section.
Electric motor
An electric vehicle cannot under any
circumstances be used to tow another
vehicle.
However, it may be used, for example, to exit
a rut.
With a manual gearbox, place the gear
lever in neutral.
With an automatic gearbox, place the gear
selector in position N.
Failure to adhere to this instruction may lead
to damage to some braking components and
the lack of braking assistance on restarting
the engine.
Towing constraints
Type of vehicle
(engine/gearbox) Front wheels on the
ground Rear wheels on the
ground Flatbed
4 wheels on the ground
with towbar
Internal combustion/Manual
Internal combustion/Automatic
Page 290 of 324

288
Alphabetical index
Changing a bulb (side-hinged doors) 215
Changing a fuse
217–219
Changing a wheel
208
Changing a wiper blade
96
Changing the remote control battery
36
Changing to free-wheeling
223
Charge level indicator (Electric)
22
Charging cable
183
Charging cable (Electric)
182
Charging connector (Electric)
181, 186–188
Charging flap (Electric)
181, 186–188
Charging system (Electric)
5, 9, 26, 180, 193
Charging the traction battery
(Electric)
22, 180, 186–188
Checking the engine oil level
19
Checking the levels
193–195
Checking tyre pressures
(using the kit)
205, 207–208
Checks
193, 195–197
Checks, routine
195–197
Child lock
134–135
Child lock on rear windows
135
Children
107, 114, 122–124,
131, 131–133, 131–132
Children (safety)
134
Child seats
107, 110–114, 119, 120, 132
Child seats, conventional
113–114, 119, 120
Child seats, i-Size
131–132
Child seats, ISOFIX
122–124, 131, 131–132, 132
Cleaning (advice)
180, 201–202
Closing the boot
45Closing the doors 29, 34, 44–45
Collision Risk Alert
166–167
Compressor, tyre inflation
205
Configuration, vehicle
26
Connected applications
274
Connection, Bluetooth
244, 257–258,
274–275, 279–280
Connection, Wi-Fi network
275
Connectivity
273
Consumption figures
27
Container, AdBlue®
198
Control, emergency boot release
36
Control, emergency door
29, 35–36
Control, heated seats
52
Control stalk, lighting
89
Control stalk, wipers
94–95
Control unit
182–183
Courtesy lamp
87
Courtesy lamp, front
87–88, 216
Courtesy lamp, rear
87–88, 216
Courtesy lamps
87–88, 216
Cover, load space
72
Crew cab, fixed
66–68
Crew cab, folding
68
Cruise control
156, 158–159, 161–163
Cruise control, adaptive
158, 163, 165–166
Cruise control by speed limit
recognition
158–159
Cruise control, dynamic with
Stop function
158–159D
DAB (Digital Audio Broadcasting) -
Digital radio
240–241, 254, 277
Date (setting)
28, 260, 282
Daytime running lamps
90, 213–214
Deactivating the passenger airbag
108, 112
Deactivation of DSC (ESC)
102
Deadlocking
34–35
Deferred charging
27, 188
Deferred charging (Electric)
26–27, 181, 186
Defrosting
54, 82–83
Demisting
82–83
Demisting, rear
83
Demisting, rear screen
83
Dimensions
233
Dipstick
19, 193
Direction indicators
90, 213–215, 217
Display, head-up
155–156
Domestic charging
183
Domestic charging (Electric)
187–188, 231
Door pockets
70
Doors, rear
44–45
Doors, side
40
Doors, side-hinged
34–35, 44–45, 215
Driver’s attention warning
170
Drive selector (Electric)
149, 196
Driving
136–137
Driving aids camera (warnings)
154
Driving aids (recommendations)
154
Driving economically
8
Driving modes
150