spare wheel CITROEN DISPATCH SPACETOURER 2021 Handbook (in English)
[x] Cancel search | Manufacturer: CITROEN, Model Year: 2021, Model line: DISPATCH SPACETOURER, Model: CITROEN DISPATCH SPACETOURER 2021Pages: 324, PDF Size: 10.52 MB
Page 211 of 324

209
In the event of a breakdown
8These tools are specific to the vehicle and may vary according to the level of
equipment.
Do not use them for any other purpose.
The jack must only be used to change a wheel with a damaged or punctured tyre.
Do not use any jack other than the one
supplied with the vehicle.
If the vehicle does not have its original jack,
contact a CITROËN dealer or a qualified
workshop to obtain the one that was intended
by the manufacturer.
The jack meets European standards, as
defined in the Machinery Directive 2006/42/
CE.
The jack does not require any maintenance.
Access to the spare wheel
► Access to the spare wheel is from the rear .
► Depending on version, open the side-hinged
doors or the tailgate.
To avoid any unwanted opening of the electric side door(s), deactivate the
Hands-Free Access function in the vehicle
configuration menu.
For more information on the Hands-Free
Sliding Side Door , refer to the corresponding
section.
► If the vehicle is fitted with a towing device,
raise the rear of the vehicle using the jack (must
be at jacking point B
) to allow sufficient space to
remove the spare wheel.
Remove the spare wheel from the
carrier
► Access the carrier bolt, located on the rear
door sill.
►
Slacken the bolt using the wheelbrace (about
14 turns) until the carrier is low enough to allow
the carrier hook to be disengaged.
► Release the carrier from the hook, take the
spare wheel and place it next to the wheel to be
changed.
Refit the spare wheel in the carrier
► Position the wheel facing the carrier .
► Progressively return the wheel to the carrier
by pushing alternately at the left and right until it
is clear of the hook fixing area.
Page 212 of 324

210
In the event of a breakdown
► Engage the carrier on the hook, then tighten
the bolt using the wheelbrace until the bolt is fully
tightened.
Tyre in the carrier
You can change the size of the tyre on the spare
wheel by following the instructions below.
Original tyre
size XS-M
XL
215/65 R16 Placing a 225 wheel in the carrier is prohibited. There is no
restriction.
215/60 R17
215/60 R17
M&S
225/55 R17 Placing a 215 wheel in the carrier is not recom-
mended (risk of noise).
A punctured tyre of size 215 or 225 can be placed in the carrier.
Removing a wheel
Parking the vehicle
Immobilise the vehicle where it does
not obstruct traffic: the ground must be level,
stable and non-slippery.
With a manual gearbox, engage first gear
then switch off the ignition to block the
wheels.
With an automatic gearbox, place the gear
selector in position P then switch off the
ignition to block the wheels.
With a drive selector, place the gear selector
in position P then switch off the ignition to
block the wheels.
Apply the parking brake, unless it is
programmed to automatic mode (for an
electric parking brake), and check that the
indicator lamp lights up on
the instrument
panel.
Ensure that the occupants have left the
vehicle and are located in a safe place.
Never go underneath a vehicle raised using a
jack; use an axle stand.
With an electric parking brake, place a chock
against the wheel diagonally opposite to the
one being replaced.
► With a steel wheel, remove the bolt cover
using tool 3
or the wheel trim by hand. ►
With an alloy wheel, remove the cover from
each of the bolts using tool 3
.
►
If the vehicle is so equipped, fit security bolt
socket
4 to wheelbrace
1 to slacken the security
bolt.
►
Slacken
(without removing) the other wheel
bolts using just wheelbrace 1.
► Place the foot of the jack on the ground and
ensure that it is directly below the A
or B jacking
point provided on the underbody, whichever is
closest to the wheel to be changed.
Page 213 of 324

2 11
In the event of a breakdown
8
► Use the knob to extend the jack 2 until its
head comes into contact with jacking point A or
B, whichever is used; contact surface A or B on
the vehicle must be correctly engaged with the
central part of the head of the jack.
►
Raise the vehicle until there is sufficient
space between the wheel and the ground to
admit the spare (not punctured) wheel easily
.
Risk of injury!
Ensure that the jack is stable. If the
ground is slippery or loose, the jack may slip
or collapse.
Ensure that the jack is positioned strictly at
one of the jacking points A or B under the
vehicle, making sure that the vehicle's contact
surface is correctly centred on the head of the
jack. Otherwise, there is a risk of damage to
the vehicle and/or of the jack collapsing.
► Remove the bolts and store them in a clean
place.
►
Remove the wheel.
Fitting the wheel
► Fit the wheel on the hub.
► Screw in the bolts by hand as far as possible.
►
If fitted to your vehicle,
pre-tighten the anti-
theft bolt using the wheelbrace 1 fitted with the
anti-theft socket 4. ►
Pre-tighten
the other bolts using the
wheelbrace
1
only.
► Lower the vehicle again fully
.
► Fold jack 2 and remove it.
► If fitted to your vehicle, tighten the anti-theft
bolt using the wheelbrace 1 fitted with the anti-
theft socket
4.
►
T
ighten the other bolts using the
wheelbrace
1
only.
►
Stow the tools in the tool box.
Page 214 of 324

212
In the event of a breakdown
Model with halogen
headlamps
1.Sidelamps (W5W-5W)
2. Main beam headlamps (H1-55W)
3. Dipped beam headlamps (H7-55W)
4. Daytime running lamps (W21W LL-21W)
5. Direction indicators (PY21W-21W amber)
Model with Xenon
headlamps
1.Main beam headlamps (H1-55W)
2. Dipped beam headlamps (D8S-25W)
3. Direction indicators (PY21W-21W amber)
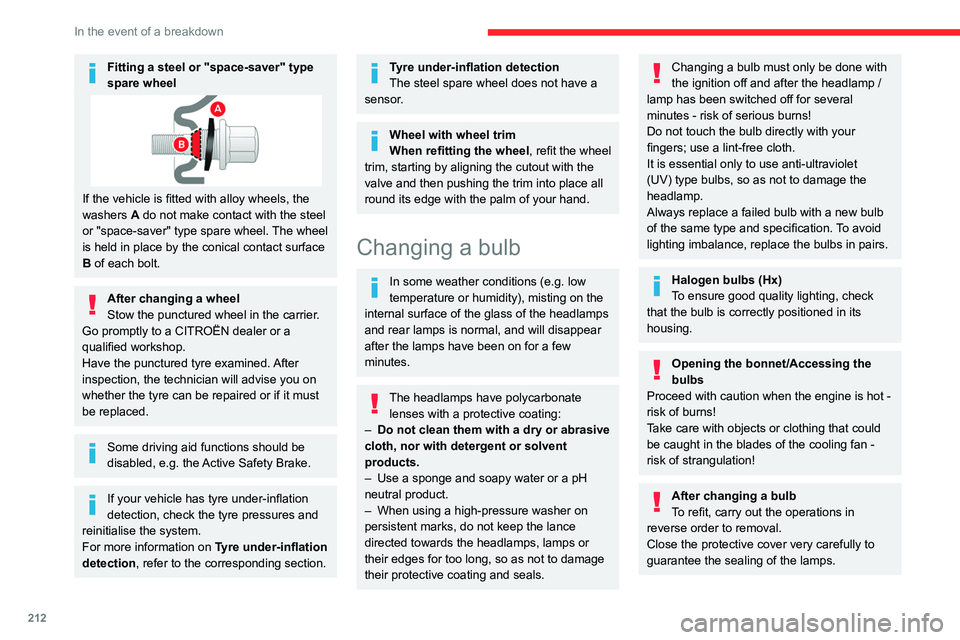
Fitting a steel or "space-saver" type
spare wheel
If the vehicle is fitted with alloy wheels, the
washers A do not make contact with the steel
or "space-saver" type spare wheel. The wheel
is held in place by the conical contact surface
B of each bolt.
After changing a wheel
Stow the punctured wheel in the carrier.
Go promptly to a CITROËN dealer or a
qualified workshop.
Have the punctured tyre examined. After
inspection, the technician will advise you on
whether the tyre can be repaired or if it must
be replaced.
Some driving aid functions should be
disabled, e.g. the Active Safety Brake.
If your vehicle has tyre under-inflation
detection, check the tyre pressures and
reinitialise the system.
For more information on Tyre under-inflation
detection, refer to the corresponding section.
Tyre under-inflation detection
The steel spare wheel does not have a
sensor.
Wheel with wheel trim
When refitting the wheel, refit the wheel
trim, starting by aligning the cutout with the
valve and then pushing the trim into place all
round its edge with the palm of your hand.
Changing a bulb
In some weather conditions (e.g. low
temperature or humidity), misting on the
internal surface of the glass of the headlamps
and rear lamps is normal, and will disappear
after the lamps have been on for a few
minutes.
The headlamps have polycarbonate lenses with a protective coating:
–
Do not clean them with a dry or abrasive
cloth, nor with detergent or solvent
products.
–
Use a sponge and soapy water or a pH
neutral product.
–
When using a high-pressure washer on
persistent marks, do not keep the lance
directed towards the headlamps, lamps or
their edges for too long, so as not to damage
their protective coating and seals.
Changing a bulb must only be done with
the ignition off and after the headlamp /
lamp has been switched off for several
minutes - risk of serious burns!
Do not touch the bulb directly with your
fingers; use a lint-free cloth.
It is essential only to use anti-ultraviolet
(UV) type bulbs, so as not to damage the
headlamp.
Always replace a failed bulb with a new bulb
of the same type and specification. To avoid
lighting imbalance, replace the bulbs in pairs.
Halogen bulbs (Hx)
To ensure good quality lighting, check
that the bulb is correctly positioned in its
housing.
Opening the bonnet/Accessing the
bulbs
Proceed with caution when the engine is hot -
risk of burns!
Take care with objects or clothing that could
be caught in the blades of the cooling fan -
risk of strangulation!
After changing a bulb
To refit, carry out the operations in
reverse order to removal.
Close the protective cover very carefully to
guarantee the sealing of the lamps.
Page 289 of 324

287
Alphabetical index
180° rear vision 176
A
ABS 101
Accelerated charging unit (Wallbox)
182
Accessories
98
Access to the 3rd row
58, 60
Access to the spare wheel
209
Active Safety Brake
166–168
AdBlue®
20, 197
AdBlue® tank
198
Additive, Diesel
195–196
Adjusting head restraints
51
Adjusting seat
49–51
Adjusting the air distribution
80–81
Adjusting the air flow
80–81
Adjusting the date
28, 260, 282
Adjusting the height and reach of the
steering wheel
53
Adjusting the lumbar support
49
Adjusting the seat angle
49, 51
Adjusting the seat belt height
106
Adjusting the temperature
80–81
Adjusting the time
28, 259, 283
Advanced Grip Control
103–104
Advice on care and maintenance
180, 201
Advice on driving
8, 136–137
Airbags
107–110, 112
Airbags, curtain
109–110
Airbags, front
108, 110, 112
Airbags, lateral 109–110
Air conditioning
79–80, 81–84, 82
Air conditioning, digital
83
Air conditioning, dual-zone automatic
80–81
Air conditioning, manual
80, 82
Air intake
80–82
Air vents
79
Alarm
46–47
Android Auto connection
256, 274
Anti-lock braking system (ABS)
101
Anti-pinch
75
Antitheft / Immobiliser
30
Apple CarPlay connection
256, 273
Applications
274
Area, loading
31, 38–39, 73
Armrest, front
51
Assistance call
99
Assistance, emergency braking
101, 168
Audible warning
100
Audio streaming (Bluetooth)
243, 255, 278
B
Battery 220
Battery, 12 V
189, 195–196, 219–222
Battery, ancillaries
219–220
Battery, charging
221–222
Battery, remote control
36–37, 85
Bench seat, one-piece, fixed
58–59
Blind, panoramic roof
75
Blind spot monitoring system
172
Blind spot sensors 171
Blinds, side
75
BlueHDi
20, 195, 203
Bluetooth (hands-free)
243–244, 257, 279
Bluetooth (telephone)
257–258, 279–280
Bodywork
201
Bonnet
192
Boot
45
Boot lid
34–35, 36, 45
Brake discs
197
Brake lamps
215, 217
Brakes
196–197
Braking
150
Braking assistance system
101
Braking, automatic emergency
166–168
Braking, dynamic emergency
143–144
Brightness
259
Bulbs
212
Bulbs (changing)
212, 215
C
Cable, audio 277
Cable, Jack
277
Capacity, fuel tank
178–179
Cap, fuel filler
178–179
Care of the bodywork
201
CD
242
CD, MP3
242
Central locking
29, 34, 38
Changing a bulb
212, 215, 217
Page 295 of 324

293
Alphabetical index
T
Table of weights 226
Table position
50
Table, retractable sliding
75–78
Tables, aircraft
70
Tables of engines
231
Tables of fuses
217–219
Table top, working
57
Tailgate rear screen
45
Tank, fuel
178–179
Technical data
226, 231
Telephone
243–246, 257–258, 279–281
Telephone, Bluetooth with voice
recognition
246
Temperature, coolant
19
Textured Paint
201
Thermal comfort consumption indicator
(Electric)
22
Thermal comfort equipment
22
Third brake lamp
215
Time (setting)
28, 259, 283
TMC (Traffic info)
270
Tool box
204
Tools
205, 208
Topping-up AdBlue®
198
Top Rear Vision
174
Total distance recorder
23
Touch screen
25–27, 86
Towbar
103, 190
Towed loads
225–226, 231
Towing another vehicle
223–224
Towing eye
224
Traction battery charge
183
Traction battery (Electric) 22, 26,
180–181, 231
Traction control (ASR)
101, 104
Traffic information (TA)
239
Traffic information (TMC)
270
Trailer
103, 190
Trailer stability assist (TSA)
103
Trajectory control systems
101
Triangle, warning
203
Trip computer
24–25
Trip distance recorder
23
Tyres
197, 236
Tyre under-inflation detection
152–153, 207, 212
U
Under-inflation (detection) 152
Unlocking
29–33
Unlocking from the inside
38–39
Unlocking, selective
31–33
Unlocking the doors
38
Unlocking, total
31–33
Updating the date
28, 260, 282
Updating the time
28, 259, 283
USB
241, 254, 256, 273, 277
V
Ventilation 79–80, 84–86
Video
278
Voice commands 265–268
W
Wallbox (Electric) 182
Warning and indicator lamps
12
Warning lamp, driver''s seat belt
not fastened
107
Warning lamps
12
Warning lamp, seat belts
107
Warnings and indicators
12
Washing
155
Washing (advice)
180, 201–202
Weights
225–226, 231
Welcome lighting
30
Wheel, spare
153, 197, 208–209, 212
Windows, rear
74
Windscreen wipers
94–95
Wiper blades (changing)
96
Wiper, rear
95
Wipers
94–95
Wipers, automatic rain sensitive
95