door lock CITROEN DISPATCH SPACETOURER 2021 Handbook (in English)
[x] Cancel search | Manufacturer: CITROEN, Model Year: 2021, Model line: DISPATCH SPACETOURER, Model: CITROEN DISPATCH SPACETOURER 2021Pages: 324, PDF Size: 10.52 MB
Page 150 of 324

148
Driving
Creeping (moving without
using the accelerator)
This function facilitates manoeuvring of the
vehicle at low speed (when parking, in traffic
jams, etc.).
With the engine at idle, parking brake released
and position D, M or R selected, the vehicle
moves
as soon as you take your foot off
the brake pedal (even without pressing the
accelerator).
As a safety precaution, never leave the vehicle with the engine running and the
doors closed.
Manual operation
► With the selector in position D , press
button M to enable 6- or 8-speed
sequential
gear changing.
The indicator lamp for the button comes on.
►
Operate the "
+" or "-" steering mounted
controls.
M appears and the engaged gears are
shown in succession on the instrument
panel.
►
Y
ou can revert to automatic operation at any
time by pressing button M again.
The indicator lamp for the button goes off.
In manual mode, there is no need to
release the accelerator pedal while
changing gear.
It is only possible to change from one
gear to another if the vehicle speed and
engine speed permit.
If the engine speed is too low or too high,
the selected gear flashes for a few
seconds, then the gear actually engaged is
shown.
When the vehicle is stationary or moving very
slowly, the gearbox automatically selects gear
M1.
To preserve the brakes while descending a steep incline, use engine braking to
reduce your speed (change down or select a
lower gear).
Keeping the brake pedal pressed
continuously for long periods can overheat
the brakes, with the risk of damaging the
braking system or making it inoperative.
Only use the brakes when necessary, to slow
or stop the vehicle.
Depending on the road configuration
(e.g. mountainous road), manual
operation may be preferable.
Automatic operation may not always be
suitable, and does not enable engine braking.
Invalid value during manual
operation
This symbol is displayed if a gear is not engaged correctly (gear selector between
two positions).
►
Place the selector "correctly" at a position.
Switching off the vehicle
Before switching off the engine, select position
P then apply the parking brake to immobilise
the vehicle, unless this is set to automatic mode
(with electric parking brake).
Check that mode
P has been engaged and that
the electric parking brake has been applied
automatically; if not, apply it manually.
The corresponding indicator lamps in the
selector and the electric parking brake control
lever must be on, as well as those on the
instrument panel.
A point of resistance may be noticed when moving to position P.
If the selector is not in position P, when the
driver's door is opened or approximately 45
seconds after the ignition is switched off,
an audible signal sounds and a message
appears.
►
Return the drive selector to position P
;
the audible signal stops and the message
disappears.
When positioned on a steep slope with a
loaded vehicle, depress the brake
pedal, select position P, apply the parking
brake, unless it is set to automatic mode (with
electric parking brake), then release the brake
pedal.
In all circumstances, ensure that the
selector is in position P before leaving
your vehicle.
Malfunction
When the ignition is on, a message appears on
the instrument panel to indicate a fault with the
gearbox.
In this case, the gearbox goes into back-up
mode and is locked in 3
rd gear. You may feel a
significant jolt (without risk to the gearbox) when
changing from P to R and from N to R.
Do not exceed 62 mph (100 km/h), local speed
restrictions permitting.
Have the system checked by a CITROËN dealer
or a qualified workshop.
There is a risk of damaging the gearbox: – If the accelerator and brake pedals are
depressed simultaneously.
– In the event of a battery failure, forcing the
selector from position P to another position.
Page 181 of 324
179
Practical information
7
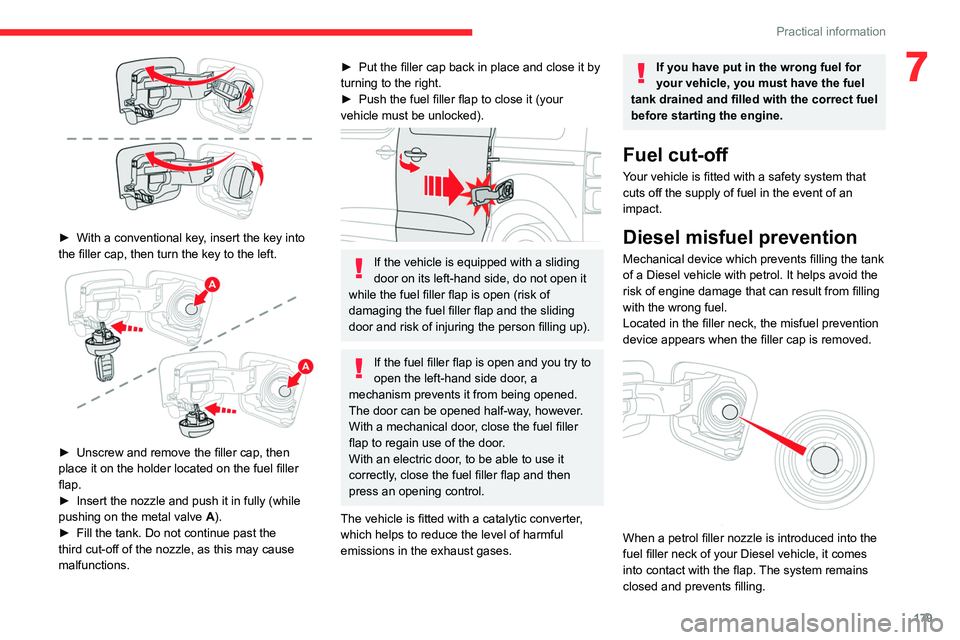
► With a conventional key, insert the key into
the filler cap, then turn the key to the left.
► Unscrew and remove the filler cap, then
place it on the holder located on the fuel filler
flap.
►
Insert the nozzle and push it in fully (while
pushing on the metal valve A
).
►
Fill the tank. Do not continue past the
third cut-off of the nozzle, as this may cause
malfunctions.
► Put the filler cap back in place and close it by
turning to the right.
►
Push the fuel filler flap to close it (your
vehicle must be unlocked).
If the vehicle is equipped with a sliding
door on its left-hand side, do not open it
while the fuel filler flap is open (risk of
damaging the fuel filler flap and the sliding
door and risk of injuring the person filling up).
If the fuel filler flap is open and you try to
open the left-hand side door, a
mechanism prevents it from being opened.
The door can be opened half-way, however.
With a mechanical door, close the fuel filler
flap to regain use of the door.
With an electric door, to be able to use it
correctly, close the fuel filler flap and then
press an opening control.
The vehicle is fitted with a catalytic converter,
which helps to reduce the level of harmful
emissions in the exhaust gases.
If you have put in the wrong fuel for
your vehicle, you must have the fuel
tank drained and filled with the correct fuel
before starting the engine.
Fuel cut-off
Your vehicle is fitted with a safety system that
cuts off the supply of fuel in the event of an
impact.
Diesel misfuel prevention
Mechanical device which prevents filling the tank
of a Diesel vehicle with petrol. It helps avoid the
risk of engine damage that can result from filling
with the wrong fuel.
Located in the filler neck, the misfuel prevention
device appears when the filler cap is removed.
When a petrol filler nozzle is introduced into the
fuel filler neck of your Diesel vehicle, it comes
into contact with the flap. The system remains
closed and prevents filling.
Page 184 of 324

182
Practical information
Specific domestic charging cable
(mode 2)
You must not damage the cable.
In the event of damage, do not use it and
contact a CITROËN dealer or a qualified
workshop to replace it.
Control unit (mode 2)
POWER
Green: electrical connection established;
charging can begin.
CHARGE
Flashing green: charging in progress or
temperature pre-conditioning activated.
Fixed green: charging complete.
FAULT
Red: fault; charging not permitted or must
be stopped immediately. Check that everything
is connected correctly and that the electrical
system is not faulty.
State of charging indicator lamp Meaning
Fixed green Charging complete. The charging
indicator lamp goes off after about 2 minutes as the
vehicle's functions go into standby.
The indicator lamp comes back on
when the vehicle is unlocked using the Keyless Entry and Starting or when
a door is opened, to indicate that
the battery is fully charged.
Fixed red Malfunction.
Do not dismantle or modify the charging
connector - risk of electrocution and/or
fire!
Contact a CITROËN dealer or a qualified
workshop.
Charging cables, sockets
and chargers
The charging cable supplied with the vehicle
(depending on version) is compatible with the
electrical systems in the country of sale. When
travelling abroad, check the compatibility of local
electrical systems with the charging cable.
A full range of charging cables is available from
your dealer.
Contact a CITROËN dealer or a qualified
workshop for more information and to obtain
suitable charging cables.
Standard charging, mode 2
Domestic socket
(domestic charging - alternating current (AC))
Mode 2 with a standard socket A: 8 A
maximum charging current.
Mode 2 with a Green'Up socket B: 16 A
maximum charging current.
To have this type of socket installed, call a professional installer.
Specific domestic charging cable - mode 2 (AC)
Page 188 of 324
186
Practical information
For domestic or accelerated charging
Before charging
Depending on the context:
► Have a professional check that the
electrical system to be used complies with
applicable standards and is compatible with
the vehicle.
► Have a professional electrician install
a dedicated domestic power socket or
accelerated charging unit (Wallbox)
compatible with the vehicle.
You should preferably use the charging cable
available as an accessory.
For more information, contact a CITROËN
dealer or a qualified workshop.
(During charging)
While charging is in progress, unlocking
the vehicle will cause the charging to stop.
If no action is taken on one of the openings
(door or boot) or on the charging nozzle, the
vehicle will lock again after 30 seconds and
charging will resume automatically.
Never work under the bonnet:
– Some areas remain very hot, even an hour
after charging ends - risk of burns!
– The fan may start at any time - risk of cuts
or strangulation!
After charging
Check that the charging flap is closed.
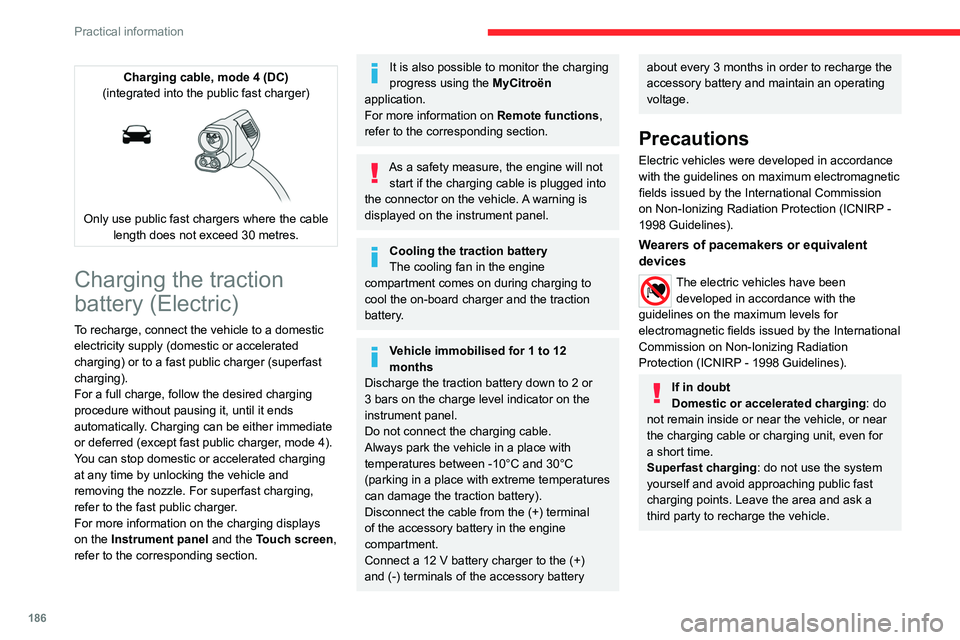
Charging cable, mode 4 (DC)
(integrated into the public fast charger)
Only use public fast chargers where the cable length does not exceed 30 metres.
Charging the traction
battery (Electric)
To recharge, connect the vehicle to a domestic
electricity supply (domestic or accelerated
charging) or to a fast public charger (superfast
charging).
For a full charge, follow the desired charging
procedure without pausing it, until it ends
automatically. Charging can be either immediate
or deferred (except fast public charger, mode 4).
You can stop domestic or accelerated charging
at any time by unlocking the vehicle and
removing the nozzle. For superfast charging,
refer to the fast public charger.
For more information on the charging displays
on the Instrument panel and the Touch screen,
refer to the corresponding section.
It is also possible to monitor the charging
progress using the MyCitroën
application.
For more information on Remote functions,
refer to the corresponding section.
As a safety measure, the engine will not start if the charging cable is plugged into
the connector on the vehicle. A warning is
displayed on the instrument panel.
Cooling the traction battery
The cooling fan in the engine
compartment comes on during charging to
cool the on-board charger and the traction
battery.
Vehicle immobilised for 1 to 12
months
Discharge the traction battery down to 2 or
3 bars on the charge level indicator on the
instrument panel.
Do not connect the charging cable.
Always park the vehicle in a place with
temperatures between -10°C and 30°C
(parking in a place with extreme temperatures
can damage the traction battery).
Disconnect the cable from the (+) terminal
of the accessory battery in the engine
compartment.
Connect a 12 V battery charger to the (+)
and (-) terminals of the accessory battery
about every 3 months in order to recharge the
accessory battery and maintain an operating
voltage.
Precautions
Electric vehicles were developed in accordance
with the guidelines on maximum electromagnetic
fields issued by the International Commission
on Non-Ionizing Radiation Protection
(ICNIRP -
1998 Guidelines).
Wearers of pacemakers or equivalent
devices
The electric vehicles have been developed in accordance with the
guidelines on the maximum levels for
electromagnetic fields issued by the International
Commission on Non-Ionizing Radiation
Protection (ICNIRP - 1998 Guidelines).
If in doubt
Domestic or accelerated charging: do
not remain inside or near the vehicle, or near
the charging cable or charging unit, even for
a short time.
Superfast charging: do not use the system
yourself and avoid approaching public fast
charging points. Leave the area and ask a
third party to recharge the vehicle.
Page 189 of 324
187
Practical information
7For domestic or accelerated charging
Before charging
Depending on the context:
►
Have a professional check that the
electrical system to be used complies with
applicable standards and is compatible with
the vehicle.
►
Have a professional electrician install
a dedicated domestic power socket or
accelerated charging unit (W
allbox)
compatible with the vehicle.
You should preferably use the charging cable
available as an accessory.
For more information, contact a CITROËN
dealer or a qualified workshop.
(During charging)
While charging is in progress, unlocking
the vehicle will cause the charging to stop.
If no action is taken on one of the openings
(door or boot) or on the charging nozzle, the
vehicle will lock again after 30 seconds and
charging will resume automatically.
Never work under the bonnet:
–
Some areas remain very hot, even an hour
after charging ends - risk of burns!
–
The fan may start at any time - risk of cuts
or strangulation!
After charging
Check that the charging flap is closed.
Do not leave the cable connected to the
domestic power socket - risk of short-circuit
or electrocution in the event of contact with or
immersion in water!
For superfast charging
Before charging
Check that the fast public charging
station and its charging cable are compatible
with the vehicle.
If the exterior temperature is below:
–
0°C, charging times may be extended.
–
-20°C, charging is still possible, but
charging times may be extended even further
(the battery has to be heated first).
After charging
Check that the charging flap is closed.
Connection
► Before charging, check that the drive selector
is in mode P, otherwise charging is not possible.
►
Open the charging flap by pressing the
push-button, and check that there are no foreign
bodies on the charging connector
.
Domestic charging, mode 2
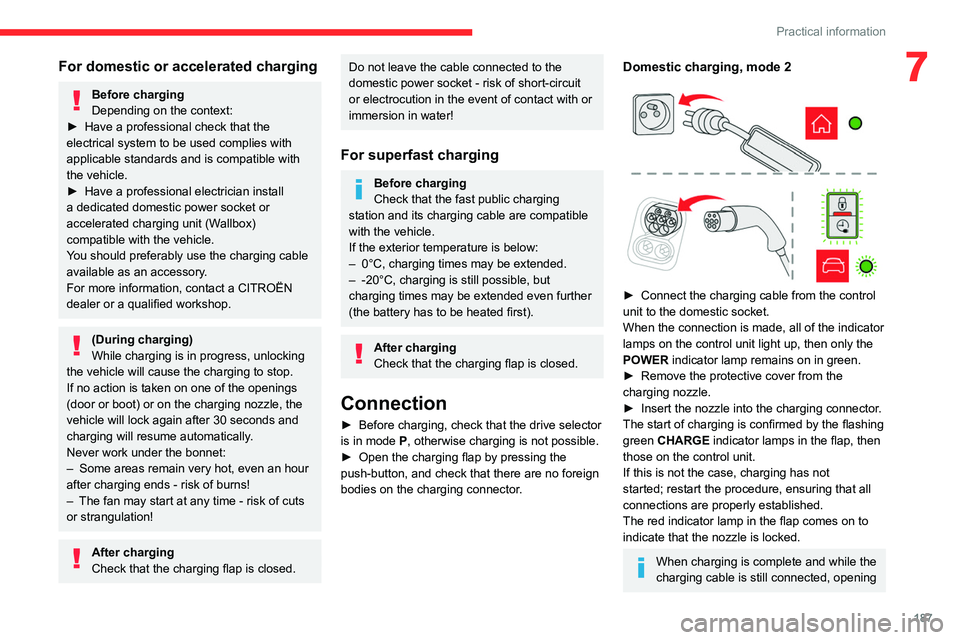
► Connect the charging cable from the control
unit to the domestic socket.
When the connection is made, all of the indicator
lamps on the control unit light up, then only the
POWER
indicator lamp remains on in green.
►
Remove the protective cover from the
charging nozzle.
►
Insert the nozzle into the charging connector
.
The start of charging is confirmed by the flashing
green CHARGE indicator lamps in the flap, then
those on the control unit.
If this is not the case, charging has not
started; restart the procedure, ensuring that all
connections are properly established.
The red indicator lamp in the flap comes on to
indicate that the nozzle is locked.
When charging is complete and while the
charging cable is still connected, opening
Page 190 of 324
188
Practical information
the driver's door will display the charge level
on the instrument panel for about 20 seconds.
Accelerated charging, mode 3
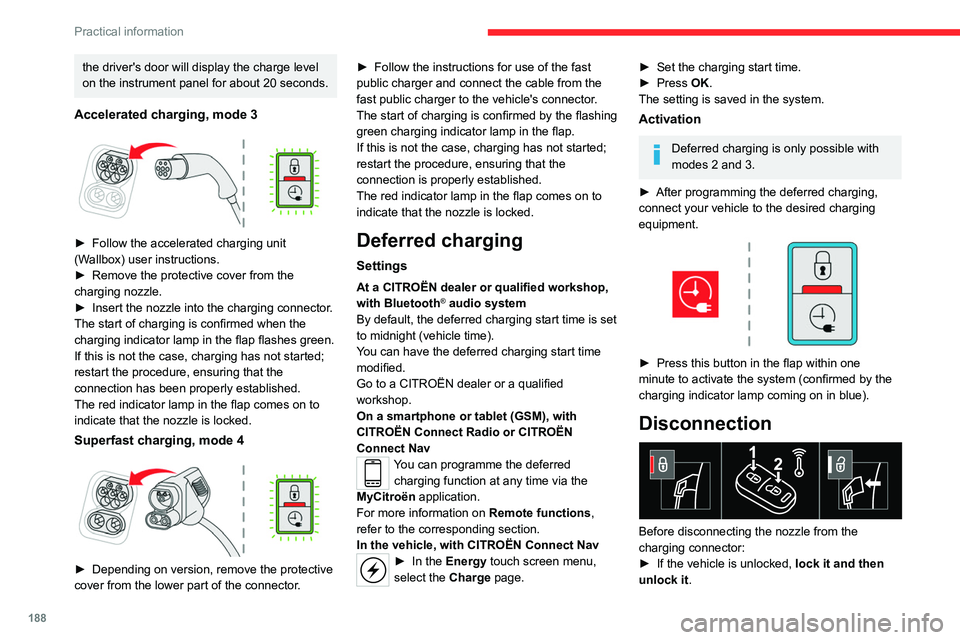
► Follow the accelerated charging unit
(W allbox) user instructions.
►
Remove the protective cover from the
charging nozzle.
►
Insert the nozzle into the charging connector
.
The start of charging is confirmed when the
charging indicator lamp in the flap flashes green.
If this is not the case, charging has not started;
restart the procedure, ensuring that the
connection has been properly established.
The red indicator lamp in the flap comes on to
indicate that the nozzle is locked.
Superfast charging, mode 4
► Depending on version, remove the protective
cover from the lower part of the connector .►
Follow the instructions for use of the fast
public charger and connect the cable from the
fast public charger
to the vehicle's connector.
The start of charging is confirmed by the flashing
green charging indicator lamp in the flap.
If this is not the case, charging has not started;
restart the procedure, ensuring that the
connection is properly established.
The red indicator lamp in the flap comes on to
indicate that the nozzle is locked.
Deferred charging
Settings
At a CITROËN dealer or qualified workshop,
with Bluetooth® audio system
By default, the deferred charging start time is set
to midnight (vehicle time).
You can have the deferred charging start time
modified.
Go to a CITROËN dealer or a qualified
workshop.
On a smartphone or tablet (GSM), with
CITROËN Connect Radio or CITROËN
Connect Nav
You can programme the deferred charging function at any time via the
MyCitroën application.
For more information on Remote functions,
refer to the corresponding section.
In the vehicle, with CITROËN Connect Nav
► In the Energy touch screen menu,
select the Charge page.
► Set the charging start time.
► Press OK.
The setting is saved in the system.
Activation
Deferred charging is only possible with
modes 2 and 3.
►
After programming the deferred charging,
connect your vehicle to the desired charging
equipment.
► Press this button in the flap within one
minute to activate the system (confirmed by the
charging indicator lamp coming on in blue).
Disconnection
Before disconnecting the nozzle from the
charging connector:
►
If the vehicle is unlocked, lock it and then
unlock it .
Page 191 of 324

189
Practical information
7► If the vehicle is locked, unlock it.
The red indicator lamp in the flap goes out to
confirm that the charging nozzle is unlocked.
►
Within
30 seconds, remove the charging
nozzle.
The charging indicator lamp comes on in white.
With selective door unlocking activated,
press the unlocking button twice to
disconnect the charging nozzle.
When charging is complete, the green
charging indicator lamp in the flap goes
out after about 2 minutes.
Domestic charging, mode 2
The end of charging is confirmed when the green
CHARGE indicator lamp on the control unit and
the green charging indicator lamp in the flap
come on fixed.
►
Replace the protective cover on the charging
nozzle and close the charging flap.
►
Disconnect the control unit end of the
charging cable from the domestic socket.
Accelerated charging , mode 3
The end of charging is indicated by the charging
control unit and by the fixed lighting of the green
indicator lamp in the flap.
►
Hang up the nozzle on the charging unit and
close the charging flap.
Superfast charging, mode 4
The end of charging is indicated by the charger
and by the fixed lighting of the green indicator
lamp in the flap.
► You can also pause charging by
pressing this button in the flap (in mode 4
only).
►
Hang up the nozzle on the charger
.
►
Depending on version, replace the protective
cover on the lower section and close the
charging flap.
Energy economy mode
This system manages the duration of use of
certain functions, in order to conserve a sufficient
level of charge in the battery with the ignition off.
After switching off the engine, you can still
use functions such as the audio and telematic
system, the wipers and the dipped beam
headlamps or courtesy lamps, for a combined
duration of approximately 40 minutes.
Selecting the mode
A confirmation message is displayed when
energy economy mode is entered, and the active
functions are placed on standby.
If a telephone call is in progress at the
time, it will be maintained for around 10
minutes via the audio system’s hands-free
system.
Exiting the mode
These functions are automatically reactivated the
next time the vehicle is used.
To restore the use of these functions
immediately, start the engine and let it run:
–
For less than 10 minutes, to use the
equipment for approximately 5 minutes.
–
For more than 10 minutes, to use the
equipment for approximately 30 minutes.
Let the engine run for the specified duration to
ensure that the battery charge is sufficient.
T
o recharge the battery, avoid repeatedly or
continuously restarting the engine.
A flat battery prevents the engine from starting.
For more information on the 12
V battery,
refer to the corresponding section.
Load reduction mode
This system manages the use of certain
functions according to the level of charge
remaining in the battery.
When the vehicle is being driven, the load
reduction function temporarily deactivates certain
functions, such as the air conditioning and the
heated rear screen.
The deactivated functions are reactivated
automatically as soon as conditions permit.
Page 194 of 324
192
Practical information
Diesel engine
1.Screenwash fluid reservoir
2. Engine coolant reservoir
3. Brake fluid reservoir
4. Battery
5. Remote earth point (-)
6. Fusebox
7. Air filter
8. Engine oil filler cap
9. Engine oil dipstick
10. Priming pump*
11 . Power steering fluid reservoir
Diesel fuel system
This system is under very high pressure.
All work must be carried out only by a
CITROËN dealer or a qualified workshop.
* Depending on engine.
► Place the roof rack on the roof aligned with
the fixing points and secure each one to the roof
in turn.
►
Ensure that the roof rack is correctly fitted (by
shaking it).
Bonnet
Stop & Start
Before doing anything under the bonnet,
you must switch off the ignition to avoid any
risk of injury resulting from an automatic
change to START mode.
Electric motor
Take care with objects or clothing that
could be caught in the blades of the cooling
fan or in certain moving components - risk of
strangulation and serious injury!
Before carrying out any work under the
bonnet, you must switch off the ignition, check
that the READY indicator lamp is off on the
instrument panel and disconnect the charging
nozzle if it is plugged in.
The location of the interior bonnet release lever prevents the bonnet being
opened when the left-hand front door is
closed.
When the engine is hot, handle the
exterior safety catch and the bonnet stay
with care (risk of burns), using the protected
area.
When the bonnet is open, take care not to
damage the safety catch.
Do not open the bonnet under very windy
conditions.
Cooling of the engine when stopped
The engine cooling fan may start after
the engine has been switched off.
Take care with objects or clothing that
could be caught in the blades of the fan!
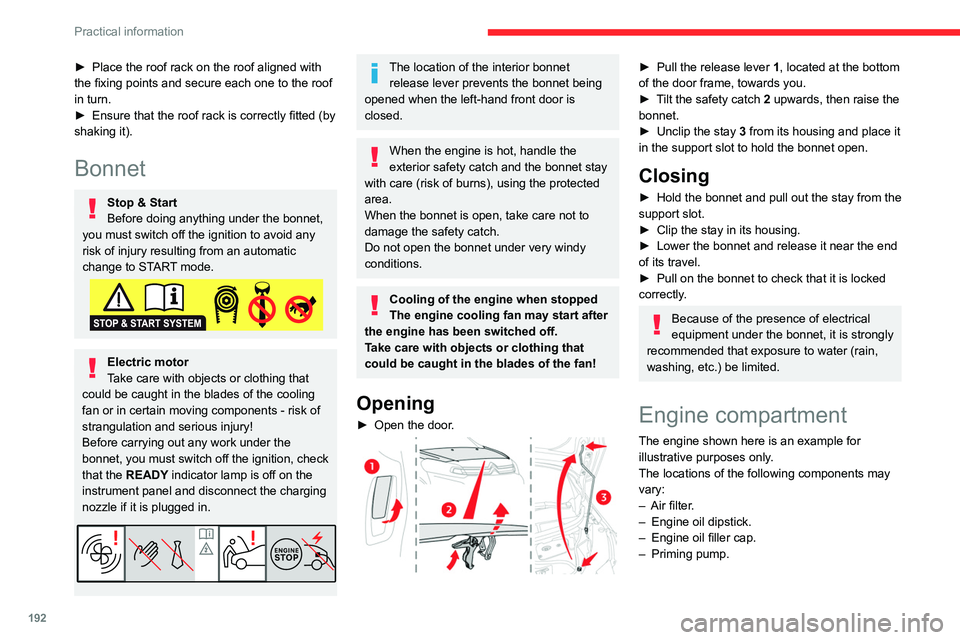
Opening
► Open the door .
► Pull the release lever 1 , located at the bottom
of the door frame, towards you.
►
T
ilt the safety catch 2 upwards, then raise the
bonnet.
►
Unclip the stay
3 from its housing and place it
in the support slot to hold the bonnet open.
Closing
► Hold the bonnet and pull out the stay from the
support slot.
►
Clip the stay in its housing.
►
Lower the bonnet and release it near the end
of its travel.
►
Pull on the bonnet to check that it is locked
correctly
.
Because of the presence of electrical
equipment under the bonnet, it is strongly
recommended that exposure to water (rain,
washing, etc.) be limited.
Engine compartment
The engine shown here is an example for
illustrative purposes only.
The locations of the following components may
vary:
–
Air filter
.
–
Engine oil dipstick.
–
Engine oil filler cap.
–
Priming pump.
Page 200 of 324

198
Practical information
In wintry conditions, ensure that the temperature
of the vehicle is above -11°C. Otherwise the
AdBlue
® may be frozen and so cannot be poured
into the tank. Park the vehicle in a warmer area
for a few hours to allow the top-up to be carried
out.
Never pour the AdBlue® into the Diesel
fuel tank.
If any AdBlue® is splashed, or if there are
any spillages on the bodywork, rinse
immediately with cold water or wipe with a
damp cloth.
If the fluid has crystallised, clean it off using a
sponge and hot water.
Important: in the event of a top-up after
a breakdown because of a lack of
AdBlue, it is essential to wait around 5
minutes before switching on the ignition,
without opening the driver’s door,
unlocking the vehicle, inserting the key
into the ignition switch, or bringing the
key for the "Keyless Entry and Starting"
system into the passenger compartment.
Switch on the ignition, then wait for 10
seconds before starting the engine.
► Switch off the ignition and remove the key
from the switch to switch off the engine.
or
Several alerts are triggered successively during
the remaining 1,500 miles (2,400 km) until the
tank is empty and the vehicle is immobilised.
If the estimated distance travelled by the vehicle
between two services is greater than 3,000
miles
(5,000
km), it will be necessary to top up the
AdBlue.
For more information on the Warning
and indicator lamps and the associated
alerts, or the Indicators, please refer to the
corresponding sections.
Once the AdBlue® tank is empty, a device
required by law prevents the engine from
being restarted.
If the SCR system is faulty, the level of
emissions from the vehicle will no longer meet
the Euro 6 standard and the vehicle starts
polluting the environment.
In the event of a confirmed SCR system
malfunction, it is essential to visit a CITROËN
dealer or a qualified workshop. After 685
miles (1,100 km), a device is automatically
activated to prevent the engine from starting.
In both cases, a range indicator indicates
the distance that can be travelled before the
vehicle is stopped.
Freezing of the AdBlue®
AdBlue® freezes at temperatures below
around -11°C.
The SCR system includes a heater for the
AdBlue® tank, allowing you to continue driving
in very cold conditions.
Supply of AdBlue®
It is recommended that the AdBlue® be topped
up as soon as the first alert is issued indicating
that the reserve level has been reached.
For the correct operation of the SCR
system:
–
Use
only AdBlue
® fluid that meets the ISO
22241 standard.
–
Never
transfer AdBlue
® to another container
as it would lose its purity.
–
Never
dilute AdBlue
® with water.
You can obtain AdBlue
® from a CITROËN dealer
or a qualified workshop, as well as service
stations equipped with AdBlue
® pumps specially
designed for passenger vehicles.
Never top up from an AdBlue® dispenser
reserved for heavy goods vehicles.
Recommendations on
storage
AdBlue® freezes at about -11°C and deteriorates
above +25°C. Containers should be stored in a
cool area and protected from direct sunlight.
Under these conditions, the fluid can be kept for
at least a year.
If the fluid has frozen, it can be used once it has
completely thawed out at room temperature.
Never store AdBlue® containers in your
vehicle.
Precautions for use
AdBlue® is a urea-based solution. This fluid is
non-flammable, colourless and odourless (when
kept in a cool place).
In the event of contact with the skin, wash the
affected area with soap and running water. In the
event of contact with the eyes, immediately rinse
the eyes with large amounts of water or with an
eye wash solution for at least 15 minutes. Seek
medical attention if you feel a persistent burning
sensation or irritation.
If swallowed, immediately wash out the mouth
with clean water and then drink plenty of water.
In certain conditions (high temperature, for
example), the risk of release of ammonia cannot
be excluded: do not inhale the fluid. Ammonia
vapours have an irritant effect on mucous
membranes (eyes, nose and throat).
Store AdBlue® out of the reach of
children, in its original container.
Procedure
Before starting the top-up procedure, ensure that
the vehicle is parked on a flat and level surface.
Page 201 of 324
199
Practical information
7In wintry conditions, ensure that the temperature
of the vehicle is above -11°C. Otherwise the
AdBlue
® may be frozen and so cannot be poured
into the tank. Park the vehicle in a warmer area
for a few hours to allow the top-up to be carried
out.
Never pour the AdBlue® into the Diesel
fuel tank.
If any AdBlue® is splashed, or if there are
any spillages on the bodywork, rinse
immediately with cold water or wipe with a
damp cloth.
If the fluid has crystallised, clean it off using a
sponge and hot water.
Important: in the event of a top-up after
a breakdown because of a lack of
AdBlue, it is essential to wait around 5
minutes before switching on the ignition,
without opening the driver’s door,
unlocking the vehicle, inserting the key
into the ignition switch, or bringing the
key for the "Keyless Entry and Starting"
system into the passenger compartment.
Switch on the ignition, then wait for 10
seconds before starting the engine.
►
Switch off the ignition and remove the key
from the switch to switch off the engine.
or ►
With Keyless Entry and Starting, press the
"
START/STOP" button to switch off the engine.
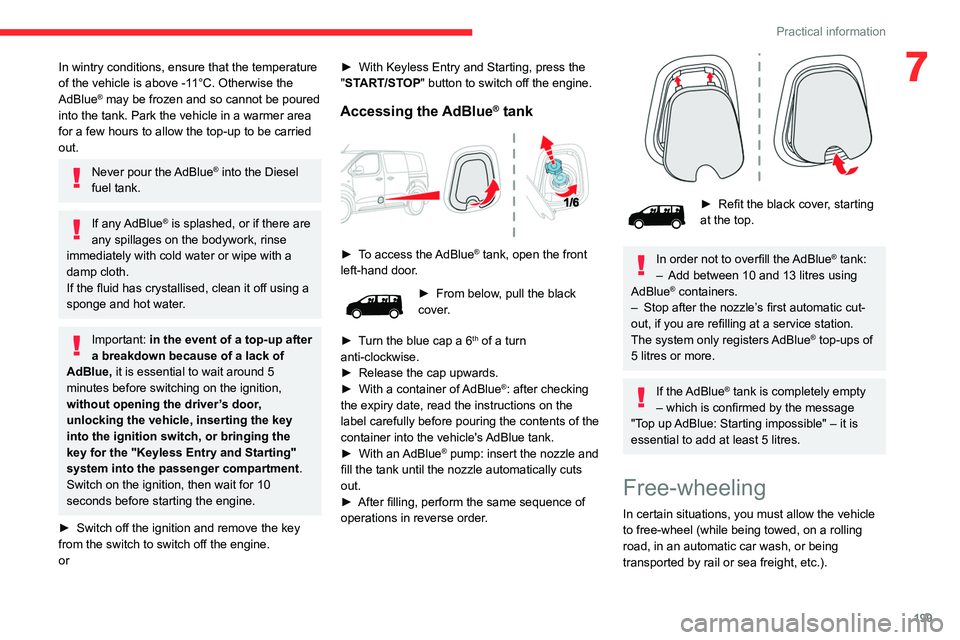
Accessing the AdBlue® tank
► To access the AdBlue® tank, open the front
left-hand door.
► From below , pull the black
cover.
►
T
urn the blue cap a 6
th of a turn
anti-clockwise.
►
Release the cap upwards.
►
With a container of
AdBlue
®: after checking
the expiry date, read the instructions on the
label carefully before pouring the contents of the
container into the vehicle's AdBlue tank.
►
With an
AdBlue® pump: insert the nozzle and
fill the tank until the nozzle automatically cuts
out.
►
After filling, perform the same sequence of
operations in reverse order
.
► Refit the black cover , starting
at the top.
In order not to overfill the AdBlue® tank:
–
Add between 10 and 13 litres using
AdBlue® containers.
–
Stop after the nozzle’ s first automatic cut-
out, if you are refilling at a service station.
The system only registers AdBlue
® top-ups of
5
litres or more.
If the AdBlue® tank is completely empty
– which is confirmed by the message
"Top up
AdBlue: Starting impossible" – it is
essential to add at least 5 litres.
Free-wheeling
In certain situations, you must allow the vehicle
to free-wheel (while being towed, on a rolling
road, in an automatic car wash, or being
transported by rail or sea freight, etc.).