child lock CITROEN DISPATCH SPACETOURER 2021 Handbook (in English)
[x] Cancel search | Manufacturer: CITROEN, Model Year: 2021, Model line: DISPATCH SPACETOURER, Model: CITROEN DISPATCH SPACETOURER 2021Pages: 324, PDF Size: 10.52 MB
Page 4 of 324
2
Contents
■
OverviewOverview 4
Labels 6
■
Eco-driving
1InstrumentsInstrument Panel 10
Warning and indicator lamps 12
Indicators 18
Distance recorders 23
Lighting dimmer 23
Trip computer 24
Touch screen 25
Remotely operable functions (Electric) 27
Setting the date and time 27
2AccessElectronic key with remote control function and
built-in key, 29
Unlocking/Complete or selective unlocking 31
Back-up procedures 35
Central locking 38
Electric sliding side door(s) 39
General recommendations for the sliding
side doors
40
Hands-free sliding side door(s) 43
Side-hinged rear doors 44
Tailgate 45
Tailgate rear screen 45
Alarm 46
Electric windows 48
3Ease of use and comfortCorrect driving position 49
Front seats 49
2-seat front bench seat 51
Steering wheel adjustment 53
Mirrors 53
Moduwork 54
Precautions for the seats and bench seats 57
Fixed one-piece bench seat 58
Fixed rear seat and bench seat 60
Rear seat and bench seat on rails 62
Individual rear seat(s) on rails 64
Crew cab, fixed 66
Crew cab, folding 68
Interior fittings 69
Loading area fittings 72
Seating area fittings 73
Panoramic sunroof 75
Retractable sliding table 75
Heating and Ventilation 79
Heating 80
Manual air conditioning 80
Dual-zone automatic air conditioning 80
Front demisting - defrosting 82
Rear screen and/or door mirror
demisting/de-icing
83
Rear heating - air conditioning 83
Additional heating/ventilation system 84
A/C preconditioning (Electric) 86
Courtesy lamp(s) 87
4Lighting and visibilityLighting control stalk 89
Direction indicators 90
Daytime running lamps/Sidelamps 90
Automatic illumination of headlamps 90
Guide-me-home and welcome lighting 91
Cornering lighting 92
Automatic headlamp dipping 92
Headlamp beam height adjustment 93
Interior ambient lighting 93
Wiper control stalk 94
Automatic wipers 95
Changing a wiper blade 96
5SafetyGeneral safety recommendations 98
Hazard warning lamps 98
Emergency or assistance 99
Horn 100
Pedestrian horn (Electric) 101
Electronic stability control (ESC) 101
Advanced Grip Control 103
Seat belts 104
Airbags 107
Child seats 11 0
Deactivating the front passenger airbag 11 2
ISOFIX and i-Size child seats 120
Manual child lock 134
Electric child lock 135
Child lock on rear windows 135
6DrivingDriving recommendations 136
Starting/switching off the engine 138
Manual parking brake 141
Electric parking brake 142
Hill start assist 144
6-speed manual gearbox 145
Gear shift indicator 145
Automatic gearbox 146
Drive selector (Electric) 149
Driving modes (Electric) 150
Stop & Start 150
Tyre under-inflation detection 152
Driving and manoeuvring aids - General
recommendations
154
Page 6 of 324
4
Overview
Presentation
Instruments and controls
These illustrations and descriptions are intended as a guide. The presence and
location of some components varies
according to the version, trim level and
country of sale.
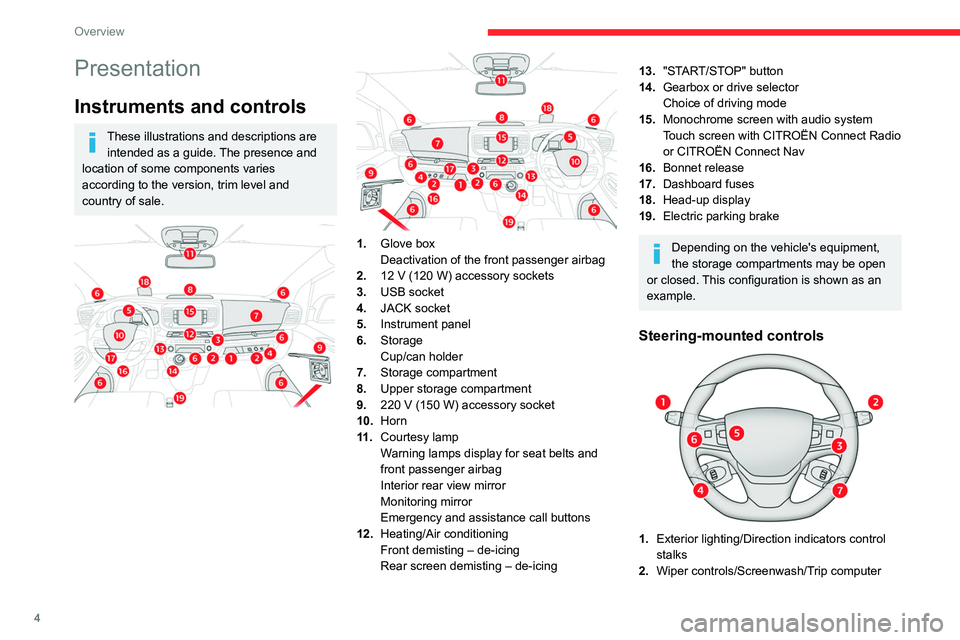
1. Glove box
Deactivation of the front passenger airbag
2. 12
V (120 W) accessory sockets
3. USB socket
4. JACK socket
5. Instrument panel
6. Storage
Cup/can holder
7. Storage compartment
8. Upper storage compartment
9. 220
V (150 W) accessory socket
10.Horn
11
.Courtesy lamp
Warning lamps display for seat belts and
front passenger airbag
Interior rear view mirror
Monitoring mirror
Emergency and assistance call buttons
12. Heating/Air conditioning
Front demisting – de-icing
Rear screen demisting – de-icing
13."START/STOP" button
14. Gearbox or drive selector
Choice of driving mode
15. Monochrome screen with audio system
Touch screen with CITROËN Connect Radio
or CITROËN Connect Nav
16. Bonnet release
17. Dashboard fuses
18. Head-up display
19. Electric parking brake
Depending on the vehicle's equipment,
the storage compartments may be open
or closed. This configuration is shown as an
example.
Steering-mounted controls
1. Exterior lighting/Direction indicators control
stalks
2. Wiper controls/Screenwash/Trip computer
3.Audio system setting controls
4. Controls for Cruise control/Speed limiter/
Adaptive Cruise Control
5. Instrument panel display mode selection
wheel
6. Voice synthesis control
Volume adjustment
7. Audio system setting controls
Central control bar
1. Locking/unlocking from the inside
2. Left-hand electric sliding side door
3. Electric child lock
4. Right-hand electric sliding side door
5. Cab/loading area selectivity
6. Hazard warning lamps
7. DSC/ASR system
8. Tyre under-inflation detection
9. Stop & Start (Diesel)
Page 7 of 324
5
Overview
3.Audio system setting controls
4. Controls for Cruise control/Speed limiter/
Adaptive Cruise Control
5. Instrument panel display mode selection
wheel
6. Voice synthesis control
Volume adjustment
7. Audio system setting controls
Central control bar
1. Locking/unlocking from the inside
2. Left-hand electric sliding side door
3. Electric child lock
4. Right-hand electric sliding side door
5. Cab/loading area selectivity
6. Hazard warning lamps
7. DSC/ASR system
8. Tyre under-inflation detection
9. Stop & Start (Diesel)
Side control bar
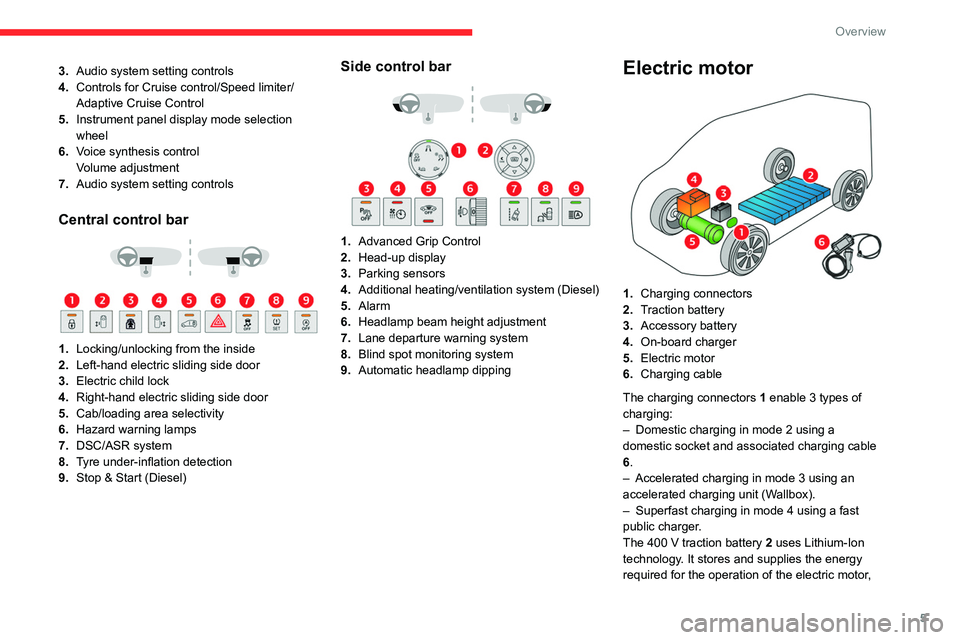
1. Advanced Grip Control
2. Head-up display
3. Parking sensors
4. Additional heating/ventilation system (Diesel)
5. Alarm
6. Headlamp beam height adjustment
7. Lane departure warning system
8. Blind spot monitoring system
9. Automatic headlamp dipping
Electric motor
1.Charging connectors
2. Traction battery
3. Accessory battery
4. On-board charger
5. Electric motor
6. Charging cable
The charging connectors 1 enable 3
types of
charging:
–
Domestic charging in mode 2 using a
domestic socket and associated charging cable
6
.
–
Accelerated charging in mode 3 using an
accelerated charging unit (W
allbox).
–
Superfast charging in mode 4 using a fast
public charger
.
The 400
V traction battery 2 uses Lithium-Ion
technology. It stores and supplies the energy
required for the operation of the electric motor,
Page 9 of 324
7
Overview
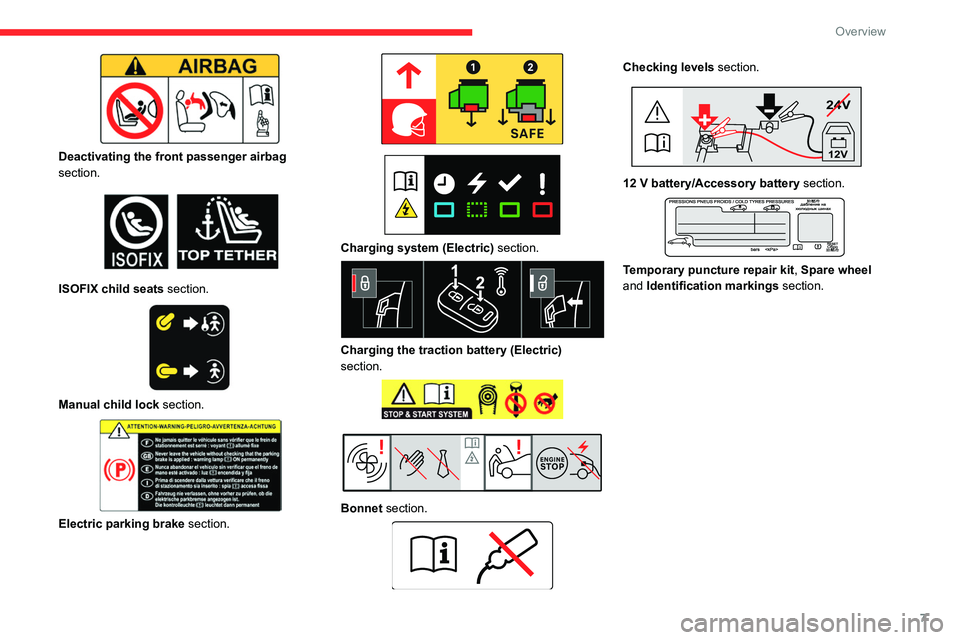
Deactivating the front passenger airbag
section.
ISOFIX child seats section.
Manual child lock section.
Electric parking brake section.
Charging system (Electric) section.
Charging the traction battery (Electric)
section.
Bonnet section.
Checking levels section.
24V
12V
12 V battery/Accessory battery section.
Temporary puncture repair kit, Spare wheel
and Identification markings section.
Page 36 of 324
34
Access
With Keyless Entry and Starting on
your person
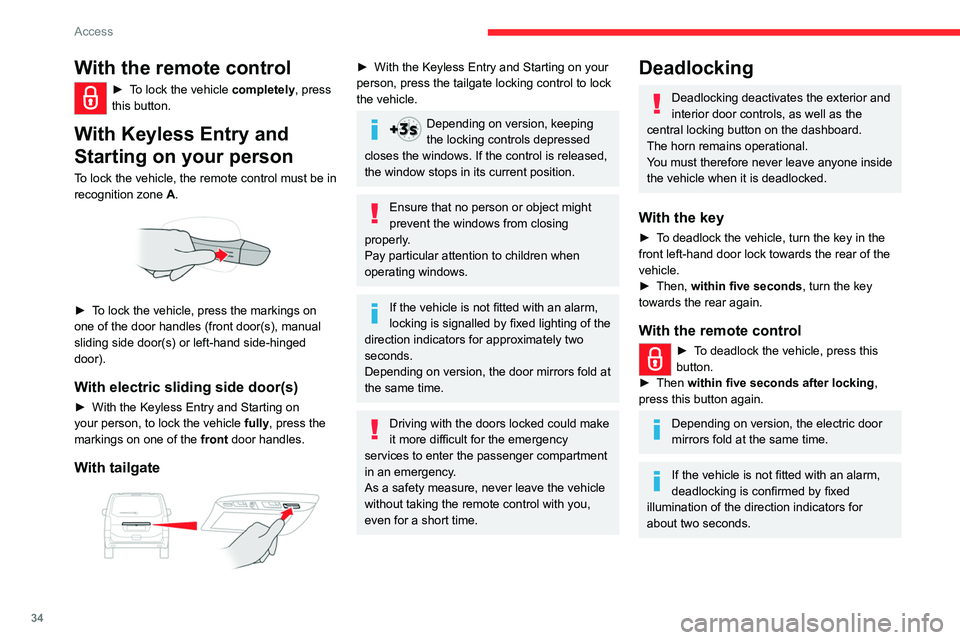
To lock the vehicle, the remote control must be in
recognition zone A.
► To lock the vehicle fully, press the markings
on one of the door handles (front door(s),
manual sliding side door(s) or left-hand side-
hinged door).
► To deadlock the vehicle, press the markings
again within five seconds.
With electric sliding side door(s)
► With the Keyless Entry and Starting on
your person, to lock the vehicle fully, press the
markings on one of the front door handles.
► To deadlock the vehicle, press the markings
again within five seconds.
With tailgate
With the remote control
► To lock the vehicle completely, press
this button.
With Keyless Entry and
Starting on your person
To lock the vehicle, the remote control must be in
recognition zone A.
► To lock the vehicle, press the markings on
one of the door handles (front door(s), manual
sliding side door(s) or left-hand side-hinged
door).
With electric sliding side door(s)
► With the Keyless Entry and Starting on
your person, to lock the vehicle fully , press the
markings on one of the front
door handles.
With tailgate
► With the Keyless Entry and Starting on your
person, press the tailgate locking control to lock
the vehicle.
Depending on version, keeping
the locking controls depressed
closes the windows. If the control is released,
the window stops in its current position.
Ensure that no person or object might
prevent the windows from closing
properly.
Pay particular attention to children when
operating windows.
If the vehicle is not fitted with an alarm,
locking is signalled by fixed lighting of the
direction indicators for approximately two
seconds.
Depending on version, the door mirrors fold at
the same time.
Driving with the doors locked could make
it more difficult for the emergency
services to enter the passenger compartment
in an emergency.
As a safety measure, never leave the vehicle
without taking the remote control with you,
even for a short time.
Deadlocking
Deadlocking deactivates the exterior and
interior door controls, as well as the
central locking button on the dashboard.
The horn remains operational.
You must therefore never leave anyone inside
the vehicle when it is deadlocked.
With the key
► To deadlock the vehicle, turn the key in the
front left-hand door lock towards the rear of the
vehicle.
►
Then,
within five seconds , turn the key
towards the rear again.
With the remote control
► To deadlock the vehicle, press this
button.
►
Then
within five seconds after locking ,
press this button again.
Depending on version, the electric door
mirrors fold at the same time.
If the vehicle is not fitted with an alarm,
deadlocking is confirmed by fixed
illumination of the direction indicators for
about two seconds.
Page 38 of 324
36
Access
Central locking not
functioning
Use these procedures in the following cases:
– Central locking malfunction.
–
Battery disconnected or discharged.
In the event of a malfunction of the
central locking system, the battery must
be disconnected to ensure that the vehicle is
locked fully.
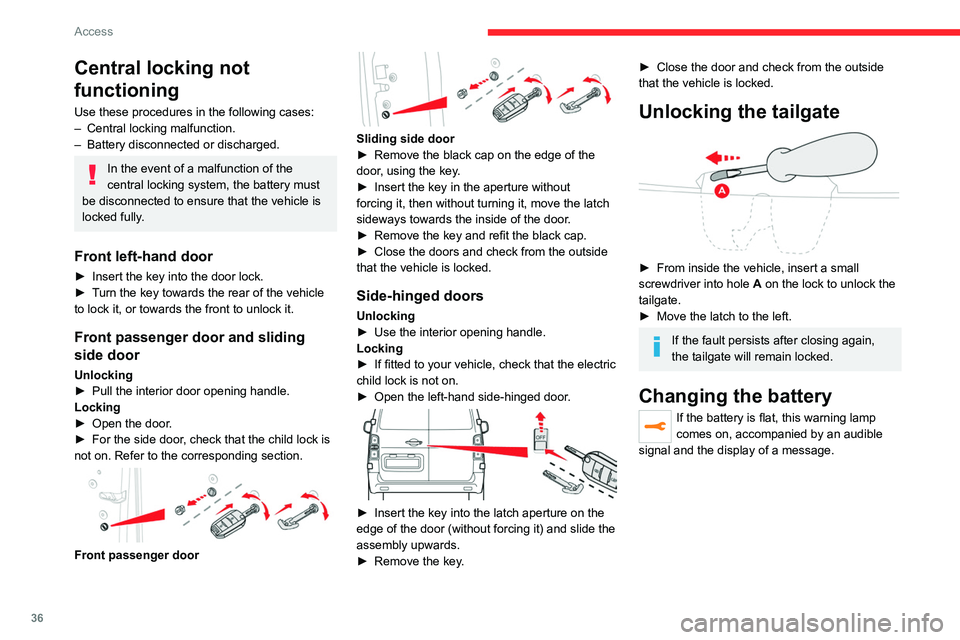
Front left-hand door
► Insert the key into the door lock.
► T urn the key towards the rear of the vehicle
to lock it, or towards the front to unlock it.
Front passenger door and sliding
side door
Unlocking
► Pull the interior door opening handle.
Locking
►
Open the door
.
►
For the side door
, check that the child lock is
not on. Refer to the corresponding section.
Front passenger door
Sliding side door
► Remove the black cap on the edge of the
door
, using the key.
►
Insert the key in the aperture without
forcing it, then without turning it, move the latch
sideways towards the inside of the door
.
►
Remove the key and refit the black cap.
►
Close the doors and check from the outside
that the vehicle is locked.
Side-hinged doors
Unlocking
► Use the interior opening handle.
Locking
►
If fitted to your vehicle, check that the electric
child lock is not on.
►
Open the left-hand side-hinged door
.
► Insert the key into the latch aperture on the
edge of the door (without forcing it) and slide the
assembly upwards.
►
Remove the key
.
► Close the door and check from the outside
that the vehicle is locked.
Unlocking the tailgate
► From inside the vehicle, insert a small
screwdriver into hole A
on the lock to unlock the
tailgate.
►
Move the latch to the left.
If the fault persists after closing again,
the tailgate will remain locked.
Changing the battery
If the battery is flat, this warning lamp
comes on, accompanied by an audible
signal and the display of a message.
Page 41 of 324
39
Access
2Keyless Entry and Starting, depending on
equipment) or if any of the doors are still
open.
Automatic
The loading area is always locked when driving.
To deactivate this automatic locking, go to a CITROËN dealer or a qualified
workshop.
Manual
► With complete unlocking activated,
press this button to lock (indicator lamp
comes on)/unlock (indicator lamp goes off) the
vehicle
.
►
With selective unlocking activated, press this
button to lock (indicator lamp comes on)/unlock
(indicator lamp goes off) the loading area
.
Driving with the doors locked could make
it more difficult for the emergency
services to enter the vehicle in an emergency.
The indicator lamp goes off when unlocking one or more doors of the
loading area.
With the ignition off and the vehicle fully
locked, the indicator lamp goes off for energy
economy reasons.
Electric sliding side
door(s)
The exterior and interior door handles and the interior buttons allow the electrically powered
movement of the door to be started.
Opening and closing of the doors is
accompanied by an audible signal.
Opening
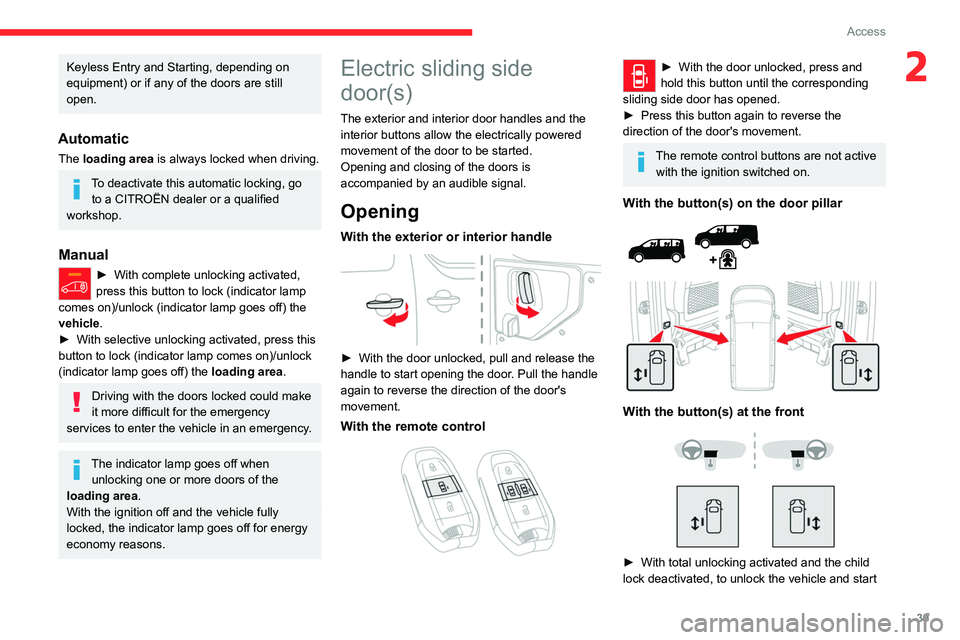
With the exterior or interior handle
► With the door unlocked, pull and release the
handle to start opening the door . Pull the handle
again to reverse the direction of the door's
movement.
With the remote control
► With the door un locked, press and
hold this button until the corresponding
sliding side door has opened.
►
Press this button again to reverse the
direction of the door's movement.
The remote control buttons are not active with the ignition switched on.
With the button(s) on the door pillar
With the button(s) at the front
► With total unlocking activated and the child
lock deactivated, to unlock the vehicle and start
Page 42 of 324
40
Access
opening a door, press the button corresponding
to the door you wish to open.
►
With selective unlocking activated, to unlock
only the
loading area and start opening a door,
press the button corresponding to the door you
wish to open.
►
In both cases, pressing the button again
reverses the direction of the door's movement.
Closing
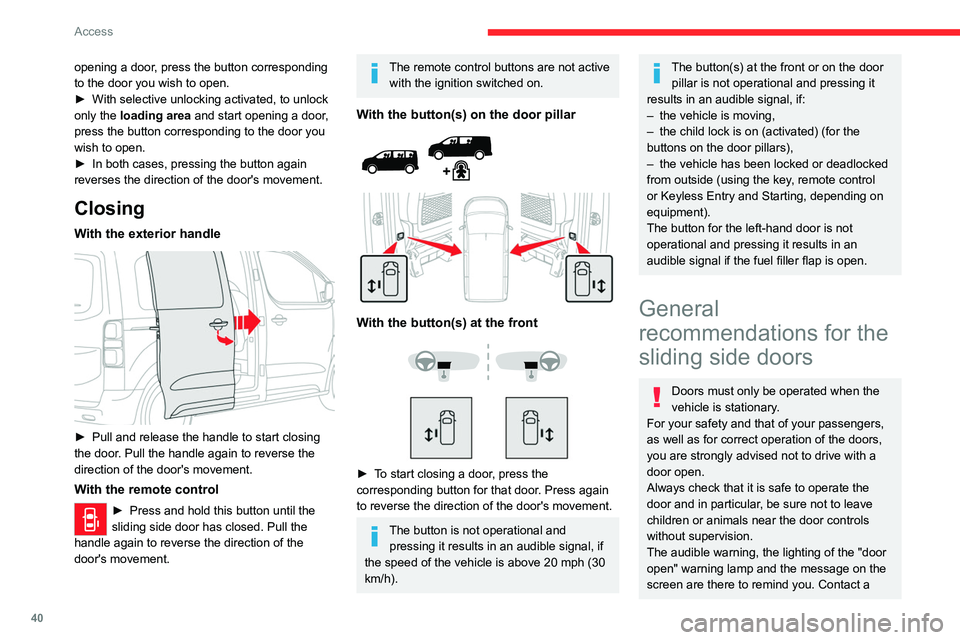
With the exterior handle
► Pull and release the handle to start closing
the door . Pull the handle again to reverse the
direction of the door's movement.
With the remote control
► Press and hold this button until the
sliding side door has closed. Pull the
handle again to reverse the direction of the
door's movement.
The remote control buttons are not active with the ignition switched on.
With the button(s) on the door pillar
With the button(s) at the front
► To start closing a door, press the
corresponding button for that door. Press again
to reverse the direction of the door's movement.
The button is not operational and pressing it results in an audible signal, if
the speed of the vehicle is above 20 mph (30
km/h).
The button(s) at the front or on the door pillar is not operational and pressing it
results in an audible signal, if:
–
the vehicle is moving,
–
the child lock is on (activated) (for the
buttons on the door pillars),
–
the vehicle has been locked or deadlocked
from outside (using the key
, remote control
or Keyless Entry and Starting, depending on
equipment).
The button for the left-hand door is not
operational and pressing it results in an
audible signal if the fuel filler flap is open.
General
recommendations for the
sliding side doors
Doors must only be operated when the
vehicle is stationary.
For your safety and that of your passengers,
as well as for correct operation of the doors,
you are strongly advised not to drive with a
door open.
Always check that it is safe to operate the
door and in particular, be sure not to leave
children or animals near the door controls
without supervision.
The audible warning, the lighting of the "door
open" warning lamp and the message on the
screen are there to remind you. Contact a
Page 46 of 324
44
Access
(the right-hand door is not detected). For more
information on the List of warning lamps and,
in particular, the door open warning, refer to the
corresponding section.
Opening to approximately
180°
If fitted to your vehicle, a check strap system
allows the doors to be opened from about 90° to
about 180°.
► Pull the yellow control when the door is open.
The check strap will engage again automatically
on closing.
When parked with the rear doors open to
90°, the doors will cover the rear lamps.
In order to warn other road users travelling in
the same direction (who may not be aware
that the vehicle is stationary) of the vehicle's
position, use a warning triangle or other
Malfunction
An audible signal repeated three times while
using the function indicates a fault with the
system.
Contact a CITROËN dealer or a qualified
workshop to have the system checked.
If the "Hands-free tailgate access
self-locking" option is selected in the
vehicle menu and after closing the door,
check that the vehicle is properly locked.
Locking will not take place:
–
if the ignition is on,
–
if one of the doors or the tailgate is open,
–
if a "Keyless Entry and Starting" remote
control is inside the vehicle.
If a number of gestures with your foot have
no effect, wait a few seconds before starting
again.
The system is automatically deactivated in
heavy rain or with accumulations of snow
.
If it does not work, make sure that the
remote control is not exposed to a source of
electromagnetic interference (smartphone,
etc.).
Operation may be affected if using a
prosthetic leg.
This system may not work correctly if your
vehicle is fitted with a towbar.
The side door may open or close without warning if:
–
Y
our vehicle is fitted with a towbar.
– A trailer is coupled or decoupled.
– A bicycle carrier is installed or removed.
–
Bicycles are loaded on to or unloaded from
the bicycle carrier
.
–
Something is deposited or lifted behind the
vehicle.
–
An animal approaches the bumper
,
–
The vehicle is washed.
–
The vehicle is being serviced.
–
A
wheel is changed.
To avoid any sudden operation, keep the key
away from the detection zone (also from the
boot’s interior sides) or deactivate the function
in the vehicle configuration menu.
Ensure that no person or object might
prevent the correct opening or closing of
the doors.
Be aware of children when operating the
doors.
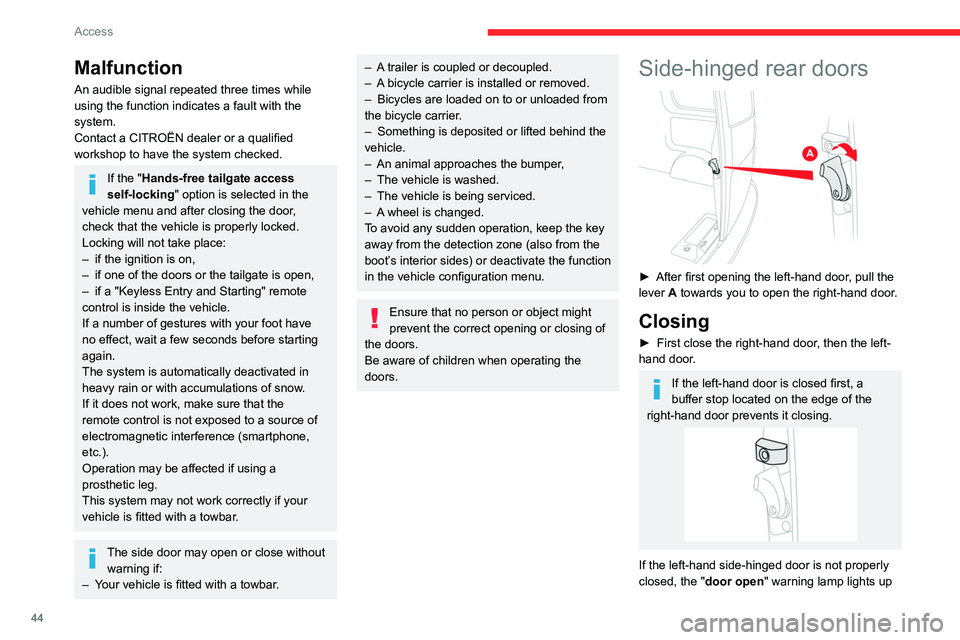
Side-hinged rear doors
► After first opening the left-hand door , pull the
lever A towards you to open the right-hand door.
Closing
► First close the right-hand door , then the left-
hand door.
If the left-hand door is closed first, a
buffer stop located on the edge of the
right-hand door prevents it closing.
If the left-hand side-hinged door is not properly
closed, the "door open " warning lamp
lights up
Page 50 of 324

48
Access
Automatic activation
(Depending on version)
The system is activated automatically 2 minutes
after the last door or the boot is closed.
►
T
o avoid triggering the alarm on entering the
vehicle, first press the unlocking button on the
remote control or unlock the vehicle using the
“Keyless Entry and Starting” system.
Electric windows
1. Left-hand electric window control.
2. Right-hand electric window control.
Operation
► To open/close the window manually, press/
pull the switch without passing the point of
resistance; the window stops as soon as the
switch is released.
►
T
o open/close the window automatically,
press/pull the switch fully, beyond the point of
resistance; the window opens/closes completely
when the switch is released (pressing the switch
again stops the movement of the window).
The electric window controls remain operational for about 45 seconds after
the ignition is switched off if the front doors
are not open.
After that time, the controls are disabled. To
reactivate them, switch the ignition on again.
Safety anti-pinch
If your vehicle is fitted with the safety anti-pinch
function, when the window rises and meets an
obstacle, it stops and partially lowers.
In the event of unwanted opening of the window
on closing, press the control until the window
opens completely. Within 4 seconds, pull the
control until the window closes.
The safety anti-pinch does not operate while
doing this.
Reinitialising the electric
windows
After reconnecting the battery, or in the event
of abnormal window movement, the anti-pinch
function must be reinitialised.
The anti-pinch function is disabled during the
following sequence of operations.
For each window:
►
Lower the window fully
, then raise it; it will
rise in steps of a few centimetres each time the
control is pressed. Repeat the operation until the
window is fully closed.
►
Continue to pull the control for at least one
second after the window reaches the closed
position.
If an electric window meets an obstacle
during operation, the movement of the
window must be reversed. To do this, press
the relevant switch.
When the driver operates the passenger
electric window switch, it is important to
ensure that nothing can prevent the window
from closing properly.
Pay particular attention to children when
operating windows.