fold seats CITROEN DISPATCH SPACETOURER 2021 Handbook (in English)
[x] Cancel search | Manufacturer: CITROEN, Model Year: 2021, Model line: DISPATCH SPACETOURER, Model: CITROEN DISPATCH SPACETOURER 2021Pages: 324, PDF Size: 10.52 MB
Page 4 of 324

2
Contents
■
OverviewOverview 4
Labels 6
■
Eco-driving
1InstrumentsInstrument Panel 10
Warning and indicator lamps 12
Indicators 18
Distance recorders 23
Lighting dimmer 23
Trip computer 24
Touch screen 25
Remotely operable functions (Electric) 27
Setting the date and time 27
2AccessElectronic key with remote control function and
built-in key, 29
Unlocking/Complete or selective unlocking 31
Back-up procedures 35
Central locking 38
Electric sliding side door(s) 39
General recommendations for the sliding
side doors
40
Hands-free sliding side door(s) 43
Side-hinged rear doors 44
Tailgate 45
Tailgate rear screen 45
Alarm 46
Electric windows 48
3Ease of use and comfortCorrect driving position 49
Front seats 49
2-seat front bench seat 51
Steering wheel adjustment 53
Mirrors 53
Moduwork 54
Precautions for the seats and bench seats 57
Fixed one-piece bench seat 58
Fixed rear seat and bench seat 60
Rear seat and bench seat on rails 62
Individual rear seat(s) on rails 64
Crew cab, fixed 66
Crew cab, folding 68
Interior fittings 69
Loading area fittings 72
Seating area fittings 73
Panoramic sunroof 75
Retractable sliding table 75
Heating and Ventilation 79
Heating 80
Manual air conditioning 80
Dual-zone automatic air conditioning 80
Front demisting - defrosting 82
Rear screen and/or door mirror
demisting/de-icing
83
Rear heating - air conditioning 83
Additional heating/ventilation system 84
A/C preconditioning (Electric) 86
Courtesy lamp(s) 87
4Lighting and visibilityLighting control stalk 89
Direction indicators 90
Daytime running lamps/Sidelamps 90
Automatic illumination of headlamps 90
Guide-me-home and welcome lighting 91
Cornering lighting 92
Automatic headlamp dipping 92
Headlamp beam height adjustment 93
Interior ambient lighting 93
Wiper control stalk 94
Automatic wipers 95
Changing a wiper blade 96
5SafetyGeneral safety recommendations 98
Hazard warning lamps 98
Emergency or assistance 99
Horn 100
Pedestrian horn (Electric) 101
Electronic stability control (ESC) 101
Advanced Grip Control 103
Seat belts 104
Airbags 107
Child seats 11 0
Deactivating the front passenger airbag 11 2
ISOFIX and i-Size child seats 120
Manual child lock 134
Electric child lock 135
Child lock on rear windows 135
6DrivingDriving recommendations 136
Starting/switching off the engine 138
Manual parking brake 141
Electric parking brake 142
Hill start assist 144
6-speed manual gearbox 145
Gear shift indicator 145
Automatic gearbox 146
Drive selector (Electric) 149
Driving modes (Electric) 150
Stop & Start 150
Tyre under-inflation detection 152
Driving and manoeuvring aids - General
recommendations
154
Page 52 of 324

50
Ease of use and comfort
Backrest angle
► Tilt the control forwards or rearwards to
adjust the angle of the backrest.
Head restraint height
adjustment
If fitted to your vehicle.
► To raise it, pull it upwards as far as possible
(notch).
► To remove it, press the lug A and pull it
upwards.
Table position of the driver's
and/or the front passenger
seat backrest
On the front passenger side, this position allows
long objects to be carried.
On the driver's side, this position allows rear
passengers to be helped out of the vehicle (by
the emergency services).
Check that there is no object that could
interfere with the movement of a seat,
both above and below.
►
Place the head restraint in the low position,
and if fitted to your vehicle, raise the armrest and
fold the table fitted to the back of the seat.
We recommend deactivating the front
passenger airbag.
► Pull the control fully up and tip the backrest
forward.
T
o return to the normal position, pull the control
up to release the backrest, then pull the backrest
up to its raised position.
When sharp deceleration occurs, objects
placed on the folded backrest can turn
into projectiles.
Electric front seat
To avoid discharging the battery, carry out these adjustments with the engine
running.
For more information on the Seat belts,
refer to the corresponding section.
Longitudinal
► Push the control forwards or rearwards to
slide the seat.
Before moving the seat backwards,
ensure that there is nothing that might
prevent the full travel of the seat.
There is a risk of trapping or pinching
passengers if present in the rear seats or
jamming the seat if large objects are placed
on the floor behind the seat.
Seat cushion height
► Tilt the control upwards or downwards to
obtain the desired height.
Page 60 of 324

58
Ease of use and comfort
► To return the seat, tip the bench towards the
rear until the feet lock into place..
It is not necessary to fold the backrest
(table position) to tip the bench seat for
access to row 3.
Folding the backrest to the
table position
► Put the head restraints in the low position.
► From the rear, lower the handle to release the
backrest.
► From the front, raise the handle to release
the backrest.
► Fold the backrest onto the cushion.
► To return the backrest to its normal position,
raise the handle and pull the backrest up.
Do not leave objects (such as a bag or
toys) on the cushion when folding the
backrest.
introducing any foreign bodies into the
mechanisms.
The seats and bench seats are not designed for any other use than in the
vehicle. They are equipped with mechanisms
and features that may be damaged if used
improperly or if dropped.
Loading luggage or objects
behind the row 3 seat and
bench seat
If you want to load luggage onto the backrests in
row 3 while in the table position, the backrests in
row 2 must also be in the table position.
When driving, it is prohibited to have a
passenger:
–
in rows 2 and 3, in the outer right-hand seat, if
the bench seat is in the fully folded position,
–
in the centre seat if the outer right-hand seat is
in the fully folded position,
–
in row 3 if the backrest in front (row 2) is in the
table position,
–
in row 3 if the seat/bench seat in front (row 2)
is in the fully folded position.
Fixed one-piece bench
seat
Combi, Business
The different equipment and settings described
hereafter vary according to the version and the
configuration of your vehicle.
The bench seat has a one-piece backrest that
may be fixed or foldable (table position).
For more information on the Seat belts,
refer to the corresponding section.
Access to row 3
► Using the handle, release the rear feet then
tip the seat forward.
Page 72 of 324

70
Ease of use and comfort
► To connect a 12 V accessory (maximum
power: 120 Watts), lift the cover and plug in a
suitable adapter.
Observe the maximum power rating to
avoid damaging the accessory.
The connection of an electrical device not approved by CITROËN, such as a
USB charger, may adversely affect the
operation of vehicle electrical systems,
causing faults such as poor radio reception or
interference with displays in the screens.
a risk of injury in the event of an accident or
sudden braking.
Front door storage pockets
Liquids carried in an open vessel (e.g. a
cup or mug) could be spilt, presenting a
risk of damage on contact with the controls in
the dashboard and centre console. Be
careful.
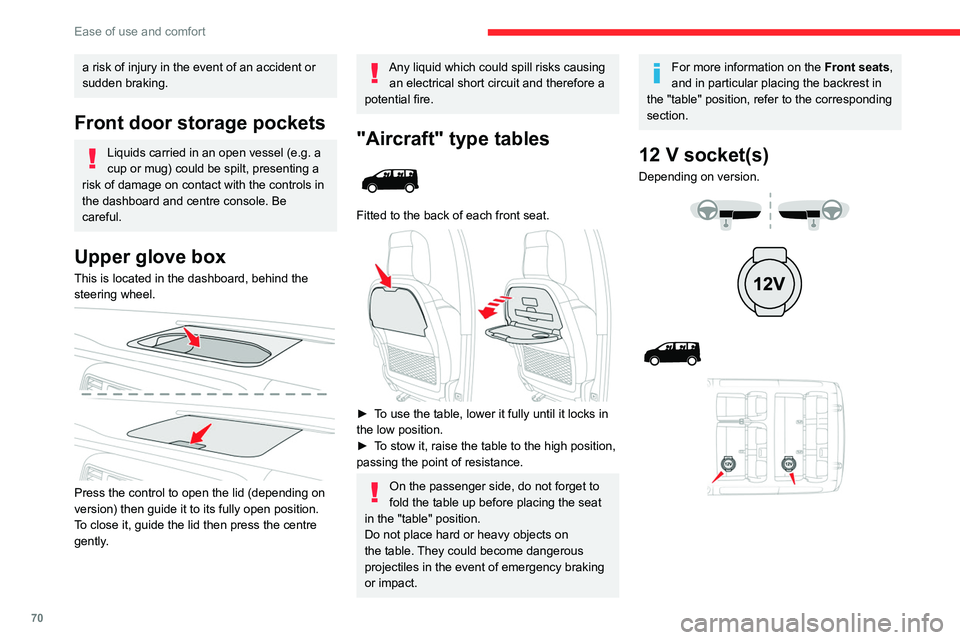
Upper glove box
This is located in the dashboard, behind the
steering wheel.
Press the control to open the lid (depending on
version) then guide it to its fully open position.
To close it, guide the lid then press the centre
gently.
Any liquid which could spill risks causing an electrical short circuit and therefore a
potential fire.
"Aircraft" type tables
Fitted to the back of each front seat.
► To use the table, lower it fully until it locks in
the low position.
►
T
o stow it, raise the table to the high position,
passing the point of resistance.
On the passenger side, do not forget to
fold the table up before placing the seat
in the "table" position.
Do not place hard or heavy objects on
the table. They could become dangerous
projectiles in the event of emergency braking
or impact.
For more information on the Front seats,
and in particular placing the backrest in
the "table" position, refer to the corresponding
section.
12 V socket(s)
Depending on version.
Page 75 of 324

73
Ease of use and comfort
3
On the floor, behind the front seats, a vertical
partition protects the driver and front passengers
against the risk of load movement.
Steel or glazed partitions separate the loading
area from the cab.
Recommendations on
loading
The weight of the load must comply with the Gross Train Weight (GTW).
For more information on Engine technical
data and towed loads , refer to the
corresponding section.
If you are using a carrying system (roof
bars/roof rack), comply with the
maximum loads associated with this system.
For more information on Roof bars/Roof
rack , refer to the corresponding section.
Make sure that the size, shape and
volume of the loads carried are
compatible with the highway code and safety
regulations and do not impair the driver’s field
of vision.
The load must be evenly distributed in the loading area so as not to interfere
with driving the vehicle.
Place the load close to the side panels, or
even push it against the side panels between
the wheel arches.
However, it is recommended that heavy
objects are placed as close to the cab as
possible as a precaution in case of sharp
braking.
Firmly secure all parts of the load using
the stowing rings on the floor of the
loading area.
For more information on the Interior
fittingsand in particular on the stowing rings,
refer to the corresponding section.
To avoid the risk of injury or accident, the load must be made stable so that it
cannot slide, tip over, fall or be thrown. To do
this, use only retaining straps that conform to
current standards (DIN for example).
For more information on putting straps in
place, refer to the manufacturer’s user guide.
There must not be any empty space between
the components of the load.
To prevent the load sliding, there must not be
any empty space between the load and the
panels of the vehicle.
As well as the straps, optimise the stability
of the load with stable handling equipment
(wedges, rigid blocks of wood or padding).
When washing your vehicle, never clean
the inside directly using a water jet.
Seating area fittings
High load retaining net
This allows the use of the entire loading capacity,
up to the roof:
–
behind the front seats in row 1, when the rear
seats (and bench seats) in rows 2 and 3 are
folded or removed,
–
behind the rear seats (and bench seats) in row
2, when the rear seats (and bench seats) in row
3 are folded or removed.
Page 76 of 324

74
Ease of use and comfort
While driving, the windows must be closed or
secured at one of the notches.
► Squeeze the two controls then move the
window sideways.
For more information on the Child lock
on rear windows , refer to the
corresponding section.
Side blinds
Fitted to the windows in row 2, these protect the
passenger compartment from the sun's rays.
Upper fixings
► Unclip the anchorage cover in the roof on
each side.
Lower fixings (behind row 1)
If your vehicle has fixed one-piece bench seats
or seats and bench seats:
► On each side in row 2, insert the fixings in the
floor anchorages (as shown above).
If your vehicle has seats and bench seats or
individual seats on rails
:
► On each side in row 2, insert the fixings in the
floor anchorages then turn them a quarter turn to
lock them in place (as shown above).
Place them as close as possible to the end of
the rail.
Lower fixings (behind row 2)
► Use the stowing rings.
Fit the net
Unclip the upper fixing covers and secure the
lower fixings (as previously described).
►
Fold (table position) the seats and bench
seats in rows 2 and 3 (according to equipment).
►
Close the rear heating and air conditioning
vents (depending on the equipment you have).
►
Unroll the high load retaining net.
►
Position the net upper fixings in the
corresponding anchorages in the roof (first one
side, then the other).
►
Fully extend the straps.
►
On each side, attach the bottom fixings of the
net to the lower anchorages (behind row 1) or in
the stowing rings (behind row 2).
►
T
ension the straps to extend the net.
►
Check that the net is attached securely and
properly extended.
Never use the ISOFIX ring provided for
fixing the strap of a child seat with Top
Tether.
Rear windows in row 2
If fitted to your vehicle, the side windows in row 2
can be opened.
Page 108 of 324

106
Safety
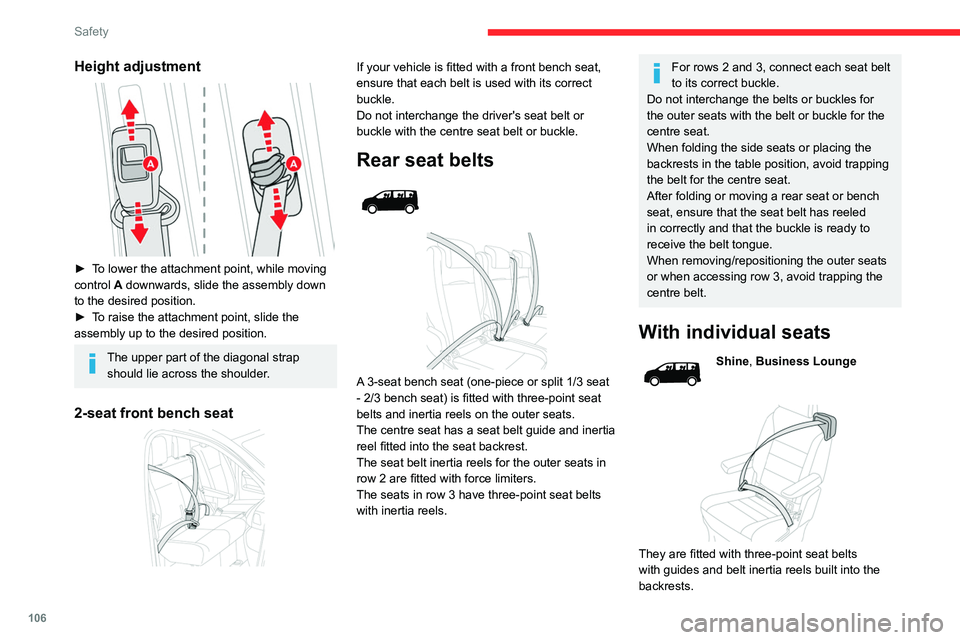
Height adjustment
► To lower the attachment point, while moving
control A downwards, slide the assembly down
to the desired position.
►
T
o raise the attachment point, slide the
assembly up to the desired position.
The upper part of the diagonal strap should lie across the shoulder.
2-seat front bench seat
If your vehicle is fitted with a front bench seat,
ensure that each belt is used with its correct
buckle.
Do not interchange the driver's seat belt or
buckle with the centre seat belt or buckle.
Rear seat belts
A 3-seat bench seat (one-piece or split 1/3 seat
- 2/3 bench seat) is fitted with three-point seat
belts and inertia reels on the outer seats.
The centre seat has a seat belt guide and inertia
reel fitted into the seat backrest.
The seat belt inertia reels for the outer seats in
row 2 are fitted with force limiters.
The seats in row 3 have three-point seat belts
with inertia reels.
For rows 2 and 3, connect each seat belt
to its correct buckle.
Do not interchange the belts or buckles for
the outer seats with the belt or buckle for the
centre seat.
When folding the side seats or placing the
backrests in the table position, avoid trapping
the belt for the centre seat.
After folding or moving a rear seat or bench
seat, ensure that the seat belt has reeled
in correctly and that the buckle is ready to
receive the belt tongue.
When removing/repositioning the outer seats
or when accessing row 3, avoid trapping the
centre belt.
With individual seats
Shine, Business Lounge
They are fitted with three-point seat belts
with guides and belt inertia reels built into the
backrests.
Seat belt(s) warning lamps
A. Front seat belts not fastened/unfastened
warning lamp.
B. Left-hand seat belt not fastened/unfastened
warning lamp.
C. Centre seat belt unfastened warning lamp (if
your vehicle is fitted with a 2-seat front bench
seat).
D. Right-hand seat belt not fastened/unfastened
warning lamp (if your vehicle is fitted with
individual front seats).
Right-hand seat belt unfastened warning
lamp (if your vehicle is fitted with a 2-seat
front bench seat).
On switching on the ignition, the warning lamp(s)
come(s) on if the corresponding seat belt is not
fastened or is unfastened.
At speeds above approximately 12 mph
(20 km/h), the warning lamp(s) flash(es) for 2
minutes, accompanied by an audible signal.
Once these 2 minutes have elapsed, the warning
lamp(s) remain(s) on until the driver or the
passenger fastens their seat belt.
Page 109 of 324

107
Safety
5Seat belt(s) warning lamps
A.Front seat belts not fastened/unfastened
warning lamp.
B. Left-hand seat belt not fastened/unfastened
warning lamp.
C. Centre seat belt unfastened warning lamp (if
your vehicle is fitted with a 2-seat front bench
seat).
D. Right-hand seat belt not fastened/unfastened
warning lamp (if your vehicle is fitted with
individual front seats).
Right-hand seat belt unfastened warning
lamp (if your vehicle is fitted with a 2-seat
front bench seat).
On switching on the ignition, the warning lamp(s)
come(s) on if the corresponding seat belt is not
fastened or is unfastened.
At speeds above approximately 12 mph
(20
km/h), the warning lamp(s) flash(es) for 2
minutes, accompanied by an audible signal.
Once these 2 minutes have elapsed, the warning
lamp(s) remain(s) on until the driver or the
passenger fastens their seat belt.
Advice
The driver must ensure that passengers use the seat belts correctly and that they
are all fastened before setting off.
Wherever seated in the vehicle, you must
always fasten the seat belt, even for short
journeys.
Do not invert the seat belt buckles, as they
will not fulfil their role properly.
To ensure the proper functioning of the belt
buckles, make sure that there are no foreign
bodies present (e.g.
a coin) before fastening.
Before and after use, ensure that the seat belt
is reeled in correctly.
After folding or moving a seat or rear bench
seat, ensure that the seat belt is positioned
and reeled in correctly.
Installation
The lower part of the strap must be
positioned as low as possible over the pelvis.
The upper part must be positioned in the
hollow of the shoulder.
In order to be effective, a seat belt must:
–
be tightened as close to the body as
possible.
–
be pulled in front of you with a smooth
movement, ensuring that it is not twisted.
–
only be used to secure one person.
–
not show signs of tearing or fraying.
–
not be changed or modified, in order to
avoid affecting its performance.
Recommendations for children
Use a suitable child seat if the passenger
is less than 12 years old or shorter than 1.5
metres.
Never use the same seat belt to secure more
than one child.
Never carry a child on your lap.
For more information on Child seats, refer to
the corresponding section.
Maintenance
In accordance with current safety
regulations, for all work on your vehicle's
seat belts, contact a qualified workshop with
the skills and equipment needed, which a
CITROËN dealer is able to provide.
Have the seat belts checked regularly by a
CITROËN dealer or a qualified workshop,
particularly if the straps show signs of
damage.
Clean the seat belt straps with soapy water or
a textile cleaning product, sold by CITROËN
dealers.
Airbags
General information
System designed to help improve the safety
of the occupants sitting in the front seats and
the rear outer seats, in the event of a violent
collision. The airbags supplement the action
Page 234 of 324

232
Technical data
Dimensions (mm)
These dimensions have been measured on an unladen vehicle.
Mirrors folded
Side-hinged doors
Towed loads
Model codes: ZZKXZ
Braked trailer (within the GTW limit) (kg)
on a 10% or 12% gradient 1,000
Unbraked trailer (kg) 750
Maximum authorised nose weight (kg) 60
Model codes:V1ESZ/V1EZZ/VZESZ/VZEZZ
Code: MEL ZAE BATT S/
MEL ZAE BATT XL
Length XS, M, XL
(L1/L2/L3)
Braked trailer (within the GTW limit) (kg)
on a 10% or 12% gradient 5-6-7-8-9 seats
1,000
Unbraked trailer (kg) 750
Maximum authorised nose weight (kg) 60
Page 290 of 324

288
Alphabetical index
Changing a bulb (side-hinged doors) 215
Changing a fuse
217–219
Changing a wheel
208
Changing a wiper blade
96
Changing the remote control battery
36
Changing to free-wheeling
223
Charge level indicator (Electric)
22
Charging cable
183
Charging cable (Electric)
182
Charging connector (Electric)
181, 186–188
Charging flap (Electric)
181, 186–188
Charging system (Electric)
5, 9, 26, 180, 193
Charging the traction battery
(Electric)
22, 180, 186–188
Checking the engine oil level
19
Checking the levels
193–195
Checking tyre pressures
(using the kit)
205, 207–208
Checks
193, 195–197
Checks, routine
195–197
Child lock
134–135
Child lock on rear windows
135
Children
107, 114, 122–124,
131, 131–133, 131–132
Children (safety)
134
Child seats
107, 110–114, 119, 120, 132
Child seats, conventional
113–114, 119, 120
Child seats, i-Size
131–132
Child seats, ISOFIX
122–124, 131, 131–132, 132
Cleaning (advice)
180, 201–202
Closing the boot
45Closing the doors 29, 34, 44–45
Collision Risk Alert
166–167
Compressor, tyre inflation
205
Configuration, vehicle
26
Connected applications
274
Connection, Bluetooth
244, 257–258,
274–275, 279–280
Connection, Wi-Fi network
275
Connectivity
273
Consumption figures
27
Container, AdBlue®
198
Control, emergency boot release
36
Control, emergency door
29, 35–36
Control, heated seats
52
Control stalk, lighting
89
Control stalk, wipers
94–95
Control unit
182–183
Courtesy lamp
87
Courtesy lamp, front
87–88, 216
Courtesy lamp, rear
87–88, 216
Courtesy lamps
87–88, 216
Cover, load space
72
Crew cab, fixed
66–68
Crew cab, folding
68
Cruise control
156, 158–159, 161–163
Cruise control, adaptive
158, 163, 165–166
Cruise control by speed limit
recognition
158–159
Cruise control, dynamic with
Stop function
158–159D
DAB (Digital Audio Broadcasting) -
Digital radio
240–241, 254, 277
Date (setting)
28, 260, 282
Daytime running lamps
90, 213–214
Deactivating the passenger airbag
108, 112
Deactivation of DSC (ESC)
102
Deadlocking
34–35
Deferred charging
27, 188
Deferred charging (Electric)
26–27, 181, 186
Defrosting
54, 82–83
Demisting
82–83
Demisting, rear
83
Demisting, rear screen
83
Dimensions
233
Dipstick
19, 193
Direction indicators
90, 213–215, 217
Display, head-up
155–156
Domestic charging
183
Domestic charging (Electric)
187–188, 231
Door pockets
70
Doors, rear
44–45
Doors, side
40
Doors, side-hinged
34–35, 44–45, 215
Driver’s attention warning
170
Drive selector (Electric)
149, 196
Driving
136–137
Driving aids camera (warnings)
154
Driving aids (recommendations)
154
Driving economically
8
Driving modes
150