ESP CITROEN DISPATCH SPACETOURER DAG 2017 Handbook (in English)
[x] Cancel search | Manufacturer: CITROEN, Model Year: 2017, Model line: DISPATCH SPACETOURER DAG, Model: CITROEN DISPATCH SPACETOURER DAG 2017Pages: 774, PDF Size: 38.33 MB
Page 90 of 774

88
Spacetourer-VP_en_Chap03_ergonomie-et-confort_ed01-2016
F Turn the knob to adjust the backrest.
Backrest angle
F Turn the knob manually to obtain the desired level of lumbar support.
Lumbar
For more information on the Seat belts ,
refer to the corresponding section. F
P
ull the control fully up and move the
backrest for ward or backward.
Ease of use and comfort
Page 92 of 774

90
Spacetourer-VP_en_Chap03_ergonomie-et-confort_ed01-2016
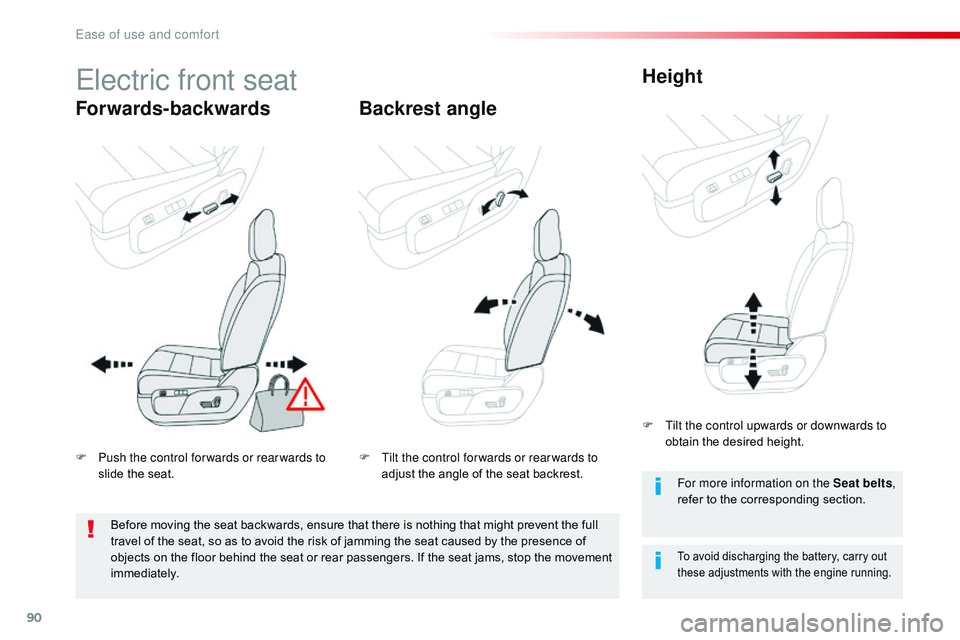
Electric front seat
Forwards-backwardsBackrest angleHeight
To avoid discharging the battery, carry out
these adjustments with the engine running.
F Push the control for wards or rear wards to
slide the seat. F
T ilt the control for wards or rear wards to
adjust the angle of the seat backrest. F
T
ilt the control upwards or downwards to
obtain the desired height.
Before moving the seat backwards, ensure that there is nothing that might prevent the full
travel of the seat, so as to avoid the risk of jamming the seat caused by the presence of
objects on the floor behind the seat or rear passengers. If the seat jams, stop the movement
immediately. For more information on the Seat belts
,
refer to the corresponding section.
Ease of use and comfort
Page 95 of 774

93
Spacetourer-VP_en_Chap03_ergonomie-et-confort_ed01-2016
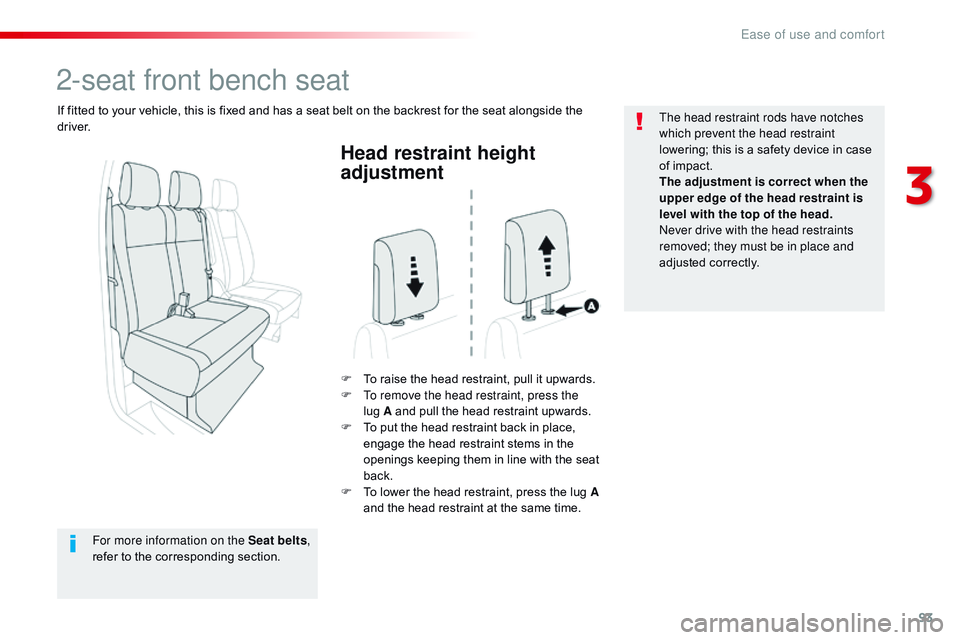
Head restraint height
adjustment
F To raise the head restraint, pull it upwards.
F T o remove the head restraint, press the
lug
A and pull the head restraint upwards.
F
T
o put the head restraint back in place,
engage the head restraint stems in the
openings keeping them in line with the seat
back.
F
T
o lower the head restraint, press the lug A
and the head restraint at the same time. The head restraint rods have notches
which prevent the head restraint
lowering; this is a safety device in case
of impact.
The adjustment is correct when the
upper edge of the head restraint is
level with the top of the head.
Never drive with the head restraints
removed; they must be in place and
adjusted correctly.
2-seat front bench seat
If fitted to your vehicle, this is fixed and has a seat belt on the backrest for the seat alongside the
driver.
For more information on the Seat belts ,
refer to the corresponding section.
3
Ease of use and comfort
Page 97 of 774

95
Spacetourer-VP_en_Chap03_ergonomie-et-confort_ed01-2016
Fixed one-piece bench seat
F To raise a head restraint, pull it up until it engages in its notches.
F
T
o remove the head restraint, press the
lug
A and pull the head restraint upward.
F
T
o put it back in place, engage the head
restraint rods in the apertures keeping
them in line with the seat backrest.
F
T
o lower it, press on the lug A and on the
head restraint at the same time. F
Place the head restraints in the low position
The different items of equipment and adjustments
described hereafter vary according to the version
and the configuration of your vehicle.Angled head restraints
Folding the seat backrest to
the table position
For more information on the Seat belts ,
refer to the corresponding section.
The bench seat includes a one-piece backrest
which may be fixed or folding (table position).
F
F
rom the front, raise the handle to release
the seat backrest.
F
F
rom the rear, lower the handle to release
the seat backrest.
F F old the backrest onto the seat cushion.
F
To return the backrest to its normal position,
raise the handle and pull the backrest up.
3
Ease of use and comfort
Page 100 of 774

98
Spacetourer-VP_en_Chap03_ergonomie-et-confort_ed01-2016
Folding the backrest to the
table position
F Put the head restraints into the low position.
F
T
o raise a head restraint, pull it up until it
engages in its notches.
F
T
o remove the head restraint, press the
lug
A and pull the head restraint upward.
F
T
o put it back in place, engage the head
restraint rods in the apertures keeping
them in line with the seat backrest.
F
T
o lower it, press on the lug A and on the
head restraint at the same time.Angled head restraints
For more information on the Seat belts ,
refer to the corresponding section. F
F
rom the front, raise the handle to release
the backrest.
F
F
rom the rear, lower the lever to release
the backrest.
Fixed rear seat and bench seatThe different levels of equipment and adjustments described hereafter vary according to the
version and the configuration of your vehicle.
The seat has a backrest that may be fixed or
folding (table position).
The bench seat has a one-piece backrest that
may be fixed or foldable (table position).
Ease of use and comfort
Page 103 of 774

101
Spacetourer-VP_en_Chap03_ergonomie-et-confort_ed01-2016
Head restraints
F To raise a head restraint, pull it up until it engages in its notch.
F
T
o remove it, press the lug A and pull the
head restraint up.
F
T
o refit it, engage the head restraint rods in
the apertures keeping them in line with the
seat backrest.
F
T
o lower it, press on the lug A and on the
head restraint at the same time.
Rear seat and bench seat on rails
The different equipment and adjustments
described hereafter vary according to the
version and configuration of your vehicle.
For more information on the Seat belts ,
refer to the corresponding section. F
T
o recline the backrest, raise the control
(from the rear, lower the lever).
F
R
elease the control when the desired
position is obtained.
Reclining the backrest
The reclining backrest can be adjusted to
several positions.
The individual seat is always on the right and
the bench seat on the left (facing for ward).
The bench seat has two independent
backrests.
3
Ease of use and comfort
Page 107 of 774

105
Spacetourer-VP_en_Chap03_ergonomie-et-confort_ed01-2016
Individual seat(s) on rails
The different equipment and adjustments
described hereafter vary according to the
version and configuration of your vehicle.F
T
o raise a head restraint, pull it up until it
engages in its notch.
F
T
o remove it press the lug A and pull the
head restraint up.
F
T
o refit it, engage the head restraint rods in
the apertures keping them in line with the
seat backrest.
F
T
o lower it, press on the lug A and on the
head restraint at the same time.
Head restraints
The armrest has notches.
F P ull the armrest fully up.
F
L
ower it fully down.
F
R
aise the armrest to the desired position.
Ar mrest(s)
It can be placed forward facing or
rearward facing.
The individual seat is fitted with a three-point
inertia reel seat belt.
For more information on the Seat belts ,
refer to the corresponding section.
3
Ease of use and comfort
Page 114 of 774

112
Spacetourer-VP_en_Chap03_ergonomie-et-confort_ed01-2016
"Aircraft" type tables
Fitted to the back of each front seat, these
allow you to place objects.On the passenger side, do not forget
to fold the "aircraft" type table before
placing the seat in the table position.
Do not place hard or heavy objects
on the table. They could become
dangerous projectiles in the event of
emergency braking or impact.
For more information on the Front
seats and in particular the "table"
position for the backrest, refer to the
corresponding section.
Upper storage compartment
Front door pockets
Liquids carried in an open vessel (a cup
or mug) could be spilt, presenting a risk
of damage on contact with the controls
in the dashboard and centre console.
Take care. This is located in the dashboard, behind the
steering wheel.
Press the control to open the lid (depending on
version) then guide it to its fully open position.
To close, guide the lid then press the centre
g e nt l y.
Any liquid which could spill risks causing an
electrical short circuit and therefore a potential
fire.
F
T o use the table, lower it fully until it locks
in the low position.
F
T
o stow the table, raise it, passing the point
of resistance, to the high position.
Ease of use and comfort
Page 119 of 774

117
Spacetourer-VP_en_Chap03_ergonomie-et-confort_ed01-2016
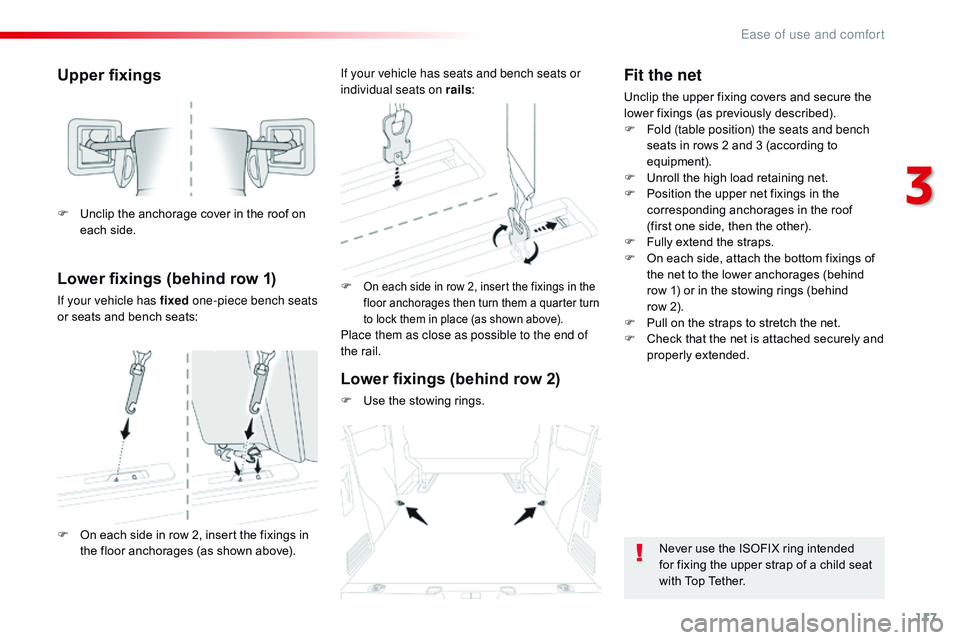
Upper fixings
Lower fixings (behind row 1)
If your vehicle has fixed one-piece bench seats
or seats and bench seats: F
On each side in row 2, insert the fixings in the
floor anchorages then turn them a quarter turn
to lock them in place (as shown above).
Place them as close as possible to the end of
the rail.
F
U
nclip the anchorage cover in the roof on
each side.
F
O
n each side in row 2, insert the fixings in
the floor anchorages (as shown above). If your vehicle has seats and bench seats or
individual seats on rails
:
Lower fixings (behind row 2)
F Use the stowing rings.
Fit the net
Unclip the upper fixing covers and secure the
lower fixings (as previously described).
F
F
old (table position) the seats and bench
seats in rows 2 and 3 (according to
equipment).
F
U
nroll the high load retaining net.
F
P
osition the upper net fixings in the
corresponding anchorages in the roof
(first one side, then the other).
F
F
ully extend the straps.
F
O
n each side, attach the bottom fixings of
the net to the lower anchorages (behind
row 1) or in the stowing rings (behind
row
2).
F
P
ull on the straps to stretch the net.
F
C
heck that the net is attached securely and
properly extended.
Never use the ISOFIX ring intended
for fixing the upper strap of a child seat
with Top Tether.
3
Ease of use and comfort
Page 120 of 774

118
Spacetourer-VP_en_Chap03_ergonomie-et-confort_ed01-2016
Luggage cover
F Raise it to remove it.
F T o install it, insert the guides into their
housings.
If fitted to your vehicle, the side windows in row 2
c an be opened.
While driving, the window must be closed or
secured at one of the notches.
Windows in row 2
For more information on the Child
lock for rear windows , refer to the
corresponding section. Always guide the blind slowly using the
tab, both up and down.
Side blinds
Fitted to the windows in row 2, they protect the
passenger compartment from the sun's rays.
F
P
ull the tab A and anchor the blind on the
hook B .
F
S
queeze the two controls then move the
window sideways.
Ease of use and comfort