ESP CITROEN DISPATCH SPACETOURER DAG 2018 Handbook (in English)
[x] Cancel search | Manufacturer: CITROEN, Model Year: 2018, Model line: DISPATCH SPACETOURER DAG, Model: CITROEN DISPATCH SPACETOURER DAG 2018Pages: 400, PDF Size: 16.99 MB
Page 180 of 400

178
Manoeuvre cautiously, at low
speed
The dimensions of your vehicle differ from
those of a light vehicle, in width, in height, as
well as in length, and some obstacles will be
more difficult to notice.
Manoeuvre slowly.
Before turning, check that there are no
obstacles at mid-height along the sides.
Before reversing, check that there are no
obstacles, particularly at high level behind the
vehicle.
Be aware of the external dimensions, if ladders
are fitted.
Load the vehicle correctly
If your vehicle is fitted with a drop-side back,
the height and width of the load must remain
within the overall dimensions of the vehicle.
Drive the vehicle in a prudent
and efficient way
Take corners gently.
Anticipate the need to brake as the stopping
distance is increased, particularly on wet or icy
roads.
Be aware of the effect of side winds on the
vehicle.
Effective eco-driving saves fuel; accelerate
progressively, anticipate the need to slow down
and adapt your speed to suit the situation.
Indicate changes of direction well in advance
so that you are seen by other road users.
Take care
The tyres must be inflated to at least the
pressures indicated on the label, even over-
inflated by 0.2 to 0.3 bar for long journeys.
With a load carried, the vehicle must remain
within the maximum authorised weight, the
Gross Vehicle Weight.
To avoid upsetting the balance of the vehicle,
the load should be centred and the heaviest
part placed on the floor in front of the rear
wheels.
It is inadvisable to place heavy loads on a roof
rack.
Loading also implies adherence to the
maximum load of the roof bar anchor points.
Adhere to the maximum permissible weight,
according to CITROËN dealer specifications.
Loads must be securely lashed down.
A load that is not properly secured inside the
vehicle may affect vehicle handling and create
a risk of accident.
In case of towing
Driving with a trailer places greater
demands on the towing vehicle and
requires extra care from the driver.
Distribution of loads
F Distribute the load in the trailer so that the
heaviest items are as close as possible to
the axle and the nose weight approaches
the maximum permitted without exceeding
it.
Air density decreases with altitude, thus
reducing engine performance. The maximum
towed load must be reduced by 10% for every
1,000
metres of altitude.
Please respect the maximum towable
weights.
F
T
ake into account the increased sensitivity
to wind.
Side wind
Driving
Page 181 of 400

179
Cooling
Towing a trailer on a slope increases the
temperature of the coolant.
As the fan is electrically controlled, its cooling
capacity is not dependent on the engine speed.
F
T
o lower the engine speed, reduce your
speed.
The maximum towable load on an incline
depends on the gradient and the exterior
temperature.
In all cases, keep a check on the coolant
temperature.
F
I
f this warning lamp and the
STOP warning lamp come on,
stop the vehicle and switch off
the engine as soon as possible.
New vehicle
Do not pull a trailer before having driven at
least around 600
miles (1,000 kilometres).
When the exterior temperature is high,
leaving the engine running for 1
to
2
minutes after stopping the vehicle to
allow it to cool is recommended.
Braking
Towing a trailer increases the braking distance.
To avoid overheating of the brakes, the use of
engine braking is recommended.
Ty r e s
F Check the tyre pressures of the towing vehicle and of the trailer, observing the
recommended pressures.
Lighting
F Check the electrical lighting and signalling on the trailer and the headlamp beam height
of your vehicle.
For more information on Headlamp
beam height adjustment , refer to the
corresponding section.
The rear parking sensors will be
deactivated automatically to avoid the
audible signal if a genuine CITROËN
towbar is used.
Starting/switching off
the engine, manual key,
remote control
Ignition switch
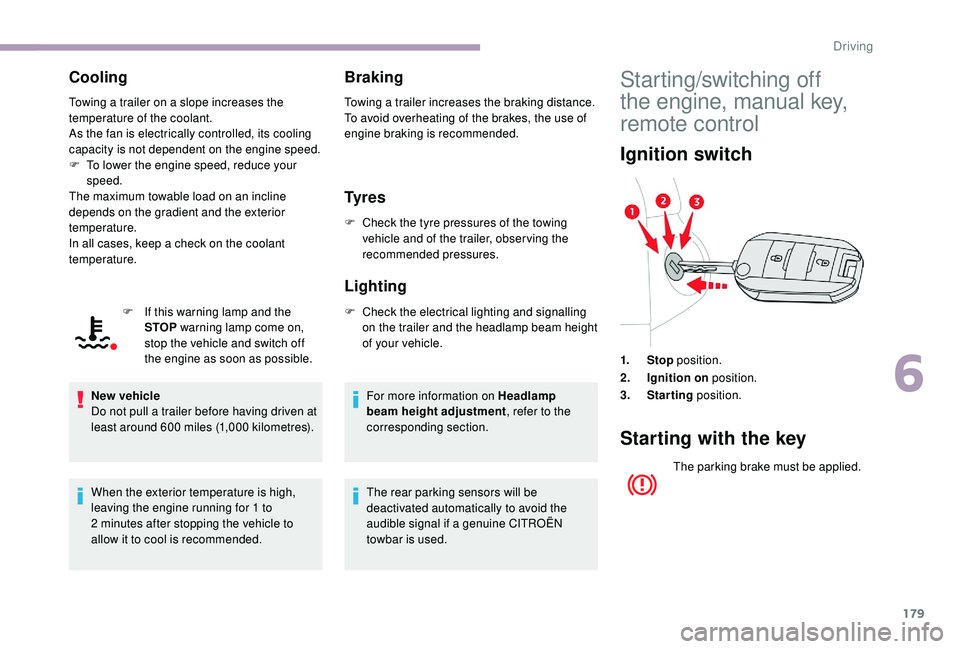
1. Stop position.
2. Ignition on position.
3. Starting position.
Starting with the key
The parking brake must be applied.
6
Driving
Page 193 of 400

191
Display on the instrument panel
When you move the gear selector or press the
M button, the corresponding symbol appears in
the instrument panel.
P.Parking
R. Reverse
N. Neutral
D. Drive (automatic operation)
M. Manual
1
to 6. Gear engaged
- Invalid value
F
I
f the message " Foot on the
brake " is displayed in the
instrument panel, press the
brake pedal firmly.
Starting the vehicle
F Start the engine.
If the conditions are not met, there is an audible
signal, accompanied by a message on the
instrument panel screen.
F
R
elease the parking brake.
F
Sel
ect position R , N or D.
If you have to move off on a steep slope
with a loaded vehicle, depress the brake
pedal , select position D , release the
parking brake, then release the brake
pedal.
F
P
rogressively release the brake pedal.
The vehicle moves off immediately. If P is displayed on the instrument panel
but the selector is in another position,
place the selector in position P to allow
the engine to be started.
If position N is selected inadvertently while
driving, allow the engine to return to idle,
then select position D to accelerate.
If position R
, D or M is selected when the
engine is running at idle, with the brakes
released, the vehicle moves even without
the accelerator being depressed.
Never leave children in the vehicle
unsupervised.
As a safety measure, never leave the
vehicle without taking your key or remote
control with you, even for a short time.
When carrying out maintenance with the
engine running, apply the parking brake
and select position P .
If your vehicle has an automatic gearbox,
never try to start the engine by pushing
the vehicle.
F
W
ith your foot on the brake,
select position P .
6
Driving
Page 197 of 400

195
Electronic gearbox
Electronically controlled gearbox which offers
a choice between the comfort of fully automatic
operation and manual gear changing.
Two driving modes are available:
-
a
utomatic operation for automatic control
of the gears by the gearbox, without any
action on the part of the driver,
-
man
ual operation for sequential gear
changing by the driver using the steering
mounted paddles.
With automatic operation, you can temporarily
take over control of gear changing at any time.
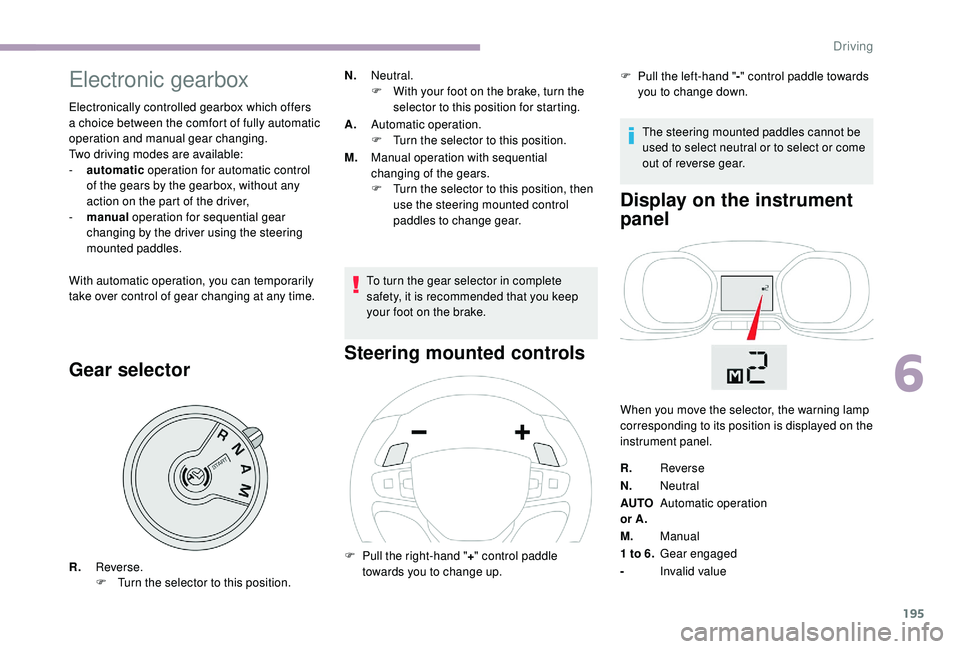
Gear selector
N. Neutral.
F
W ith your foot on the brake, turn the
selector to this position for starting.
A. Automatic operation.
F
T
urn the selector to this position.
M. Manual operation with sequential
changing of the gears.
F
T
urn the selector to this position, then
use the steering mounted control
paddles to change gear.
To turn the gear selector in complete
safety, it is recommended that you keep
your foot on the brake.
Steering mounted controls Display on the instrument
panel
R.
Reverse.
F
T urn the selector to this position. F
P ull the right-hand "
+" control paddle
towards you to change up. F
P
ull the left-hand "
-" control paddle towards
you to change down.
When you move the selector, the warning lamp
corresponding to its position is displayed on the
instrument panel.
R. Reverse
N. Neutral
AUTO
or A. Automatic operation
M. Manual
1 to 6.
Gear engaged
- Invalid value
The steering mounted paddles cannot be
used to select neutral or to select or come
out of reverse gear.
6
Driving
Page 203 of 400

201
Operating fault
Depending on your vehicle's equipment:In the event of a fault with the
system, this warning lamp flashes in
the instrument panel.
The indicator lamp in this button
flashes and a message appears,
accompanied by an audible signal. Have it checked by a CITROËN dealer or a
qualified workshop.
If a fault occurs in STOP mode, the vehicle may
stall.
All of the instrument panel warning lamps come
on.
Depending on version, an alert message may
also be displayed, asking you to place the gear
lever in position N and put your foot on the
brake pedal.
With the vehicle stationary, you must switch off
the ignition and then start the engine again.
Head-up display
System which projects various information onto
a blade in the driver's field of vision so that they
do not have to take their eyes off the road.
Displays during operation
A.
The speed of your vehicle.
B. Cruise control/speed limiter information.
C. If your vehicle is so equipped, inter-
vehicle distance information, automatic
emergency braking alerts and navigation
instructions.
D. If your vehicle is so equipped, speed limit
information.
Driving on flooded roads
Before driving in a flooded area, it is
strongly recommended that you deactivate
the Stop & Start system.
For more information on Driving advice
,
particularly on flooded roads, refer to the
corresponding section.
Once the system has been activated, the
following information is grouped together in the
head-up display:
6
Driving
Page 205 of 400

203
In certain extreme weather conditions
(rain and/or snow, bright sunshine, etc.),
the head-up display may not be legible or
may suffer temporary interference.
Some sunglasses may hamper reading of
the information.
To clean the blade, use a clean, soft cloth
(such as a spectacles cloth or microfibre
cloth). Do not use a dry or abrasive cloth
or detergent or solvent products as these
could scratch the blade or damage the
anti-reflection coating.
This system operates when the engine is
running, and the settings are stored when
the ignition is switched off.Memorising speeds
This function allows speed settings to
be stored that will then be offered for
configuration of two systems: speed limiter
or cruise control.
You can memorise up to six speed settings for
each system.
Programming
The speed settings can be adjusted in the
touch screen.F
I
n the "Driving/Vehicle " menu,
select " Adjust speed settings ".
F
S
elect the system for which you want to
memorise new speed settings:
•
sp
eed limiter
or •
c
ruise control. F
E
nter the new value using the numerical
keypad and confirm.
F C onfirm to store the changes and exit the
menu.
Memorised speeds are recalled
by pressing this button.
F
P
ress the button corresponding to the
speed setting you want to modify.
6
Driving
Page 208 of 400

206
The following situations may inter fere with the
operation of the system or prevent it working:
-
p
oor visibility (inadequate street lighting,
falling snow, rain, fog),
-
h
idden road signs (other vehicles,
vegetation, snow),
-
s
peed limit signs that do not conform to the
standard, are damaged or distorted.
Clean the area of the windscreen in front
of the camera regularly.
Memorising the speed
setting
This function is additional to the display of
Speed limit recognition . For more information on the Speed
limiter
, Cruise control or Adaptive
cruise control , refer to the corresponding
sections.
Steering mounted controls
The driver can choose to adapt the speed
setting to the speed limit suggested, by
pressing the memorisation button at the speed
limiter controls, with the standard cruise control
or the adaptive cruise control.
This speed setting overrides the speed limiter
and/or cruise control’s previous speed setting.
Display on the instrument panel
1. Select speed limiter/cruise control mode.
2. Memorise a speed setting.
Head-up display
3.Speed limit indication.
4. Memorise the speed.
5. Current speed setting.
Driving
Page 209 of 400

207
Speed limiter ("LIMIT")
System which prevents the
vehicle from exceeding the speed
programmed by the driver.
Once the programmed speed limit is reached,
additional pressure on the accelerator pedal
has no effect.
The speed setting value is stored when
the ignition is switched off.
For more information on this
button and the Dynamic
cruise control , refer to the
corresponding section.
For more information on
Memorising speeds , refer to
the corresponding section.
For more information on Speed limit
recognition and memorising them in
particular, refer to the corresponding
section.
F
M
ake an initial press on this
button to display the suggested
limit speed.
On detection of a speed limit sign, the system
displays the speed limit value and offers to
make it the speed setting.
"
MEM " flashes in the screen for a few seconds. F
P
ress this button again to
confirm the new speed setting.
Memorisation
F When the speed limiter/cruise control is switched on, the corresponding information
is displayed.
6
Driving
Page 211 of 400

209
The programmed speed can
be exceeded temporarily by
pressing the accelerator firmly
beyond the point of resistance.
To return to the programmed
speed, simply release the
accelerator pedal until the set
speed limit has been reached
again.
Adjusting the limit speed
(set ting)
You do not have to switch the speed limiter on
in order to set the speed.
Once the function is selected, you can modify
the speed setting by:
-
u
sing buttons 2 and 3, increasing or
decreasing the speed displayed:
F
b
y successive short presses, to modify
the speed by + or - 1
mph (km/h),
F
b
y a maintained press, to change in steps
of + or - 5
mph (km/h). For more information on Speed
limit recognition
, refer to the
corresponding section.
Temporarily exceeding the
speed setting
F Press firmly on the accelerator pedal,
going beyond the point of resistance , to
exceed the programmed speed limit.
The speed limiter is deactivated temporarily
and the displayed programmed speed flashes.
An audible signal accompanies the flashing
of the programmed speed when exceeding
the speed is not due to an action by the driver
(steep hill, etc.).
As soon as the vehicle's speed returns to the
programmed value, the limiter operates again:
the display of the programmed speed becomes
steady again.
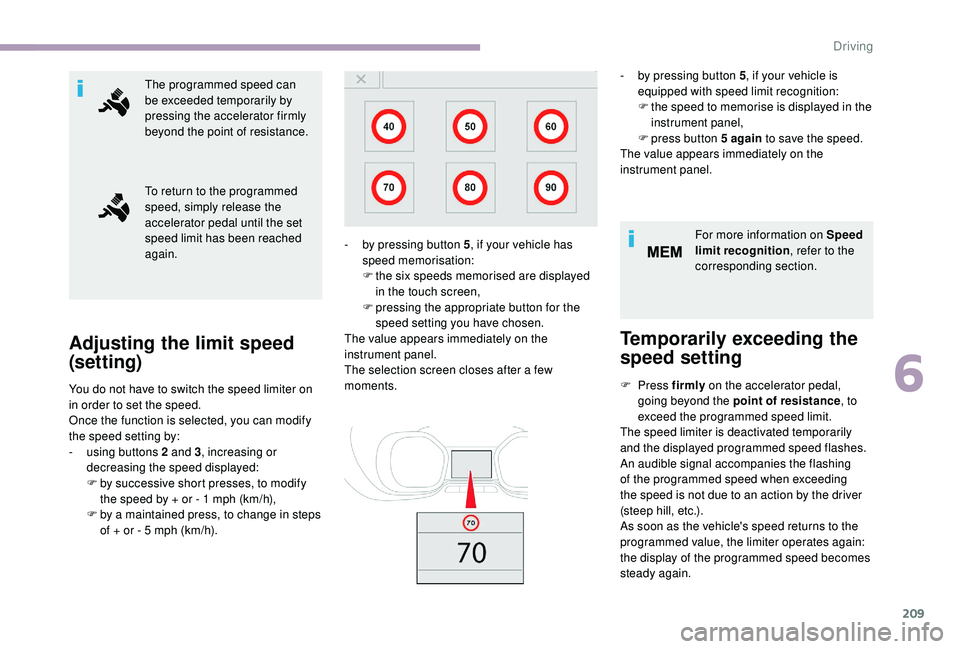
-
b
y pressing button 5
, if your vehicle has
speed memorisation:
F
t
he six speeds memorised are displayed
in the touch screen,
F
p
ressing the appropriate button for the
speed setting you have chosen.
The value appears immediately on the
instrument panel.
The selection screen closes after a few
moments. -
b
y pressing button 5
, if your vehicle is
equipped with speed limit recognition:
F
t
he speed to memorise is displayed in the
instrument panel,
F press button
5 again
to save the speed.
The value appears immediately on the
instrument panel.
6
Driving
Page 212 of 400

210
Switching off
Operating faultOn sharp acceleration, as when
descending a steep hill, the speed limiter
will not be able to prevent the vehicle from
exceeding the programmed speed.
The speed limiter is deactivated
temporarily and the displayed
programmed speed flashes.
An audible signal accompanies the
flashing of the programmed speed when
exceeding the speed is not due to an
action by the driver.
F
T
urn wheel 1
to the 0
position. The display
of information related to the speed limiter
disappears.
Flashing of the dashes indicates a fault with the
speed limiter.
Have it checked by a CITROËN dealer or a
qualified workshop.Cruise control ("CRUISE")
System which automatically
maintains the speed of the
vehicle at the value programmed
by the driver, without any action
on the accelerator pedal.
Switching off the ignition cancels any
programmed speed setting.
For more information on
Memorising speeds , refer to the
corresponding section.
For more information on Speed
limit recognition , refer to the
corresponding section.
Driving