weight CITROEN DISPATCH SPACETOURER DAG 2020 Handbook (in English)
[x] Cancel search | Manufacturer: CITROEN, Model Year: 2020, Model line: DISPATCH SPACETOURER DAG, Model: CITROEN DISPATCH SPACETOURER DAG 2020Pages: 324, PDF Size: 10.89 MB
Page 133 of 324
131
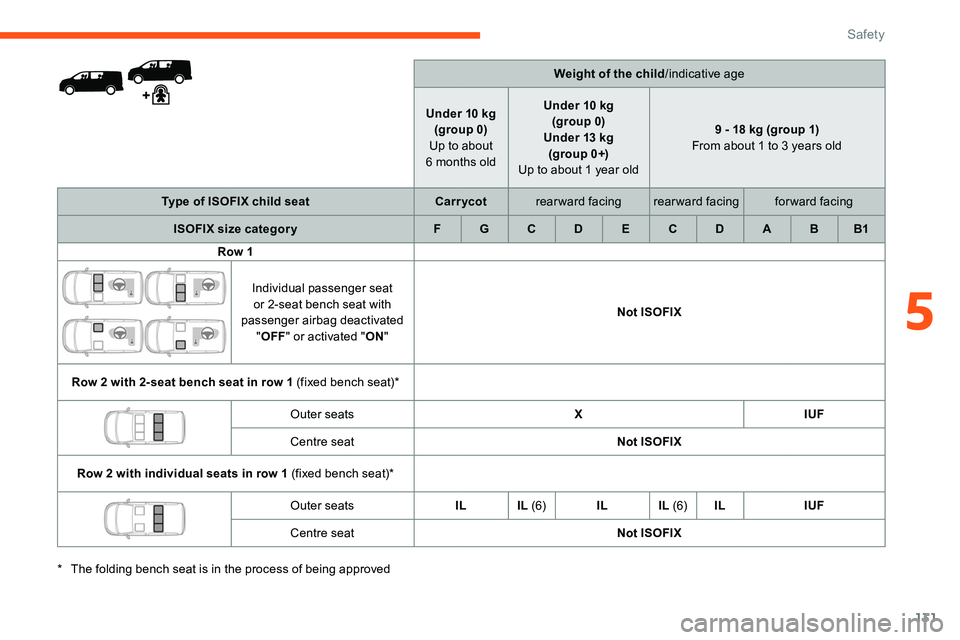
Weight of the child/indicative age
Under 10
kg
(group 0)
Up to about
6
months old Under 10
kg
(group 0)
Under 13
kg
(group 0+)
Up to about 1 year old 9 - 18
kg (group 1)
From about 1 to 3 years old
Type of ISOFIX child seat Carr ycotrearward facing rearward facing forward facing
ISOFIX size categor y F G C D E C D A B B1
Row 1
Individual passenger seat or 2-seat bench seat with
passenger airbag deactivated "OFF " or activated " ON" Not ISOFIX
Row 2 with 2-seat bench seat in row 1 (fixed bench seat)* Outer seats XIUF
Centre seat Not ISOFIX
Row 2 with individual seats in row 1 (fixed bench seat)* Outer seatsIL IL (6)IL IL (6)IL IUF
Centre seat Not ISOFIX
*
T
he folding bench seat is in the process of being approved
5
Safety
Page 134 of 324
132
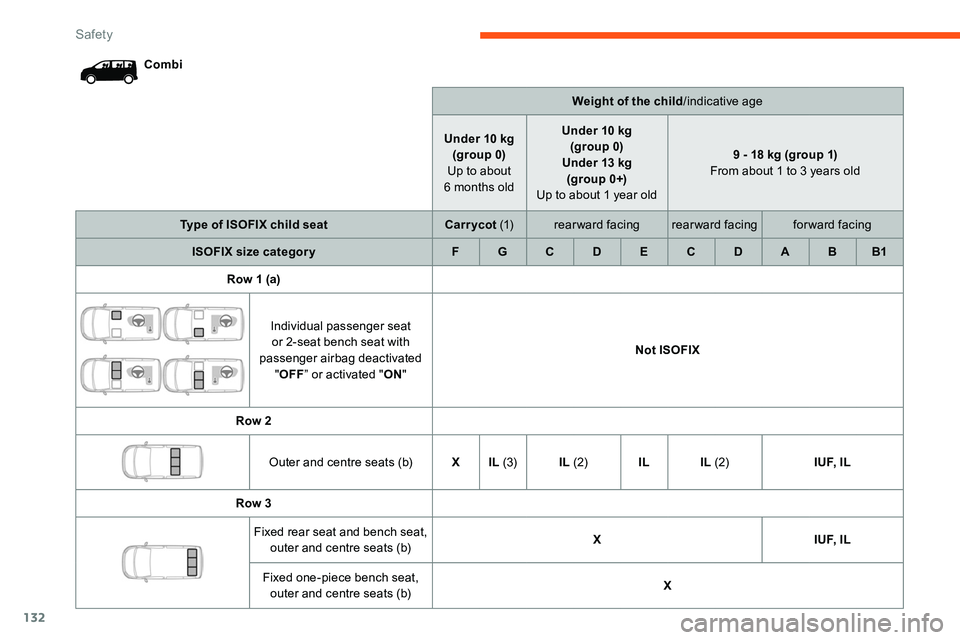
CombiWeight of the child/indicative age
Under 10
kg
(group 0)
Up to about
6
months oldUnder 10
kg
(group 0)
Under 13
kg
(group 0+)
Up to about 1 year old 9 - 18
kg (group 1)
From about 1 to 3 years old
Type of ISOFIX child seat Carr ycot (1) rearward facing rearward facing forward facing
ISOFIX size categor y F G C D E C D A B B1
Row 1 (a)
Individual passenger seat or 2-seat bench seat with
passenger airbag deactivated "OFF ” or activated " ON" Not ISOFIX
Row 2 Outer and centre seats (b) XIL (3) IL (2) IL IL (2) I U F, I L
Row 3 Fixed rear seat and bench seat, outer and centre seats (b) X
I U F, I L
Fixed one-piece bench seat, outer and centre seats (b) X
Safety
Page 135 of 324

133
BusinessWeight of the child/indicative age
Under 10
kg
(group 0)
Up to about
6
months oldUnder 10
kg
(group 0)
Under 13
kg
(group 0+)
Up to about 1 year old 9 - 18
kg (group 1)
From about 1 to 3 years old
Type of ISOFIX child seat Carr ycot (1) rearward facing rearward facing forward facing
ISOFIX size categor y F G C D E C D A B B1
Row 1 (a)
Individual passenger seat or 2-seat bench seat with
passenger airbag deactivated "OFF " or activated " ON" Not ISOFIX
Row 2 Rear seats XIL
(1- 3) IL
(2) IL IL (2) I U F, I L
Row 3 Fixed rear seat and bench seat, rear seats X
I U F, I L
Fixed one-piece bench seat, rear seats X
5
Safety
Page 136 of 324

134
FeelWeight of the child/indicative age
Under 10
kg
(group 0)
Up to about
6
months oldUnder 10
kg
(group 0)
Under 13
kg
(group 0+)
Up to about 1 year old From 9 to 18
kg (group 1)
From about 1 to 3 years old
Type of ISOFIX child seat Carr ycot (1) rearward facing rearward facing forward facing
ISOFIX size categor y F G C D E C D A B B1
Row 1 (a)
Passenger seat with passenger airbag deactivated " OFF" or
activated " ON" Not ISOFIX
Row 2 Rear seats ILI U F, I L
Row 3 Rear seats IL (1- 4) XIL (4) XIL (4) I U F, I L
Safety
Page 137 of 324

135
Shine, Business Lounge
Weight of the child/indicative age
Under 10
kg
(group 0)
Up to about
6 months old Under 10
kg
(group 0)
Under 13
kg
(group 0+)
Up to about 1 year old 9 - 18
kg (group 1)
From about 1 to 3 years old
Type of ISOFIX child seat Carr ycot (1) rearward facing
rearward facingforward facing
ISOFIX size categor y F G C D E C D A B B1
Row 1 (a) Passenger seat with passenger airbag deactivated " OFF" or
activated " ON" Not ISOFIX
Row 2 Seat behind driver or passenger X
IL(5) IL IL (5)IL I U F, I L
Centre seat (b) XIL(5) IL IL (5)IL I U F, I L
Rear seats IL (1- 5) ILILI U F, I L
Row 3 Outer seats XIL (4) IL IL (4) I U F, I L
Centre seat (b) XIL (4) IL IL (4) I U F, I L
Rear seats IL (1- 4) XIL (4) XIL (4) I U F, I L
5
Safety
Page 138 of 324

136
(a)Refer to the current legislation in the
country where you are driving, before
installing a child at this seat position.
(b) The seat can be installed centrally in the
vehicle
; it then prevents the use of the
outer seats.
IUF Seat position suitable for installing an
Isofix U niversal seat, " For ward facing",
secured using the upper strap.
IL Seat position suitable for installing an
Isofix semi-universa L child seat which
can be:
-
"
rear ward facing" fitted with an upper
strap or a support leg,
-
"
for ward facing" fitted with a support leg,
-
a c
arrycot fitted with an upper strap or
a support leg.
For securing the upper strap using
the ISOFIX mountings , refer to the
corresponding section.
X Seat position unsuitable for the installation
of an ISOFIX child seat or carrycot of the
weight group indicated. (4)
The seat in row 2 must be adjusted so that
there is no contact between the child in
row 3 and the seat immediately in front.
(5) The front seat must be adjusted so that
there is no contact between the child in
row 2 and the seat immediately in front.
(6) The front seat must be adjusted so that
there is no contact between the child in
row 2 and the seat immediately in front
(with the front seat adjusted to 2 notches
ahead of the centre of the runner).
(1) The installation of a carrycot on this seat
may prevent the use of one or more of the
other seats in this row.
(2) Installation possible only behind the
driver's seat.
(3) Installation possible only behind the
driver's seat with individual passenger
seat.
Manual child lock
Mechanical system to prevent opening of the
sliding side door using its interior lever.
Locking/Unlocking
F Turn the control located on the edge of the
side door upwards to lock it or downwards
to unlock it.
Electric child lock
Remote control system to prevent
opening of the rear doors (sliding
side door(s), side-hinged doors or
tailgate (depending on version))
using their interior controls.
Activation/Deactivation
With the ignition on:
F
P
ress this button ; its indicator remains on
for as long as the child lock is activated. A
message confirms the activation.
It is still possible to open the doors from the
outside.
Safety
Page 141 of 324
139
In case of towing
Driving with a trailer places greater
demands on the towing vehicle and
requires extra care from the driver.Respect the maximum towable weights.
At altitude:
reduce the maximum load
by 10% per 1,000 metres of altitude ; the
density of the air decreases with altitude
and the performance of the engine
reduces.
New vehicle: do not pull a trailer before
having driven at least 620 miles (1,000
kilometres).
If the outside temperature is high, let the
engine idle for 1 to 2 minutes after the
vehicle comes to a stop, to help it to cool.
Before setting off
Nose weight
F Distribute the load in the trailer so that the heaviest items are as close as possible to
the axle and the nose weight (at the point
where it joins your vehicle) approaches the
maximum permitted without exceeding it.
Ty r e s
F Check the tyre pressures of the towing vehicle and of the trailer, observing the
recommended pressures.
Lighting
F Check the electrical signalling on the trailer and the headlamp beam height of your
vehicle.
If a genuine CITROËN towing device is
used, the rear parking sensors will be
deactivated automatically to avoid the
audible signal.
When driving
Cooling
Towing a trailer uphill increases the
temperature of the coolant. The maximum
towable load depends on the gradient and the
exterior temperature. The cooling capacity of
the fan does not increase with engine speed.
F
T
o reduce the heating up, reduce the
vehicle speed and the engine speed.
In all cases, keep a check on the coolant
temperature.
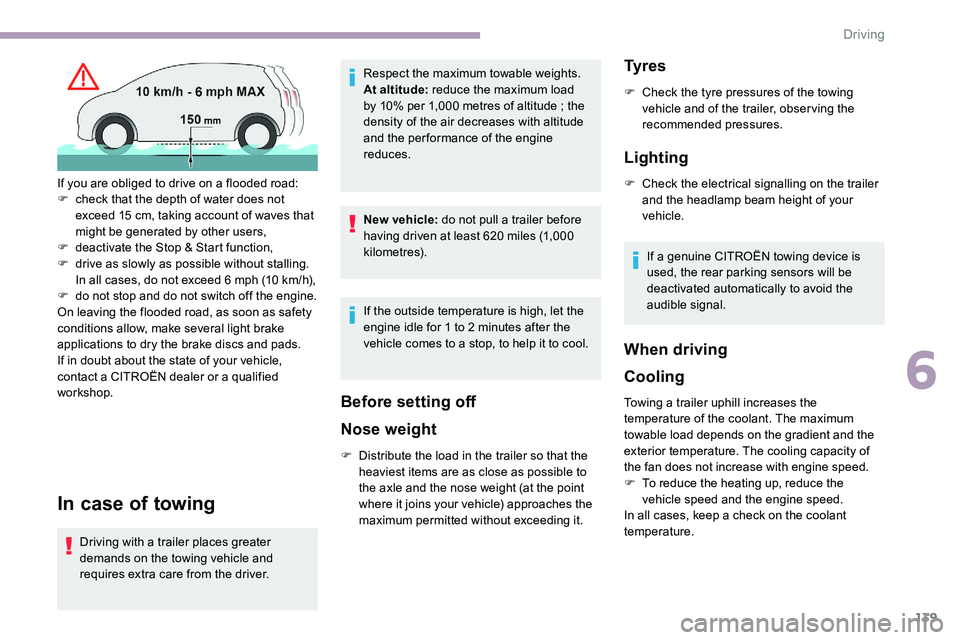
If you are obliged to drive on a flooded road:
F
c
heck that the depth of water does not
exceed 15
cm, taking account of waves that
might be generated by other users,
F
d
eactivate the Stop & Start function,
F
d
rive as slowly as possible without stalling.
In all cases, do not exceed 6 mph (10
km/h),
F
d
o not stop and do not switch off the engine.
On leaving the flooded road, as soon as safety
conditions allow, make several light brake
applications to dry the brake discs and pads.
If in doubt about the state of your vehicle,
contact a CITROËN dealer or a qualified
workshop.
6
Driving
Page 190 of 324

188
Installation tips
F If you have to fit the chains during a journey, stop the vehicle on a flat sur face on the side
of the road.
F
A
pply the parking brake and position any
wheel chocks under the wheels to prevent
movement of your vehicle.
F
F
it the chains following the instructions
provided by the manufacturer.
F
M
ove off gently and drive for a few
moments, without exceeding 31 mph
(50
km/h).
F
S
top your vehicle and check that the snow
chains are correctly tightened.
It is strongly recommended that before
you leave, you practise fitting the snow
chains on a level and dry sur face.
Avoid driving with snow chains on roads
that have been cleared of snow to avoid
damaging your vehicle's tyres and the
road sur face. If your vehicle is fitted with
alloy wheels, check that no part of the
chain or its fixings is in contact with the
wheel rim. Use only the chains designed to be fitted to the
type of wheel fitted to your vehicle:
You can also use snow socks.
For more information, contact a CITROËN
dealer or a qualified workshop.
Original tyre size
Type of chain
215/65 R16 12 mm link
215/60 R17 KONIG K-SUMMIT
VA N K8 4
2 2 5 / 5 5 R17
Towing device
Load distribution
F
D istribute the load in the trailer so that the
heaviest items are as close as possible to
the axle and the nose weight approaches
the maximum permitted without exceeding
it.
Air density decreases with altitude, thus
reducing engine performance. The maximum
towed load must be reduced by 10
% for every
1,000 metres of altitude. Use towing devices and their unmodified
harnesses approved by CITROËN. It is
recommended that the installation be
per formed by a CITROËN dealer or a
qualified workshop.
If the towing device is not fitted by
a CITROËN dealer, it must still be
fitted in accordance with the vehicle
manufacturer's instructions.
Certain driving assistance or manoeuvring
assistance functions are automatically
disabled if an approved towbar is used.
Obser ve the maximum authorised towable
weight, indicated on your vehicle's
registration certificate, the manufacturer's
label as well as in the Technical data
section of this guide.
Complying with the maximum
authorised nose weight (towball)
also includes the use of accessories
(bicycle carriers, tow boxes, etc.).
Obser ve the legislation in force in the
country in which you are driving.
Practical information
Page 192 of 324
190
As this value may change, please verify
the maximum load set out in the manual
supplied with the roof bars.
If the height exceeds 40 cm, adapt the
speed of the vehicle to the profile of the
road to avoid damaging the roof bars and
the fixings on the vehicle.
Be sure to refer to national legislation in
order to comply with the regulations for
transporting objects which are longer than
the vehicle.
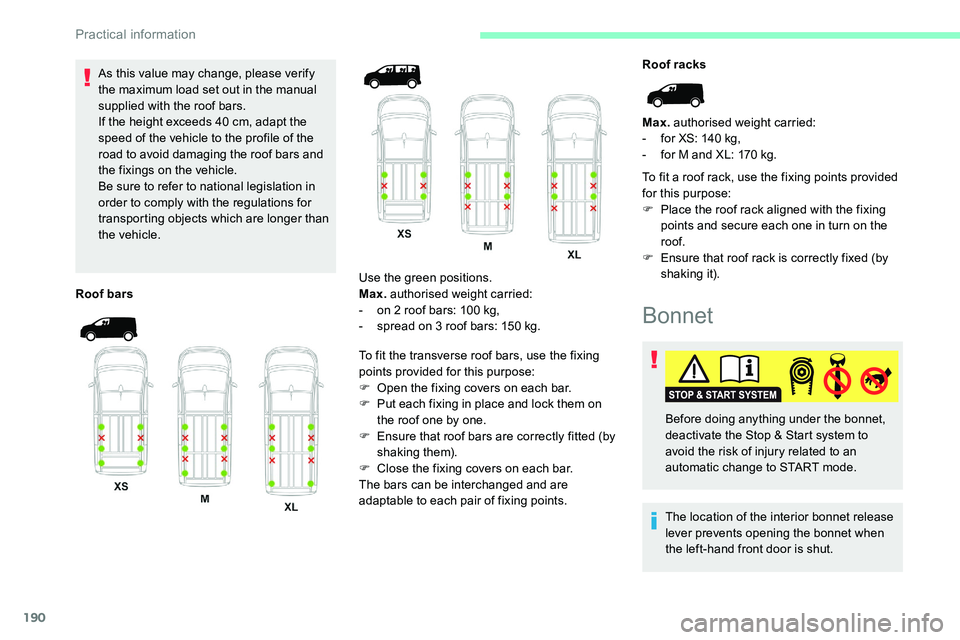
Roof bars Use the green positions.
Max.
authorised weight carried:
-
o
n 2 roof bars: 100 kg,
-
s
pread on 3 roof bars: 150 kg.
To fit the transverse roof bars, use the fixing
points provided for this purpose:
F
O
pen the fixing covers on each bar.
F
P
ut each fixing in place and lock them on
the roof one by one.
F
E
nsure that roof bars are correctly fitted (by
shaking them).
F
C
lose the fixing covers on each bar.
The bars can be interchanged and are
adaptable to each pair of fixing points. Roof racks
Max.
authorised weight carried:
-
f
or XS: 140 kg,
-
f
or M and XL: 170 kg.
To fit a roof rack, use the fixing points provided
for this purpose:
F
P
lace the roof rack aligned with the fixing
points and secure each one in turn on the
roof.
F
E
nsure that roof rack is correctly fixed (by
shaking it).
Bonnet
The location of the interior bonnet release
lever prevents opening the bonnet when
the left-hand front door is shut. Before doing anything under the bonnet,
deactivate the Stop & Start system to
avoid the risk of injury related to an
automatic change to START mode.
Practical information
Page 225 of 324
223
For more information on the Tool box,
refer to the corresponding section.
With a manual gearbox, move the gear
lever into neutral.
With an automatic or electronic gearbox,
place the gear selector in position N .
Failure to adhere to this instruction
may lead to damage to braking system
components and the lack of braking
assistance on restarting the engine.
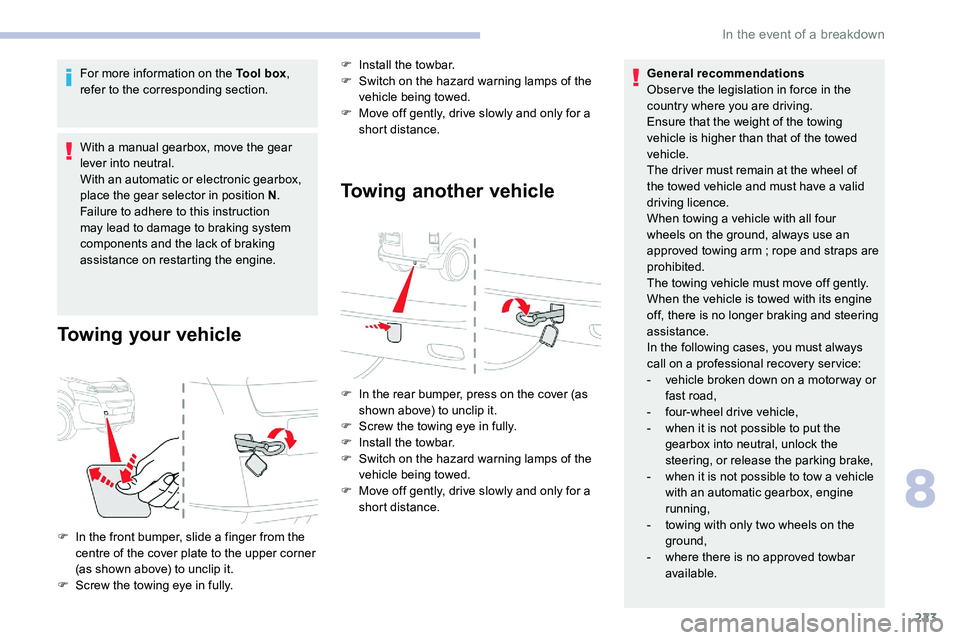
Towing your vehicle
F Install the towbar.
F S witch on the hazard warning lamps of the
vehicle being towed.
F
M
ove off gently, drive slowly and only for a
short distance.
Towing another vehicle
F In the rear bumper, press on the cover (as shown above) to unclip it.
F
S
crew the towing eye in fully.
F
I
nstall the towbar.
F
S
witch on the hazard warning lamps of the
vehicle being towed.
F
M
ove off gently, drive slowly and only for a
short distance.
F
I
n the front bumper, slide a finger from the
centre of the cover plate to the upper corner
(as shown above) to unclip it.
F
S
crew the towing eye in fully. General recommendations
Obser ve the legislation in force in the
country where you are driving.
Ensure that the weight of the towing
vehicle is higher than that of the towed
vehicle.
The driver must remain at the wheel of
the towed vehicle and must have a valid
driving licence.
When towing a vehicle with all four
wheels on the ground, always use an
approved towing arm
; rope and straps are
prohibited.
The towing vehicle must move off gently.
When the vehicle is towed with its engine
off, there is no longer braking and steering
assistance.
In the following cases, you must always
call on a professional recovery ser vice:
- v ehicle broken down on a motor way or
fast road,
-
f
our-wheel drive vehicle,
-
w
hen it is not possible to put the
gearbox into neutral, unlock the
steering, or release the parking brake,
-
w
hen it is not possible to tow a vehicle
with an automatic gearbox, engine
running,
-
t
owing with only two wheels on the
ground,
-
w
here there is no approved towbar
available.
8
In the event of a breakdown