stop start CITROEN DISPATCH SPACETOURER DAG 2020 Handbook (in English)
[x] Cancel search | Manufacturer: CITROEN, Model Year: 2020, Model line: DISPATCH SPACETOURER DAG, Model: CITROEN DISPATCH SPACETOURER DAG 2020Pages: 324, PDF Size: 10.89 MB
Page 200 of 324

198
Keep AdBlue® out of the reach of children,
in its original container.
Procedure
Before starting the top-up procedure, ensure
that the vehicle is parked on a flat and level
sur face.
In wintry conditions, ensure that the
temperature of the vehicle is above -11
°C.
Otherwise the AdBlue
® may be frozen and so
cannot be poured into its tank. Park the vehicle
in a warmer area for a few hours to allow the
top-up to be carried out.
Never put the AdBlue
® into the Diesel fuel
tank.
If any AdBlue
® is splashed, or if there
are any spillages on the bodywork, rinse
immediately with cold water or wipe with a
damp cloth.
If the fluid has crystallised, clean it off
using a sponge and hot water. F
S
witch off the ignition and remove the key
from the switch to switch off the engine.
or
F
W
ith Keyless Entry and Starting, press the
" START/STOP " button to switch off the
engine.
Access to the AdBlue® tank
F From below, pull the black c ove r.
In certain conditions (high temperature, for
example), risks of the release of ammonia
cannot be excluded: do not inhale the vapour.
Vapours containing ammonia have an irritant
effect on mucous membranes (eyes, nose and
throat).
F
T
urn the blue cap 1/6 of a turn anti-
clockwise.
F
L
ift off the cap.
F
O
btain a container of AdBlue
®. After first
checking the use-by date, carefully read
the instructions for use on the label before
pouring the contents of the container into
the vehicle's AdBlue tank.
Or F
I
nsert the AdBlue
® pump nozzle and refill
the tank until the nozzle stops automatically.
F
A
fter refilling, carry out the same operations
in reverse order.
F
R
efit the black cover, starting
at the top.
F
F
or access to the AdBlue
® tank, open the
front left-hand door. To avoid over flowing the AdBlue
® tank:
•
T
op up between 10 and 13
litres using
AdBlue
® containers.
Or
•
D
o not continue after the nozzle’s first
automatic cut-off if you are refilling at a
service station.
Practical information
Page 223 of 324

221
24v 12v
F Wait for it to return to idle.
F D isconnect the jump leads in reverse
order .
F
R
efit the plastic cover to the (+) terminal, if
your vehicle has one.
F
A
llow the engine to run for at least
30
minutes, by driving or with the vehicle
stationary, so that the battery reaches an
adequate state of charge.
To disconnect, proceed in reverse order.
Some functions, including Stop & Start,
are not available if the battery is not
sufficiently charged.
Charging the battery using
a battery charger
For optimum ser vice life of the battery, it is
essential to maintain an adequate state of
charge.
In some circumstances, it may be necessary to
charge the battery:
-
i
f you only use your vehicle for short
journeys,
-
i
f the vehicle is to be taken off the road for
several weeks.
Contact a CITROËN dealer or a qualified
workshop. If you wish to charge your vehicle's battery
yourself, use only a charger compatible
with lead-acid batteries with a nominal
voltage of 12
V.
Follow the instructions provided by the
manufacturer of the charger.
Never reverse polarities.
It is not necessary to disconnect the
battery.
F
S
witch off the ignition.
F
S
witch off all electrical consumers (audio
system, lighting, wipers, etc.). F
E
nsure that the charger cables are in good
condition.
F
I
f your vehicle has one, lift the plastic cover
on the (+) terminal.
F
C
onnect the cables of charger B as follows:
-
t
he positive (+) red cable to the (+)
terminal of battery A ,
-
t
he negative (-) black cable to earth
point C on the vehicle.
F
A
t the end of the charging operation, switch
off charger B before disconnecting the
cables from battery A .
F
S
witch off charger B before connecting the
cables to the battery, so as to avoid any
dangerous sparks. If this label is present, it is essential to
use only a 12
V charger to avoid causing
irreversible damage to the electrical
components related to the Stop & Start
system.
Never try to charge a frozen battery - risk
of explosion!
If the battery has frozen, have it checked
by a CITROËN dealer or by a qualified
workshop who will check that the internal
components have not been damaged and
that the container has not cracked, which
would mean a risk of toxic and corrosive
acid leaking.
8
In the event of a breakdown
Page 224 of 324
222
Disconnecting the battery
In order to maintain an adequate state
of charge for starting the engine, it is
recommended that the battery be disconnected
if the vehicle is taken out of ser vice for a long
period.
Before disconnecting the battery:
F
c
lose the windows and the doors before
disconnecting the battery,
F
s
witch off all electrical consumers (audio
system, wipers, lighting, etc.).
F
s
witch off the ignition and wait for
four
minutes.
At the battery, detach the (+) terminal only.
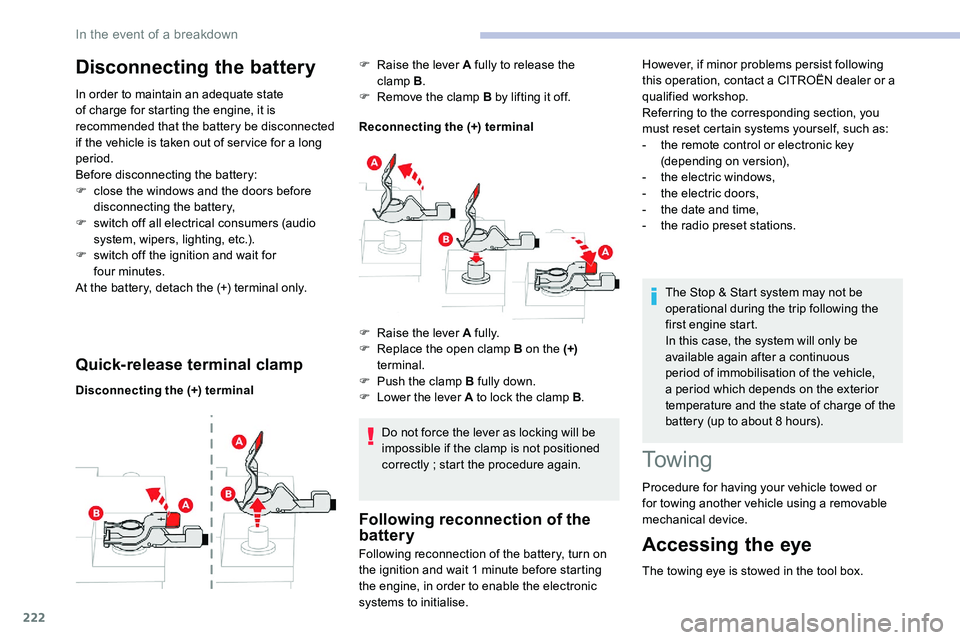
Quick-release terminal clamp
Disconnecting the (+) terminal Reconnecting the (+) terminal
Do not force the lever as locking will be
impossible if the clamp is not positioned
correctly ; start the procedure again.
Following reconnection of the
battery
F Raise the lever A fully to release the clamp B.
F
R
emove the clamp B by lifting it off.
Following reconnection of the battery, turn on
the ignition and wait 1
minute before starting
the engine, in order to enable the electronic
systems to initialise. The Stop & Start system may not be
operational during the trip following the
first engine start.
In this case, the system will only be
available again after a continuous
period of immobilisation of the vehicle,
a period which depends on the exterior
temperature and the state of charge of the
battery (up to about 8 hours).
To w i n g
Procedure for having your vehicle towed or
for towing another vehicle using a removable
mechanical device.
Accessing the eye
The towing eye is stowed in the tool box.
F
Ra
ise the lever A fully.
F
R
eplace the open clamp B on the (+)
terminal.
F
P
ush the clamp B fully down.
F
L
ower the lever A to lock the clamp B
.However, if minor problems persist following
this operation, contact a CITROËN dealer or a
qualified workshop.
Referring to the corresponding section, you
must reset certain systems yourself, such as:
-
t
he remote control or electronic key
(depending on version),
-
t
he electric windows,
-
t
he electric doors,
-
t
he date and time,
-
t
he radio preset stations.
In the event of a breakdown
Page 273 of 324
1
CITROËN Connect Nav
GPS navigation -
Applications - Multimedia
audio system - Bluetooth
®
telephone
Contents
First steps
1
S
teering mounted controls
2
M
enus
3
V
oice commands
4
N
avigation
1
2
Connected navigation
1
4
Applications
1
7
Radio
2
0
DAB radio (Digital Audio Broadcasting)
2
2
Media
2
2
Telephone
2
4
Settings
2
8
Frequently asked questions
3
0The various functions and settings
described differ according to the version
and configuration of the vehicle.
For safety reasons and because they
require continued attention on the part of
the driver, the following operations must
be carried out with the vehicle stationary
and the ignition switched off:
-
Us
ing a smartphone.
-
P
airing a Bluetooth mobile phone to
the hands-free Bluetooth system of the
audio system.
-
Sm
artphone connection operations for
CarPlay
®, MirrorLinkTM or Android Auto
(certain applications interrupt their
display when the vehicle starts to move
again).
-
W
atching a video (the video stops
when the vehicle starts to move again).
-
T
he configuration of profiles.
The system is protected in such a way that
it will only operate in the vehicle.
The display of the message Energy
Economy Mode signals that a change to
standby is imminent. The link below gives access to the OSS
(Open Source Software) code for the
system.
https://www.groupe-psa.com/fr/oss/
https://www.groupe-psa.com/en/oss/
First steps
With the engine running, a press
mutes the sound.
With the ignition off, a press turns
the system on.
Increase or decrease the volume using
the wheel or the "plus" or "minus" buttons
(depending on the equipment).
Use the menu buttons on either side of or
below the touch screen for access to the
menus, then press the virtual buttons in the
touch screen.
Depending on the model, use the "Source" or
"Menu" buttons to access the rolling menus,
then press the virtual buttons in the touch
screen.
Display the rolling menus at any time by
pressing the screen briefly with three fingers.
All of the touch areas of the screen are white.
Press the back arrow to go back a level.
Press "OK" to confirm.
.
CITROËN Connect Nav
Page 279 of 324
7
"Navigation" voice
commands
Voice commandsHelp messages
Navigate home To plan a route, say "navigate to" followed by the address, the contact name or an intersection. For
example, "navigate to address 11 Regent Street, London", "navigate to contact, John Miller", or
"navigate to intersection of Regent Street, London". You can specify if it's a preferred address, or a
Point of Interest. For example, say "navigate to preferred address, Tennis club", or "navigate to POI
Heathrow Airport in London". Or, you can just say, "navigate home". To see Points of Interest on
a map, you can say things like "show POI hotels in Banbury". For more information say "help with
points of interest" or "help with route guidance".
To choose a destination, say something like "navigate to line three" or "select line two". If you can't
find the destination but the street's right, say for example "select the street in line three". To move
around a displayed list, you can say "next page" or "previous page". You can undo your last action
and start over by saying "undo", or say "cancel" to cancel the current action.
Navigate to work
Navigate to preferred address, Tennis club
Navigate to contact, John Miller
Navigate to address 11 regent street,
London
Tell me the remaining distance
You can say "stop" or "resume route guidance". To get information about your current route,
you can say "tell me the remaining time", "remaining distance" or "arrival time". To learn more
commands, try saying "help with navigation".
Tell me the remaining time
Tell me the arrival time
Stop route guidance
.
CITROËN Connect Nav
Page 295 of 324
23
Auxiliary socket (AUX)
Depending on equipment
This source is only available if "Auxiliary input"
has been checked in the audio settings.
Connect a portable device (MP3 player, etc.) to
the auxiliary Jack socket using an audio cable
(not supplied).
First adjust the volume on the portable device
(to a high level). Then adjust the volume of the
audio system.
Management of the controls is via the portable
device.
CD player
Depending on equipment
Insert the CD in the player.
Selecting the source
Press Radio Media to display the
primary page. Select "
Source".
Choose the source.
Watching a video
Insert a USB memory stick in the USB socket.
Select " Sources ".
Select Video to start the video.
To remove the USB memory stick,
press the pause button to stop the
video, then remove the memory
stick.
Bluetooth® audio streaming
Streaming allows you to listen to music from
your smartphone.
The Bluetooth profile must be activated ; first
adjust the volume on the portable device (to a
high level).
Then adjust the volume of the audio system. If play does not start automatically, it may be
necessary to start the audio playback from the
telephone.
Control is from the portable device or by using
the system's touch buttons.
Once connected in streaming mode, the
telephone is considered to be a media
source.
Connecting Apple® players
Connect the Apple® player to the USB port
using a suitable cable (not supplied).
Play starts automatically.
Control is via the audio system.
The classifications available are those of
the portable device connected (artists/
albums/genres/playlists/audio books/
podcasts).
The default classification used is by artist.
To modify the classification used, return
to the first level of the menu then select
the desired classification (playlists for
example) and confirm to go down through
the menu to the desired track.
The version of software in the audio system
may not be compatible with the generation of
the Apple
® p l aye r.
Video control commands are accessible
only through the touch screen.
Press Radio Media to display the
primary page.
.
CITROËN Connect Nav
Page 313 of 324
237
Table of weights ............................................2 25
Table position .................................................. 55
Table, retractable sliding
...........................83-85
Tables, aircraft
................................................ 76
Tables of fuses
....................................... 217-219
Table top, working
........................................... 63
Tailgate rear screen
........................................ 50
Ta n k , f u e l
................................................ 185 -187
Technical data
............................................... 225
Temperature, coolant
................................12, 24
Textured Paint
............................................... 19 9
Third brake lamp
........................................... 215
Time (setting)
.................................................. 30
Tool box
................
................................. 201-202
To o l s
..................................................... 202, 206
Topping-up AdBlue
®...................................... 198
Top Rear Vision............................................. 18 0
T
V
U
W
Ventilation ............................... 86 - 87, 90, 92, 94
Under-inflation (detection)
............................
15 4
Unlocking
.......................................
31-32, 34-36
Unlocking from the inside .........................
41- 4 3
Unlocking, selective
..................................
33-36
Unlocking the doors
................................... 4
1- 42
Unlocking, total
.........................................
33-36
Updating the date
............................................ 3
0
Updating the time
...............................
.............
30
USB
.................................................................
77Warning and indicator lamps
.....................
1
0 -11
Warning lamp, airbag
...................................... 18
W
arning lamp, braking system
..................
11 -12
Warning lamp, Diesel engine pre-heater
.......
18
Warning lamp, driver''s seat belt not fastened
.........................................
115
Warning lamp, low fuel level ...........................
19
Warning lamp, parking brake
..........................
12
Warning lamps
................................................
11
Warning lamp, seat belts
........................
12 , 115
Warning lamp, Service ....................................13
Warnings and indicators
............................
1 0 -11
Washer jets, heated
........................................
91
Washing
........................................................
15 8
Weights
...............
..................................
224-225
Welcome lighting ............................................. 32
Wheel, spare
................. 1
55, 196, 206 -207, 210
Windows, rear
.................................................
82
Windscreen, heated
........................................
91
Wiper blades (changing)
.......................
105 -10 6
Wiper, rear ..................................................... 104
Wipers
.............................................
20, 103 -104
Wipers, automatic rain sensitive
...........
103 -104
Stability control (ESC).............
1 0 9 -11 0 , 112 -113
Starting a Diesel engine
............................... 18
5
Starting the engine
....................................... 14
0
Starting the vehicle
........ 14
1, 143, 145, 147-152
Starting using another battery
......................
220
Stay, bonnet
..................................................
191
Steering wheel, adjustment
............................ 58
S
topping the vehicle
..............
141, 143, 147-152
Stop & Start
........................................
21, 29, 87,
152-154, 185, 190, 194, 222
Storage
..........................................
56, 63, 73 -76
Storage compartments
...................................
76
Storage wells
.......................................
73-74, 76
Stowing rings
..................................................
79
Sunshine sensor
.............................................
86
Switching off the engine
.......................
140, 142
Synchronising the remote control
...................
40Total distance recorder
...................................
27
To w b a r
...............................
............................
188
Towed loads
..........................................
224-225
Towing another vehicle
.........................
222-223
Towing eye ....................................................
222
Traction control (ASR)
.....................
17, 1 0 9 -11 3
Tr a i l e r
...............
.............................................
188
Trajectory control systems
.....................
10
9 -110
Triangle, warning ........................................... 200
Trip computer
............................................
28-29
Trip distance recorder
..................................... 2
7
Ty r e s
..............................................................
19 6
Tyre under-inflation detection
....................... 1
8, 154-155, 205, 210
.
Index alphab