driver seat adjustment CITROEN DISPATCH SPACETOURER DAG 2020 Handbook (in English)
[x] Cancel search | Manufacturer: CITROEN, Model Year: 2020, Model line: DISPATCH SPACETOURER DAG, Model: CITROEN DISPATCH SPACETOURER DAG 2020Pages: 324, PDF Size: 10.89 MB
Page 57 of 324
55
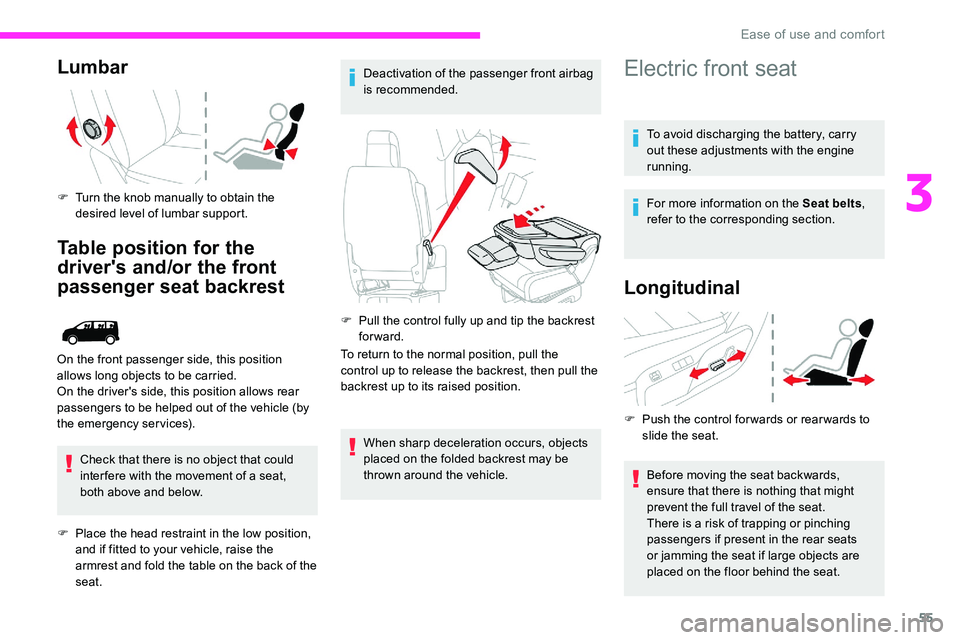
Lumbar
F Turn the knob manually to obtain the desired level of lumbar support.
Table position for the
driver's and/or the front
passenger seat backrest
Check that there is no object that could
inter fere with the movement of a seat,
both above and below.
F
P
lace the head restraint in the low position,
and if fitted to your vehicle, raise the
armrest and fold the table on the back of the
seat. Deactivation of the passenger front airbag
is recommended.
F
P
ull the control fully up and tip the backrest
forward.
To return to the normal position, pull the
control up to release the backrest, then pull the
backrest up to its raised position.
On the front passenger side, this position
allows long objects to be carried.
On the driver's side, this position allows rear
passengers to be helped out of the vehicle (by
the emergency services).
When sharp deceleration occurs, objects
placed on the folded backrest may be
thrown around the vehicle.
Electric front seat
To avoid discharging the battery, carry
out these adjustments with the engine
running.
For more information on the Seat belts,
refer to the corresponding section.
Longitudinal
F Push the control for wards or rear wards to slide the seat.
Before moving the seat backwards,
ensure that there is nothing that might
prevent the full travel of the seat.
There is a risk of trapping or pinching
passengers if present in the rear seats
or jamming the seat if large objects are
placed on the floor behind the seat.
3
Ease of use and comfort
Page 58 of 324
56
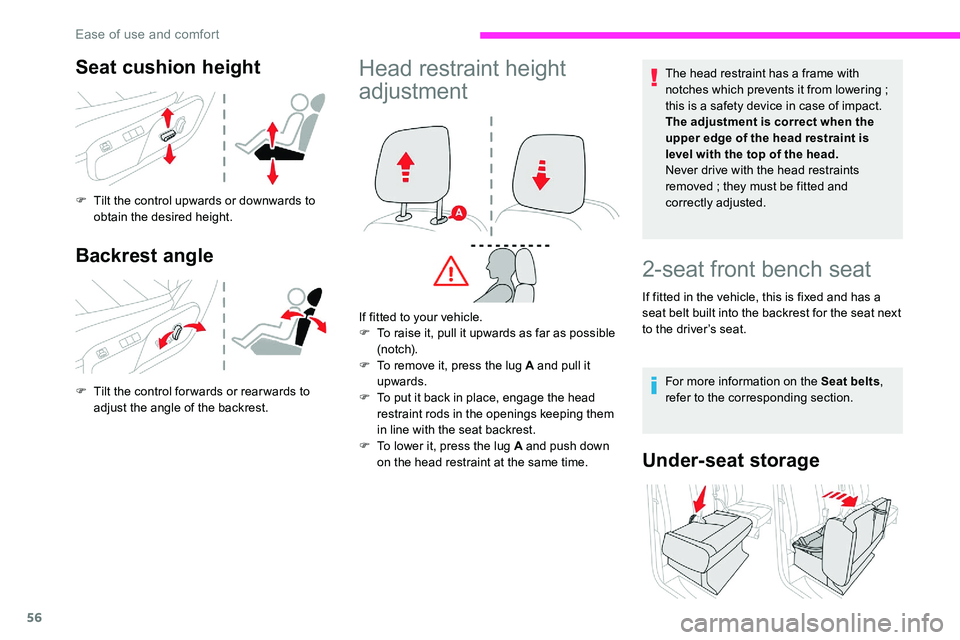
Seat cushion height
F Tilt the control upwards or downwards to obtain the desired height.
Backrest angle
F Tilt the control for wards or rear wards to adjust the angle of the backrest.
Head restraint height
adjustmentThe head restraint has a frame with
notches which prevents it from lowering ;
this is a safety device in case of impact.
The adjustment is correct when the
upper edge of the head restraint is
level with the top of the head.
Never drive with the head restraints
removed
; they must be fitted and
correctly adjusted.
If fitted to your vehicle.
F
T
o raise it, pull it upwards as far as possible
(n otc h).
F
T
o remove it, press the lug
A and pull it
upwards.
F
T
o put it back in place, engage the head
restraint rods in the openings keeping them
in line with the seat backrest.
F
T
o lower it, press the lug A and push down
on the head restraint at the same time.
2-seat front bench seat
If fitted in the vehicle, this is fixed and has a
seat belt built into the backrest for the seat next
to the driver’s seat.
For more information on the Seat belts ,
refer to the corresponding section.
Under-seat storage
Ease of use and comfort
Page 62 of 324
60
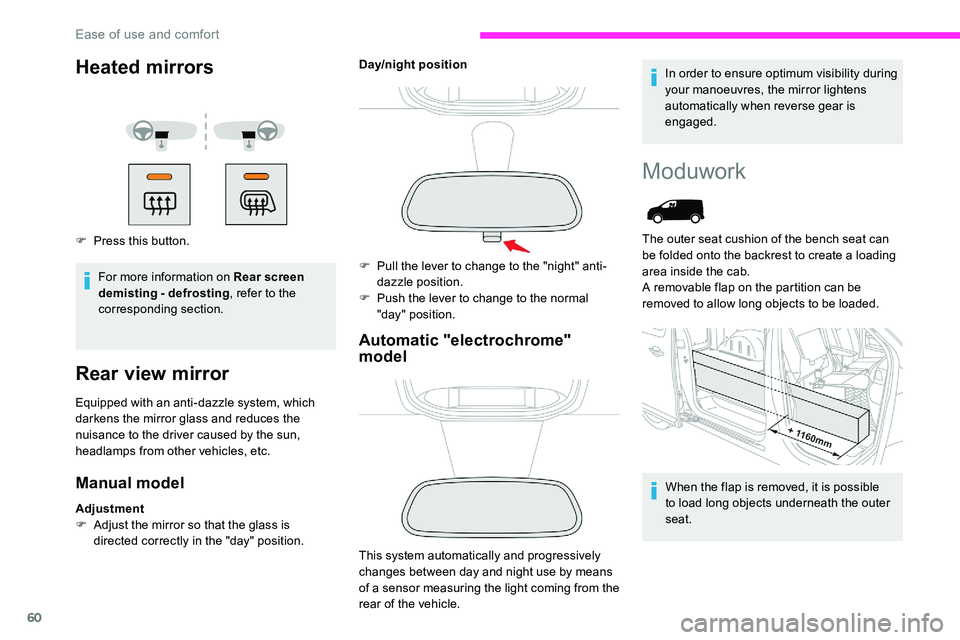
Heated mirrors
F Press this button.For more information on Rear screen
demisting - defrosting , refer to the
corresponding section.
Rear view mirror
Equipped with an anti-dazzle system, which
darkens the mirror glass and reduces the
nuisance to the driver caused by the sun,
headlamps from other vehicles, etc.
Manual model
Adjustment
F A djust the mirror so that the glass is
directed correctly in the "day" position. Day/night position
Automatic "electrochrome"
model
This system automatically and progressively
changes between day and night use by means
of a sensor measuring the light coming from the
rear of the vehicle. In order to ensure optimum visibility during
your manoeuvres, the mirror lightens
automatically when reverse gear is
engaged.
F
P
ull the lever to change to the "night" anti-
dazzle position.
F
P
ush the lever to change to the normal
"day" position.
Moduwork
When the flap is removed, it is possible
to load long objects underneath the outer
seat.
The outer seat cushion of the bench seat can
be folded onto the backrest to create a loading
area inside the cab.
A removable flap on the partition can be
removed to allow long objects to be loaded.
Ease of use and comfort
Page 104 of 324
102
Interior ambient lighting
The dimmed passenger compartment lighting
improves visibility in the vehicle when the light
i s p o o r.
Switching on
At night, the front roof lighting and panoramic
roof lighting (if fitted to your vehicle) comes on
automatically when the sidelamps are switched
on.
The ambient lighting switches off automatically
when the sidelamps are switched off.
Programming
With audio system or touch
screen
The activation, deactivation and
the choice of brightness of the
ambience lighting can be set via the
vehicle configuration menu.
The system may suffer inter ference or not
work correctly:
-
u
nder conditions of poor visibility (for
example, snowfall, heavy rain or thick
f o g , e t c .),
-
i
f the windscreen is dirty, misted or
obscured (by a sticker, etc.) in front of
the camera,
-
i
f the vehicle is facing highly reflective
signs.
If the fog is too dense, the system is
automatically deactivated.
The system is not able to detect:
-
r
oad users that do not have their own
lighting, such as pedestrians,
-
r
oad users whose lighting is obscured,
such as vehicles running behind a
safety barrier (on a motor way, for
example),
-
r
oad users at the top or bottom of
a steep slope, on twisty roads, on
crossroads.
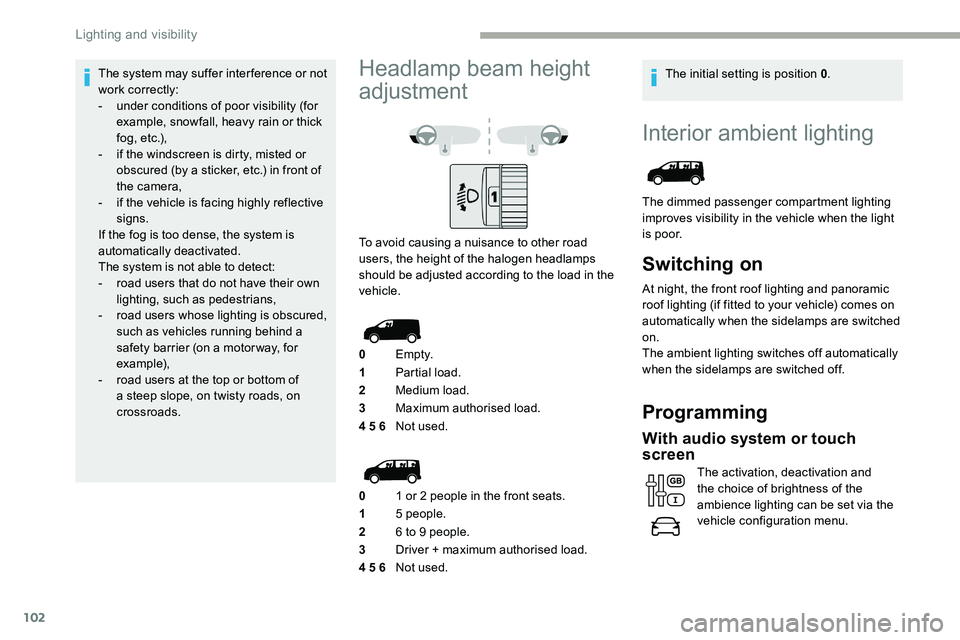
Headlamp beam height
adjustment
To avoid causing a nuisance to other road
users, the height of the halogen headlamps
should be adjusted according to the load in the
vehicle.
0 Em pt y.
1 Partial load.
2 Medium load.
3 Maximum authorised load.
4 5 6 Not used.
0 1 or 2 people in the front seats.
1 5 people.
2 6 to 9 people.
3 Driver + maximum authorised load.
4 5 6 Not used. The initial setting is position 0
.
Lighting and visibility
Page 116 of 324
114
Locking
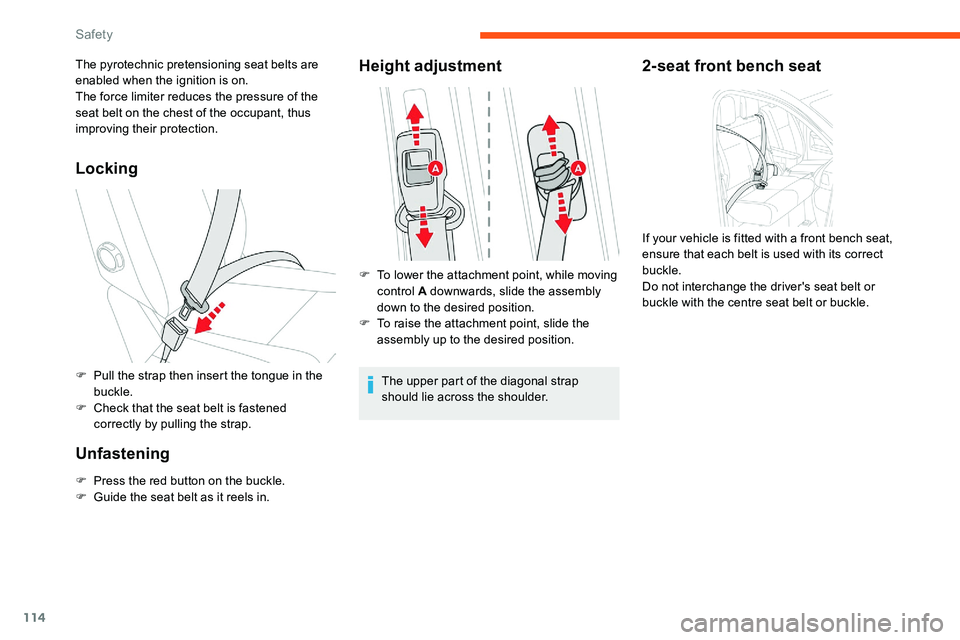
F Pull the strap then insert the tongue in the buckle.
F
C
heck that the seat belt is fastened
correctly by pulling the strap.
Unfastening
F Press the red button on the buckle.
F G uide the seat belt as it reels in.
Height adjustmentThe pyrotechnic pretensioning seat belts are
enabled when the ignition is on.
The force limiter reduces the pressure of the
seat belt on the chest of the occupant, thus
improving their protection.
F
T
o lower the attachment point, while moving
control A downwards, slide the assembly
down to the desired position.
F
T
o raise the attachment point, slide the
assembly up to the desired position.
The upper part of the diagonal strap
should lie across the shoulder.2-seat front bench seat
If your vehicle is fitted with a front bench seat,
ensure that each belt is used with its correct
buckle.
Do not interchange the driver's seat belt or
buckle with the centre seat belt or buckle.
Safety
Page 118 of 324
116
From approximately 12 mph (20 km/h), the
w arning lamp(s) flashes for two minutes,
accompanied by an audible signal. Beyond
these two
minutes, the warning lamp(s)
remains on if the driver or front passenger do
not fasten their seat belt(s). Advice
The driver must ensure that passengers
use the seat belts correctly and that they
are all fastened before setting off.
Wherever you are seated in the vehicle,
always fasten your seat belt, even for
short journeys.
Do not interchange the seat belt buckles
as they will not fulfil their role fully.
The seat belts are fitted with an inertia
reel permitting automatic adjustment of
the length of the strap to your size. The
seat belt is stowed automatically when not
in use.
Before and after use, ensure that the seat
belt is reeled in correctly.
The lower part of the strap must be
positioned as low as possible on the
pelvis.
The upper part must be positioned in the
hollow of the shoulder.
The inertia reels have an automatic
locking device at the time of a collision,
during sudden braking or if the vehicle
turns over. You can release the device by
pulling the strap firmly and then releasing
it so that it reels in slightly.Advice
In order to be effective, a seat belt must:
-
b
e tightened as close to the body as
possible,
-
b
e pulled in front of you with a smooth
movement, checking that it does not
twist,
-
b
e used to restrain only one person,
-
n
ot show any signs of cuts or fraying,
-
n
ot be converted or modified to avoid
affecting its performance.
In accordance with current safety
regulations, for all repairs on your
vehicle's seat belts, go to a qualified
workshop with the skills and equipment
needed, which a CITROËN dealer is able
to provide.
Have your seat belts checked regularly
by a CITROËN dealer or a qualified
workshop, particularly if the straps show
signs of damage.
Clean the seat belt straps with soapy
water or a textile cleaning product, sold by
CITROËN dealers.
After folding or moving a seat or rear
bench seat, ensure that the seat belt is
positioned and reeled in correctly.
Safety
Page 313 of 324
237
Table of weights ............................................2 25
Table position .................................................. 55
Table, retractable sliding
...........................83-85
Tables, aircraft
................................................ 76
Tables of fuses
....................................... 217-219
Table top, working
........................................... 63
Tailgate rear screen
........................................ 50
Ta n k , f u e l
................................................ 185 -187
Technical data
............................................... 225
Temperature, coolant
................................12, 24
Textured Paint
............................................... 19 9
Third brake lamp
........................................... 215
Time (setting)
.................................................. 30
Tool box
................
................................. 201-202
To o l s
..................................................... 202, 206
Topping-up AdBlue
®...................................... 198
Top Rear Vision............................................. 18 0
T
V
U
W
Ventilation ............................... 86 - 87, 90, 92, 94
Under-inflation (detection)
............................
15 4
Unlocking
.......................................
31-32, 34-36
Unlocking from the inside .........................
41- 4 3
Unlocking, selective
..................................
33-36
Unlocking the doors
................................... 4
1- 42
Unlocking, total
.........................................
33-36
Updating the date
............................................ 3
0
Updating the time
...............................
.............
30
USB
.................................................................
77Warning and indicator lamps
.....................
1
0 -11
Warning lamp, airbag
...................................... 18
W
arning lamp, braking system
..................
11 -12
Warning lamp, Diesel engine pre-heater
.......
18
Warning lamp, driver''s seat belt not fastened
.........................................
115
Warning lamp, low fuel level ...........................
19
Warning lamp, parking brake
..........................
12
Warning lamps
................................................
11
Warning lamp, seat belts
........................
12 , 115
Warning lamp, Service ....................................13
Warnings and indicators
............................
1 0 -11
Washer jets, heated
........................................
91
Washing
........................................................
15 8
Weights
...............
..................................
224-225
Welcome lighting ............................................. 32
Wheel, spare
................. 1
55, 196, 206 -207, 210
Windows, rear
.................................................
82
Windscreen, heated
........................................
91
Wiper blades (changing)
.......................
105 -10 6
Wiper, rear ..................................................... 104
Wipers
.............................................
20, 103 -104
Wipers, automatic rain sensitive
...........
103 -104
Stability control (ESC).............
1 0 9 -11 0 , 112 -113
Starting a Diesel engine
............................... 18
5
Starting the engine
....................................... 14
0
Starting the vehicle
........ 14
1, 143, 145, 147-152
Starting using another battery
......................
220
Stay, bonnet
..................................................
191
Steering wheel, adjustment
............................ 58
S
topping the vehicle
..............
141, 143, 147-152
Stop & Start
........................................
21, 29, 87,
152-154, 185, 190, 194, 222
Storage
..........................................
56, 63, 73 -76
Storage compartments
...................................
76
Storage wells
.......................................
73-74, 76
Stowing rings
..................................................
79
Sunshine sensor
.............................................
86
Switching off the engine
.......................
140, 142
Synchronising the remote control
...................
40Total distance recorder
...................................
27
To w b a r
...............................
............................
188
Towed loads
..........................................
224-225
Towing another vehicle
.........................
222-223
Towing eye ....................................................
222
Traction control (ASR)
.....................
17, 1 0 9 -11 3
Tr a i l e r
...............
.............................................
188
Trajectory control systems
.....................
10
9 -110
Triangle, warning ........................................... 200
Trip computer
............................................
28-29
Trip distance recorder
..................................... 2
7
Ty r e s
..............................................................
19 6
Tyre under-inflation detection
....................... 1
8, 154-155, 205, 210
.
Index alphab