fuel pump CITROEN DISPATCH SPACETOURER DAG 2020 Handbook (in English)
[x] Cancel search | Manufacturer: CITROEN, Model Year: 2020, Model line: DISPATCH SPACETOURER DAG, Model: CITROEN DISPATCH SPACETOURER DAG 2020Pages: 324, PDF Size: 10.89 MB
Page 189 of 324
187
The vehicle is fitted with a catalytic converter
which reduces harmful substances in the
exhaust gases.If you have put in the wrong fuel for
your vehicle, you must have the fuel
tank drained and filled with the correct
fuel before star ting the engine.
Fuel cut- of f
Your vehicle is fitted with a safety system that
cuts off the supply of fuel in the event of an
impact.
Diesel misfuel prevention
Mechanical device which prevents filling the
tank of a Diesel vehicle with petrol. It helps
avoid the risk of engine damage that can result
from filling with the wrong fuel.
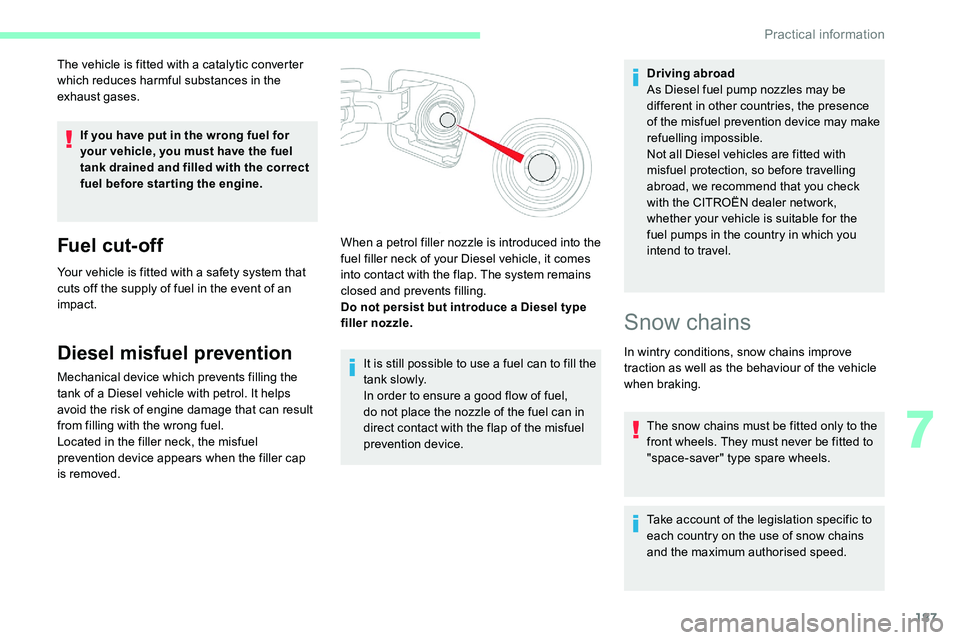
Located in the filler neck, the misfuel
prevention device appears when the filler cap
is removed. It is still possible to use a fuel can to fill the
t a n k s l ow l y.
In order to ensure a good flow of fuel,
do not place the nozzle of the fuel can in
direct contact with the flap of the misfuel
prevention device.Driving abroad
As Diesel fuel pump nozzles may be
different in other countries, the presence
of the misfuel prevention device may make
refuelling impossible.
Not all Diesel vehicles are fitted with
misfuel protection, so before travelling
abroad, we recommend that you check
with the CITROËN dealer network,
whether your vehicle is suitable for the
fuel pumps in the country in which you
intend to travel.
When a petrol filler nozzle is introduced into the
fuel filler neck of your Diesel vehicle, it comes
into contact with the flap. The system remains
closed and prevents filling.
Do not persist but introduce a Diesel type
filler nozzle.
Snow chains
In wintry conditions, snow chains improve
traction as well as the behaviour of the vehicle
when braking.
The snow chains must be fitted only to the
front wheels. They must never be fitted to
"space-saver" type spare wheels.
Take account of the legislation specific to
each country on the use of snow chains
and the maximum authorised speed.
7
Practical information
Page 195 of 324
193
During the 30 minutes after topping up the
o il, the check per formed with the oil level
indicator in the instrument panel when the
ignition is switched on is not valid.
Brake fluid
The level of this fluid should be
close to the " MAX" mark. If not,
check the brake pad wear.
To know how often the brake fluid should be
replaced, refer to the manufacturer's servicing
schedule. If topping up, clean the cap before
replacing it. Use only DOT4 brake fluid
from a sealed canister.
F
A
dd more oil if necessary.
F
A
fter checking the level, carefully refit the oil
filler cap and the dipstick in its tube.
Power steering fluid
The level of this fluid should be
close to the " MAX" mark. With the
engine cold and the vehicle standing
on level ground, check this by
reading the level on the filler neck.
Engine coolant
Check the engine coolant level
regularly.
It is normal to top up this fluid
between two services.
The check and top-up must only be done with
the engine cold.
A low level presents a risk of serious damage
to the engine.
The level of this fluid should be close to the
" MAX " mark but should never exceed it.
If the level is close to or below the " MIN” mark,
it is essential to top up. the pressure to drop.
Once the pressure has dropped, remove the
cap and top up to the required level.
Screen and headlamp
washer fluid
Top up the reser voir when you next
stop the vehicle.
Fluid specification
The fluid must be topped up with a ready-to-
use mixture.
In winter (temperatures below zero), a liquid
containing an agent to prevent freezing must
be used which is appropriate for the prevailing
conditions, in order to protect the elements of
the system (pump, tank, ducts, jets, etc.).
When the engine is hot, the temperature of this
fluid is regulated by the fan.
In addition, as the cooling system is
pressurised, wait at least one hour after
switching off the engine before carrying out any
work.
To avoid the risk of scalding if you need to top
up in an emergency, wrap a cloth around the
cap and unscrew the cap by two turns to allow Filling with pure water is prohibited
under all circumstances (risk of freezing,
limestone deposits, etc.).
Diesel fuel additive (Diesel
with particle filter)
or
The minimum level in the particle
filter additive tank is indicated by
fixed illumination of this warning
lamp, accompanied by an audible
warning and a message warning that
the level of additive is too low.
7
Practical information
Page 200 of 324

198
Keep AdBlue® out of the reach of children,
in its original container.
Procedure
Before starting the top-up procedure, ensure
that the vehicle is parked on a flat and level
sur face.
In wintry conditions, ensure that the
temperature of the vehicle is above -11
°C.
Otherwise the AdBlue
® may be frozen and so
cannot be poured into its tank. Park the vehicle
in a warmer area for a few hours to allow the
top-up to be carried out.
Never put the AdBlue
® into the Diesel fuel
tank.
If any AdBlue
® is splashed, or if there
are any spillages on the bodywork, rinse
immediately with cold water or wipe with a
damp cloth.
If the fluid has crystallised, clean it off
using a sponge and hot water. F
S
witch off the ignition and remove the key
from the switch to switch off the engine.
or
F
W
ith Keyless Entry and Starting, press the
" START/STOP " button to switch off the
engine.
Access to the AdBlue® tank
F From below, pull the black c ove r.
In certain conditions (high temperature, for
example), risks of the release of ammonia
cannot be excluded: do not inhale the vapour.
Vapours containing ammonia have an irritant
effect on mucous membranes (eyes, nose and
throat).
F
T
urn the blue cap 1/6 of a turn anti-
clockwise.
F
L
ift off the cap.
F
O
btain a container of AdBlue
®. After first
checking the use-by date, carefully read
the instructions for use on the label before
pouring the contents of the container into
the vehicle's AdBlue tank.
Or F
I
nsert the AdBlue
® pump nozzle and refill
the tank until the nozzle stops automatically.
F
A
fter refilling, carry out the same operations
in reverse order.
F
R
efit the black cover, starting
at the top.
F
F
or access to the AdBlue
® tank, open the
front left-hand door. To avoid over flowing the AdBlue
® tank:
•
T
op up between 10 and 13
litres using
AdBlue
® containers.
Or
•
D
o not continue after the nozzle’s first
automatic cut-off if you are refilling at a
service station.
Practical information
Page 202 of 324
200
Warning triangle
This safety equipment should be used in
addition to the hazard warning lamps.
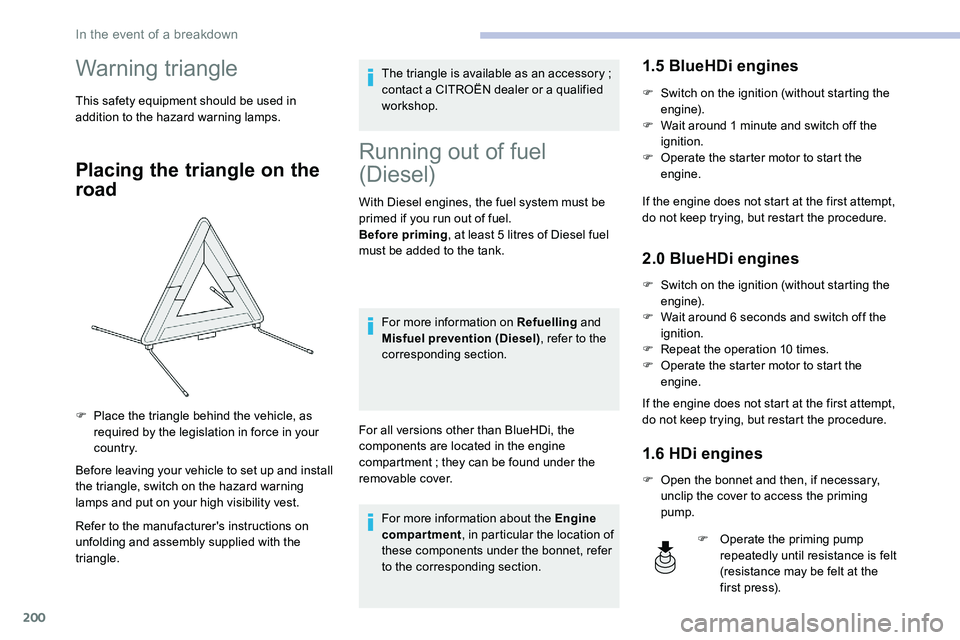
Placing the triangle on the
road
Before leaving your vehicle to set up and install
the triangle, switch on the hazard warning
lamps and put on your high visibility vest.
Refer to the manufacturer's instructions on
unfolding and assembly supplied with the
triangle.The triangle is available as an accessory
;
contact a CITROËN dealer or a qualified
workshop.
Running out of fuel
(Diesel)
With Diesel engines, the fuel system must be
primed if you run out of fuel.
Before priming , at least 5
litres of Diesel fuel
must be added to the tank.
For more information on Refuelling and
Misfuel prevention (Diesel) , refer to the
corresponding section.
For all versions other than BlueHDi, the
components are located in the engine
compartment
; they can be found under the
removable cover.
For more information about the Engine
compartment , in particular the location of
these components under the bonnet, refer
to the corresponding section.
1.5 BlueHDi engines
F Switch on the ignition (without starting the engine).
F
W
ait around 1 minute and switch off the
ignition.
F
O
perate the starter motor to start the
engine.
If the engine does not start at the first attempt,
do not keep trying, but restart the procedure.
2.0 BlueHDi engines
F Switch on the ignition (without starting the engine).
F
W
ait around 6 seconds and switch off the
ignition.
F
R
epeat the operation 10
times.
F
O
perate the starter motor to start the
engine.
If the engine does not start at the first attempt,
do not keep trying, but restart the procedure.
1.6 HDi engines
F Open the bonnet and then, if necessary, unclip the cover to access the priming
pump.
F
P
lace the triangle behind the vehicle, as
required by the legislation in force in your
c o u nt r y.
F
O
perate the priming pump
repeatedly until resistance is felt
(resistance may be felt at the
f i r st p r e s s).
In the event of a breakdown
Page 203 of 324
201
F Operate the starter motor to start the engine (if the engine does not start at the first
attempt, wait around 15 seconds before
trying again).
F
I
f the engine does not start after a few
attempts, operate the priming pump again,
then the starter motor.
F
P
ut the cover back in place and clip it in,
then close the bonnet.
2.0 HDi engines
F Open the bonnet and then, if necessary, unclip the cover to access the priming
pump.
F
L
oosen the degassing bolt. F
O
perate the priming pump until
fuel appears in the transparent
tube.
F
R
etighten the degassing bolt.
F
O
perate the starter motor until the engine
starts (if the engine does not start at the
first attempt, wait around 15
seconds before
trying again).
F
I
f the engine does not start after a few
attempts, operate the priming pump again,
then the starter motor.
F
P
ut the cover back in place and clip it in,
then close the bonnet.
Tool box
Access
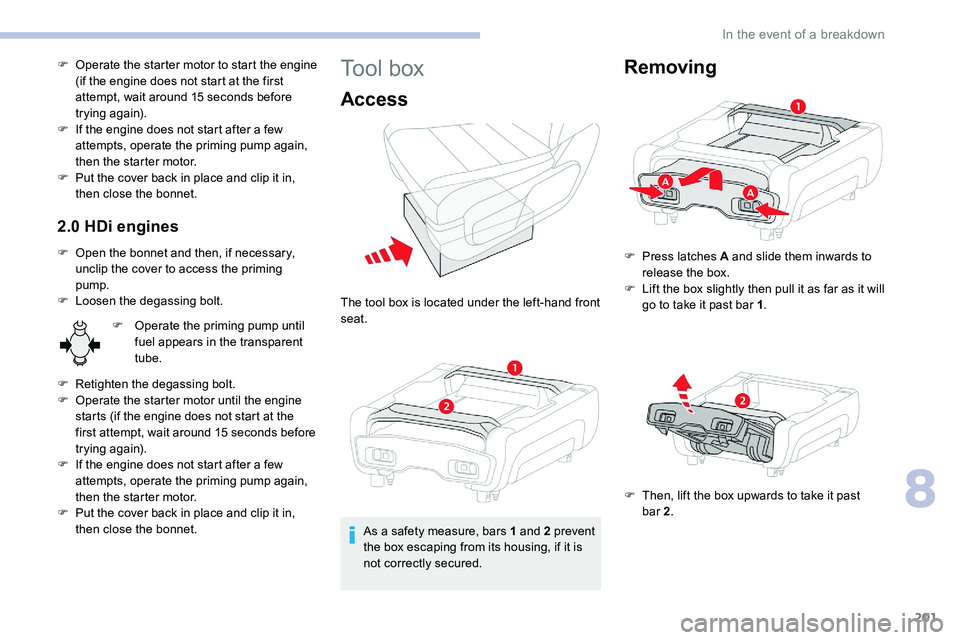
The tool box is located under the left-hand front
seat.
As a safety measure, bars 1 and 2 prevent
the box escaping from its housing, if it is
not correctly secured.
Removing
F Press latches A and slide them inwards to release the box.
F
L
ift the box slightly then pull it as far as it will
go to take it past bar 1 .
F
T
hen, lift the box upwards to take it past
bar
2.
8
In the event of a breakdown
Page 312 of 324
236
O
Obstacle detection ........................................ 178
Oil change ..................................................... 19
2
Oil consumption
............................................ 192
OIl, engine
...............................
......................192
On-board tools
...................................... 201-202
Opening the bonnet
...............................19 0 -191
Opening the boot
................................ 31- 32, 50
Opening the doors
.........................31- 32, 43 - 4 4
Opening to 180°
........................................ 49
-50
Pads, brake
................................................... 195
Paint
.............................................................. 231
Paint colour code
.......................................... 231
Panoramic glass sunroof
................................82
Parcel shelf, rear
............................................. 76
Parking brake
........................................ 14 4, 19 5
Parking sensors, audible and visual
.............178
Parking sensors, front
...................................179
Parking sensors, rear .................................... 178
Plates, identification ...................................... 231
Port, USB
........................................................ 77
Power steering
...............................
.................19
Pre-heater, Diesel
........................................... 18
Pressures, tyres
........................... 196, 203, 205
Pre-tensioning seat belts
.......................11 6 -117
Priming pump
........................................ 20
0-201
Priming the fuel system
................................200
Protecting children
..........118 , 12 0 -124, 13 0 -13 6
Puncture
................................. 202-203, 205-206
P
RRadar (warnings) ........................................... 15 6
Range .............................................................. 29
Range, AdBlue
.................................. 15, 25, 194
Rear screen, demisting
...................................91
Recharging the battery
.................................221
Recirculation, air
....................................... 88-90
Reduction of electrical load
..........................189
Regeneration of the particle filter
.................195
Reinitialisation of the under- inflation detection system
...........................15 5
Reinitialising the remote control
..................... 40
R
eminder, key in ignition
...............................14
2
Reminder, lighting on
...................................... 98
R
emote control
............................ 31-36, 38, 140
Removing a wheel
................................ 208 -210
Removing the mat
........................................... 75
Replacing bulbs
............................. 21
1, 213 -216
Replacing fuses
..................................... 217-218
Replacing the air filter
................................... 19
4
Replacing the oil filter
................................... 19
4
Replacing the passenger compartment filter
...................................... 19 4
Reservoir, headlamp wash
........................... 19
3
Reservoir, screenwash
.................................193
Resetting the service indicator
.......................23
Resetting the trip recorder
..............................27
Reversing camera
......................... 1
57, 18 0, 183
Reversing camera (on interior mirror)
..........18 0
Reversing lamp
..................................... 214, 216
Roof bars
....................................................... 189
Running out of fuel (Diesel)
..........................200SSafety, children ...............118 , 12 0 -124, 13 0 -13 6
Saturation of the particle filter (Diesel) .........195
Screen, instrument panel
................................28
Screenwash
.................................................. 104
Screenwash, rear
.......................................... 104
SCR (Selective Catalytic Reduction)
......26, 19 6
Seat and bench seat, rear, fixed
...63-64, 66-67
Seat and bench seat, rear, on rails
......................................... 63-64, 68-70
Seat angle
....................................................... 54
Seat belts
.................................. 12 , 113 -117, 12 3
Seat belts, rear
.............................................. 115
Seat, bench front, 2-seat
........................ 5
6 , 114
Seat, rear bench
....................................... 63-64
Seats, electric
........................................... 55-56
Seats, front
...............................
.................54-56
Seats, heated
.................................................. 57
Seat(s), individual, rear, on rails
........71 - 7 2 , 115
Seats, rear
......................................... 6 4 -70, 12 2
Selector, gear
.................................146, 15 0 -152
Sensors (warnings)
....................................... 157
Serial number, vehicle
..................................231
Service indicator
....................................... 23 -24
Servicing
............................... 1
3, 23, 23 -24, 194
Sidelamps
................................ 9
7, 211-214, 216
Side repeater
................................................ 214
Sliding side door, electric
...............37- 3 8 , 4 3 - 47
Sliding side door, hands-free
.....................47- 4 9
Sliding side window
........................................ 8
2
Snow chains
........................... 155, 187-188, 208
Snow chains, link
.................................. 188, 208
Socket, 12 V accessory
..................................77
Socket, 220 V
.................................................. 78
Socket, Jack
.................................................... 78
Sockets, audio
........................................... 7
7-78
Sockets, auxiliary
...............................
.............78
Speed limiter
.................................. 1
59, 161-16 4
Speed limit recognition
............ 16
0 -161, 163, 166, 170 -171
Speedometer
................................................ 15 8
Index alphab