height adjustment CITROEN DISPATCH SPACETOURER DAG 2020 Handbook (in English)
[x] Cancel search | Manufacturer: CITROEN, Model Year: 2020, Model line: DISPATCH SPACETOURER DAG, Model: CITROEN DISPATCH SPACETOURER DAG 2020Pages: 324, PDF Size: 10.89 MB
Page 4 of 324
2
.
.
Instrument Panel 9
I ndicators 23
Distance recorders
2
7
Lighting dimmer
2
7
Trip computer
2
8
Setting the time and date
2
9
Electronic key with remote control
function and built-in key,
3
1
Unlocking/Complete or selective unlocking
3
3
Back-up procedures
3
8
Central locking
/ unlocking
4
1
Electric sliding side door(s)
4
3
General recommendations
for the sliding side doors
4
5
Hands-free sliding side door(s)
4
7
Side-hinged rear doors
4
9
Tailgate
5
0
Tailgate rear screen
5
0
Alarm
51
Electric windows
5
3Correct driving position
5
4
Front seats
5
4
2-seat front bench seat
5
6
Steering wheel adjustment
5
8
Mirrors 59
Moduwork
6
0
Precautions for the seats and bench seats
6
3
Fixed one-piece bench seat 6 4
Fixed rear seat and bench seat 6 6
Rear seat and bench seat on rails 6 8
Individual rear seat(s) on rails
7
1
Crew cab, fixed
7
3
Crew cab, folding
7
4
Interior fittings
7
5
Loading area fittings
7
9
Seating area fittings
8
1
Panoramic sunroof
8
2
Retractable sliding table
8
3
Heating and Ventilation
8
6
Heating
87
Manual air conditioning
8
7
Dual-zone automatic air conditioning
8
8
Recirculation of interior air
9
0
Front demisting - defrosting
9
0
Rear screen and/or door mirrors demisting -
defrosting
91
Rear heating - air conditioning
9
2
Additional Heating
/ Ventilation
9
2
Courtesy lamp(s)
9
5Lighting control stalk
9
7
Direction indicators
9
8
Daytime running lamps/Sidelamps
9
9
Automatic illumination of headlamps
9
9
Guide-me-home and welcome lighting
9
9
Cornering lighting
1
00
Automatic headlamp dipping
1
01
Manual headlamp beam
height adjustment 1 02
Interior ambient lighting 1 02
Wiper control stalk
1
03
Automatic wiping
1
04
Changing a wiper blade
1
06
General safety recommendations
1
07
Hazard warning lamps
1
08
Emergency or assistance call
1
08
Audible warning
1
09
Electronic stability control (ESC)
1
09
Advanced Grip Control
1
12
Seat belts
1
13
Airbags
117
Child seats
1
20
Deactivating the front passenger airbag
1
22
ISOFIX child seats
1
29
Manual child lock
1
36
Electric child lock
1
36
Child lock on rear windows
1
37
Over view
Instruments
Access Ease of use and comfort
Safety
Lighting and visibility
Instruments and controls 4
L abels 5
Eco-driving
Contents
Page 7 of 324
5
4.Controls for speed limiter/cruise control/
adaptive cruise control
5. Instrument panel display mode selection
wheel
6. Voice synthesis control (depending on
ve r s i o n)
Volume adjustment (depending on
ve r s i o n)
7. Audio system adjustment controls
(depending on version)
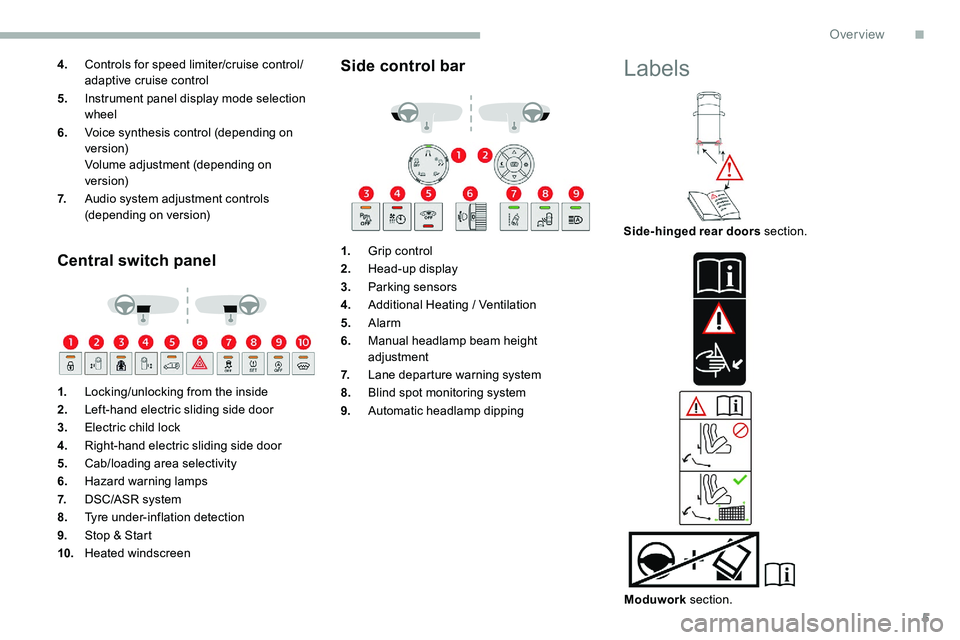
Central switch panel
1.Locking/unlocking from the inside
2. Left-hand electric sliding side door
3. Electric child lock
4. Right-hand electric sliding side door
5. Cab/loading area selectivity
6. Hazard warning lamps
7. DSC/ASR system
8. Tyre under-inflation detection
9. Stop & Start
10. Heated windscreen
Side control bar
1.Grip control
2. Head-up display
3. Parking sensors
4. Additional Heating
/ Ventilation
5. Alarm
6. Manual headlamp beam height
adjustment
7. Lane departure warning system
8. Blind spot monitoring system
9. Automatic headlamp dipping
Labels
Side-hinged rear doors section.
Moduwork section.
.
Over view
Page 56 of 324
54
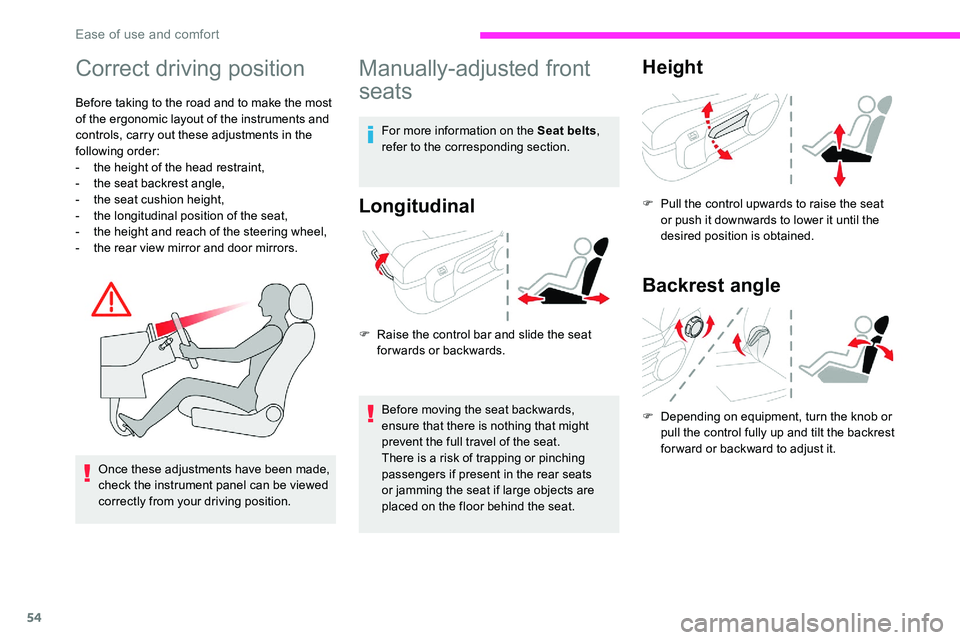
Correct driving position
Before taking to the road and to make the most
of the ergonomic layout of the instruments and
controls, carry out these adjustments in the
following order:
-
t
he height of the head restraint,
-
t
he seat backrest angle,
-
t
he seat cushion height,
-
t
he longitudinal position of the seat,
-
t
he height and reach of the steering wheel,
-
t
he rear view mirror and door mirrors.
Once these adjustments have been made,
check the instrument panel can be viewed
correctly from your driving position.
Manually-adjusted front
seats
For more information on the Seat belts ,
refer to the corresponding section.
Longitudinal
F Raise the control bar and slide the seat forwards or backwards.
Before moving the seat backwards,
ensure that there is nothing that might
prevent the full travel of the seat.
There is a risk of trapping or pinching
passengers if present in the rear seats
or jamming the seat if large objects are
placed on the floor behind the seat.
Height
F Pull the control upwards to raise the seat or push it downwards to lower it until the
desired position is obtained.
Backrest angle
F Depending on equipment, turn the knob or pull the control fully up and tilt the backrest
forward or backward to adjust it.
Ease of use and comfort
Page 58 of 324
56
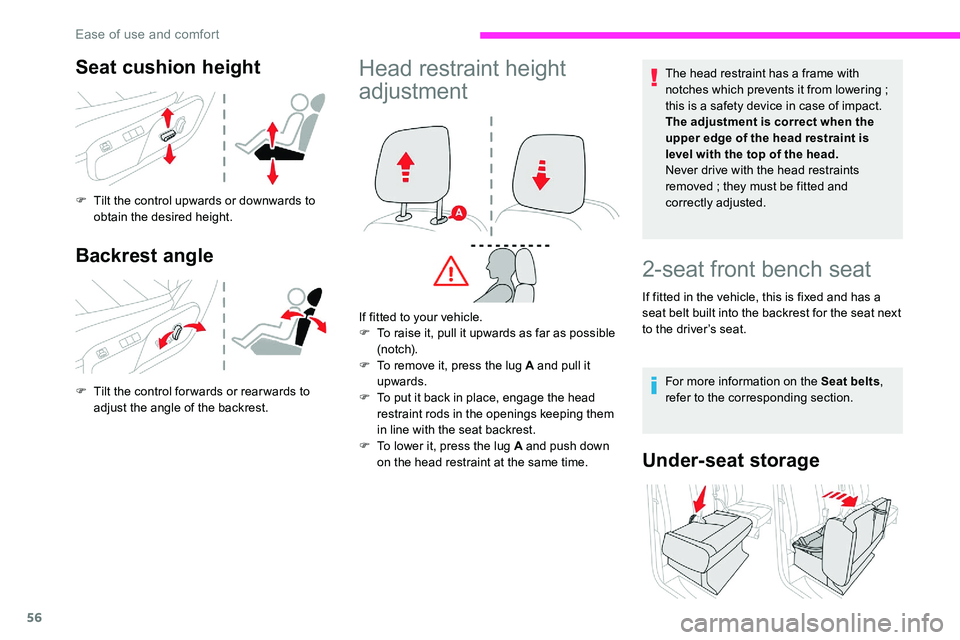
Seat cushion height
F Tilt the control upwards or downwards to obtain the desired height.
Backrest angle
F Tilt the control for wards or rear wards to adjust the angle of the backrest.
Head restraint height
adjustmentThe head restraint has a frame with
notches which prevents it from lowering ;
this is a safety device in case of impact.
The adjustment is correct when the
upper edge of the head restraint is
level with the top of the head.
Never drive with the head restraints
removed
; they must be fitted and
correctly adjusted.
If fitted to your vehicle.
F
T
o raise it, pull it upwards as far as possible
(n otc h).
F
T
o remove it, press the lug
A and pull it
upwards.
F
T
o put it back in place, engage the head
restraint rods in the openings keeping them
in line with the seat backrest.
F
T
o lower it, press the lug A and push down
on the head restraint at the same time.
2-seat front bench seat
If fitted in the vehicle, this is fixed and has a
seat belt built into the backrest for the seat next
to the driver’s seat.
For more information on the Seat belts ,
refer to the corresponding section.
Under-seat storage
Ease of use and comfort
Page 60 of 324
58
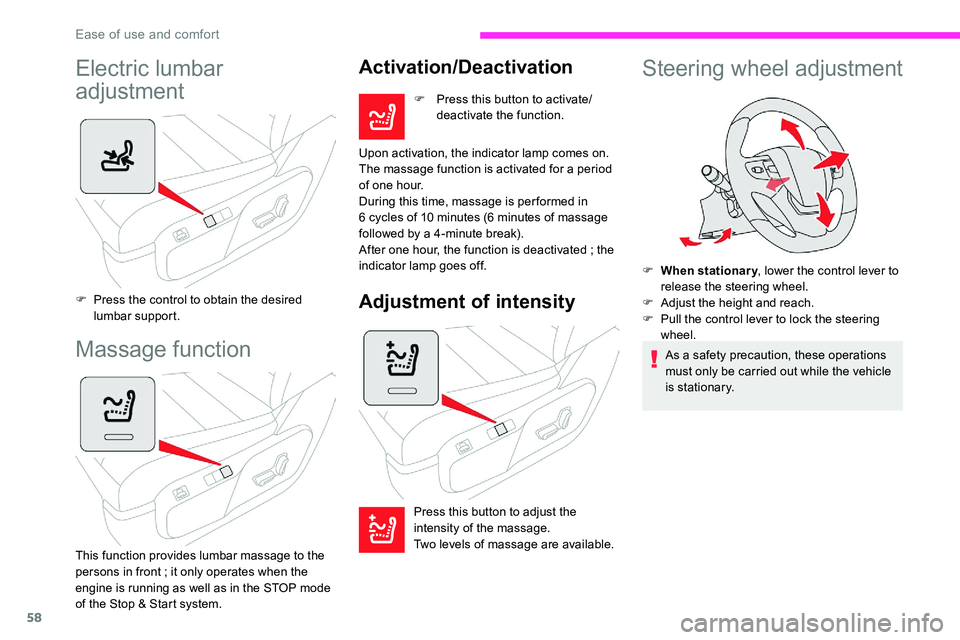
Electric lumbar
adjustment
F Press the control to obtain the desired lumbar support.
Massage function
This function provides lumbar massage to the
persons in front ; it only operates when the
engine is running as well as in the STOP mode
of the Stop & Start system.
Activation/Deactivation
F Press this button to activate/ deactivate the function.
Upon activation, the indicator lamp comes on.
The massage function is activated for a period
of one hour.
During this time, massage is per formed in
6
cycles of 10 minutes (6 minutes of massage
followed by a 4-minute break).
After one hour, the function is deactivated
; the
indicator lamp goes off.
Adjustment of intensity
Press this button to adjust the
intensity of the massage.
Two levels of massage are available.
Steering wheel adjustment
F When stationary , lower the control lever to
release the steering wheel.
F
A
djust the height and reach.
F
P
ull the control lever to lock the steering
wheel.
As a safety precaution, these operations
must only be carried out while the vehicle
is stationary.
Ease of use and comfort
Page 104 of 324
102
Interior ambient lighting
The dimmed passenger compartment lighting
improves visibility in the vehicle when the light
i s p o o r.
Switching on
At night, the front roof lighting and panoramic
roof lighting (if fitted to your vehicle) comes on
automatically when the sidelamps are switched
on.
The ambient lighting switches off automatically
when the sidelamps are switched off.
Programming
With audio system or touch
screen
The activation, deactivation and
the choice of brightness of the
ambience lighting can be set via the
vehicle configuration menu.
The system may suffer inter ference or not
work correctly:
-
u
nder conditions of poor visibility (for
example, snowfall, heavy rain or thick
f o g , e t c .),
-
i
f the windscreen is dirty, misted or
obscured (by a sticker, etc.) in front of
the camera,
-
i
f the vehicle is facing highly reflective
signs.
If the fog is too dense, the system is
automatically deactivated.
The system is not able to detect:
-
r
oad users that do not have their own
lighting, such as pedestrians,
-
r
oad users whose lighting is obscured,
such as vehicles running behind a
safety barrier (on a motor way, for
example),
-
r
oad users at the top or bottom of
a steep slope, on twisty roads, on
crossroads.
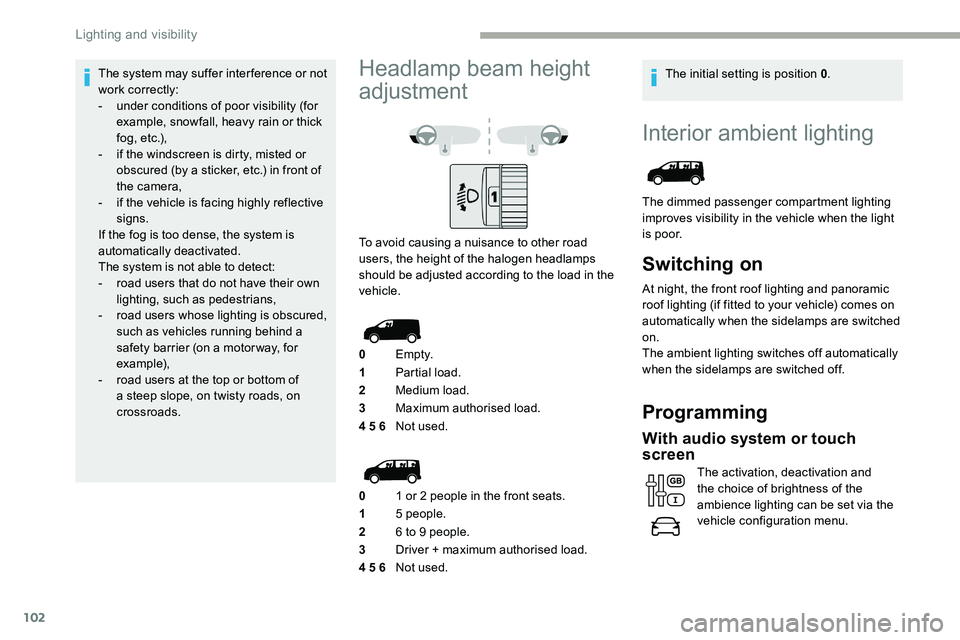
Headlamp beam height
adjustment
To avoid causing a nuisance to other road
users, the height of the halogen headlamps
should be adjusted according to the load in the
vehicle.
0 Em pt y.
1 Partial load.
2 Medium load.
3 Maximum authorised load.
4 5 6 Not used.
0 1 or 2 people in the front seats.
1 5 people.
2 6 to 9 people.
3 Driver + maximum authorised load.
4 5 6 Not used. The initial setting is position 0
.
Lighting and visibility
Page 116 of 324
114
Locking
F Pull the strap then insert the tongue in the buckle.
F
C
heck that the seat belt is fastened
correctly by pulling the strap.
Unfastening
F Press the red button on the buckle.
F G uide the seat belt as it reels in.
Height adjustmentThe pyrotechnic pretensioning seat belts are
enabled when the ignition is on.
The force limiter reduces the pressure of the
seat belt on the chest of the occupant, thus
improving their protection.
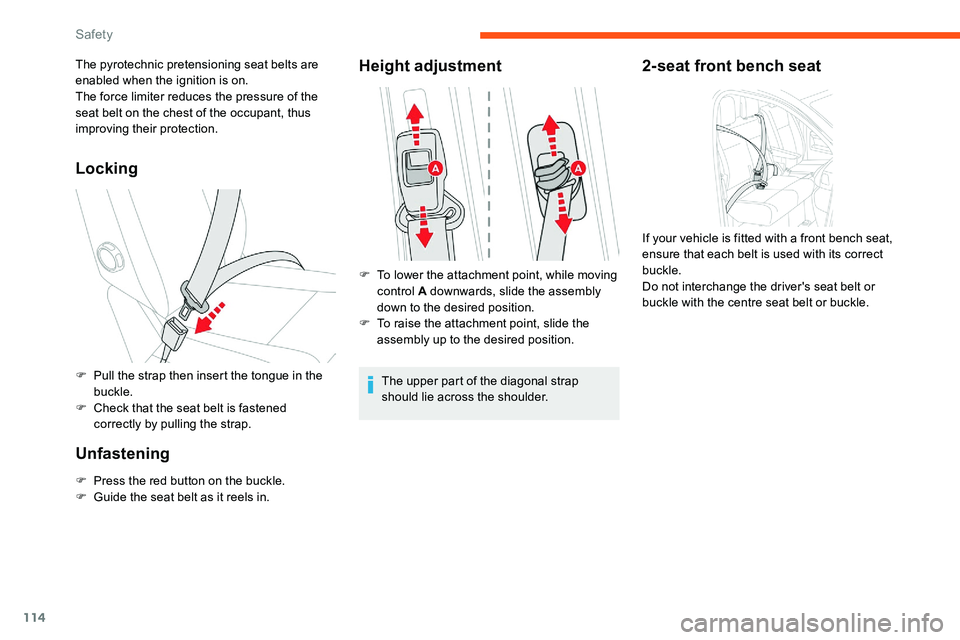
F
T
o lower the attachment point, while moving
control A downwards, slide the assembly
down to the desired position.
F
T
o raise the attachment point, slide the
assembly up to the desired position.
The upper part of the diagonal strap
should lie across the shoulder.2-seat front bench seat
If your vehicle is fitted with a front bench seat,
ensure that each belt is used with its correct
buckle.
Do not interchange the driver's seat belt or
buckle with the centre seat belt or buckle.
Safety
Page 129 of 324
127
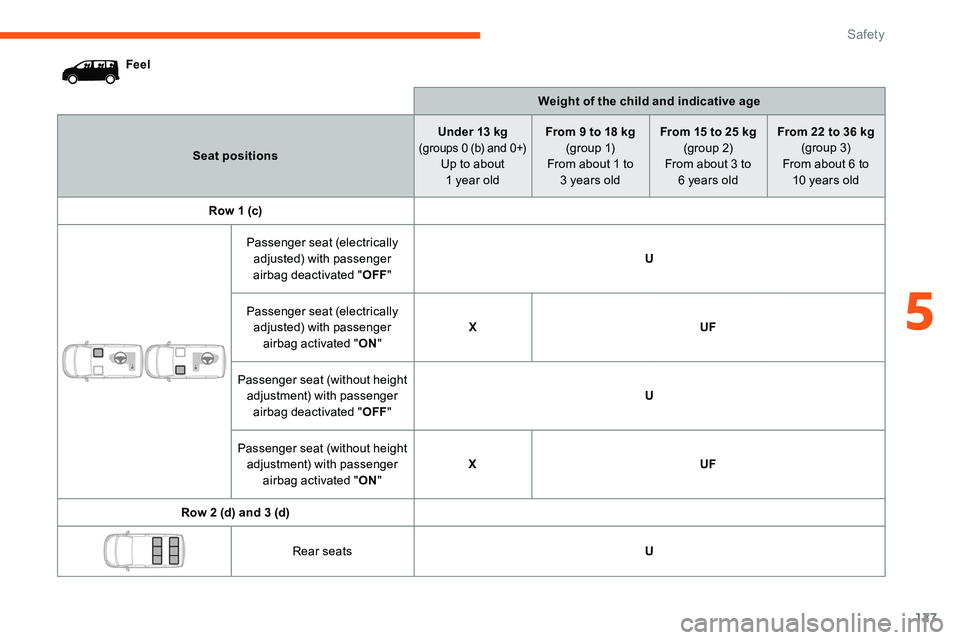
FeelWeight of the child and indicative age
Seat positions Under 13
kg
(groups 0 (b) and 0+)Up to about 1 year old From 9 to 18
kg
(g r o u p 1)
From about 1 to 3 years old From 15 to 25
kg
(group 2)
From about 3 to 6 years old From 22 to 36
kg
(group 3)
From about 6 to 10 years old
Row 1 (c)
Passenger seat (electrically adjusted) with passenger
airbag deactivated " OFF" U
Passenger seat (electrically adjusted) with passenger airbag activated " ON" X
UF
Passenger seat (without height adjustment) with passenger airbag deactivated " OFF" U
Passenger seat (without height adjustment) with passenger airbag activated " ON" X
UF
Row 2 (d) and 3 (d) Rear seats U
5
Safety
Page 140 of 324
138
Driving recommendations
F Observe the driving regulations and remain vigilant whatever the traffic conditions.
F
M
onitor your environment and keep your
hands on the wheel to be able to react to
anything that may happen any time.
F
D
rive smoothly, anticipate the need for
braking and maintain a longer safety
distance, especially in bad weather.
F
S
top the vehicle to carry out operations
that require close attention (such as
adjustments).
F
D
uring long trips, take a break every two
hours.
To assure the durability of your vehicle and
for safety reasons, remember that certain
precautions, described hereafter, should be
taken when driving your vehicle:
Manoeuvre cautiously, at low
speed
The dimensions of this vehicle differ greatly
from those of a light vehicle, in width, in height,
as well as in length, and some obstacles will be
more difficult to notice.
Manoeuvre slowly.
Before turning, check that there are no
obstacles at mid-height along the sides.
Before reversing, check that there are no
obstacles, particularly at high level behind the
vehicle.
Be aware of the external dimensions, if ladders
are fitted.
Drive the vehicle in a cautious
and efficient way
Take corners gently.
Anticipate the need to brake as the stopping
distance is increased, particularly on wet or icy
roads.
Be aware of the effect of side winds on the
vehicle.
Be careful
The tyres must be inflated to at least the
pressures indicated on the label, even over-
inflated by 0.2 to 0.3 bar for long journeys.
Important!
Never leave the engine running in
a closed space without sufficient
ventilation. Internal combustion engines
emit toxic exhaust gases such as carbon
monoxide. Danger of poisoning and death!
In severe wintry conditions (temperature
below -23°C), let the engine run for
4
minutes before moving off, to ensure
the correct operation and durability of the
mechanical components of your vehicle
(engine and gearbox). Never drive with the parking brake
applied
. Risk of overheating and damage
to the braking system!
Do not park the vehicle or leave the
engine running on a flammable sur face
(dr y grass, dead leaves, etc.). The
exhaust system of your vehicle is very
hot, even several minutes after the engine
stops. Risk of fire!
Never leave a vehicle unattended with
the engine running. If you have to leave
your vehicle with the engine running, apply
the parking brake and put the gearbox into
neutral or position N or P (depending on
the type of gearbox).
Never leave children inside the vehicle
unsupervised .
On flooded roads
We strongly advise against driving on flooded
roads, as this could cause serious damage
to the engine or gearbox, as well as to the
electrical systems of your vehicle.
Driving
Page 160 of 324
158
Maintenance
Clean the bumpers and door mirrors and
the field of vision of the cameras regularly.
When washing your vehicle at high
pressure, direct the spray from at least
30 cm away from the radar, sensors and
cameras.
Mats
The use of mats not approved by
CITROËN may inter fere with the operation
of the speed limiter or cruise control.
To avoid any risk of jamming the pedals:
F
e
nsure that the mat is secured
c o r r e c t l y,
F
n
ever fit one mat on top of another.
Units of speed
Ensure that the units of speed displayed
on the instrument panel (mph or
km/h) are
those for the country you are driving in.
If this is not the case, when the vehicle is
stationary, set the display to the required
units of speed so that it complies with
what is authorised locally.
In case of doubt, contact a CITROËN
dealer or a qualified workshop.Head-up display
System which projects various information onto
a smoked blade in the driver's field of vision so
that they do not have to take their eyes off the
road.
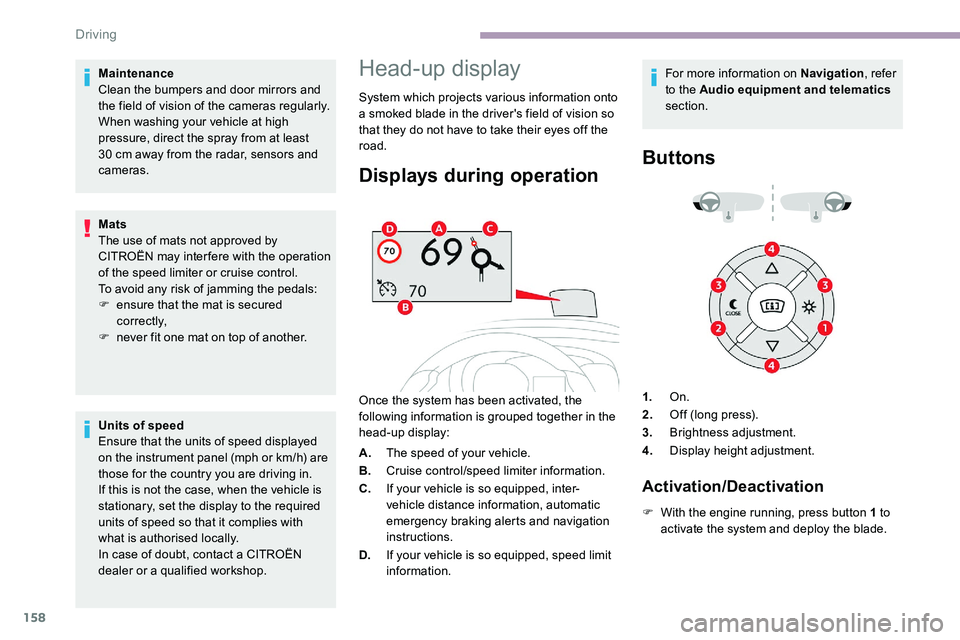
Displays during operation
Once the system has been activated, the
following information is grouped together in the
head-up display: For more information on Navigation
, refer
to the Audio equipment and telematics
section.
Buttons
A. The speed of your vehicle.
B. Cruise control/speed limiter information.
C. If your vehicle is so equipped, inter-
vehicle distance information, automatic
emergency braking alerts and navigation
instructions.
D. If your vehicle is so equipped, speed limit
information. 1.
On.
2. Off (long press).
3. Brightness adjustment.
4. Display height adjustment.
Activation/Deactivation
F With the engine running, press button 1 to
activate the system and deploy the blade.
Driving