CITROEN DS3 2009 User Guide
Manufacturer: CITROEN, Model Year: 2009, Model line: DS3, Model: CITROEN DS3 2009Pages: 233, PDF Size: 6.8 MB
Page 11 of 233

17
Familiarisation
Vent ilat ion
Advice on interior settin
gs
I require...
Heat
ing or
Manua
l air con
ditioning
Air distribution
Air flow
Air reci
rculatio
n/
Exterior air in
take
Tem
peratur
e
Manual A/
C
HEATCOO
L
DEMISTINGDEFROSTING
Digital
air conditioning:use of the fully automatic mode by pressing the
"AUTO"
button is preferable.
Page 12 of 233

Monitoring On switchin
g on, the dial needles
go to the
extent of their travel then return to 0. A.
With the i
gnition on, the
fuel
gauge bars
for
the
fuel remainin
g should li
ght up.
B.
With the en
gine runn
ing, the assoc
iate
d
low level warning lamp should switch o
ff.
C. With the ignition on, the oil level indicator
should display
"OIL OK
" for a few
seco
nds.
If the levels are not correct, top up the level which is low.
Instrument panel
24
1.
With the i
gnition on, the oran
ge and red
warnin
g lamps come on.
2.
With the en
gine runn
ing, these warn
ing
lam
ps should switch o
ff.
I
f a warnin
g lamp remains on, re
fer to the pa
ge
concerne
d.
Warnin
g lamps
26
Lightin
g of the indicator lamp indicates
deactivation of the ESP/ASR s
ystem.
Switch panel
131
Page 13 of 233

Familiarisation
Passenger safety 1.
Open the glove box. 2.
Insert the ke
y.
3.
Select position: "ON"
(activation
), with
front passen
ger o
r
"
forwards
facin
g" child seat,
"OFF"
(deactivation), with "rear facing"
child
seat.
4.
Remove the key keeping the switch in thenew
position.
Front passen
ger's airba
g
137
A.
Fr
ont sea
t belts not fastened or unfastened
warnin
g lamp
.
Fr
ont seat
be
lts
and
passen
ger's front airba
g
138
Personalise your vehicle
These st
yling stickers are treated to
give
good
resistance to a
gein
g and tearin
g.
They have
been
designed to a
llow
you to
persona
lise
your ve
hicle's bodywor
k.
Available a
lso as accessor
ies, we recommen
d
that you have them fitted by a CITRO
ËN dealer.
Usin
g expressive stickers
When usin
g a hi
gh pressure
jet wash,
keep the end o
f the lance at least
30 centimetres
from the stickers
B. Front passen
ger's a
irbag deact
ivat
ion
indicator
lam
p.
C. Front passenger
's a
irbag act
ivat
ion
indicator lamp.
133
Page 14 of 233

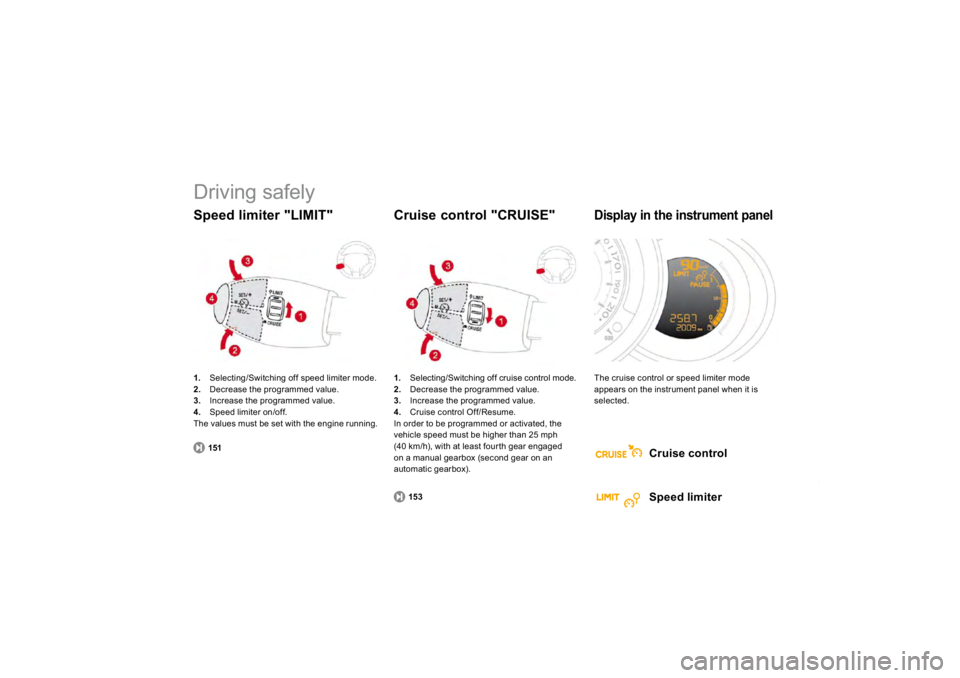
Driving safely 1. Selecting/Switching off speed limiter mode.2.
Decrease the pro
grammed value.
3. Increase t
he pro
gramme
d va
lue.
4. Speed limiter on/off.The values must be set with the engine running. Speed limiter "LIMIT"
151
1.
Selecting/Switching off cruise control mode.
2.
Decrease the pro
grammed value.
3. Increase t
he pro
gramme
d va
lue.
4.
Cruise control
Off/
Resume.
In or
der to
be pro
gramme
d or act
ivate
d, the
vehicle speed must be higher than 25 mph
(40 km
/h), with at least
fourth gear engaged
on a manual gearbox (second gear on an
automatic gearbox).
Cr
uise
co
ntrol "CR
UISE"
153
The cruise control or speed limiter modeappears on the instrument panel when it is selec
ted.
Displa
y in the instrument panel
Cruise control
Speed limiter
Page 15 of 233

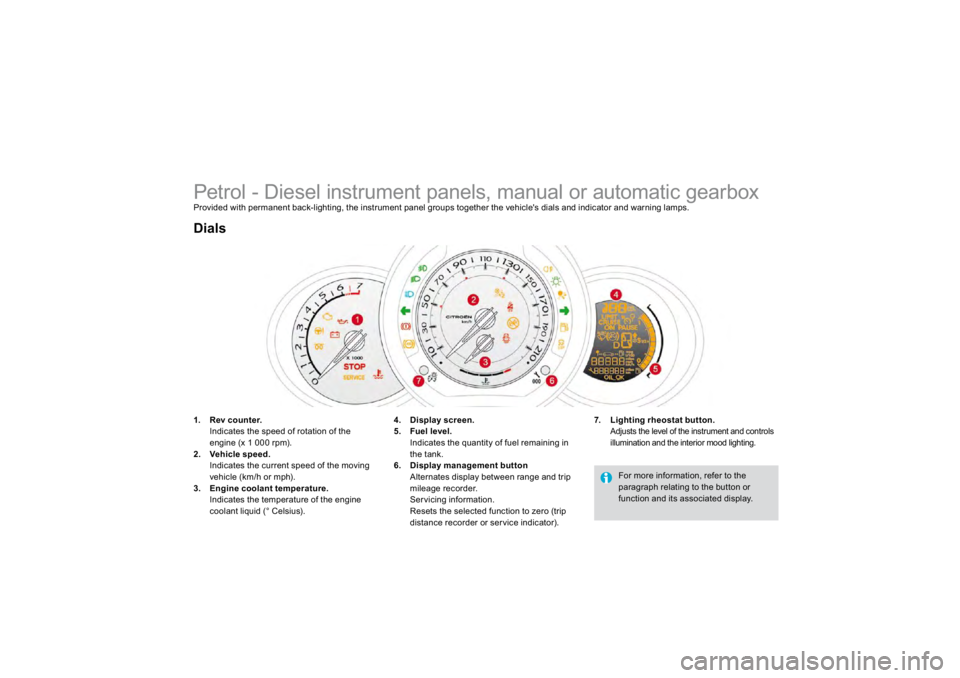
Petrol - Diesel instrument panels, manual or automatic gearbox Provided with permanent back-lighting, the instrument panel groups together the vehicle's dials and indicator and warning lamps.1.
Rev counter.
Indicates the speed of rotation of the
engine
(x 1 000 rpm
).
2.
Vehicle s
peed.
Indicates the current speed o
f the movin
g
vehicle
(km
/h or mph
).
3.
Engine coolant
temperature
.
Indicates the temperature of the enginecoolant liquid (° Celsius).
Dials
7.
Lighting rheostat button.
Adjusts the level of the instrument and controls
illumination an
d the inter
ior moo
d ligh
ting.
4.
Display screen
.
5. Fuel level
.
Indicates the quantit
y of fuel remainin
g in
the
tank.
6.
Display mana
gement
button
Alternates
display between range an
d trip
mileage recorder.
Servicing information.
Resets the selected function to zero (trip
distance recorder or service indicator).
For more information
, refer to the
para
grap
h relating to t
he button or
function and its associated displa
y.
Page 16 of 233

25
Instruments and controls
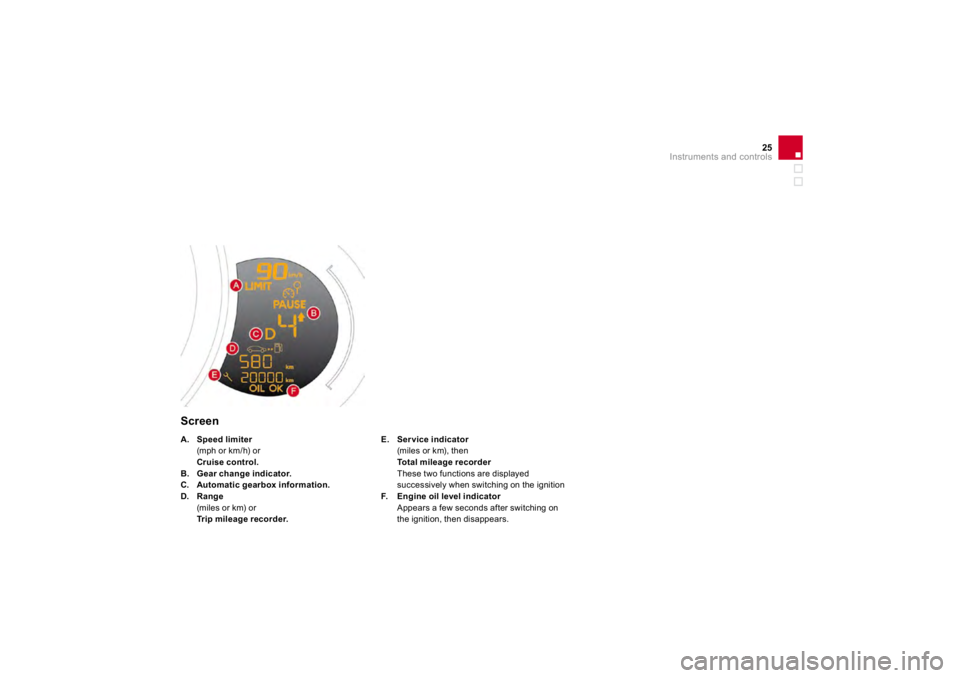
Screen
E.
Service indicator(miles or km), then Total mileage recorderThese two functions are displa
yed
success
ively when sw
itching on t
he ignition
F.
Engine oil level indicator
r
Appears a
few seconds a
fter switchin
g on
the ignition, t
hen
disappears.
A
.Speed limiter
(mph or km/h) or
Cruise control.
B.
Gear change indicator.
C.Automatic
gearbox in
formation.
D.
Range
(miles or km) or
Trip m
ileage recor
der.
Page 17 of 233

Visual indicators informing the driver that a system is in operation
(operation
or deactivation indicator lamps) or of the
occurrence of a fault (warning lamp).
Indicator and warnin
g lamps
Wh
en t
he ign
ition
is sw
itched on
Certain warnin
g lamps come on
for a
few seconds
w
hen t
he ve
hicle's ignition is sw
itched on.
Wh
en t
he eng
ine is starte
d, these same warn
ing
lam
ps should switch o
ff.
If they remain on, before moving off, refer to the
information on the warning lamp concerned.
Assoc
iate
d warn
ings
The switchin
g on o
f certain warnin
g lamps ma
y
be accompan
ied by an au
dibl
e s
ignal an
d a
message on the multi
function screen.
The warning lamps may come oncontinuously (fixed) or flash. Certain warnin
g lamps ma
y come
on in two different modes. Onl
y by
relatin
g the t
ype o
f lightin
g to the
operatin
g status o
f the vehicle can it
be ascerta
ined whether t
he s
ituat
ion
is
normal or whether a
fault has occurred.
The passenger a
irbag system operat
ion
lamp stays on for about a minute after switching on the ignition, even after the engine has started.
Page 18 of 233

27
Instruments and controls
Operation indicator lamps If one o
f the
following indicator lamps comes on, this con
firms that the corresponding system has come into operation.
Warning lamp
is o
n
Cause
Action/Observations
Left-hand
directio
n indicato
r
flashing with buzzer.
The ligh
ting sta
lk is pus
hed down.
Right-hand
direction indicator
flashing with buzzer.
The li
ghtin
g stalk is pushed up.
Sidelamps
fixed.
The lighting stalk is in the "
Sidelamps"
position.
Turn t
he contro
l to t
he desired position.
Dipped beam
headlam
ps
fixed.
The li
ghtin
g stalk is in the "Dipped
beam
headlam
ps" position. Turn the control to the desired position.
Main beam headlamps
fixed.
The lighting sta
lk is pu
lled towar
ds
you.
Pull the sta
lk to return to
dipp
ed beam
headlam
ps.
Front foglamps
fixed.
The front foglamps are switched on. Turn the ring on the stalk rear wards twice to switch of
f
the front fo
glamps.
Rear
foglamps
fixed.
The rear
foglamps are switched on. Turn the rin
g on the stalk rear wards to switch o
ff the
rear
foglamps.
Page 19 of 233

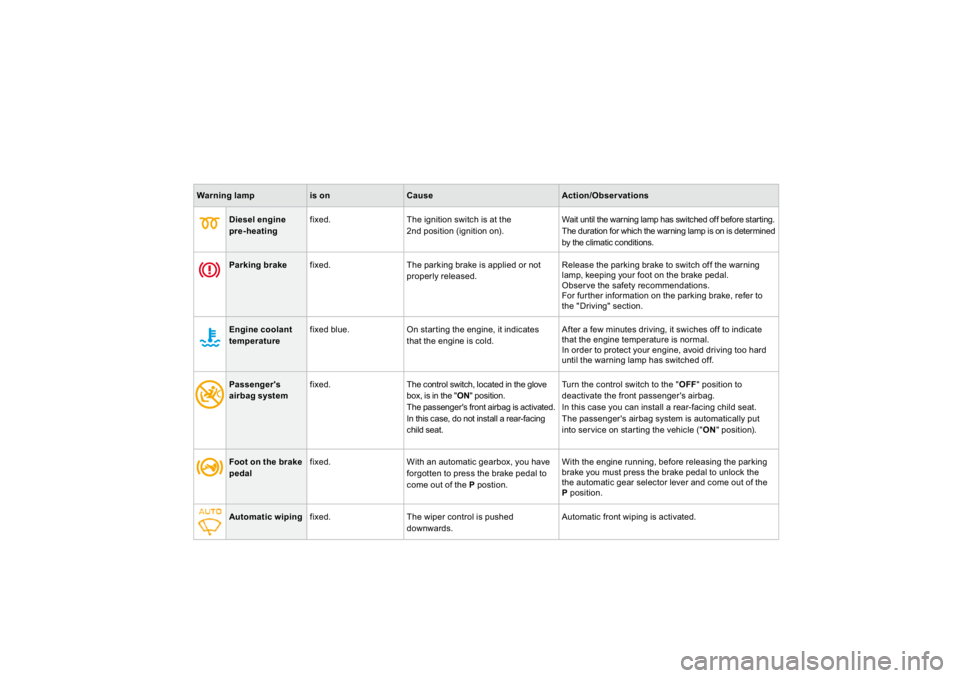
Warning lamp
is on
Cause
Action/Obse
rvations
Diesel engine pre-heatin
g
fixed. The ignition switch is at the
2nd
position
(ignition on
).
Wait until the warning lamp has switched off before starting.
The duration for which the warnin
g lamp is on is determined
by the climat
ic con
ditions.
Parking brake
fixed.
The par
king brake is app
lied or not
properly released.
Release the parkin
g brake to switch o
ff the warnin
g
lamp, keepin
g your
foot on the brake pedal.
Observe the sa
fety recommendations.
For
further in
formation on the parkin
g brake, re
fer to
the "Driving" sect
ion.
Engine coolant tempera
ture
fixed blue.
On starting the engine, it indicates that the engine is cold.
After a
few minutes driving, it swiches o
ff to indicate
that t
he eng
ine temperature
is norma
l.
In or
der to protect your eng
ine, avo
id driving too
hard
until the warning lamp has switched o
ff.
Foot on the brake peda
l
fixed. With an automatic gearbox, you have
forgotten to press the brake pedal to
come out of the
Ppost
ion. With the engine running, before releasing the parking
brake you must press the brake pedal to unlock the the automatic gear selector lever and come out of the
P position.
Automat
ic w
iping
fixed.
The w
iper contro
l is pushed
downwards.
Automatic
front wipin
g is activated.
Passenger's airbag system
fixed. The control switch, located in the glove
box, is in the "
ON
" position.
The passen
ger's front airba
g is activated.
In this case, do not install a rear-
facin
g
child
seat. T
urn th
e control switch to the "
OF
F " position to
deactivate the front passen
ger's airba
g.
In this case
you can install a rear-facin
g child seat.
The passen
ger's a
irbag system
is automat
ically put
into service on startin
g the vehicle
("ON
" position
).
Page 20 of 233

29
Instruments and controls
Deactivation indicator lampsIf one o
f the
following indicator lamps comes on, this con
firms that the corresponding system has been switched o
ff intentionally.
This is accompanied by an audible signal and a message on the multifunction screen.
Warning lamp
is o
n
Cause
Action/Observations
Passen
ger's
airbag system
fixed.
The contro
l, locate
d in the glove
box,
is set to the
OFF position.
The passenger's front airbag is
deactivated. In this case you can install a "rear facing" child seat.
Set the control to the
ONposition to act
ivate t
he
passenger's
front airbag. In this case, do not
fit a child
seat in the rear-facing position.
The passenger's airbag system is put into ser vice
automatically when the vehicle is started (
ON position).
ESP/A
SR
fixed.
The button,
locate
d at t
he bottom
left of the dashboard, is
pressed. Its
indicator
lam
p is on.
The E
SP/ASR is deactivated.
ESP: electronic stability programme.
ASR: anti-skid regulation.
Press t
he button a
gain to manua
lly react
ivate t
he
E
SP/ASR. Its indicator lam
p switches o
ff.
From approximately 30 mph
(50 km
/h),
the system
is react
ivate
d automat
ically
(except for the 1.6 litre THP 150 engine).
The ESP/ASR system is activated automatically when
the vehicle is started.