ESP CITROEN DS3 CABRIO 2016 Handbook (in English)
[x] Cancel search | Manufacturer: CITROEN, Model Year: 2016, Model line: DS3 CABRIO, Model: CITROEN DS3 CABRIO 2016Pages: 450, PDF Size: 17.47 MB
Page 25 of 450
23
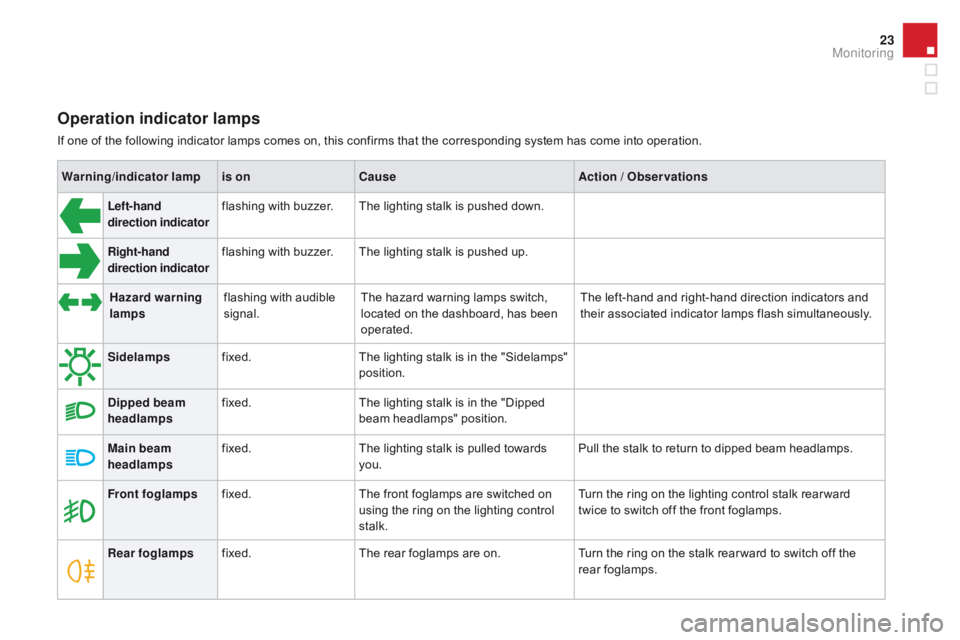
Operation indicator lamps
If one of the following indicator lamps comes on, this confirms that the corresponding system has come into operation.
W arning /indicator lampis on Cause Action / Observations
Left-hand
direction indicatorflashing with buzzer.The lighting stalk is pushed down.
Right-hand
direction indicatorflashing with buzzer.The lighting stalk is pushed up.
Sidelamps fixed. The
lighting stalk is in the "Sidelamps"
p
osition.
di
pped beam
headlamps fixed.
The
lighting stalk is in the "Dipped
b
eam headlamps" position.
Main beam
headlamps fixed.
The
lighting stalk is pulled towards
yo
u. Pull
the stalk to return to dipped beam headlamps.
Front foglamps fixed. The
front foglamps are switched on
u
sing the ring on the lighting control
st
alk. Turn
the ring on the lighting control stalk rear ward
t
wice to switch off the front foglamps.
Rear foglamps fixed. The
rear foglamps are on.Turn
the ring on the stalk rear ward to switch off the
r
ear
fo
glamps.
Hazard warning
lamps
flashing
with audible
s
ignal. The
hazard warning lamps switch,
l
ocated on the dashboard, has been
ope
rated. The
left-hand and right-hand direction indicators and
t
heir associated indicator lamps flash simultaneously.
Monitoring
Page 26 of 450
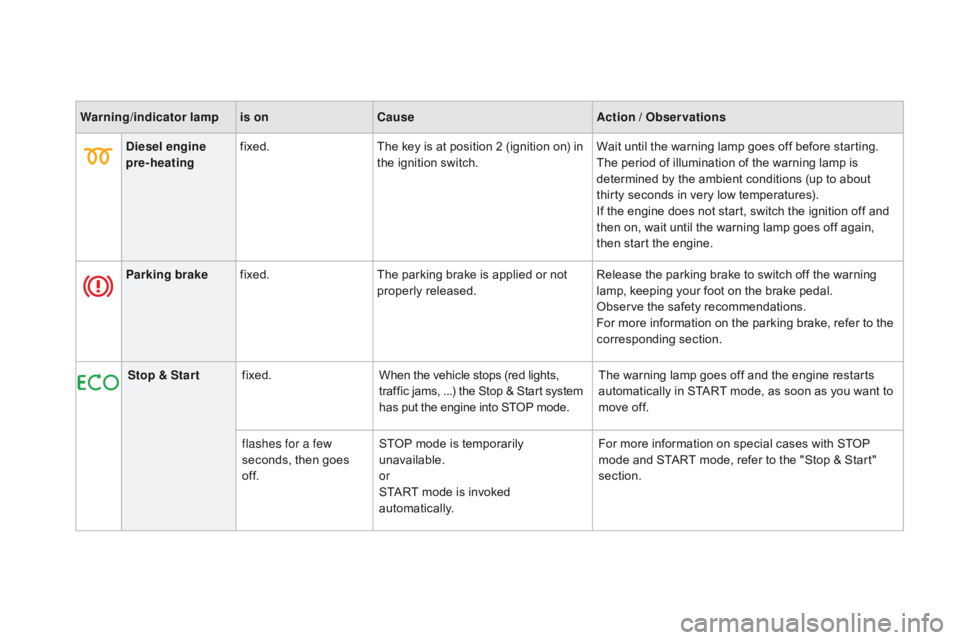
Warning/indicator lampis on Cause Action / Observations
di
esel engine
pre-heating fixed.
The
key is at position 2 (ignition on) in
t
he ignition switch.Wait
until the warning lamp goes off before starting.
The
period of illumination of the warning lamp is
d
etermined by the ambient conditions (up to about
t
hirty seconds in very low temperatures).
If
the engine does not start, switch the ignition off and
t
hen on, wait until the warning lamp goes off again,
t
hen start the engine.
Parking brake fixed. The
parking brake is applied or not
p
roperly
r
eleased.Release
the parking brake to switch off the warning
l
amp, keeping your foot on the brake pedal.
Observe
the safety recommendations.
For
more information on the parking brake, refer to the
c
orresponding
s
ection.
Stop & Star t fixed. When
the vehicle stops (red lights,
t
raffic jams, ...) the Stop & Start system
h
as put the engine into STOP mode.The
warning lamp goes off and the engine restarts
a
utomatically in START mode, as soon as you want to
m
ove off.
flashes for a few
seconds,
then goes
o
f f.STOP
mode is temporarily
u
navailable.
or
START
mode is invoked
au
tomatically.For
more information on special cases with STOP
m
ode and START mode, refer to the "Stop & Start"
s
ection.
Page 28 of 450

deactivation indicator lamps
If one of the following indicator lamps comes on, this confirms that the corresponding system has been switched off intentionally.
T his is may be accompanied by an audible signal and a message in the multifunction screen.
Warning /indicator lampis on Cause Action / Observations
Passenger's
airbag system fixed.
The
control, located in the glove box,
i
s set to the OFF
p
osition.
The
passenger's front airbag is
d
eactivated.
You
can install a rear ward facing
c
hild seat, unless there is a fault with
t
he operation of the airbags (Airbag
w
arning lamp on).Set the control to the O
n p
osition to activate the
passenger's
front airbag.
In
this case, do not fit a child seat in the rear ward
f
acing position.
Page 35 of 450

33
Warning/indicator lampis on Cause Action / Observations
AdBlue
® additive
(BlueH
d i d iesel) fixed,
on switching o
n the ignition,
a
ccompanied by an
a
udible signal and a
m
essage indicating
t
he
r
emaining
d
riving
ra
nge. The
remaining driving range is b
etween 350 miles (600 km) and
1
500 miles (2400 km).Have
the AdBlue® additive tank topped up as soon a
s
possible:
go
to
a CITROËN dealer or a qualified
w
orkshop,
or
carry out this operation yourself by
r
eferring
to
the
corresponding section.
+ flashing
a
ssociated
w
ith
t
he
SERVICE
warning
l
amp,
accompanied
by
a
n
audible
signal
and
a
message
indicating
t
he
r
emaining
d
riving
ra
nge. The
remaining
driving
range
is
b
etween
0
and
350
miles
(600
km). You
must
top-up the
Ad
Blue
® additive tank to avoid
a
breakdown :
go
to
a
CITROËN dealer or a qualified
w
orkshop,
or
carry
out
this
operation yourself by
r
eferring
to
the
corresponding
section.
flashing,
associated
w
ith the SERVICE
warning
lam
p,
a
ccompanied
by
an
a
udible
signal
and
a
m
essage
indicating
t
hat
starting
is
p
revented. The
AdBlue
® tank is empty: the s
tarting
inhibition system required
b
y
legislation prevents starting of the
e
ngine. To
be able to start the engine, you must top-up the
AdBlue® additive tank: go to a CITROËN dealer or a q
ualified workshop, or carry out this operation yourself
b
y
referring to the corresponding section.
It is essential
to add at least 3.8 litres of AdBlue
® to
the
additive
tank.
Monitoring
Page 46 of 450

Languages
Once the "Languages" menu has been selected, you can change the language used by the s
creen by choosing one from a defined list.
Units
Once the "Units" menu has been selected, you can change the units of the following
par
ameters:
-
t
emperature (°C or °F),
-
f
uel consumption (l/100 km, mpg or km/l).
Once
the fuel consumption units have
b
een set to mpg, the information in the
i
nstrument panel screen on speed and
d
istance will also be in mph and miles.
As
a safety measure, configuration by
t
he driver of the multifunction screen
s
hould only be done when stationary.
display settings
Once the "Display settings" menu has been selected, you can gain access to the following settings:
- year,
- m onth,
-
d
ay,
-
h
o u r,
-
m
inutes,
-
1
2 or 24 hour mode.
F
O
nce you have selected a setting, press
t
he "7" or " 8"
buttons to change its value.
F
P
ress the " 5" or " 6" buttons to switch
respectively
to the previous or next setting.
F
P
ress the "OK"
button to save the change
a
nd return to the normal display or press
t
he "Back"
button to cancel. Setting the date and time
F
P
ress the ME
n
U
button.
F
S
elect "Display settings" using the "5 "
or
"6 "
button.
F
Press "OK"
to confirm the selection.
F
S
elect the "Year" function using the "5 "
or
"6 "
button.
F
Press "OK"
to confirm the selection.
F
C
hoose the desired value, using the "7 "
or
"8 "
button.
F
Press "OK"
to confirm the selection.
F
R
epeat the procedure to set the "Month",
"
Day", "Hours", and "Minutes".
Page 52 of 450
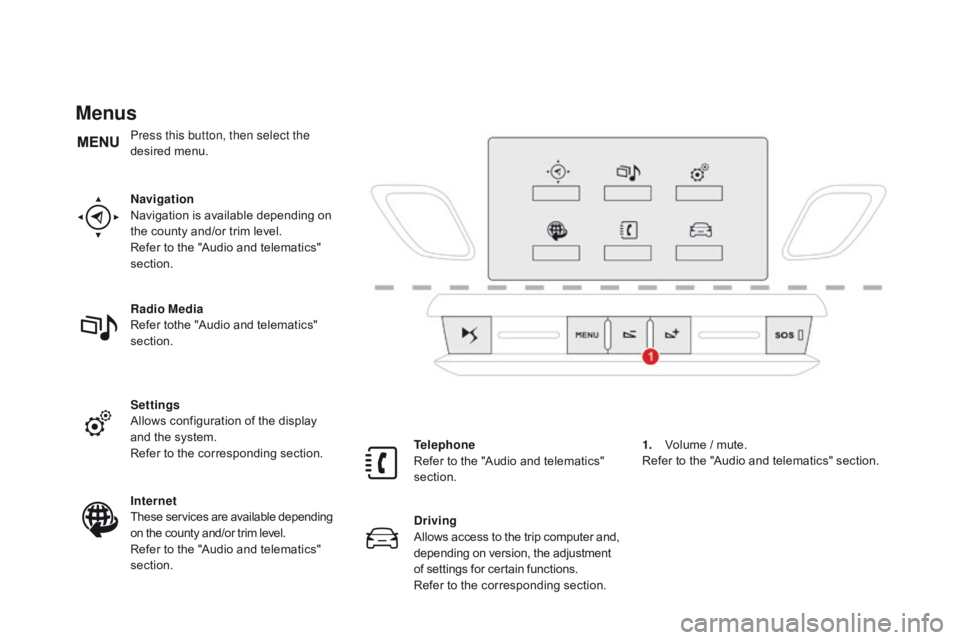
Menus
navigation
Navigation is available depending on
t
he county and/or trim level.
Refer
to the "Audio and telematics"
s
ection.
Radio Media
Refer
tothe "Audio and telematics"
s
ection.
Settings
Allows
configuration of the display
a
nd the system.
Refer
to the corresponding section.
Internet
These
services are available depending
o
n the county and/or trim level.
Refer
to the "Audio and telematics"
s
ection. Telephone
Refer
to the "Audio and telematics"
s
ection.
dr
iving
Allows
access
to
the
trip
computer
and,
d
epending on version, the adjustment
o
f settings for certain functions.
Refer
to the corresponding section.1.
V
olume / mute.
Refer
to the "Audio and telematics" section.
Press this button, then select the
desired
m
enu.
Page 53 of 450
51
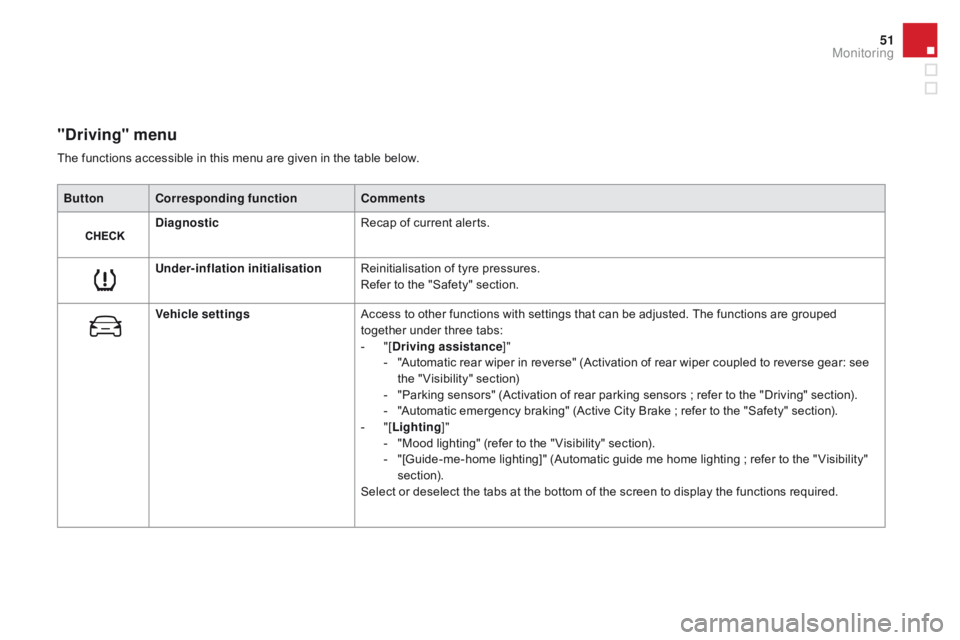
"driving" menu
ButtonCorresponding function Comments
di
agnostic Recap
of current alerts.
Under-inflation initialisation Reinitialisation
of tyre pressures.
Refer
to the "Safety" section.
Vehicle settings Access
to other functions with settings that can be adjusted. The functions are grouped
t
ogether under three tabs:
-
"
[
dr
iving assistance]"
-
"
Automatic rear wiper in reverse" (Activation of rear wiper coupled to reverse gear: see
t
he " Visibility" section)
-
"
Parking sensors" (Activation of rear parking sensors ; refer to the "Driving" section).
-
"
Automatic emergency braking" (Active City Brake ; refer to the "Safety" section).
-
"
[Lighting ]"
-
"
Mood lighting" (refer to the " Visibility" section).
-
"
[Guide-me-home lighting]" (Automatic guide me home lighting ; refer to the " Visibility"
s
ection).
Select
or deselect the tabs at the bottom of the screen to display the functions required.
The
functions accessible in this menu are given in the table below.
Monitoring
Page 54 of 450
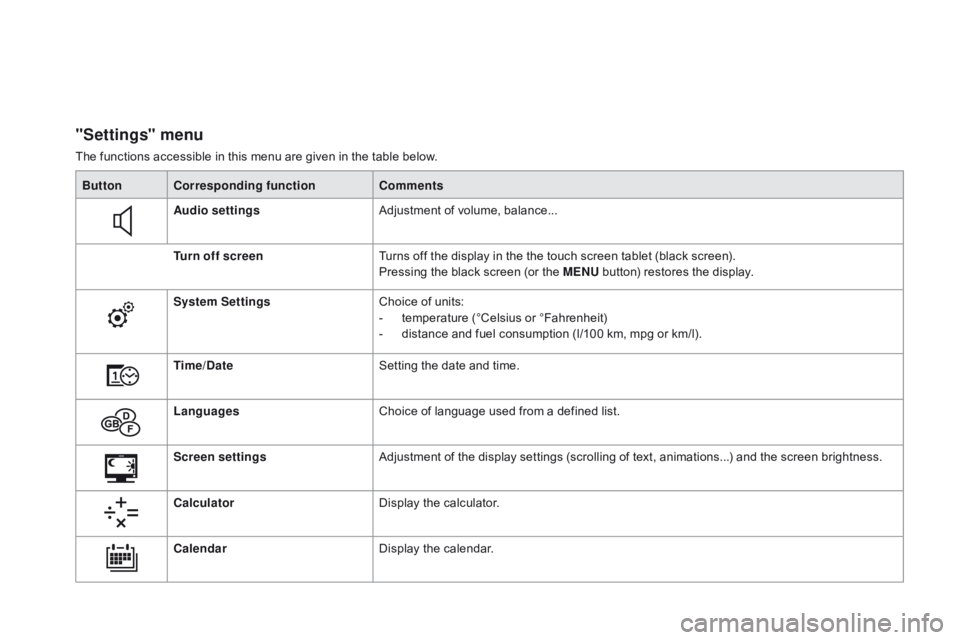
"Settings" menu
The functions accessible in this menu are given in the table below.
Bu tton Corresponding function Comments
Audio settings Adjustment
of volume, balance...
Turn off screen Turns
off the display in the the touch screen tablet (black screen).
Pressing
the black screen (or the ME
n
U
button) restores the display.
System Settings Choice
of units:
-
t
emperature (°Celsius or °Fahrenheit)
-
d
istance and fuel consumption (l/100 km, mpg or km/l).
Time/
d
a
te Setting
the date and time.
Languages Choice
of language used from a defined list.
Screen settings Adjustment
of the display settings (scrolling of text, animations...) and the screen brightness.
Calculator Display
the calculator.
Calendar Display
the calendar.
Page 71 of 450

69
In the event of unwanted opening of the window on closing (for example in the
p
resence of frost):
F
p
ress the switch beyond the point
o
f resistance and release it; the
w
indow opens completely,
F
t
hen immediately pull the switch
w
ithout going beyond the point of
r
esistance until the window closes
f
ully,
F
c
ontinue to hold the switch for
a
pproximately one second after the
w
indow has closed.
The safety anti-pinch function is not
active during these operations.
Safety anti-pinch
On the driver's s ide, t he o ne-touch f ront e lectric w
indow has a safety anti-pinch function.
When
the window rises and meets an obstacle,
i
t stops and partially lowers again.
Reinitialisation
Always remove t he k ey f rom t he i gnition w
hen leaving the vehicle, even for a
s
hort time.
In
the event of contact during operation
o
f the windows, reverse the movement
o
f the window. To do this, press the
c
orresponding
s
witch.
When
the driver operates the
p
assenger electric window switch, they
s
hould ensure that no one is preventing
c
orrect closing of the window.
Be
particularly aware of children when
o
perating
t
he
w
indows.
In
the
event
of
a
malfunction
you
have
to
r
einitialise the operation of the electric
windows:
F
r
elease
the
switch
and
pull
it
again
until
the
w
indow
closes
completely,
F
h
old
the
switch
for
approximately
o
ne second
after
closing,
F
p
ress
the
switch
to
lower
the
window
au
tomatically.
The safety anti-pinch function is not active
during these operations.
Access
Page 83 of 450

81
Rear seatsBench seat with fixed one-piece cushion and 1/3 - 2/3 split folding backrest to vary the load space in the boot.
F
M
ove the corresponding front seat for ward
i
f necessary.
F
C
heck that the seat belt is positioned
c
orrectly on the side of the seat backrest.
F
P
lace the head restraints in the low
p
osition.
Folding the backrest
F Pull control 1 for wards to release the seat b
ackrest 2.
F
F
old the seat backrest 2 on to the cushion.F
S
traighten the seat backrest 2
and secure it.
F
C
heck
t
hat
t
he
r
ed
i
ndicator,
l
ocated
n
ext
t
o
t
he control 1
, is no longer visible.
Repositioning the seat backrest
When repositioning the seat backrest, t
ake care not to trap the seat belts.
Comfort