instrument panel CITROEN DS3 CABRIO DAG 2015 Handbook (in English)
[x] Cancel search | Manufacturer: CITROEN, Model Year: 2015, Model line: DS3 CABRIO DAG, Model: CITROEN DS3 CABRIO DAG 2015Pages: 404, PDF Size: 13.93 MB
Page 4 of 404
DS3_en_Chap00a_sommaire_ed01-2014
Contents
OVERVIEW
6
MO NITORING
18 Instrument panels
22
I
ndicator and warning lamps
35
Indicators
40
Adj
ustment
b
uttons
42
T
rip computer
Key
safety warning
a dditional
in
formation
contributes to the protection of the environment
refer to the page indicated
001
Ec
O-
d
R
IVING
14
V
ISUAL SEAR
cH
35
6
ALPHABETI
cA
L
IN
d
E
X
362
Page 13 of 404
11
DS3_en_Chap00b_vue-ensemble_ed01-2014
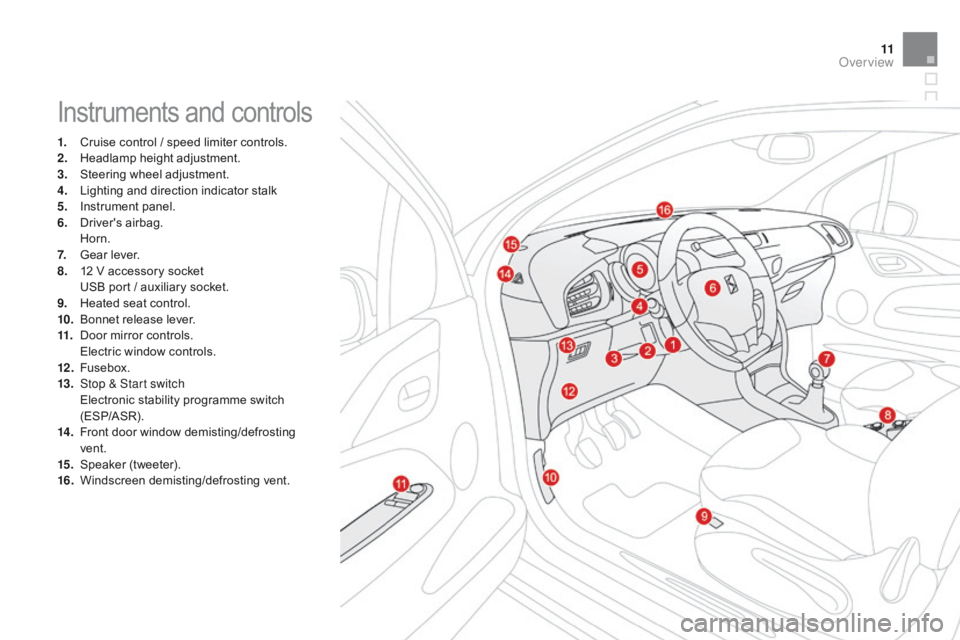
Instruments and controls
1. Cruise control / speed limiter controls.
2. H eadlamp height adjustment.
3.
S
teering wheel adjustment.
4.
L
ighting and direction indicator stalk
5.
I
nstrument panel.
6.
D
river's
ai
rbag.
H
orn.
7.
G
ear lever.
8.
1
2 V accessory socket
U
SB port / auxiliary socket.
9.
H
eated seat control.
10.
B
onnet release lever.
11.
D
oor mirror controls.
E
lectric window controls.
12 .
F
usebox.
13.
S
top & Start switch
E
lectronic stability programme switch
(
ESP/ASR).
14 .
F
ront door window demisting/defrosting
ve
nt.
15.
S
peaker
(
tweeter).
16.
W
indscreen
d
emisting/defrosting
v
ent.
Over view
Page 16 of 404
DS3_en_Chap00c_eco-conduite_ed01-2014
Before moving off, if the passenger compartment is too warm, ventilate it by opening the windows and air vents before using the air conditioning.
Above
30 mph (50 km/h), close the windows and leave the air vents
ope
n.
Remember
to make use of equipment that can help keep the
t
emperature in the passenger compartment down (sunroof and window
b
linds...).
Switch
off the air conditioning, unless it has automatic regulation, as
s
oon as the desired temperature is attained.
Switch
off the demisting and defrosting controls, if not automatic.
Switch
off the heated seat as soon as possible.
Switch
off the headlamps and front foglamps when the level of light
d
oes not require their use.
Avoid
running the engine before moving off, particularly in winter; your
v
ehicle will warm up much faster while driving.
Eco-driving
Eco-driving is a range of everyday practices that allow the motorist to optimise their fuel consumption and CO2 emissions.
Optimise the use of your gearbox
With a manual gearbox, move off gently and change up without waiting. During acceleration change up early.
With
an automatic or electronic gearbox, give preference to automatic
m
ode and avoid pressing the accelerator pedal heavily or suddenly.
The
gear shift indicator invites you engage the most suitable gear: as
s
oon as the indication is displayed in the instrument panel, follow it
s
traight away.
For
vehicles fitted with an electronic or automatic gearbox, this
i
ndicator appears only in manual mode.
drive smoothly
Maintain a safe distance between vehicles, use engine braking rather than the brake pedal, and press the accelerator progressively. These
p
ractices contribute towards a reduction in fuel consumption and CO
2
emissions
and
also
helps
reduce
the
background
traffic
noise.
control the use of your electrical
equipment
If your vehicle has cruise control, make use of the system at speeds a bove 25 mph (40 km/h) when the traffic is flowing well.As
a passenger, if you avoid connecting your multimedia devices
(
film, music, video game...), you will contribute towards limiting the c
onsumption of electrical energy, and so of fuel.
Disconnect your portable devices before leaving the vehicle.
Page 20 of 404
DS3_en_Chap01_controle-de-marche_ed01-2014
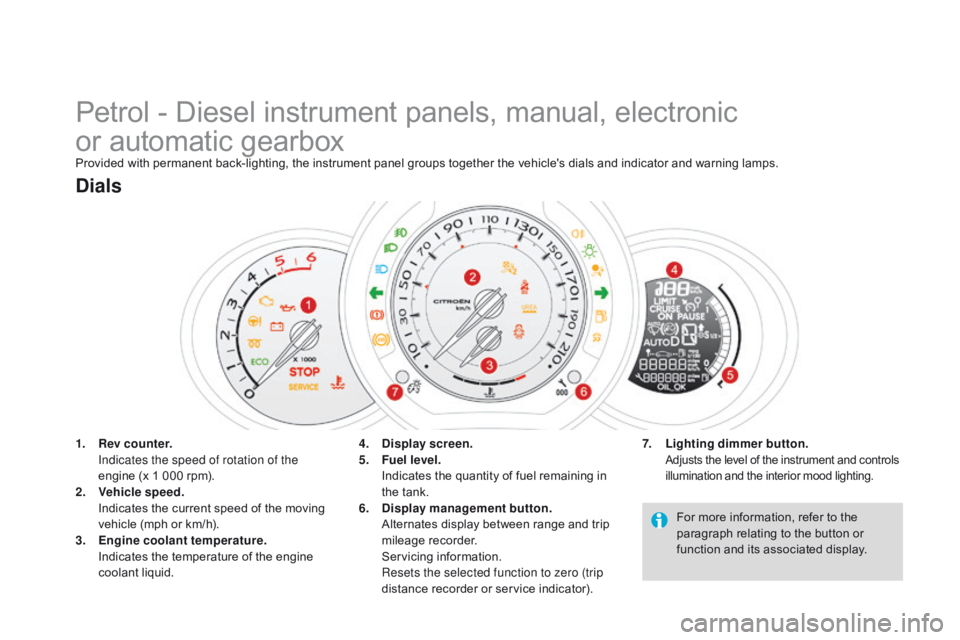
Petrol - Diesel instrument panels, manual, electronic
o r automatic gearbox
Provided with permanent back-lighting, the instrument panel groups together the vehicle's dials and indicator and warning lamps.
1.
R
ev counter.
I
ndicates the speed of rotation of the
engine
(x 1 000 rpm).
2.
V
ehicle speed.
I
ndicates the current speed of the moving
v
ehicle (mph or km/h).
3.
E
ngine coolant temperature.
I
ndicates the temperature of the engine
c
oolant
li
quid.
dials
7. Lighting dimmer button. Adjusts the level of the instrument and controls i
llumination and the interior mood lighting.4. display screen.
5. F uel level.
I
ndicates the quantity of fuel remaining in
t
he tank.
6.
di
splay management button.
A
lternates display between range and trip
mil
eage
re
corder.
S
ervicing
in
formation.
R
esets the selected function to zero (trip
distance
recorder or service indicator).For
more information, refer to the
p
aragraph relating to the button or
f
unction and its associated display.
Page 22 of 404
DS3_en_Chap01_controle-de-marche_ed01-2014
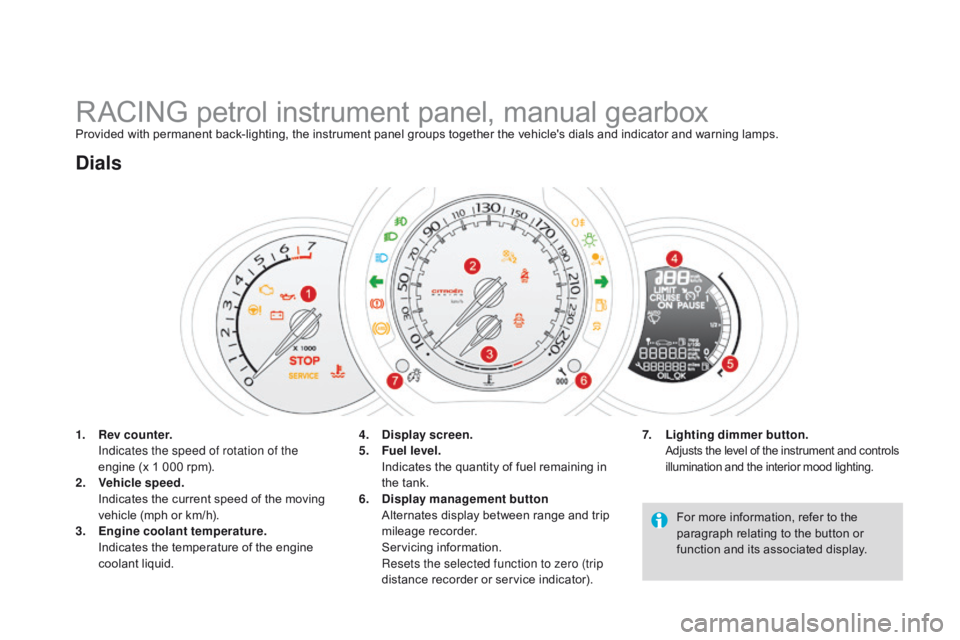
RACING petrol instrument panel, manual gearboxProvided with permanent back-lighting, the instrument panel groups together the vehicle's dials and indicator and warning lamps.
1.
R
ev counter.
I
ndicates the speed of rotation of the
engine
(x 1 000 rpm).
2.
V
ehicle speed.
I
ndicates the current speed of the moving
v
ehicle (mph or km/h).
3.
E
ngine coolant temperature.
I
ndicates the temperature of the engine
c
oolant
li
quid.
dials
7. Lighting dimmer button. Adjusts the level of the instrument and controls i
llumination and the interior mood lighting.4. display screen.
5. F uel level.
I
ndicates the quantity of fuel remaining in
t
he tank.
6.
di
splay management button
A
lternates display between range and trip
mil
eage
re
corder.
S
ervicing
in
formation.
R
esets the selected function to zero (trip
distance
recorder or service indicator).For
more information, refer to the
p
aragraph relating to the button or
f
unction and its associated display.
Page 41 of 404
39
DS3_en_Chap01_controle-de-marche_ed01-2014
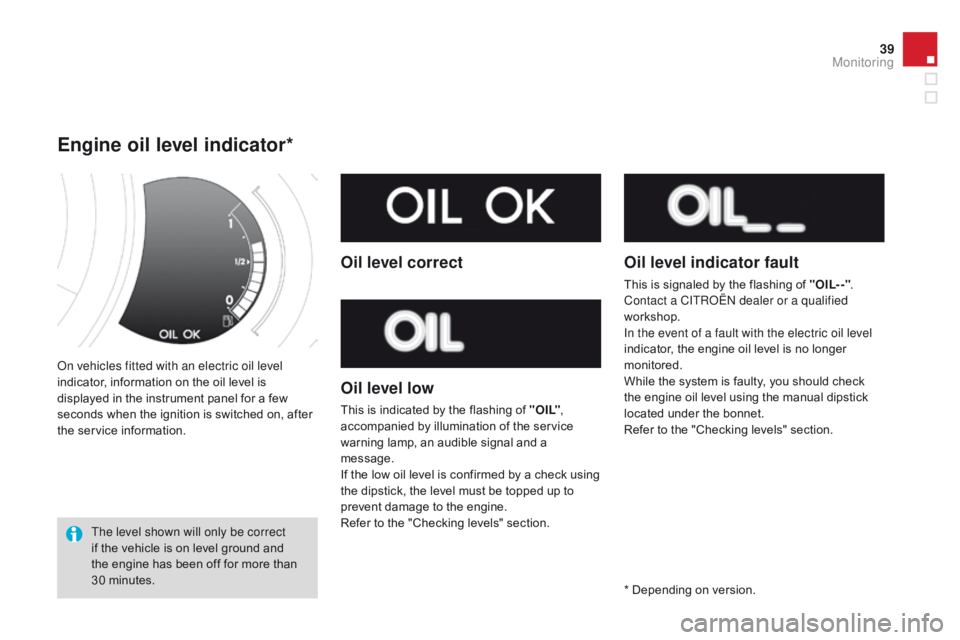
on vehicles fitted with an electric oil level
indicator, information on the oil level is
d
isplayed in the instrument panel for a few
s
econds when the ignition is switched on, after
t
he service information.
Engine oil level indicator*
The level shown will only be correct
if the vehicle is on level ground and
t
he engine has been off for more than
3
0 minutes.
Oil level correct
Oil level low
This is indicated by the flashing of " O I L" ,
a ccompanied by illumination of the service
w
arning lamp, an audible signal and a
m
essage.
If
the low oil level is confirmed by a check using
t
he dipstick, the level must be topped up to
p
revent damage to the engine.
Refer
to the "Checking levels" section.
Oil level indicator fault
This is signaled by the flashing of "OIL- -".
C ontact a CITRoË N dealer or a qualified
workshop.
In the event of a fault with the electric oil level
indicator,
the engine oil level is no longer
mon
itored.
While
the system is faulty, you should check
t
he engine oil level using the manual dipstick
l
ocated under the bonnet.
Refer
to the "Checking levels" section.
*
Depending on version.
Monitoring
Page 43 of 404
41
DS3_en_Chap01_controle-de-marche_ed01-2014
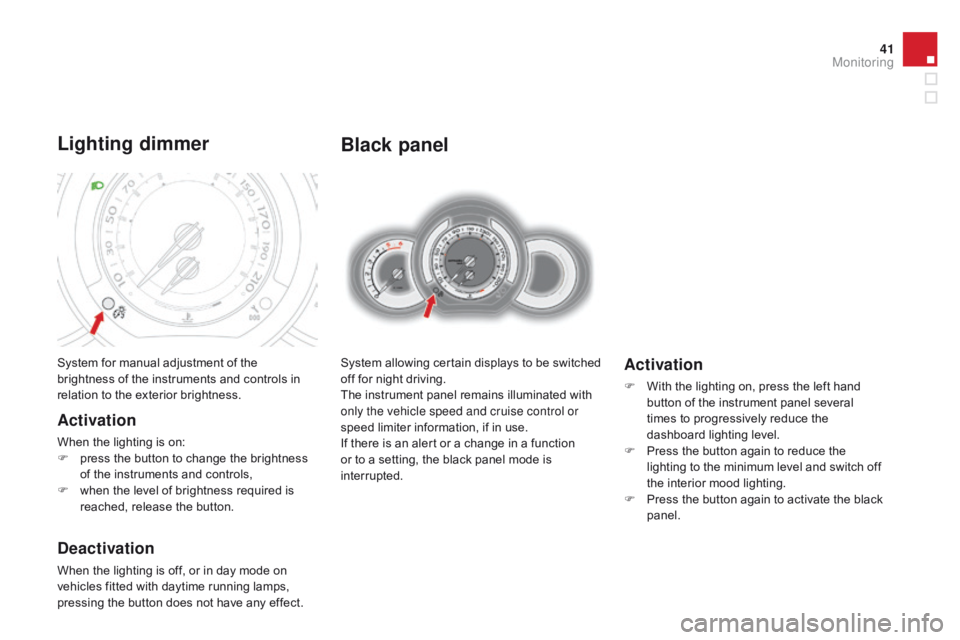
Black panel
System allowing certain displays to be switched off for night driving.
The
instrument panel remains illuminated with
o
nly the vehicle speed and cruise control or
speed
limiter information, if in use.
If
there is an alert or a change in a function
o
r to a setting, the black panel mode is
i
nterrupted.Activation
F With the lighting on, press the left hand b
utton of the instrument panel several
t
imes to progressively reduce the
d
ashboard lighting level.
F
P
ress the button again to reduce the
l
ighting to the minimum level and switch off
t
he interior mood lighting.
F
P
ress the button again to activate the black
pan
el.
System
for
manual
adjustment
of
the
b
rightness
of
the
instruments
and
controls
in
r
elation
to
the
exterior
brightness.
Lighting dimmer
Activation
When the lighting is on:
F p ress the button to change the brightness
o
f the instruments and controls,
F
w
hen the level of brightness required is
r
eached, release the button.
deactivation
When the lighting is off, or in day mode on vehicles fitted with daytime running lamps,
p
ressing the button does not have any effect.
Monitoring
Page 50 of 404
DS3_en_Chap02_ecrans-multifonction_ed01-2014
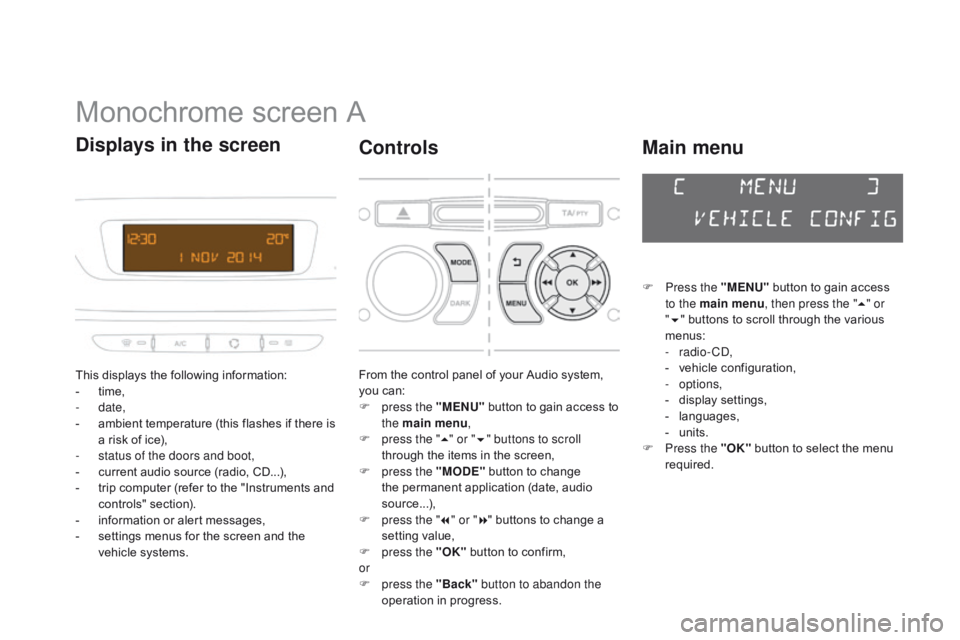
Monochrome screen A
This displays the following information:
- t ime,
-
date,
-
a
mbient temperature (this flashes if there is
a
risk of ice),
-
s
tatus of the doors and boot,
-
c
urrent audio source (radio, CD...),
-
t
rip computer (refer to the "Instruments and
c
ontrols"
s
ection).
-
i
nformation or alert messages,
-
s
ettings menus for the screen and the
v
ehicle systems.
displays in the screen
From the control panel of your Audio system, you can:
F
p
ress the "MENU"
button to gain access to
t
he main menu ,
F
p
ress the " 5" or " 6" buttons to scroll
through
the items in the screen,
F
p
ress the "MO
dE"
button to change
t
he permanent application (date, audio
s
ource...),
F
p
ress the " 7" or " 8"
buttons to change a
s
etting value,
F
p
ress the "OK"
button to confirm,
or
F
p
ress the "Back" button to abandon the
operation
in progress.
controls
F Press the "MENU" button to gain access t
o the main menu , then press the "5" or
" 6 "
buttons to scroll through the various
m
enus:
-
radio - CD,
-
v
ehicle configuration,
-
options,
-
d
isplay
se
ttings,
-
lan
guages,
-
un
its.
F
P
ress the "OK"
button to select the menu
r
equired.
Main menu
Page 53 of 404
51
DS3_en_Chap02_ecrans-multifonction_ed01-2014
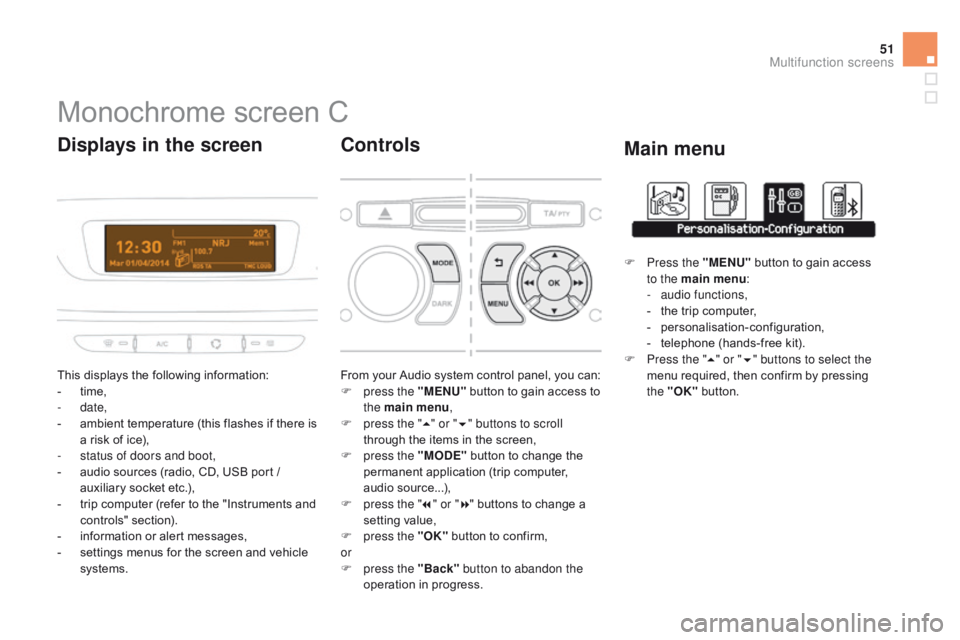
Monochrome screen C
This displays the following information:
- t ime,
-
date,
-
a
mbient temperature (this flashes if there is
a
risk of ice),
-
s
tatus of doors and boot,
-
a
udio sources (radio, CD, USB port /
a
uxiliary socket etc.),
-
t
rip computer (refer to the "Instruments and
c
ontrols"
s
ection).
-
i
nformation or alert messages,
-
s
ettings menus for the screen and vehicle
s
ystems.
displays in the screen
From your Audio system control panel, you can:
F p ress the "MENU" button to gain access to
t
he main menu ,
F
p
ress the " 5" or " 6" buttons to scroll
through
the items in the screen,
F
p
ress the "MO
dE"
button to change the
p
ermanent application (trip computer,
a
udio
s
ource...),
F
p
ress the " 7" or " 8"
buttons to change a
s
etting value,
F
p
ress the "OK"
button to confirm,
or
F
p
ress the "Back" button to abandon the
operation
in progress.
controls
F Press the "MENU" button to gain access t
o the main menu :
-
a
udio functions,
-
t
he trip computer,
-
pe
rsonalisation-configuration,
-
t
elephone (hands-free kit).
F
P
ress the " 5" or " 6" buttons to select the
menu
required, then confirm by pressing
t
he "OK"
button.
Main menu
Multifunction screens
Page 57 of 404
55
DS3_en_Chap02_ecrans-multifonction_ed01-2014
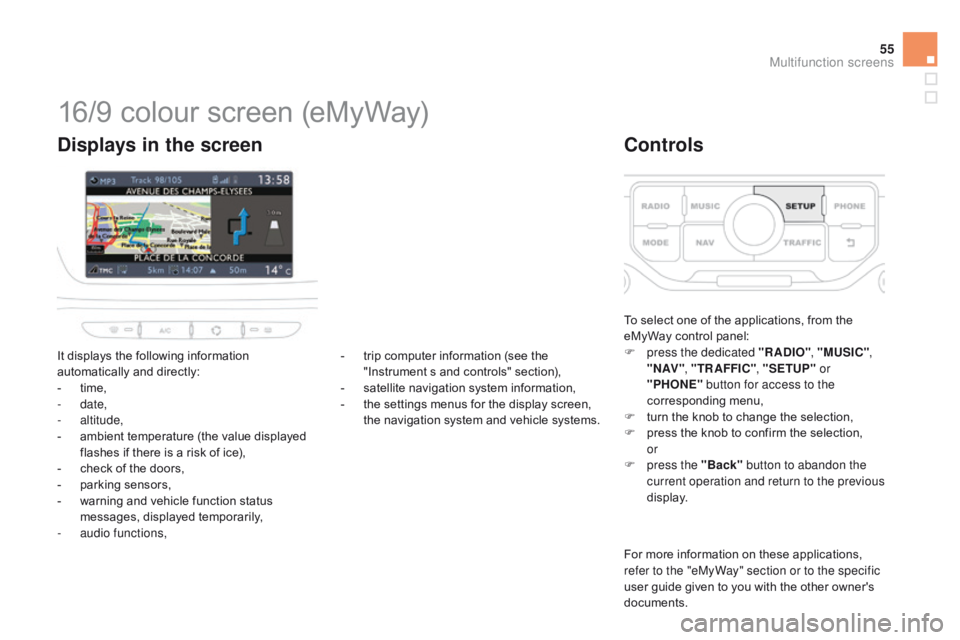
16/9 colour screen (eMyWay)
It displays the following information automatically and directly:
-
t
ime,
-
date,
-
altitude,
-
a
mbient temperature (the value displayed
f
lashes if there is a risk of ice),
-
c
heck of the doors,
-
p
arking sensors,
-
w
arning and vehicle function status
m
essages, displayed temporarily,
-
a
udio functions,
displays in the screen
To select one of the applications, from the eMyWay control panel:
F
p
ress the dedicated "RA
dI
O", "MUSI
c
",
" N AV " , "TR AFFI
c",
"SETUP" or
"PHONE" button for access to the
corresponding
m
enu,
F
t
urn the knob to change the selection,
F
p
ress the knob to confirm the selection,
or
F
p
ress the "Back" button to abandon the
current operation and return to the previous
display.
controls
For more information on these applications, r efer to the "eMyWay" section or to the specific
user
guide given to you with the other owner's
d
ocuments.
-
t
rip
computer
information
(see
the
"
Instrument
s
and
controls"
section),
-
s
atellite
navigation
system
information,
-
t
he
settings
menus
for
the
display
screen,
t
he
navigation
system
and
vehicle
systems.
Multifunction screens