steering CITROEN DS3 CABRIO DAG 2015 Handbook (in English)
[x] Cancel search | Manufacturer: CITROEN, Model Year: 2015, Model line: DS3 CABRIO DAG, Model: CITROEN DS3 CABRIO DAG 2015Pages: 404, PDF Size: 13.93 MB
Page 14 of 404

DS3_en_Chap00b_vue-ensemble_ed01-2014
Instruments and controls
1. Steering lock and ignition.
2. A udio equipment steering wheel controls.
3.
W
iper / screenwash / trip computer stalk.
4.
S
cented air freshener.
5.
C
entral locking switch.
6.
M
ultifunction
s
creen.
7.
H
azard warning lamp switch.
8.
C
entral adjustable air vents.
9.
S
unshine sensor
H
i-Fi audio system central speaker.
10.
P
assenger's
ai
rbag.
11.
S
ide adjustable air vent.
12 .
G
love box / Passenger's airbag
d
eactivation.
13.
P
arking brake.
14 .
C
entral armrest with storage.
15.
U
pper and lower storage.
16.
A
udio system or eMyWay.
17.
H
eating / air conditioning controls.
Page 33 of 404

31
DS3_en_Chap01_controle-de-marche_ed01-2014
Airbagstemporarily. This lamp comes on for a few seconds w
hen you turn on the ignition, then
g
oes off.This
lamp should go off when the engine is started.
If it does not go off, contact a CITROËN dealer or a
q
ualified
w
orkshop.
fixed. One
of the airbag or seat belt
p
retensioner systems has a fault.Have
it checked by a CITROËN dealer or a qualified
w
orkshop.
Warning lamp
is on
cau
se
Action / Observations
Seat belt not
fastened /
unfastened fixed
then flashing
a
ccompanied by an
inc
reasing
a
udible
s
ignal. The
driver and/or the front passenger
h
as not fastened or has unfastened
their
seat belt.Pull
the strap then insert the tongue in the buckle.
Power steering fixed. The
power steering has a fault. Drive carefully at reduced speed.
Have
it checked by a CITROËN dealer or a qualified
w
orkshop.
Monitoring
Page 74 of 404
DS3_en_Chap04_confort_ed01-2014
Comfort
This section describes the operation of the heating, ventilation and air conditioning system, the scented air freshener and all of the adjustments
f
or the seats, steering wheel and mirrors, for your comfort and
a
n optimum driving position.
Page 82 of 404
DS3_en_Chap04_confort_ed01-2014
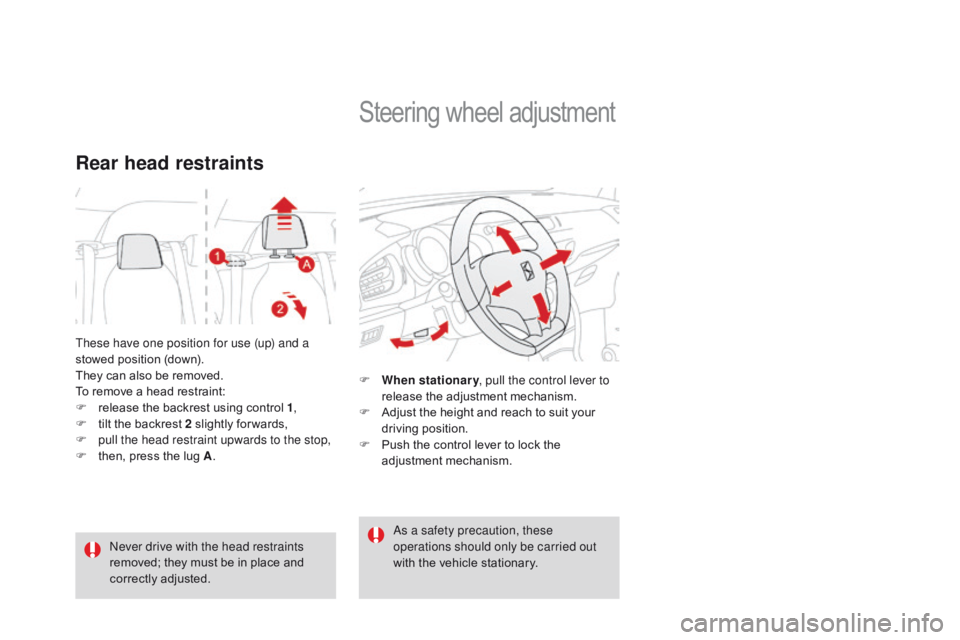
These have one position for use (up) and a
stowed position (down).
They
can also be removed.
To
remove a head restraint:
F
r
elease the backrest using control 1,
F
t
ilt the backrest 2 slightly for wards,
F
p
ull the head restraint upwards to the stop,
F
t
hen, press the lug A.
Rear head restraints
Never drive with the head restraints
removed;
they must be in place and
c
orrectly
adj
usted.
Steering wheel ad justment
F When stationary , pull the control lever to
release the adjustment mechanism.
F
A
djust the height and reach to suit your
d
riving position.
F
P
ush the control lever to lock the
a
djustment
m
echanism.
as a s
afety precaution, these
operations should only be carried out
with
the vehicle stationary.
Page 102 of 404
DS3_en_Chap05_amenagement_ed01
Auxiliary socket
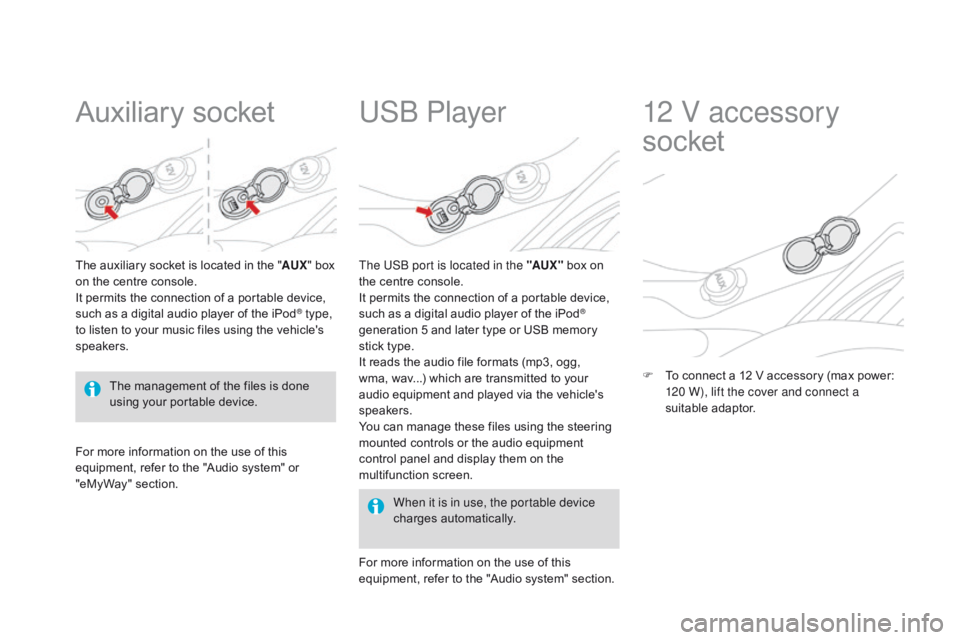
The auxiliary socket is located in the "AU X" box o
n the centre console.
It
permits the connection of a portable device,
s
uch as a digital audio player of the iPod
® type,
to
listen
to
your
music
files
using
the
vehicle's
s
peakers.
USb Player
For more information on the use of this e quipment, refer to the "Audio system" or
"e
MyWay" section. When it is in use, the portable device
charges
a
utomatically.
The US
b
port is located in the "AUX "
box on
t
he centre console.
It permits the connection of a portable device,
s
uch as a digital audio player of the iPod
®
generation
5
and
later
type
or
USB
memory
s
tick
type.
It
reads
the
audio
file
formats
(mp3,
ogg,
w
ma,
wav...)
which
are
transmitted
to
your
a
udio
equipment
and
played
via
the
vehicle's
s
peakers.
You
can
manage
these
files
using
the
steering
m
ounted
controls
or
the
audio
equipment
c
ontrol
panel
and
display
them
on
the
m
ultifunction
s
creen.
For
more
information
on
the
use
of
this
e
quipment,
refer
to
the
"Audio
system"
section.
12 V accessory
socket
F To connect a 12 V accessory (max power: 1
20 W), lift the cover and connect a
suitable
a
daptor.
The
management
of
the
files
is
done
u
sing
your
portable
device.
Page 110 of 404
DS3_en_Chap06_conduite_ed01-2014
Electronic gearbox
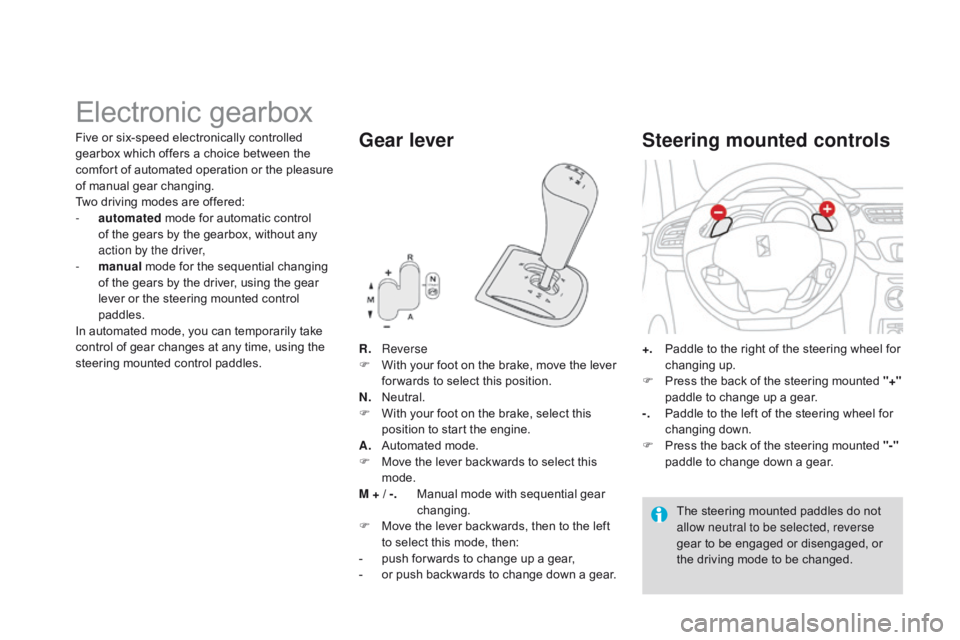
R. Reverse
F W ith your foot on the brake, move the lever
f
or wards to select this position.
N.
N
eutral.
F
W
ith your foot on the brake, select this
p
osition to start the engine.
A.
A
utomated mode.
F
M
ove the lever backwards to select this
m
ode.
M + / -.
M
anual mode with sequential gear
c
hanging.
F
M
ove the lever backwards, then to the left
t
o select this mode, then:
-
p
ush for wards to change up a gear,
-
o
r push backwards to change down a gear.
Gear lever
+. Paddle to the right of the steering wheel for c
hanging u p.
F
P
ress the back of the steering mounted "+"
paddle
to change up a gear.
-.
P
addle to the left of the steering wheel for
c
hanging
d
own.
F
P
ress the back of the steering mounted "-"
paddle
to change down a gear.
Steering mounted controls
The steering mounted paddles do not allow neutral to be selected, reverse
gear
to be engaged or disengaged, or
t
he driving mode to be changed.
Five
or
six-speed
electronically
controlled
g
earbox
which
offers
a
choice
between
the
c
omfort
of
automated
operation
or
the
pleasure
o
f
m
anual
g
ear
c
hanging.
Two
driving
modes
are
offered:
-
a
utomated
mode
for
automatic
control
o
f
the
gears
by
the
gearbox,
without
any
a
ction by the driver,
-
m
anual
mode
for
the
sequential
changing
o
f
the
gears
by
the
driver,
using
the
gear
l
ever
or
the
steering
mounted
control
p
addles.
In
automated
mode,
you
can
temporarily
take
c
ontrol
of
gear
changes
at
any
time,
using
the
s
teering
mounted
control
paddles.
Page 112 of 404
DS3_en_Chap06_conduite_ed01-2014
creep function
(depending on equipment)
This function allows the vehicle to be
manoeuvred more easily at low speeds
(when
parking, in traffic jams...).
With
the gear lever in position A, M or R , the
vehicle moves as soon as you take your
foot off the brake pedal , at low speed and
with
the engine at idle.
Automated mode
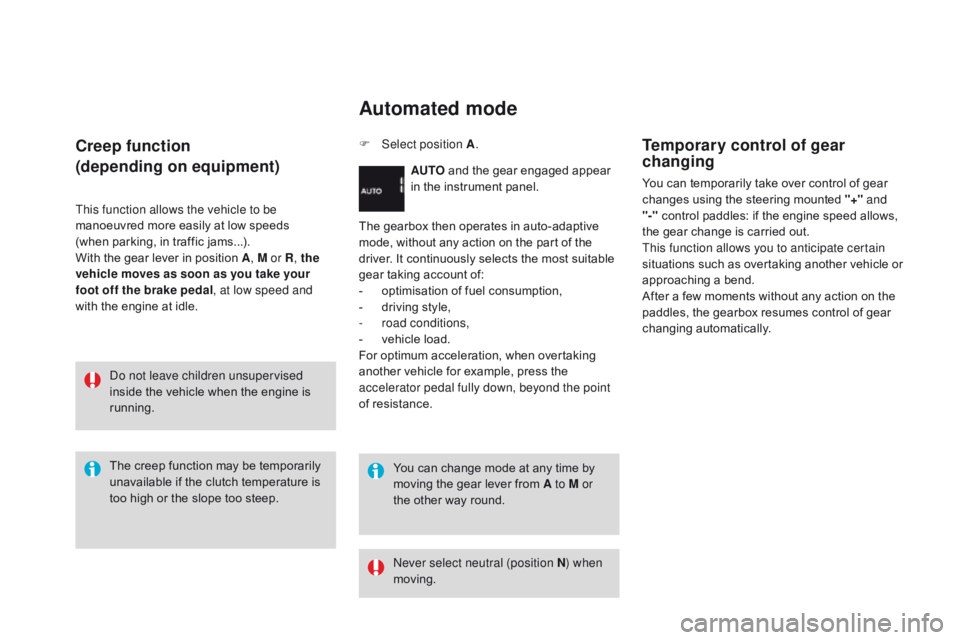
AUTO and the gear engaged appear i
n the instrument panel.
The
gearbox then operates in auto-adaptive
m
ode,
without any action on the part of the
d
river.
It
continuously selects the most suitable
g
ear
taking account of:
-
o
ptimisation of fuel consumption,
-
d
riving style,
-
r
oad conditions,
-
v
ehicle load.
For
optimum acceleration, when overtaking
a
nother
vehicle for example, press the
a
ccelerator pedal fully down, beyond the point
of
resistance. You
can change mode at any time by
m
oving the gear lever from A to M or
the
other way round.
The
creep
function
may
be
temporarily
u
navailable
if
the
clutch
temperature
is
t
oo
high
or
the
slope
too
steep.
Do not leave children unsupervised
inside
the
vehicle
when
the
engine
is
r
unning. F
Sel
ect position A
.
Never select neutral (position N ) when
moving.
Temporary control of gear
changing
You can temporarily take over control of gear c hanges using the steering mounted "+" and
"-"
control paddles: if the engine speed allows,
t
he gear change is carried out.
This function allows you to anticipate certain
situations
s
uch
a
s
ov
ertaking
a
nother
v
ehicle
o
r
a
pproaching a bend.
After
a few moments without any action on the
p
addles, the gearbox resumes control of gear
c
hanging
a
utomatically.
Page 113 of 404
111
DS3_en_Chap06_conduite_ed01-2014
The gear change requests are only carried out if the engine speed permits.
It is not necessary to release the accelerator
pedal
during gear changes.
When
braking or slowing down, the gearbox
c
hanges down automatically so that the vehicle
p
icks up in the right gear.
Under
full acceleration, the change up will
n
ot take place unless the driver operates the
g
ear lever or steering mounted control paddle
(
unless the engine is close to its maximum
s
peed).
Reverse
To engage reverse, the vehicle must be immobilised with your foot on the brake.
F
Sel
ect position R .
Stopping the vehicle
Before switching off the engine:
- c hange to position N to be in neutral,
or
-
l
eave the vehicle in gear; in this case the
v
ehicle cannot be moved.
Manual mode
F Select position M.
The gears engaged appear in
s
uccession in the instrument panel.
You
can change mode at any time by
m
oving the gear lever from A to M or
the
other way round.
Never select neutral (position N ) when
moving. There
is an audible signal on
enga
gement
o
f
r
everse.For
all parking situations, you must
apply the parking brake
to immobilise
t
he vehicle.
When
immobilising the vehicle with the
e
ngine running, you must put the gear
l
ever into neutral (position N).
Before
doing anything under the
b
onnet, ensure that the gear lever is in
neu
tral (position N)
and that the parking
b
rake is applied.
At
low speed, if reverse gear is requested,
the N
warning lamp flashes and the gearbox
g
oes into neutral automatically.
To
engage reverse, put the gear lever into
p
osition N, then to position R .
driving
Page 120 of 404

DS3_en_Chap06_conduite_ed01-2014
Stop & StartThe Stop & Start system puts the engine temporarily into standby - STOP mode - during stops in the traffic (red lights, traffic jams, or other...). The engine restarts automatically - START mode - as soon as you want to move off. The restart takes place instantly, quickly and silently.
Per fect
for urban use, the Stop & Start system reduces fuel consumption and exhaust emissions as well as the noise level when stationary.
Operation
Going into engine STOP mode
For your comfort, during parking manoeuvres, STOP mode is not
a
vailable for a few seconds after
coming
out of reverse gear.
STOP
mode does not affect the
f
unctionality of the vehicle, such as for
example,
braking, power steering...
Never
refuel with the engine in STOP
m
ode; you must switch off the ignition
w
ith the key.
The "E
cO
"
warning
lamp
comes
o
n
in
the
instrument
panel
and
the
e
ngine
goes
into
standby:
-
w
ith a manual gearbox , at speeds below
12
mph
(20
km/h),
when
you
put
the
gear
l
ever into neutral, and you release the
clutch
pedal.
-
w
ith a 5 or 6-speed electronic gearbox ,
when
stationary
or
at
speeds
below
5
mph
(
8
km/h)
(depending
on
version),
when
you
p
ress
the
brake
pedal
or
put
the
gear
lever
i
n position N .
A
time
counter
calculates
the
sum
o
f
the
periods
in
STOP
mode
d
uring
a
journey.
It
rests
itself
t
o
zero
every
time
the
ignition
is
s
witched
on
with
the
key. STOP
mode is not invoked when:
- t he driver's door is open,
-
t
he driver's seat belt is not fastened,
-
t
he vehicle has not exceeded 6 mph
(10
km/h) since the last engine start using
t
he key,
-
t
he engine is needed to maintain a
c
omfortable temperature in the passenger
c
ompartment,
-
d
emisting is active,
-
s
ome special conditions (battery charge,
e
ngine temperature, braking assistance,
a
mbient temperature...) where the engine is
n
eeded to assure control of a system.
Special cases: STOP mode not
available
The "EcO" warning lamp flashes for a
few seconds then goes off.
This operation is perfectly normal.
Page 124 of 404
DS3_en_Chap06_conduite_ed01-2014
System which prevents the vehicle from exceeding the speed programmed by the
d
river.
When
the programmed speed limit is reached,
p
ressing the accelerator pedal in the normal
m
anner no longer has any effect.
The
speed limiter is switched on
m
anually:
it r
equires a programmed speed of at least
20
mph (30 km/h).
The
speed limiter is switched off
by manual
o
peration of the control.
The
programmed speed can be exceeded
t
emporarily by pressing the accelerator firmly.
To
return to the programmed speed, simply
s
low down to a speed below the programmed
s
peed.
The
p
rogrammed
s
peed
r
emains
i
n
t
he
m
emory
w
hen the ignition is switched off.
Speed limiter
The speed limiter cannot, in any circumstances, replace the need to respect speed limits, nor can it r
eplace the need for vigilance on the part of the driver.
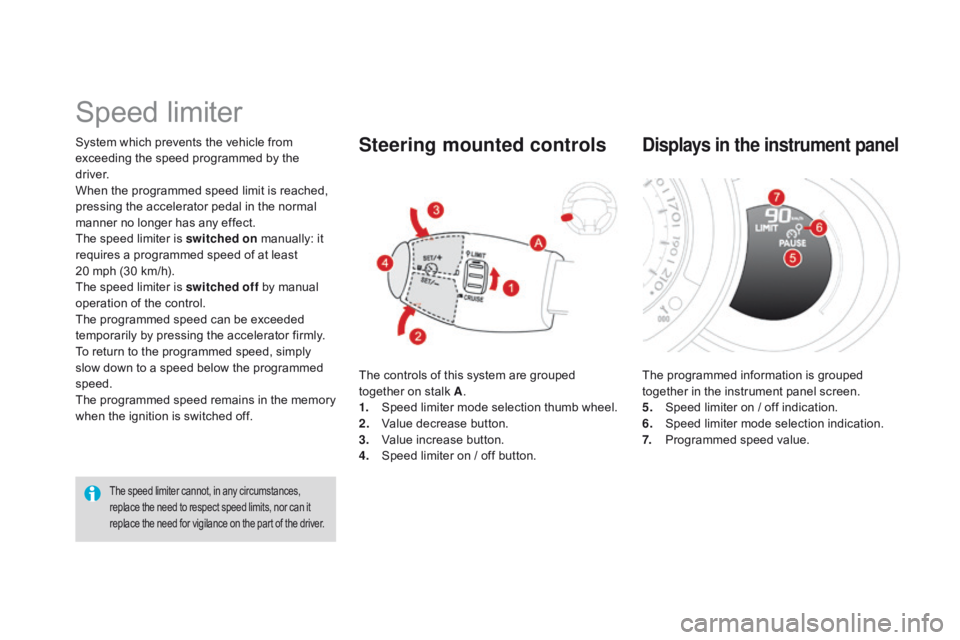
The controls of this system are grouped together on stalk A.
1.
S
peed limiter mode selection thumb wheel.
2.
V
alue decrease button.
3.
V
alue increase button.
4.
S
peed limiter on / off button.
Steering mounted controls
The programmed information is grouped together in the instrument panel screen.
5.
S
peed limiter on / off indication.
6.
S
peed limiter mode selection indication.
7.
P
rogrammed speed value.
displays in the instrument panel