ABS CITROEN DS3 CABRIO DAG 2018 Handbook (in English)
[x] Cancel search | Manufacturer: CITROEN, Model Year: 2018, Model line: DS3 CABRIO DAG, Model: CITROEN DS3 CABRIO DAG 2018Pages: 248, PDF Size: 8.79 MB
Page 16 of 248
14
Warning/indicator lampStateCause Action/Observations
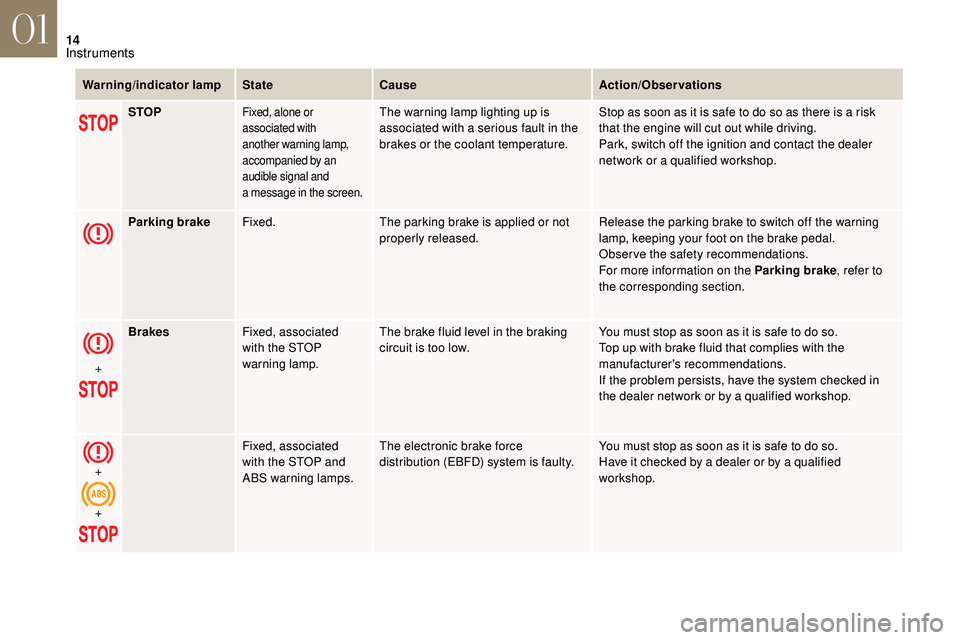
STOP
Fixed, alone or
associated with
another warning lamp,
accompanied by an
audible signal and
a
message in the screen.The warning lamp lighting up is
associated with a serious fault in the
brakes or the coolant temperature. Stop as soon as it is safe to do so as there is a
risk
that the engine will cut out while driving.
Park, switch off the ignition and contact the dealer
network or a
qualified workshop.
Parking brake Fixed. The parking brake is applied or not
properly released. Release the parking brake to switch off the warning
lamp, keeping your foot on the brake pedal.
Observe the safety recommendations.
For more information on the Parking brake
, refer to
the corresponding section.
+ Brakes
Fixed, associated
with the STOP
warning lamp. The brake fluid level in the braking
circuit is too low.
You must stop as soon as it is safe to do so.
Top up with brake fluid that complies with the
manufacturer's recommendations.
If the problem persists, have the system checked in
the dealer network or by a
qualified workshop.
+
+ Fixed, associated
with the STOP and
ABS warning lamps.
The electronic brake force
distribution (EBFD) system is faulty.
You must stop as soon as it is safe to do so.
Have it checked by a
dealer or by a qualified
workshop.
01
Instruments
Page 18 of 248
16
Warning/indicator lampStateCause Action/Observations
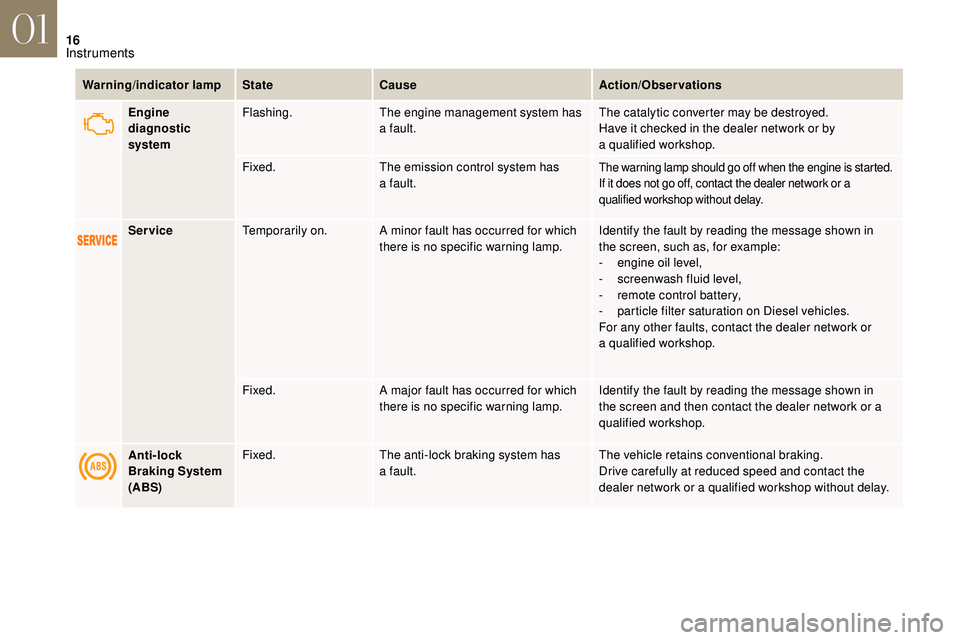
Engine
diagnostic
system Flashing.
The engine management system has
a
fault.The catalytic converter may be destroyed.
Have it checked in the dealer network or by
a
qualified workshop.
Fixed. The emission control system has
a
fault.
The warning lamp should go off when the engine is started.
If it does not go off, contact the dealer network or a
qualified workshop without delay.
ServiceTemporarily on. A minor fault has occurred for which
there is no specific warning lamp. Identify the fault by reading the message shown in
the screen, such as, for example:
-
e
ngine oil level,
-
s
creenwash fluid level,
-
r
emote control battery,
-
p
article filter saturation on Diesel vehicles.
For any other faults, contact the dealer network or
a
qualified workshop.
Fixed. A major fault has occurred for which
there is no specific warning lamp. Identify the fault by reading the message shown in
the screen and then contact the dealer network or a
qualified workshop.
Anti-lock
Braking System
(ABS) Fixed.
The anti-lock braking system has
a
fault.The vehicle retains conventional braking.
Drive carefully at reduced speed and contact the
dealer network or a
qualified workshop without delay.
01
Instruments
Page 38 of 248
36
ButtonCorresponding function Comments
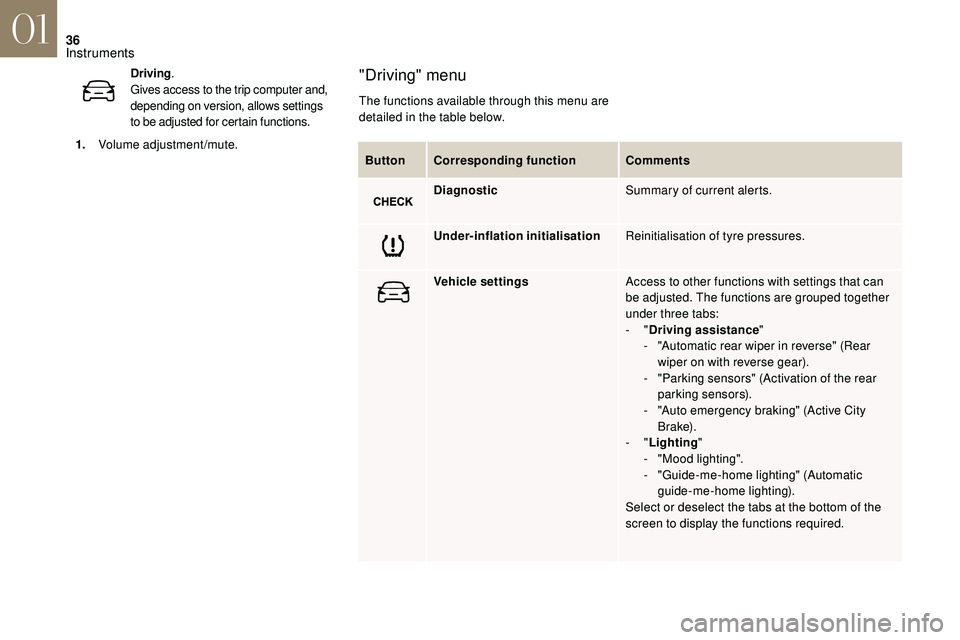
Diagnostic Summary of current alerts.
Under-inflation initialisation Reinitialisation of tyre pressures.
Vehicle settings Access to other functions with settings that can
be adjusted. The functions are grouped together
under three tabs:
-
"Driving assistance "
-
"
Automatic rear wiper in reverse" (Rear
wiper on with reverse gear).
-
"
Parking sensors" (Activation of the rear
parking sensors).
-
"
Auto emergency braking" (Active City
B r a ke).
-
"Lighting "
-
"
Mood lighting".
-
"
Guide-me-home lighting" (Automatic
guide-me-home lighting).
Select or deselect the tabs at the bottom of the
screen to display the functions required.
"Driving" menu
The functions available through this menu are
detailed in the table below.
Driving
.
Gives access to the trip computer and,
depending on version, allows settings
to be adjusted for certain functions.
1. Volume adjustment/mute.
01
Instruments
Page 40 of 248
38
Trip computer
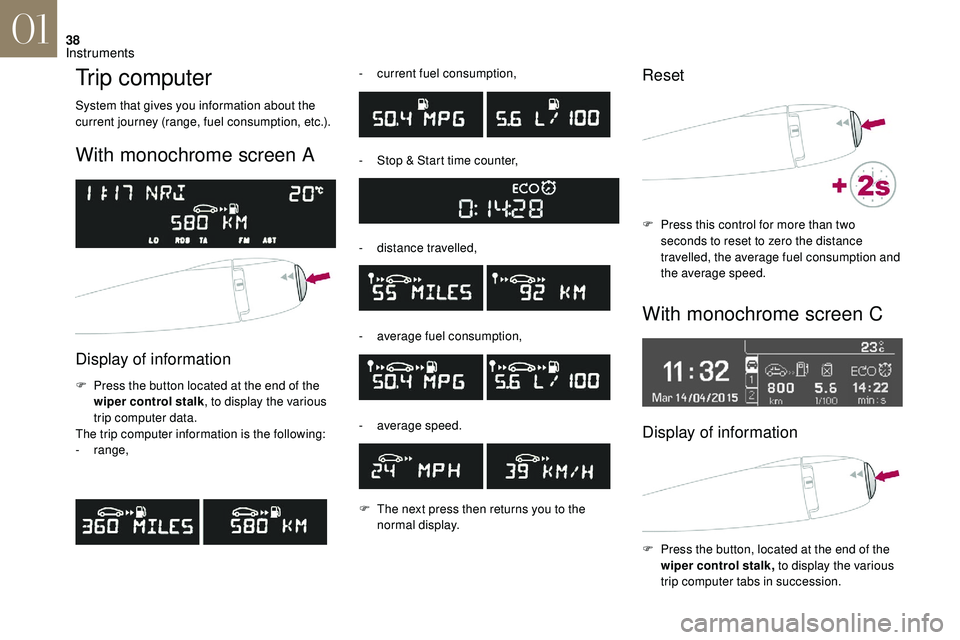
System that gives you information about the
current journey (range, fuel consumption, etc.).
With monochrome screen A
Display of information
F Press the button located at the end of the wiper control stalk , to display the various
trip computer data.
The trip computer information is the following:
-
range, -
c
urrent fuel consumption,
-
S
top & Start time counter,
-
d
istance travelled,
-
a
verage fuel consumption,
-
a
verage speed.
F
T
he next press then returns you to the
normal display.
Reset
F Press this control for more than two seconds to reset to zero the distance
travelled, the average fuel consumption and
the average speed.
With monochrome screen C
Display of information
F Press the button, located at the end of the wiper control stalk, to display the various
trip computer tabs in succession.
01
Instruments
Page 41 of 248
39
Reset trip
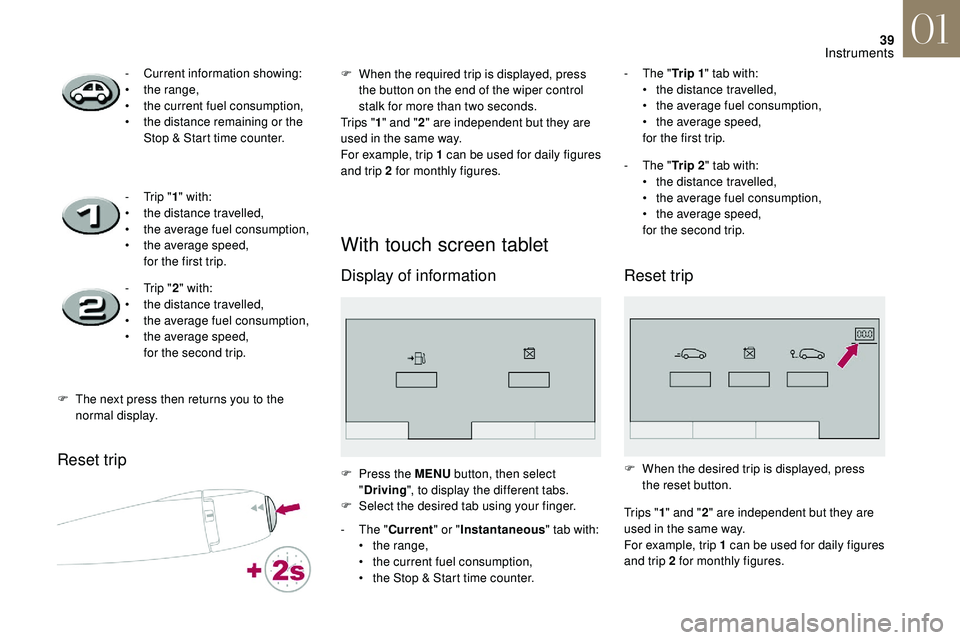
With touch screen tablet
Display of information
- Current information showing:
• t he range,
•
t
he current fuel consumption,
•
t
he distance remaining or the
Stop & Start time counter.
-
T
rip "1" with:
•
t
he distance travelled,
•
t
he average fuel consumption,
•
t
he average speed,
for the first trip.
-
T
rip "2" with:
•
t
he distance travelled,
•
t
he average fuel consumption,
•
t
he average speed,
for the second trip.
F
T
he next press then returns you to the
normal display. F
W hen the required trip is displayed, press
the button on the end of the wiper control
stalk for more than two seconds.
Tr i p s " 1" and " 2" are independent but they are
used in the same way.
For example, trip 1
can be used for daily figures
and trip 2
for monthly figures.
F
P
ress the MENU button, then select
" Driving ", to display the different tabs.
F
S
elect the desired tab using your finger.
-
T
he "Current " or "Instantaneous " tab with:
•
t
he range,
•
t
he current fuel consumption,
•
t
he Stop & Start time counter. -
T he "
Tr i p 1 " tab with:
• t he distance travelled,
•
t
he average fuel consumption,
•
t
he average speed,
for the first trip.
-
T
he "Tr i p 2 " tab with:
•
t
he distance travelled,
•
t
he average fuel consumption,
•
t
he average speed,
for the second trip.
Reset trip
F When the desired trip is displayed, press the reset button.
Tr i p s " 1" and " 2" are independent but they are
used in the same way.
For example, trip 1
can be used for daily figures
and trip 2
for monthly figures.
01
Instruments
Page 49 of 248
47
To take effect, this deactivation must
be carried out each time the ignition is
switched off.
Reactivating the volumetric
protection
F Unlock the vehicle using the unlocking button on the remote control.
F
L
ock the vehicle using the remote control.
The alarm activates again with the two
protections; the indicator lamp in button A
flashes once per second.
Triggering of the alarm
This is indicated by the sound of the siren
and the flashing of the direction indicators for
around thirty seconds.
After triggering, the protection is operational
again.
If the alarm is triggered ten times in
succession, on the eleventh occasion it
becomes inactive. Rapid flashing of the indicator lamp in
button A informs you that the alarm was
triggered during your absence. When the
ignition is switched on, this flashing stops
immediately.
To avoid triggering the alarm, when
washing your vehicle lock it using the key
in the driver's door lock.
Failure of the remote control
F Unlock the vehicle using the key in the
driver's door lock.
F
O
pen the door; the alarm is triggered.
F
S
witch on the ignition; this stops the alarm.
Locking the vehicle without
activating the alarm
F Lock or deadlock the vehicle using the key in the driver's or passenger's door lock.
Malfunction
When the ignition is switched on, illumination of
the indicator lamp in button A for ten seconds
indicates a
fault in the siren.
Have it checked in the dealer network or by
a
qualified workshop.
Automatic activation
(Depending on country of sale.)
The alarm is activated automatically 2 minutes
after the last door or the boot is closed.
F
T
o avoid triggering the alarm on entering the
vehicle, first press the unlocking button on
the remote control.
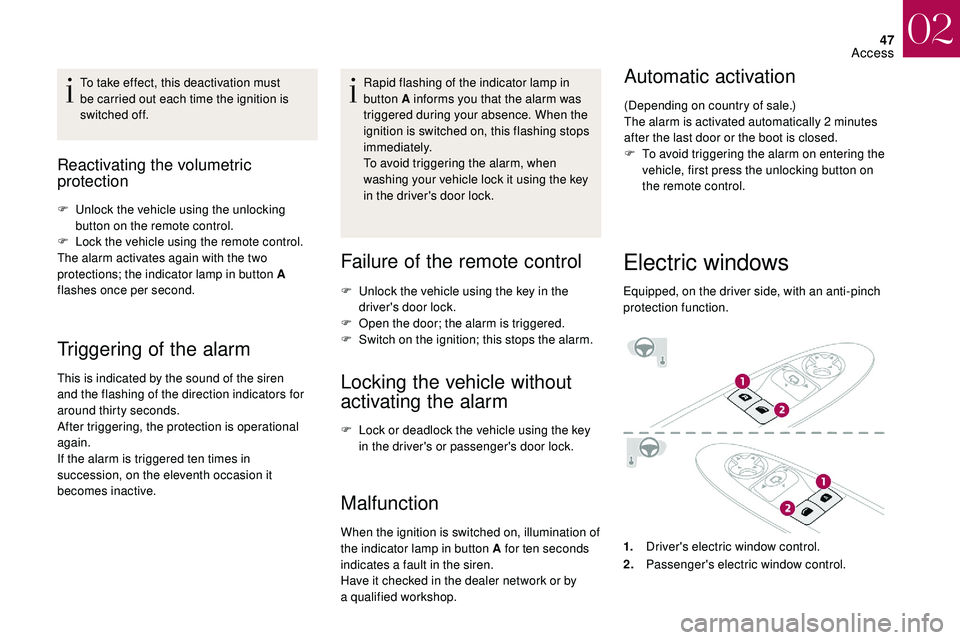
Electric windows
Equipped, on the driver side, with an anti-pinch
protection function.
1. Driver's electric window control.
2. Passenger's electric window control.
02
Access
Page 98 of 248
96
The fault with the system does not prevent
the vehicle being driven.
Localised Assistance Call
** According to the geographic coverage of "Localised Emergency Call", "Localised
Assistance Call" and the official national
language chosen by the owner of the
vehicle.
T
he list of countries covered and of
telematic services is available from dealers
or on the website for your country. Press this button for more than
2
seconds to request assistance
if the vehicle breaks down.
A voice message confirms that the call has
been made**.
Pressing this button again immediately cancels
the request.
The cancellation is confirmed by a voice
message.
Geo-location
You can deactivate geo-location by
simultaneously pressing the "Localised
Emergency Call" and "Localised Assistance
Call" buttons, followed by pressing "Localised
Assistance Call" to confirm.
You can deactivate geo-location by
simultaneously pressing the "Localised
Emergency Call" and "Localised Assistance
Call" buttons, followed by pressing "Localised
Assistance Call" to confirm.
If you purchased your vehicle outside
the dealer network, we invite you to have
a
dealer check and, if desired, modify
the configuration of these ser vices to suit
your wishes. In a
multi-lingual country,
configuration is possible in the official
national language of your choice.
For technical reasons and in particular to
improve the quality of telematic ser vices to
customers, the manufacturer reserves the
right to carry out updates to the vehicle's
on-board telematic system.Electronic stability control
(ESC)
Electronic stability control (ESC) comprising
the following systems:
-
a
nti-lock braking system (ABS) and
electronic brake force distribution (EBFD),
-
em
ergency braking assistance (EBA),
-
w
heel anti-slip regulation (ASR) or traction
control,
-
d
ynamic stability control (DSC).
Definitions
Anti-lock braking system (ABS) and
electronic brake force distribution
(EBFD)
This system improves the stability and
manoeuvrability of your vehicle when braking
and contributes towards improved control on
corners, in particular on poor or slippery road
surfaces.
The ABS prevents wheel lock in the event of
emergency braking.
The electronic brake force distribution system
manages the braking pressure wheel by wheel.
Emergency braking assistance
(EBA)
In an emergency, this system enables you to
reach the optimum braking pressure more
quickly and therefore reduce the stopping
distance.
05
Safety
Page 99 of 248
97
Anti-slip regulation (ASR)
The ASR system (also known as Traction
Control) optimises traction in order to limit
wheel slip by acting on the brakes of the driving
wheels and on the engine. It also improves
the directional stability of the vehicle on
acceleration.
Dynamic stability control (DSC)
If there is a difference between the path
f ollowed by the vehicle and that required by
the driver, the DSC monitors each wheel and
automatically acts on the brake of one or more
wheels and on the engine to return the vehicle
to the required path, within the limits of the laws
of physics.
Anti-lock braking system
(ABS) and electronic brake
force distribution (EBD)It is triggered in relation to the speed at which
the brake pedal is pressed. This is felt by
a
reduction in the resistance of the pedal and
an increase in the effectiveness of the braking.
When lit up continuously, this
warning lamp indicates a
fault with
the ABS.
The vehicle retains conventional braking. Drive
carefully at moderate speed.
If these warning lamps come on,
accompanied by an audible signal
and a
message, this indicates a fault
with the electronic brake force
distribution (EBFD).
When changing wheels (tyres and rims),
make sure that these are approved for
your vehicle.
Normal operation of the ABS system may
be indicated by slight vibration felt at the
brake pedal. In case of emergency braking, press
ver y hard without releasing the
pressure at all.
Anti-slip regulation (ASR)/
Dynamic stability control
(DSC)
Activation
These systems are activated automatically
every time the vehicle is started.
They come into operation in the event of
a
problem with grip or trajectory.
This is indicated by flashing of this
warning lamp in the instrument
panel.
Deactivation
In extremely severe conditions (deep snow,
mud, etc.), if you are unable to move off, it
may be useful to temporarily deactivate these
systems so that the wheels can spin and allow
the vehicle to regain grip.
You must stop as soon as it is safe to do so.
In both cases, have the system checked in the
dealer network or by a
qualified workshop as
soon as possible.
05
Safety
Page 143 of 248
141
Operation
- the braking assistance systems (ABS, EBFD, EBA) are not faulty.
-
t
he trajectory control systems (ASR, DSC)
are not deactivated or faulty,
-
t
he vehicle is not making a sharp turn,
-
t
he system has not triggered in the last ten
seconds.
When your vehicle is too close to or
approaches the vehicle ahead too quickly, the
system automatically applies the brakes to
avoid a
collision.
You are then warned by the display of
a
message.
The brake lamps of your vehicle are lit to warn
other users.
The collision can be avoided if the speed
difference between your vehicle and the one
ahead is not more than 9
mph (15 km/h).
Above this threshold, the system will do
what is possible to avoid or reduce the
accident by lowering the speed of impact.
The automatic braking can lead to the complete
stop of the vehicle if the situation requires it. In this case, the vehicle is held stationary
temporarily (for about 1.5
seconds) to allow
the driver to take back control by pressing the
brake pedal.
Unless the driver depresses the clutch
pedal quickly enough during automatic
braking, triggering of the system may
cause the engine to stall.
During automatic braking, the driver can
always obtain a
higher rate of deceleration
than that controlled by the system, by
pressing firmly on the brake pedal.
After an impact, the system is
automatically put out of ser vice: it no
longer operates.
You must go to a
member of the dealer
network or a
qualified workshop to have
the system made operational again.Deactivation
The system is deactivated in the vehicle
configuration menu, accessible with the ignition on.
Its state is memorised when the ignition is switched
of f.
When the system is deactivated, a
message is displayed every time the
ignition is switched on, to warn you.
With monochrome screen C
F Press the MENU button for access to the
main menu.
F
Sel
ect "Personalisation-configuration ",
F
Sel
ect "Define the vehicle parameters ".
F
Sel
ect "Driving assistance ".
F
Sel
ect "Automatic emergency braking :
OFF " or " Automatic emergency braking :
ON ".
F
P
ress the " 7" or " 8" buttons to check or
uncheck the box and respectively activate
or deactivate the system.
F
P
ress the " 5" or " 6" button, then the OK
button to select the OK box and confirm or
the Back button to cancel.
06
Driving
Page 173 of 248
171
Removing a wheel
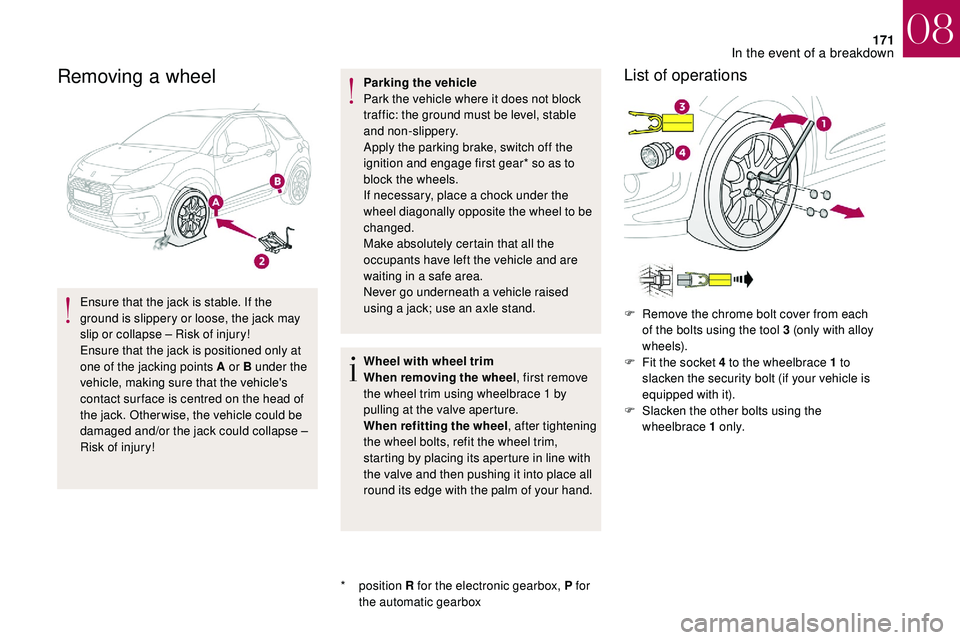
Ensure that the jack is stable. If the
ground is slippery or loose, the jack may
slip or collapse – Risk of injury!
Ensure that the jack is positioned only at
one of the jacking points A or B under the
vehicle, making sure that the vehicle's
contact sur face is centred on the head of
the jack. Otherwise, the vehicle could be
damaged and/or the jack could collapse –
Risk of injury!
*
position R for the electronic gearbox, P for
the automatic gearbox Parking the vehicle
Park the vehicle where it does not block
traffic: the ground must be level, stable
and non-slippery.
Apply the parking brake, switch off the
ignition and engage first gear* so as to
block the wheels.
If necessary, place a
chock under the
wheel diagonally opposite the wheel to be
changed.
Make absolutely certain that all the
occupants have left the vehicle and are
waiting in a safe area.
Never go underneath a vehicle raised
using a jack; use an axle stand.
Wheel with wheel trim
When removing the wheel , first remove
the wheel trim using wheelbrace 1
by
pulling at the valve aperture.
When refitting the wheel , after tightening
the wheel bolts, refit the wheel trim,
starting by placing its aperture in line with
the valve and then pushing it into place all
round its edge with the palm of your hand.
List of operations
F Remove the chrome bolt cover from each of the bolts using the tool 3 (only with alloy
w h e e l s).
F
F
it the socket 4 to the wheelbrace 1 to
slacken the security bolt (if your vehicle is
equipped with it).
F
S
lacken the other bolts using the
wheelbrace 1
o n l y.
08
In the event of a breakdown